IN small apartments Very often the problem of lack of space to store certain items arises. If in a large living space it is possible to arrange a storage room or closet, then a small apartment excludes this possibility. The most simple solution will be the installation of a wooden rack.
But it will become useful not only in the apartment, but also on the balcony, where a lot of things are often stored, and in the garage, where car accessories and tools must be placed in their places so as not to waste time constantly searching for them. It is very interesting to fit in a shelving structure for zoning space, for example, in a studio apartment.
Despite the fact that even a beginner can make a shelving unit, there are still some nuances that, when observed, will help create a high-quality piece of furniture at a minimum cost.
Types of wooden shelving
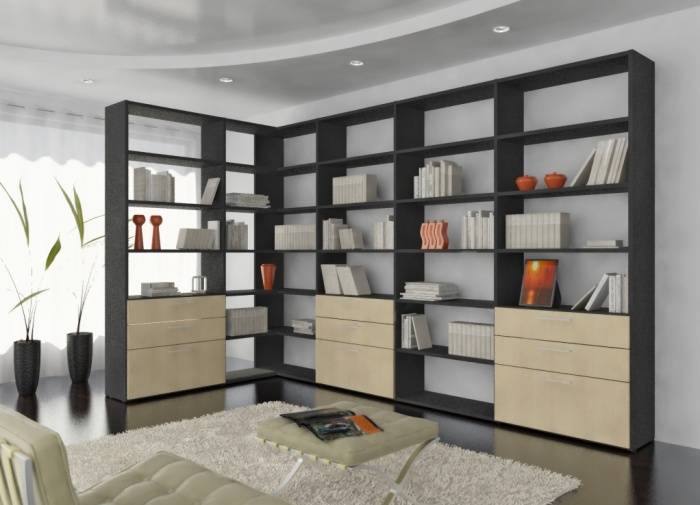
A wooden rack is a structure consisting of several shelves mounted on a support board. Their number depends only on the desires and capabilities of the owner. Prefabricated wooden shelving will fit perfectly into any interior and will help you store various items, such as books, dishes, souvenirs, etc.

The functionality of the rooms where this piece of furniture can be placed is very diverse.
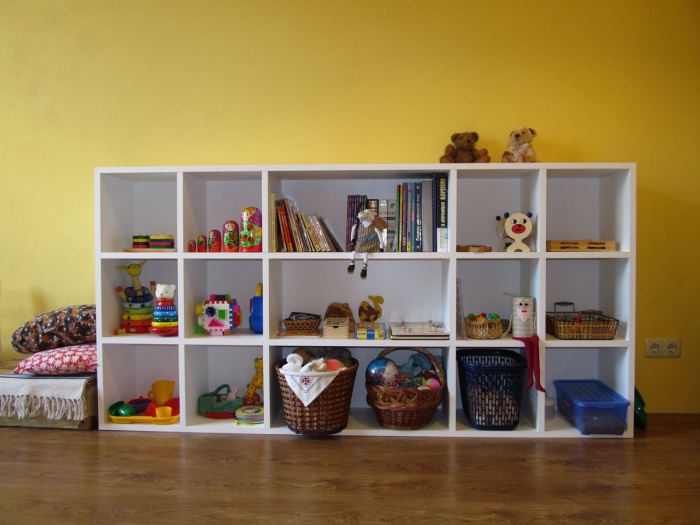
It is very convenient to install shelving in the nursery, where, thanks to the availability of free space and open shelves, the child will be able to place all his toys and get them out without the participation of adults.
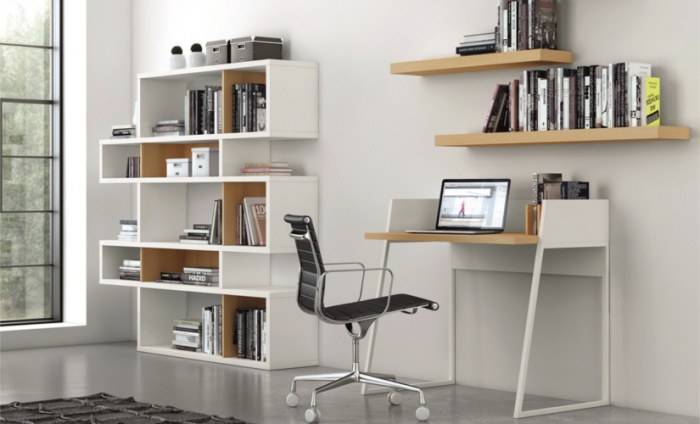
In the office, the structure will serve not only as a place to store documents, but will also become an excellent decorative element of the workplace.
For a kitchen, a shelving unit is a must. Dishes can be stored there, as well as neatly arranged containers with bulk products.
On the balcony, a wooden rack is used to place seedlings or indoor plants in the warm season. Everyone knows that plants generally need a little heating. Now available for purchase special items furniture with heated shelves, but self-made ones can also perform this function if each shelf is covered with foam plastic. This material accumulates heat and transfers it to plants.

Depending on the design, a suitable option can also be selected:

Original shelving
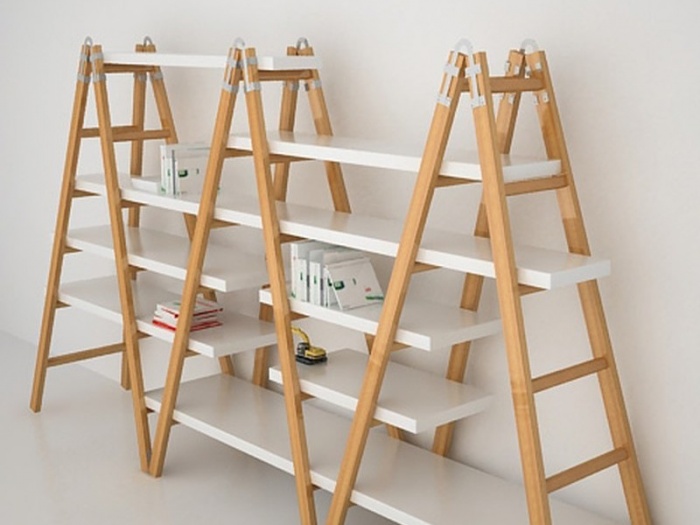
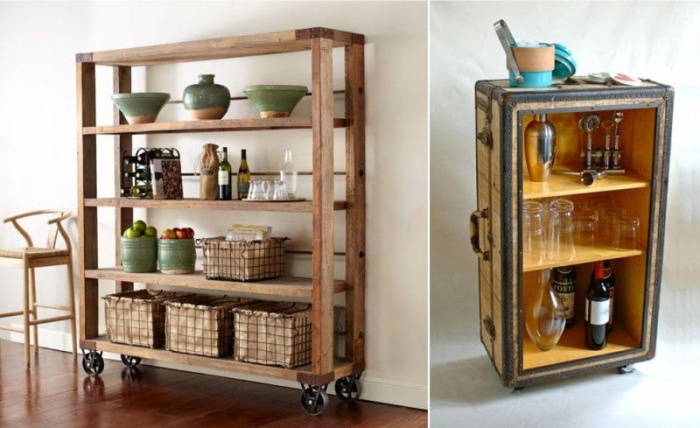
Such pieces of furniture should be given special attention, since they are created in accordance with individual project, which is suitable for a specific interior. Ordinary rough DIY wooden structures are only suitable for balconies or garages, but to decorate your living space it is better to use something more original. For example, the rack with bottles in the form of racks shown in the photo will fit perfectly into the living room or kitchen. Despite its external instability, books and even collectible bottles of wine can be stored on it.

Interesting in the interior, especially nautical style Look like rope structures of wooden shelving for the home, which are attached to the wall using massive hooks. Of course, it’s unlikely that you’ll be able to store something heavy on such racks, but small souvenirs or photo frames are fine. This design is very simple to make; all you need is a thick rope and a few scraps of wood. Shelves can also be made from leftover laminate flooring.

For interior in modern style designs using metal are suitable. One of these is the design of a rack with many shelves in a chaotic order, which are interconnected by metal tubes. Due to the fact that the metal elements create rigidity, the back wall can be dispensed with.
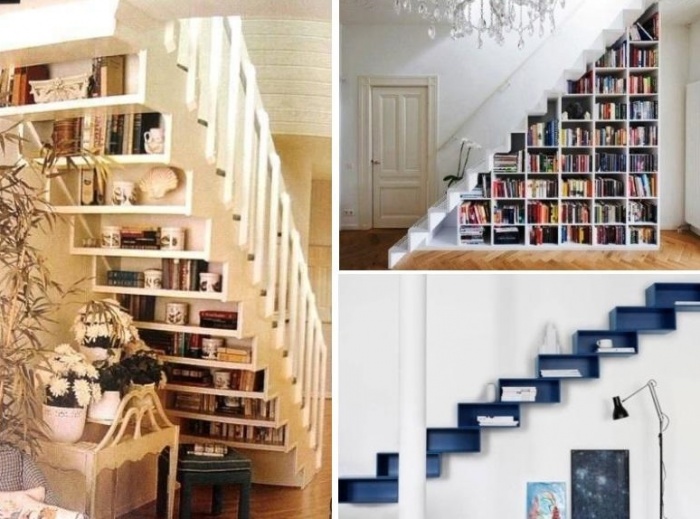
If you plan to create a shelving unit in a private house, then you can arrange it in the space under the stairs, as shown in the photo.
Making your own shelving
Execute wooden rack Doing it yourself is quite simple if you study all the nuances of the work in advance and thoroughly prepare for it.
Project development
Creating a project for a future structure is a very important stage that should not be missed under any circumstances. First of all, measurements are taken of the place where it is planned to place the rack. If the rack will not be intended for decorative purposes, but will be used only in accordance with the storage function, then it makes sense to carry it out in a simple form. To do this, measure the height of the wall near which the furniture will be located and calculate the indicator that suits the owner.
Important! In a garage, the shelving is best made to cover the entire height of the wall.
The parameters of the shelves for the structure, both in length and width, deserve special attention. Long shelves of 1.5 meters are ideal for storing light items, for example, souvenirs and toys, but jars with blanks and books require shorter ones - about 90 cm, so that there is no sagging. As for the width, shelves with a width of 25 - 40 cm will be suitable for storing books and cans, as well as growing seedlings, and for tools or larger items, those that will correspond to their size are arranged.
In general, the dimensions of the shelves completely depend on what will be placed on the rack, so first you should estimate the approximate location of the items and add 10 - 15 cm to the calculated figures so that you can easily put and remove the item.
Necessary tools
Professionals advise for self-made For shelving structures, use only strong and solid wood. It could be pine, mahogany or oak. Materials made from pressed sawdust are not suitable for installation, as they are quite short-lived.
Important! The moisture content of wood for shelving should not exceed 12%.
The boards are impregnated with antiseptic impregnations in advance and left for several days so that the solution is absorbed.
In addition to boards, you will also need to make a rack:
- Metal corners
- Shelf holders
- Bars for stuffing them into the bottom of the shelf
- Furniture legs or wheels
- Self-tapping screws
- Wood glue
- Varnish or other paint material, which will be used for finishing
- Jigsaw and sander
- Hammer
- Drill with matching drill bit set
- Tape measure, level and pencil

Algorithm for making a wooden rack
To begin, prepare all the parts necessary to assemble the rack.
Prefabricated wooden racks are manufactured starting from the bottom. For the bottom shelf, the thickest board should be selected, into which a 3 cm screw can easily fit. The shelf parameters are selected depending on the project, which describes all the dimensions of the future structure. Also, if the length of the shelf is large, then it is better to mount transverse bars in its lower part to add rigidity.
The next step is the installation of the side walls. For them, not solid wood can be used, but thick plywood. Side walls are cut out of it to the required dimensions, with them inside The location of future shelves is noted. It is worth remembering that the most commonly used height of the shelves in the design is 42 and 21 cm. These indicators can be alternated to get a neat and functional rack.

Cutting shelves from wood. Their size must correspond to the rack and be such that the owner can install and remove the shelf without restrictions.
Important! The thickness of the shelves should be at least 2.5 cm, but to give strength they can be equipped with transverse bars at the bottom.
The next step is optional and is performed only at the discretion of the master. If the wall against which the shelving structure will stand completely suits the owner, then the back wall need not be mounted to it. If it is customary to mount the back wall, then it is cut to the size of the plywood rack and nailed to it with small nails.
All the parts are prepared, now you can start assembling the entire structure:
- The back wall is screwed to the bottom shelf, which is the base. If it is not there, then you can immediately attach the side ones.
- But before installing the side walls, you need to install holders, which can be metal or plastic, in the places marked for shelves.
- Afterwards, the side walls are attached to the base with self-tapping screws. If necessary, a metal corner can be used.
- Also, shelves can be supported not on special elements, but attached directly to the side walls. To do this, the shelf is held inside the rack by an assistant, and the second master screws in the screws with outside. To increase strength, the shelves can be supported by metal corners.
Advice! At all stages of assembling the rack, it is necessary to use a building level, which will eliminate any distortions.
To create a high-quality shelving design, there are several tips that are not mandatory, but very desirable:
- The main structure of the rack can end with a top cover. This is very convenient due to the fact that the rack will become stronger, and top shelf no dust will get in.
- For additional strength, the holes are coated with wood glue after drilling.
- If you use wheels instead of regular legs, the rack can be moved. Also, installing these elements will help prevent the structure from distorting under heavy loads.
- If chipboard or MDF were used to make the rack, then their ends are treated with melamine film, which is easily glued with an iron. Such a strip is laid on the processed sandpaper end and processed with a hot iron. Thus, the end will close and acquire an aesthetic appearance.
- For greater decorativeness, the rack can be supplemented with doors or other elements that will only decorate it.

Conclusion
A shelving unit for your apartment will be a very functional addition that can be used to display memorabilia or other items. It is possible to make this piece of furniture yourself, which will allow you to save money and get exactly the design that is needed. This is not difficult to do, just read this article, which provides detailed installation instructions.
Do it yourself, you need to familiarize yourself in detail with the instructions for assembling and installing this structure. To do this, it is not at all necessary to have special tools in your arsenal, since cutting the material can be ordered from professionals.
Preparation of materials
To perform the work, you can use calibrated standard materials, the largest of which is chipboard with a thickness of 16 millimeters. It is quite possible to make the back walls from hardboard, and the color will be universal - white. You will need to prepare the side parts of the cubes in the amount of 20 pieces. They will have a square shape with a side of 300 millimeters. Large and small shelves should be cut out; they are needed in the amount of 10 pieces each. In case of large size will be 700 x 300 millimeters, while small shelves will have dimensions equal to 500 x 300 millimeters. You will need 5 pieces of fiberboard blanks with the following dimensions: 695 x 295, 495 x 295. Wooden can be made using good circular saw according to the “Robland” type, but if you do not have such a tool, then you can cut chipboard with high quality using the help of professionals. Otherwise, you should not take on the work, as the material will be damaged.
Preparing accessories and fasteners

The fittings for the described design will be the color of which should be selected in accordance with adhesive base. Gluing it yourself is quite simple; to do this, apply the edge to the end of the part with the adhesive layer down. First you need to preheat the iron, which should not be hot. Its working surface should be passed along the edge several times so that it sticks to the end. Its edges should be pressed as tightly as possible. Before it has time to cool down, the master should iron it with a dry cloth. You can get rid of the excess using a sharp knife, after which you need to sand the ribs with fine-grained sandpaper.
In order to make a wooden rack with your own hands, you should prepare fasteners; for this you will need confirmations 5 x 70 millimeters, furniture nails 1.5 x 25 millimeters, and self-tapping screws with dimensions 4 x 30 millimeters. For each cube you will need 8 confirmats, which indicates the need to purchase 80 similar fasteners. You can nail hardboard with furniture nails, and use self-tapping screws to tighten the cubes together. It is not necessary to use these elements, but it is advisable.
Preparing tools

If you decide to make a wooden rack with your own hands, then you should prepare the above-mentioned iron, drills with dimensions of 5 and 8 millimeters, a tape measure, a hammer, and a pencil. A screwdriver will be needed to drill 8mm holes. One bit must be hexagonal for confirmations. Once the parts are ready, and all the tools and fasteners have been assembled, you can begin assembly work.
Assembling the rack

If you are thinking about how to make a wooden rack with your own hands, then you should remember that the work will not be more complicated than when doing a regular one. bookshelf. The side of the shelving cube will be square with a side of 300 millimeters, so you can simplify the task. On it, the master marks the back and front edges, as well as the bottom and top. On a plane it is easiest to designate with letters for orientation. Measure 40 centimeters from the back and front edges. If we are talking about the lower and upper edges, then the master measures 8 centimeters from them, where he places crosses. At this point we can assume that the sidewall for installing 4 confirmations is marked. You need to drill 8mm through holes at the marks.

If you decide to make a wooden rack with your own hands, it is recommended to consider the drawings of this design. They will allow you to understand that when drilling laminated chipboard, you should place some unnecessary piece or flat board. This will prevent the drill from tearing out a piece of laminate from the wrong side.
Assembly procedure

The shelves of the product will have different lengths, but their width is the same. Holes should be drilled to this width. In thickness, that is, in the end, you need to go 60 millimeters deep with a 5 mm drill. The holes should be drilled 40 millimeters from the rear and front edges, so as not to mark every time, it is best to use a template. When drilling the end of a part, the tool should be held strictly perpendicular to the plane being processed. If the drill turns in one direction, the part will be hopelessly damaged, since the laminate will tear out from one of the sides.
Installation of the structure

It will be very convenient to use such wooden ones with your own hands; you can do them without resorting to outside help. At the next stage, you can proceed to installation; for this, the shelves with the sidewalls are pulled together with confirmata until you can get a cube. The hardboard should be nailed down using nails to maintain right angles. You can check how correct the geometry is by measuring the diagonals, which must be the same. Confirmed hats must be decorated with caps white, which are sold in hardware stores. It is very convenient to use wooden shelving at home; any craftsman can make them with his own hands.
From the resulting cubes you can assemble the structure as you wish. The elements can be installed in a row horizontally or vertically, everything will depend on the availability of free space. When the rack “takes root” in a certain configuration, the elements can be screwed together with 4 x 30 mm self-tapping screws.
Alternative option for making a rack
Sometimes wooden racks are made according to a different principle, which involves the presence of a frame rigidly fixed to the wall. The work begins with fixing square beams with a side of 50 millimeters. They are fastened in pairs; on each pair, one tier of the rack should be laid out. The step between these elements determines the height of the shelves, after which the shelves themselves are laid on them and fastened. If you want to create a U-shaped rack, then first you should select the same bars for the boards as in the option described above. Their length may be 40 centimeters less than the height of the room; another shelf can be installed on top of the rack. If necessary, the beams are installed in the center so that the shelves rest on them and do not sag under the influence of the load. The span length must be selected taking into account the expected load. Most often one meter is enough.
When a wooden rack is made with your own hands, the diagram can be completed by the craftsman himself. There's nothing complicated about it. Speaking of the above, it can be noted that jumpers should be installed on the side parts of the bars; it is on them that the shelves will rest. Their number depends on the expected number of shelves. If you fix the shelves to the lintels, the structure will be quite strong. If necessary, it can be further strengthened, as well as forming sides on the side parts of the rack, this can increase the functionality of the structure. The shelves are made from wooden planks, but if you want to use chipboard, the boards will not be very resistant to moisture.
Conclusion
When making a rack, it is best to place shelves at the bottom, which will have a greater height. This is explained by the fact that it is more convenient to store and retrieve large items from the bottom of the rack.
Order in any room is the placement of every thing in its place. This can only be ensured if every item has this place. In this case, a rack will provide invaluable help. It is convenient to place objects for various purposes on it. It is not always possible to purchase a ready-made structure (you are not satisfied with the size, price, quality, etc.), but making a rack with your own hands is quite affordable.
A rack is a structure consisting of open shelves. It can be used for a variety of purposes. It will be in the office comfortable spot for storing documentation and other materials that are often used in work. Any folder is easy to find and return to its place.

The racks are collapsible, but stationary models are acceptable at home. The racks can also store household items and equipment, results creative activity etc. There are no restrictions, only sizes are important. To take into account the dimensions of the things expected to be stored, correctly calculate the load and capacity, it is worth making shelves and racks with your own hands.
The main advantages of this type of furniture are:
- simplicity of design;
- ease of use;
- capacity;
- acceptability of installation in premises for almost any purpose;
- space saving.
There are several types of structures for home use:
- non-demountable frame racks;
- collapsible frame products;
- console options.
The main elements of the rack are vertical supports and horizontal parts that serve as shelves. Most often, the structures are collapsible, but stationary models are also quite acceptable at home. Prefabricated structures are assembled using various fastening materials, non-demountable ones - using welding.

Welding – reliable way fastening, but it requires certain professional skills and availability welding machine. Therefore, information on how to make a shelving unit out of wood is often in demand. This is a more affordable model. You can make the blanks yourself, or you can order them by providing information about the required dimensions.
Various options for DIY wooden shelving
The wooden shelving structure is theoretically quite simple to manufacture. To avoid problems during practical implementation, you must first make a drawing, which should reflect the height, width and depth of the future product, the location of the crossbars, taking into account the method of fastening.
Helpful advice! When taking measurements of the part of the room where the shelving will be installed, you should definitely take into account the width of the protruding plinth, molding and other possible decorative elements.
It is convenient to use timber for the main racks and crossbars; shelves can be made from boards, wood boards, and plywood.

Quite often, chipboards are used to make this type of furniture. Do-it-yourself chipboard shelving is the most affordable option. Significant savings in time and money during manufacturing are achieved due to the absence of a frame from individual elements (vertical posts, horizontal crossbars). Sawing, in the absence of appropriate equipment, is best done in special workshops, where you can order and high-quality processing end parts.
The proposed photos show do-it-yourself shelving made from chipboard. Models for living rooms have interesting elements design in the form of originally arranged shelves, additional strips, color combinations elements. Designs for purely technical purposes look simple. Sometimes the upper and lower shelves are reinforced with additional transverse strips for greater rigidity of the product.
Plywood shelving is aesthetically pleasing and quite durable. Most often these are options for utility rooms and household rooms. If you attach creative imagination, you can create such a model for any room, including a guest room. Do-it-yourself plywood racks are usually made using wooden frame, but if the plywood has a thickness of 10–15 mm, then an option similar to the construction made from chipboard is possible.

Tips to help when making a shelving unit from wood or wood materials:
- If there is no approach to the structure from both sides, the depth of the shelves should not be more than 500 mm.
- When planning a model up to the ceiling, you need to think about the ability to reach the upper shelves. Alternatively, you can make and attach a wooden permanent ladder to the side wall.
- If the shelves are more than 600 mm wide (regardless of the material of manufacture), it is worth attaching them to a horizontal frame frame - this will prevent sagging.
If you want to decorate a wooden rack, you can use stain, tinted varnishes, craquelure and other types of surface treatments.
Material requirements for shelving made of wood and wood materials
Even after correctly calculating the dimensions, making detailed drawing Even if you assemble it perfectly, you may still not get a good product. The reason will turn out to be the most commonplace - poor-quality material or material that does not meet the operating conditions.

Basic requirements for the wood used:
- The humidity of the material should not exceed 12%, otherwise the product may warp.
- The presence of cracks and chips that do not affect the integrity of parts under load is allowed.
- The processing must be of high quality: smooth cuts, polished surface. These indicators affect not only aesthetics: unevenness may not allow for high-quality assembly, a rough surface poses a risk of injury, albeit minor (splinters, scratches).
You can make a reliable rack from boards with your own hands that meets the expected characteristics only if you comply with the above requirements.
As for chipboard, when evaluating the material you need to pay attention to the quality of the coating. Lamination is suitable for arranging objects with a smooth bottom surface. For heavier elements with an imperfect surface, it is better to choose melamine. Veneer, including artificial veneer, is best used for shelving that requires decorativeness.

In addition, you need to pay attention to the quality of the cut: chips and unevenness do not allow you to reliably process the end. Consequently, there is a threat of penetration of vapors and moisture, which will inevitably lead to swelling of the material.
When planning a plywood rack, you need to consider:
- sheet thickness, it should be at least 9–10 mm;
- type of wood;
- type of gluing (preferably layers with perpendicular fibers).
Helpful advice! The purchased wood material must be marked. Its absence may indicate the absence of a certificate for this product.
For wet rooms, it is better to install shelving made of wood rather than wood materials. If you use the latter to make a shelf for the basement (with your own hands), even with high-quality protective treatment, traces of swelling and delamination will quickly appear on it.
Original design options for kitchen shelving
A special room is the kitchen. This is a living area, a room with a certain interior. At the same time, quite often the humidity level in it is increased.

There are special requirements for kitchen shelving:
- use only moisture-resistant materials for manufacturing;
- high quality surfaces that allow the use of special detergents;
- design design of the structure.
The do-it-yourself kitchen shelving options shown in the photo have a wide variety of designs:
- shelving partitions dividing the kitchen into zones;
- console options that actually and visually take up little space;
- mobile products, on wheels;
- specially designed shelving – island table.
For classic kitchens good option there will be a wooden shelf. But for modern rooms In high-tech and minimalist styles, you can make a metal rack with your own hands. It is better to use a corner (steel or aluminum) as a frame, and make the shelves from glass. You can purchase material for the frame at any store that sells rolled metal products.

If it is impossible to make a welded structure, the corner can be connected using bolts. Metal is a durable material, but without a protective coating it will be susceptible to corrosion.
It is better to purchase tempered glass with a smooth surface, which will facilitate the cleaning process. It is very important to take careful measurements. This is necessary to ensure that the glass blank fits correctly into the metal frame. For massive shelving, it is recommended to use a steel corner - aluminum is more suitable for small structures.
If the glass does not fit into a metal frame, but is placed on top of it, it must be fixed aesthetically and reliably (you can use glue) and the cut areas must be properly sanded.
Economy option: tool rack made from old water pipes
A certain set of tools is available in almost every home. Quite often, men strive to set up at least a small workshop, where they will be able to perform at least simple tasks. renovation work. In this case, the rack will become the optimal storage place. Significant funds are usually not allocated for the arrangement of such a room, so using used materials will be the best solution.

You can make a metal shelving unit for your workshop with your own hands. It is recommended to use old water pipes as a base (frame).
Required tools:
- a hacksaw or a jigsaw with a metal saw;
- threading dies or pipe clamps;
- construction hairdryer
Related article:
How to choose options based on the shape and size of the room. Features of the arrangement of furnishings. Wardrobe as the main element of the interior.

The manufacturing sequence can be as follows:
- Make a drawing of the future structure.
- Clean the pipes from traces of paint using construction hair dryer, remove traces of corrosion (if any), apply a new coating to the pipes.
- Cut the pipes into the required lengths.
- Using dies or a pipe clamp, cut the threads in the right places.
- Using fittings, starting from the bottom up, connect the rack structure.
- Cut shelves from existing material (you can take fragments of used furniture), attach them to the frames using metal screws.

This model of a rack made of pipes with your own hands can be made more interesting if the shelves are not attached to the pipes, but put (strung) on vertical supports, having previously made holes in them (in the shelves).
Helpful advice! It is better to place the shelves of a rack intended for storing tools at different distances. The bottom step will be the highest, then descending. If the reduction will have constant size(for example, 15 cm), this will add aesthetics to the product.
Designer shelving: photo ideas for a modern interior
The main function of shelving is to store items for various purposes. When installed in living rooms To this species furniture has an important requirement - compliance with the design style. Sometimes a shelving unit is made specifically for the purpose of brightening the interior.

Excellent element design design the hallway can become. The model in the form of a rack is most suitable for these purposes:
- traces of moisture easily dry out on shoes stored in such conditions;
- shoes, even dried, do not tolerate closed spaces;
- It's always easy to find the right pair.
A do-it-yourself shoe rack can be made from pallets, timber and slats, boards, wood boards, and metal products. For a small hallway, it is appropriate to use a compact console model - lay and secure the shelves on metal or wooden bases protruding from the wall. If your own imagination does not suggest any options, you can find and carefully study photos on the Internet, where some ideas will appeal to you.
Photo projects that show types of toy racks will also help you decorate your children's room. There are no restrictions for creative expression and creativity. You can make a do-it-yourself toy rack from wood, chipboard, or plywood. Metal is used only as fastening material. These can be shelving units, houses, various vertical and horizontal structures, made in bright and pleasant colors. When making a toy rack, the following points must be taken into account:
- the design is stable (preferably attached to the wall);
- it does not have sharp protruding corners;
- all shelves must be accessible to the child.
The designs of DIY flower racks proposed in the photo are impressive with the variety of ideas. They combine decorativeness and specific functionality. Different depths of the shelves allow all plants to receive the same amount of natural light; backlights decorate and replenish its deficiency in the dark.
DIY wooden shelving for space zoning
Today, many people prefer housing with a small number of partitions, where kitchens and living rooms, offices and bedrooms are combined. Zoning of such premises can be done using shelving. This is greatly facilitated by the openness of these structures.

One of the options could be a DIY wooden rack. The drawing for this design is especially important, since it is necessary not only to calculate the dimensions and outline the location of the main parts, but also to take into account the locations of the fastenings. Poor thought in this case can have a negative impact on aesthetics.
The design involves a double-sided shelving: one part in relation to the other is in a mirror image. Two more vertical ones are attached to the two main vertical posts on different sides. The material and blanks of the latter may be identical to the main ones, or may differ from them (it all depends on desire), but the additional racks must be the same.
Then you need to secure the shelves. You will get two racks with one vertical base. The shelves can be placed at the same level, or they can be shifted on one side, necessarily subordinating them to a certain pattern. Differences in the shades of the sides of the rack will help highlight the zones more clearly.
Helpful advice! The depth of the shelves of this type of furniture should not exceed 300 mm, since the structure will look massive, heavy and attract undue attention.
This option can also be used for household premises. For example, having made such a rack with your own hands for a pantry, it would be advisable to use one side for pickles and jams, and the other for storing boxes with different contents. The possibility of approaching from two sides will make use more comfortable.

How to make a rack for large round objects with your own hands
When making a rack for large items, it is very important to correctly calculate the load capacity and dimensions of the structure. If the posts and crossbars begin to bend or crack over time, the unit will need to be removed for safety reasons. Therefore, to avoid this, it is necessary to choose a durable material and calculate the dimensions, taking into account the quarter circle of the objects intended to be placed.
An excellent option for storing tires and other round-shaped things can be made from pipes. The design is extremely simple: four main vertical racks and several crossbars (depending on the planned number of tiers). The shelves for these types of products are conventional - these are two (or four, depending on the diameter of the items being placed) pipes that make up a horizontal frame.
Considering that there are not so many tires for a private car (supposedly 6-8 will be stored on racks made of pipes), the bottom tier is enough for them; on the rest you can put rims, free round containers, various coils, etc.

Making a rack for wheels with your own hands will not require a lot of time and money, but will free up a significant amount of space by organizing large-sized items, the storage of which is complicated not only by their size, but also by their shape. Their storage without a specially equipped place is extremely difficult.
Do-it-yourself universal collapsible rack
Any assembled rack can also be considered dismountable, since when performing actions in reverse order the design will turn into a set of blanks. It is convenient to have a rack on the farm that can be assembled and disassembled without additional tools. It's better if he is small sizes, so that it is easy to store and transport when disassembled.
This model is often used when performing short-term or seasonal work, for temporary organized storage of certain items. During seasonal harvesting, a do-it-yourself collapsible cellar rack design can become quite popular. It is convenient to use plastic pipes as a manufacturing material. They have a low price, are easy to install with a soldering iron, are lightweight, and are not subject to corrosion. If you don’t have your own soldering iron, you can rent one for a very small fee.
Materials and tools required for the manufacture of a collapsible shelving structure:
- plastic pipes;
- fittings for plastic pipes: angles, tees, crosses;
- pipe cutting knife;
- soldering iron

The frame of the shelves is made using corners. Cross pipes are laid and soldered using tees. Crosses are inserted at the corners of the shelves instead of tees. They perform a double function: they secure the pipe inserts that make up the shelf and are part of the prefabricated vertical support. The two crosspieces between the shelves are connected through pipes of smaller diameter, which makes them collapsible. The sections of the lower pipes can be closed with plugs.
Do-it-yourself metal garage racks made from plastic are suitable for open spaces, pavilions, as they are resistant to the influence of precipitation.
Helpful advice! Plastic pipes, having a high level of strength, are to a certain extent susceptible to ultraviolet radiation. Shelves made of this material should not be left in the open sun for a long time.
Do-it-yourself garage shelving: location options, sizes
A room that practically cannot do without shelving is the garage. Therefore, it is worth dwelling separately on garage shelving structures. The proposed photos of do-it-yourself garage shelving demonstrate various models: wooden, metal, collapsible, stationary, and even with pull-out shelves for storing metal sheets. By carefully examining the photo, it is quite possible to understand the manufacturing technology.

The question of how to make a garage rack with your own hands correctly is no less relevant. A few tips will help you avoid mistakes when designing a structure:
- If the size of the garage space allows, it is better to make the rack the entire wall. This will provide a lot of storage space and make using the garage comfortable: items will not lie under your feet.
- The garage is most often unheated room, so the material will be subject to temperature changes. If you plan to make a rack for the garage with your own hands from wood, it is better not to skimp on its quality and processing materials.
- It is advisable to make the distance between the shelves different, since in this case the space of the structure is used more efficiently.
- It’s better if you can reach the top shelf without additional accessories(stepladders, ladders, bedside tables, etc.). The accessible height of the rack facilitates comfortable and safe use.
- The free area in front of the rack must be at least 1 meter. Otherwise, it will be difficult to pick up and put down large objects.
- If the shelving area is poorly lit, it is worth illuminating it. Convenient and inexpensive option- LED Strip Light.
- It is recommended to place items on the rack in the following order: large ones on the lower shelves, frequently used ones on the middle ones, rarely used ones on the upper ones.
Matching style: do-it-yourself loft shelving
If the room is decorated in a loft style, a shelving unit with shelves can be a good design addition. This design does not require any special materials, the main thing is the shape and size of the elements. Looking through the photos depicting shelving made in this style, you will notice that they are not characterized by any multi-level or stepped arrangement of shelves.
To make the structure look more massive, the rectangular frame usually consists of several blocks. The material used is metal or wood. An interesting option is a rack made of metal pipes connected by corners. The lower parts of the pipes, which are the legs, are attached to the floor using flanges. The design is complemented by a ladder, which is hung on the top shelf with curved upper ends.

A loft-style rack can be made from a steel corner measuring at least 50x50 mm. It is advisable to make frames for shelves from smaller corners. When making a similar shelving structure from wood, the beam for the frame should also be chosen with a large cross-section, and for shelves - 15–20 mm smaller. Massive base typical for furniture of this style.
You can assemble metal racks from a corner either by welding or using bolted connections. Protruding fasteners will only enhance the stylization.
Fast and inexpensive: do-it-yourself shelving from a profile
For the manufacture of shelving frames, they are often used metallic profile. This material has a number of undeniable advantages:
- high level of strength provided by stiffening ribs;
- resistance to temperature changes, corrosion;
- ease of processing (does not require special tools, enough metal scissors or a hacksaw);
- affordable price.

To make a rack from a profile with your own hands, you need to calculate total amount lengths of all parts of the rack, purchase required amount material and screws for connection. You can make a structure of any complexity from the profile. The following materials are suitable for making shelves:
- plastic,
- tree;
- wood materials;
- sheet metal;
- gypsum.
The option should be chosen in accordance with the operating conditions of the rack. Any of the above shelves can be easily attached to a profile frame. This material is most suitable for creating modular structures. A few tips on how to make a profile rack strong and stable:


- if the shelf width is more than 0.9 meters, use a double profile;
- if the structure exceeds 1.8 meters, it should be fixed to the wall;
- do not use a profile with a metal thickness of less than 0.6 mm.
Helpful advice! If the rack is planned to be used in rooms with high levels of humidity, you should purchase a galvanized profile.
DIY book rack: library and interior options
According to their purpose, book racks come in two types:
- for maintaining a home library;
- not for storage large quantity books and interior design.

For the first option, it is advisable to design along the wall from bottom to top. The most affordable option is made from coated chipboard. The side posts are cut from the slab along its maximum length (usually 2.7 m); the transverse posts should not exceed 100 mm. The shelves are attached to the side supports using metal furniture corners installed from below. If the rack seems unstable (this is possible with a shelf depth of less than 400 mm), it is better to fix it to the wall.
A self-made shelving unit made of timber can serve as a reliable structure for a large number of books. At high heights (above 2 m), the cross-section of vertical supports must be at least 70x70 mm. As a material for the frame of the shelves, you can use timber with a section of 40x40 mm.
For the manufacture of shelving, taking into account the stylistic features of the interior, the Internet offers interesting ideas. For example, this could be a rack made of chipboard, having two flat vertical supports (300 mm wide) in one plane and one vertical perpendicular of the same dimensions located between them. It is to this that the shelves are attached on opposite sides. The other two perform a decorative function and prevent the shelves from sagging - the shelves and supports are connected at the points of contact.

You can make an original bookcase with your own hands as follows:
- A rectangular box is made.
- Then, using internal partitions (vertically - whole, horizontally - fragments) it is divided into 6-8 identical squares.
- In turn, each square is divided by vertical or horizontal partitions (of the same type in one sector), creating many small shelves.
The proposed model can be made from both wood and wood materials.
For small rooms For example, in bedrooms where a small number of books are stored, console options made of wood are suitable - shelves no more than 600 mm wide, attached in the center to a beam protruding from the wall.
Efficient use of space: do-it-yourself corner shelving
In small rooms it is advisable to place a corner shelving unit. Design modeling must be approached with a certain level of knowledge:
- take into account the correspondence of the proportions of the rack to the dimensions of the room as a whole. Too much large design visually takes up a lot of space;
- When drawing up a drawing of a rack, try to make the corner area as accessible as possible; it should not be blocked by racks.
You can make a small corner shelving unit with rounded shelves, which will be an attachment to the main furniture. Shelves of this shape are convenient for the bathroom and hallway. Using metal and glass, it is possible to organize a lightweight and aesthetic design. If you take a square shelf as a basis, you will be able to create a rack on wheels that can be easily moved and returned to its place in the corner of the room.

The corner design can be used to make your own tool racks. Wood or a metal profile is suitable as a material for the frame. A fairly common option is a shelving along three walls with two corner fragments. The design is spacious, but it should be taken into account that for comfortable use the distance between opposite sides should not be less than 100 mm.
Helpful advice! The depth of the corner rack shelves should not exceed 500 mm. Otherwise, getting objects from far corners will be problematic.
DIY combined rack for cans
The basement is a room where only the owners are. In this regard, there is a tendency to equip it with second-class or used materials. When making shelving for the basement, this approach is unacceptable. Even with properly arranged ventilation, it is impossible to ensure complete ventilation. Increased level humidity is inevitable and even desirable for storing fresh vegetables, such as beets and carrots.

These conditions must be taken into account when choosing a material. Dense wood (oak, ash) is expensive; affordable pine is more often used. Even with good treatment, over time this material will be susceptible to rotting.
It is better to make a shelf from a corner with your own hands for the basement. To create a frame, sizes 45x45x4 mm or more are suitable. You can fasten the corner using bolts; such connections are easier to inspect for integrity.
It is better to use boards as shelves; it is more pleasant and safer to place glass jars on them. Metal frames for shelves should be turned upward so that the boards can be laid perpendicularly. The thickness of the boards should be 30 mm with corner dimensions of 45x45x4 mm.

The resulting rim will prevent the cans from sliding off. It is not recommended to fix the boards. This will allow you to easily replace individual of them, if necessary. summer time you can freely lift them up open air for drying and processing.
In a similar way, you can make your own rack for seedlings. For its best development, greenhouse conditions are necessary, and this is warm wet air and constant watering. The combined design, made of a metal corner and a board, will be comfortable and will last a long time.
Exclusive interior furniture: DIY bookcase
A shelf is the same rack, only smaller in size (the length is important), where the shelves can only be attached to racks. This is a free-standing, non-fixed structure. Special attention is given to her decorative design. That is why it is better to make your own bookcase out of wood. Available option– decorative shelving made of pine. This material is inexpensive and easy to process.

If there is no tool for making decorative elements (carvings, turned parts), you can make a base and order the parts. As an artistic treatment, it is recommended to use tinting and applying compounds that “age” the wood. The shelf can be painted white, black or any other color - in accordance with the decorative style of the room.
By making a wooden shelf with your own hands and decorating it in an interesting way, you can get a wonderful piece of furniture - a shelf for souvenirs, photographs, books and other items that you want to keep in plain sight.
The advantages of making furniture with your own hands, in particular shelving, are as follows:


- This is an opportunity to fulfill all requirements, wishes, and realize your own dreams and creative ideas.
- Individuality, originality of design. Even if they take an idea from the Internet, each creator will add their own special features to it.
- Moral satisfaction.
- Saving money. Most likely, this is not even a saving, but an opportunity to get a high-quality, reliable product at low cost.
The main condition is the presence of desire, in which case you can safely get down to business. The information presented in the article will help you quickly and efficiently create the necessary rack model.
The rack allows you to conveniently place various things, using free space as rationally as possible. It can be installed in the garage, on the balcony, in the pantry, personal library, office and other rooms. Figuring out how to make a rack with your own hands is not at all difficult. This does not require expensive materials or hard-to-find tools. The work is done very quickly, and the resulting result will delight you with its quality for many years.
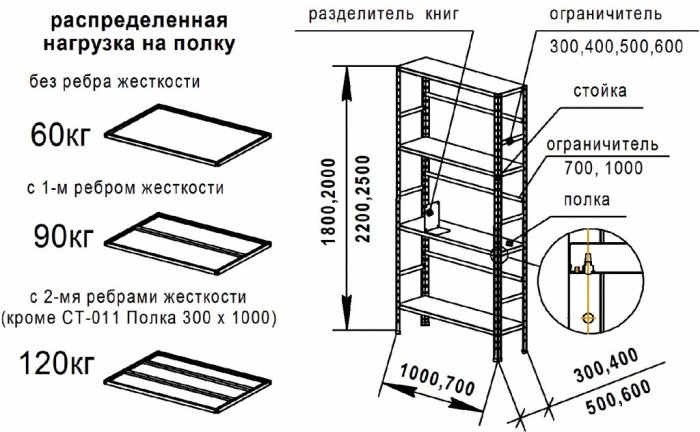
Types of self-tapping screws for making shelving.
Selection of design and dimensions
Before making a rack, you need to choose the most suitable design and determine the required dimensions. The console shelving is perfect for the pantry and kitchen. Many open and very convenient shelves gives maximum completeness of view. Necessary items It will be very easy to take out and put back. For a garage or balcony, you can make a rack from an inexpensive metal profile.
If you want to get an original addition to the interior, try making a rotating rack. It can be a small tabletop model or a full-fledged rotating cabinet.
Before you start making, you need to choose the appropriate sizes. If you do all the work yourself, then it is best to make the shelves from MDF or chipboard. Plywood will also work. Use boards 18-20 cm thick. Material left over from previous ones will do. construction work. If your budget allows and you have a sawing machine, it is best to make a rack from durable natural wood.
Select the width of the shelves taking into account what you will store on them.

Figure 1. Rack drawing.
any universal solution there is no. To store cans and various books, it will be enough to make a rack with shelves 25-40 cm wide. If you are making shelves for various tools, take into account their dimensions.
The appropriate length of the shelves is also determined taking into account what exactly will be stored on them. If you are going to make a rack for storing various figurines, toys and other souvenirs, then the shelves can be more than one and a half meters long. In the same case, if various thick and heavy books will be stored on its shelves, it is recommended to reduce their length to 80-100 cm, otherwise they will sag.
Fastening elements are also selected taking into account the loads. A light and simple decorative rack can be assembled using self-tapping screws. If the structure will be attached to concrete wall, use self-tapping screws with a length of 89 mm. If the wall is brick, fasteners 52 mm long will be sufficient. You may need hooks and anchors to assemble and secure garage shelving and bookcases. The final choice depends on how much the rack with the items stored in it will weigh. You can make a rack based on the following drawing (Fig. 1). If necessary, change the number and size of shelves to suit your needs.
Return to contents
Step-by-step assembly instructions

This design looks like this - Fig. 2. In order to make a rack, you will need the following materials and tools:
- lath 183x3.8x1.9 cm – 10 pieces, for making crossbars and planks;
- rail 20.3x3.8x1.9 cm - 3 pieces, for racks;
- beam 39x8.9x3.8 cm for support;
- shelves – 18.3x30.5x1.9 cm;
- screws;
- dowels;
- screwdriver or screwdriver;
- drill.
First you need to prepare the markup. Draw a line on the wall. It should be 183 cm in length and pass at a height of 39 cm from the floor. Draw 4 more similar lines above it in increments of 41 cm.
If the walls in the room are finished with plasterboard, you will need to find a standing profile. The finished structure will be attached to it. The profile can be found using a magnet. Mark the intersections of the wall profile and future shelves. Cut 5 crossbars and 5 slats.

Figure 2. Diagram of a rack on a metal base.
Attach each strip in its designated location to the middle stud you found under the drywall. Make holes where the planks and posts intersect. Attach the strips to the posts through these holes. Also secure the 4 remaining fastening strips.
Cut out the support and 3 posts. For support, use a beam measuring 39x10x5 cm. It will be dismantled later. In order to complete console installation shelves, you need to make a simple calculation. You can calculate the length of the slanting rail, due to which the overhanging edge of the shelf will be held, using the following formula: a²=b²+c². In this case, a is the length of the slats, b is the width of the shelf, c is the height between the individual shelves. In this example, the length of the oblique rail is 51.1 cm. You can see this in the following figure. 3.
Attach the rail to the support post and the crossbar that holds the outer edge of the shelf. It must be mounted at an angle of 45°. Use self-tapping screws to connect. To make the connection more durable, lubricate the parts with glue.
Secure the shelf using self-tapping screws of a suitable length and glue. If you use a board, you need to prepare the holes with a slightly smaller diameter, otherwise the canvas may split. Do the same for all remaining shelves.
You can attach ready-made consoles in the shape of triangles cut from a board to the racks. The fastening can also be done so that the shelf fits freely into the resulting triangular hole.
It often happens that due to the lack specific place storage of things, the apartment or house begins to gradually become cluttered. In this case, simple and in a practical way The solution to the problem may be a shelving unit. It will be useful not only in the pantry, as is commonly believed. With its help, you can divide a room into several zones, organize tools in the garage or things on the balcony.
Making a rack does not require special knowledge and skills, expensive materials and tools. It can be produced quickly, and most importantly, it does not require significant financial outlays, like buying a store-bought equivalent or a new cabinet.
Required materials and tools
To make the simplest rack you need to prepare the following materials and tools:
- slats (for slats and crossbars);
- beam;
- shelves (you can use them as edged boards, MDF boards, chipboards, laminated boards, plywood, glass, natural wood or plastic);
- screws and dowels;
- screwdriver (screwdriver);
- electric jigsaw;
- roulette;
- level;
- chalk or soft pencil.


Shelving boards
The material from which they will be made is selected taking into account the operating conditions of the future structure. If the rack will be located in a room with high humidity(bathroom) or sudden temperature changes, then wooden parts should be treated with a special protective coating, and parts made of ferrous metal are coated with protective paint.
If the shelves are planned to be made from chipboard or MDF, then you need to take care of cutting the material in advance. You can do this yourself using a jigsaw, or have it cut in a specialized store. Built-in shelves are possible.
Selecting a rack design and developing a drawing
To develop a correct and successful drawing, it is necessary to accurately measure the future location of the rack. Here you can’t do without a tape measure and a pencil (chalk). If the design is intended to store tools or cans of canning, it is better to give preference to simple forms. The height of the rack directly depends on the height of the room, your own preferences and convenience. The width of the shelves depends on the items that will be placed on it. To store cans or books, a width of 25-40 cm is sufficient. If we are talking about an instrument, then the width is selected in accordance with its dimensions.

The length of the shelves also depends on what will be stored on them. If the rack is made for toys, various figurines and other souvenirs, the shelves can reach a length of 1.5 meters, if for heavy books - no more than 90 cm (otherwise deflection cannot be avoided).

Fastening elements also need to be selected taking into account the loads. For decorative shelving, you can use self-tapping screws. If the structure will be attached to brick wall– self-tapping screws with a length of 52 mm are sufficient, if for concrete – the length of the fastener must be at least 89 mm.

After measurements have been taken and the issue with the design of the rack has been resolved, a drawing is made. Here you don’t need to be a great draftsman; it’s enough to draw an approximate drawing plan indicating the dimensions and the most optimal arrangement of the shelves.
Stages of making a rack
Further steps for making the rack can be divided into several stages:
- Base installation
- Installation of boxes and shelves
- Rack finishing
Base installation
Before you begin installing the rack, you need to mark the wall. If the rack is built along the entire height of the wall, then it is better to attach the supporting frame in the form of wooden beams to both the ceiling and the floor.

For the construction of a load-bearing support, it is best suited wooden beam. The key to a successful structure is a solid foundation.
The bars can be used both rectangular and square. It all depends on the size of the finished rack, the length and width of the shelves. To fix the beams and the base board, it is recommended to use 3 cm self-tapping screws.

During the installation of the structure, it is important to ensure that the load-bearing supports are always located vertically. Lateral transverse braces will give the structure additional rigidity, and therefore make the rack more durable. It is especially important to take this into account if the structure will be subject to heavy loads.
Installation of boxes and shelves
When the base of the rack is ready, you can proceed to forming the structure box. Pre-prepared MDF boards, chipboards, boards or other material used are attached to the beams from the bottom, top and sides. The result will be a box without a back wall. If desired, you can make a rack with back wall from fiberboard or thin plywood. It is installed last.

After installing the boxes, move on to the shelves. Marks are made on the inside side walls of the box indicating the location of future shelves. Shelves can be secured using self-tapping screws, metal corners or other selected fastening systems. If the rack is made with a heavy load in mind, then it is better to use metal corners. Transverse bars are attached to them on top, on which the shelves will rest. It is important to remember: the length of the screws that connect the shelf to the beam should be 4-6 mm greater than the thickness of the shelf.

The heaviest load falls on the middle shelf, so it should be made especially strong. For best result, when installing shelves, you should use a level. Recently, racks with asymmetrically arranged shelves have become popular.

Rack finishing
If the rack was made from chipboards or MDF, then for greater aesthetics and to give the structure a finished look, a melamine edge should be glued to all ends of the parts. This is done using a regular iron. The edge is placed on the end pre-treated with fine-grained sandpaper and smoothed with a hot iron. Excess edges of the edge are trimmed with a stationery knife.

If desired, some shelves can be closed with doors. This will add originality to the rack. Or you can even make a whole