A cesspool is a special depression in the ground designed to collect sewage and other human waste in those houses that are not connected to the drainage system through pipelines.
Today we will look at one of the most popular designs of drainage pits - a pit without pumping.
Device
The construction of a cesspool begins with the choice suitable place. There are three key rules that are used to choose the optimal location:
- the pit must be at least 12 meters away from the nearest house where people live;
- from the pit itself to the fence site the distance should be no more than 1 meter;
- the distance to groundwater, it must be over 30 meters.
After this, they begin to calculate optimal size, and there are also several patterns here:
- calculate the number of residents, as well as the average rate of water consumption per person (approximately 180 l), calculate the monthly value of wastewater volume;
- taking into account the soil where the pit will be located, it should be taken into account that those soil types that easily allow liquid to pass through make it possible to accept only 40% of the monthly volume, and the soil that does not conduct water well will force the volume of the pit to be increased higher calculated value;
- it should be remembered that the soil layer must be at least 1 meter;
- the optimal depth is about 3 meters.
Materials
Nowadays the most widely used types of materials used in constructing a cesspool are:
- bricks;
- reinforced concrete rings - similar to those used in wells. So, you can do ;
- tractor;
- special hermetic containers made of polypropylene and other polymer materials, but are the most expensive means.
Scheme
In general, the diagram of a cesspool looks something like this: the pit itself represents a pit in the soil of a certain  size, in the middle of which, to maintain its original shape, as well as to prevent the walls from falling apart, there are solid materials such as bricks, reinforced concrete rings, etc. along the entire perimeter of the pit. Outside, directly between the soil itself and the outer wall of the pit, there is a layer of clay called "clay castle".
Required condition is the presence of a ventilation hole equipped with a pipe to remove gases generated by fermentation processes in the pit. The final and most important detail is the presence of a hatch, which will provide access to the pit for regular maintenance.
Manufacturing instructions
Let's consider the 3 most simple options pit constructions.
Made of brick
The procedure for performing work when constructing a pit with brick lining: 
- to begin with, use thread and stakes to mark the selected area - on average, the dimensions of the hole are 1 by 1.5 meters;
- to fill the hole at the end of the work, you will need about 1.5-2 cubic meters of soil, the rest of the soil extracted during the digging process should be evenly distributed over the surface;
- if you plan to drain wastewater through pipes, then you should dig a trench under the pipe in advance;
- at the bottom of the dug pit, apply a 15-centimeter layer of sand, on which apply a layer of concrete of the same thickness;
- sharp object by “piercing” this layer, remove excess air bubbles;
- after the concrete pad has hardened, lay a sewer pipe (if provided);
- after that, start laying facing walls placing the bricks in a checkerboard pattern using sand-cement mortar;
- to increase the service life of the cladding, also apply the solution directly to the outer part of the walls;
- upon completion of the cladding work, apply a layer of bitumen to the walls;
- make depressions in the ground 20 centimeters around the entire circumference;
- use corrugated sheeting to build a vertical partition around the perimeter of the pit;
- strengthen the ceiling by using rods and reinforcement fastened together with wire;
- evenly fill the formwork with concrete solution and let it dry for 25-30 days;
- Carefully remove the formwork with the frame, making sure that the structure is strong.
From the rings
The procedure for performing work when constructing a pit using iron concrete rings:
- dig a pit, maintaining as much round shape cross section;
- mark the areas where the pit will be located;
- fill the bottom with a layer of concrete mortar;
- build metal carcass with the help of reinforcement rods, which will have to evenly distribute the mass of the rings over the entire area and protect the concrete pad from premature destruction;
- after the concrete has hardened, you can begin installing the rings;
- the joints of two adjacent rings must be filled with concrete solution;
- the outer part of the rings should be covered with a layer of bitumen;
- After installing all the rings, they should be covered with a concrete cover, and the joint is also filled with mortar.
Made of plastic
The procedure for performing work when constructing a pit using plastic containers: 
- dig a pit, taking into account that in this case it will be significantly larger in size than in the two previous cases;
- make the bottom as smooth as possible;
- pour a 15-centimeter layer of sand onto the bottom and compact it well;
- carefully lower the tank to the bottom and fix it in a stable position;
- connect the inlet pipe of the tank with drain pipe;
- fill with soil or sand free space between the tank and the walls of the pit;
- Fill in a small volume of water to see how the tank compensates for the pressure on the ground. If the walls of the tank gradually bend inwards, the tank is not installed correctly.
- completely fill the pit with soil.
Necessary tool
 The main tool for personal construction of a cesspool is shovel. It is optimal to have both a bayonet and a shovel, since it is more convenient for one to directly dig a pit, and for the other to throw soil to the surface.
Be sure to have a bucket and rope for pulling out soil. You will also need a wheelbarrow to remove soil from the pit. It is necessary to have a tape measure or other measuring device on hand. To descend into the pit, you should purchase a ladder.
Considering that you will have to make a solution from cement, if it is not possible to use a concrete mixer, you should allocate a separate container for preparing the required volume of solution.Installation highlights
As mentioned above, the first and main point of installation is the accuracy of the preliminary  calculations taking into account specific needs. Then comes the correct selection of the location of the cesspool, taking into account the planned type of pit, for example, a pit with or lined with bricks will be narrow and deep, and a pit with a tank will be wide, but not so deep.
When choosing an option with reinforced concrete rings, you should take into account that their installation will require the help of a truck crane due to their high mass and fragility of the structure when dropped. The option with bricks and a tank can be installed manually. It should also be taken into account that to extend the service life of a plastic tank, its outer part should be compacted with a layer of soil.
When laying pipes through which wastewater will flow, you should remember that they must be below the freezing level of the soil.Common mistakes
Practice shows that when arranging a cesspool, mistakes are often made such as:
- incorrect preliminary calculations of volume and location;
- insufficient pit depth;
- weak fortification the walls of the pit resulting in collapse
walls; - the outlet pipes are parallel to the ground, and not at a slight angle;
- neglect of the rules for installing concrete rings.
Owners of private houses often face the question:
Do you want to apply modern methods for cleaning the toilet in the country? In you will learn how to choose bacteria for the toilet.
The choice of sewer pipes is very important question. Tips and recommendations can be found at the link.
1.
2.
3.
If property owners in multi-storey buildings do not think about the question of where to dispose of waste water and sewage, then for owners of private households the problem of waste and sewage disposal requires a permanent solution. They have no choice but to make a drainage hole with their own hands. This arrangement option treatment plant is the simplest and most accessible during construction on our own.
Landscaping begins personal plot from the installation of a water supply and sewerage system, since staying in nature cannot be called comfortable if you have to carry drinking water from a well and run to nearby bushes when needed.
There are several options for disposing and processing wastewater and sewage, but the simplest design is a cesspool. It is necessary to have knowledge of how to properly make a drainage pit without the help of specialists, so that in the future you will not have problems with its operation and the environmental situation in the area adjacent to the house.
Types of drainage pits
Despite the simplicity of the design, drainage pits differ in the way they are implemented.They are:
- sealed;
- filtering;
- two-chamber.
When the pit is made airtight, sewage does not contaminate the soil and groundwater. As a result, the ecological system will not be threatened, nor will the sources drinking water. The advantage of this treatment structure is that it can be used regardless of the hydrogeological conditions in the adjacent area.

But there are also disadvantages. Sewage and sewage accumulated in a sealed container must be periodically pumped out, and calling a sewer truck is not a cheap service. The frequency of pumping depends on the volume of the tank used.
In fact sanitary standards It is prohibited to build a local sewage system of this design: if untreated wastewater gets into the ground, it can cause irreparable harm to the environment in the area. They can even be a source of contamination of drinking water sources, and this is already extremely dangerous for human health.
This option, if currently used, is only for country houses, since the people living in them require a small amount of water. It is recommended to build filter-type waste pits only if the volume of waste during the day is no more than a cubic meter. When the amount of wastewater is small, it has time to be processed through natural decomposition.
Often pits of this type are installed during the construction of baths, steam rooms and for houses in which separation of wastewater is provided. In the latter case, it is necessary to lay two sewer branches and build two drainage pits on the site. The first of them, equipped with a filter type, receives waste water from washing machine, shower cabin, from the washbasin. These effluents are considered relatively clean.
Sewage from the toilet and water from the kitchen are directed into the second sealed pit.
Two-chamber drain pit. This solution to the waste disposal problem is considered practical and reasonable.
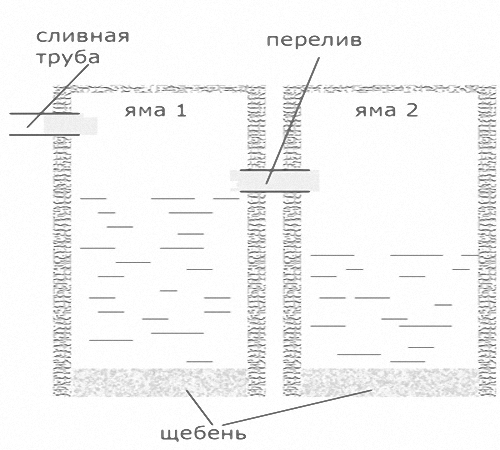
The operating principle of this treatment plant, shown in the photo, is as follows:
- a drainage pit, consisting of two chambers, is connected at the top by an overflow, the first of which is sealed, and the second is filtering;
- unseparated wastewater initially enters the first of the chambers, which is sealed, and settles there (mechanically separated);
- solid particles sink down to the bottom, and less contaminated water flows into the next chamber;
- from another chamber, water is filtered into the soil;
- The waste collected in the first chamber must be pumped out from time to time. To reduce the amount of waste, special biological preparations are used. The bacterial strains contained in them promote the processing of organic matter, which leads to a reduction in the amount of sewage.
How to make a drain hole correctly
Before making a drainage hole in a private house, you need to design a construction plan. It is necessary to select the type of structure, location of construction and calculate the required volume of the tank.Of course, the amount of waste is determined individually, but generally accepted standards also apply. For example, for a family that permanently lives in a house and has three members, they build a pit that can hold 6 cubic meters.
When calculating the volume of a container, the following points are taken into account:
- How affordable is the cost of services provided by vacuum cleaners;
- the volume of waste that sewage disposal equipment is capable of pumping out of a pit at one time.
When determining where a sump should be made, a number of factors are taken into account:
- distance to the location of soil water. It should be sufficient to dig a pit two meters deep (this is the minimum value). Read also: " ".;
- the distance from the source of drinking water to the sump must be at least three tens of meters. It is extremely important to maintain the minimum distance from the well to the cesspool, for your own safety;
- you cannot make a cesspool on a slope;
- it is necessary to provide for the possibility of access of special equipment designed to clean the pit from the drain;
- It is prohibited to make a septic tank in the immediate vicinity of a residential building and fence neighboring plot. Minimum distance to a residential building should be 5 meters.

Thus, before making a drainage hole in your house, the location should be chosen very carefully to prevent contamination of the area surrounding the building, especially when the area is built up. In any case, the rules must be followed.
Selection of building materials for arranging a drainage pit.
When creating a sealed cesspool, the following materials are used:
When constructing a filter type drain pit, you can:
- cover it with bricks, leaving 5 centimeter gaps between the rows in a checkerboard pattern;
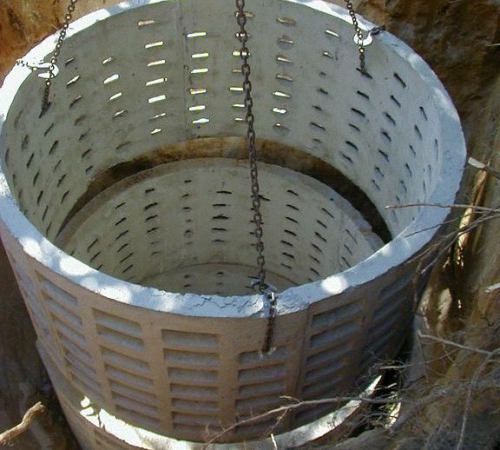
- install reinforced concrete rings for drainage wells with perforation into it;
- use car tires. They are laid on top of each other, cutting off the lower rim on each tire;
- use used metal or plastic tanks or barrels. The bottom should be cut off and holes should be made in the lower part to improve filtration of wastewater.
Making a drain hole with your own hands
There is a certain procedure for how to make a drain hole with your own hands correctly.On initial stage prepare a pit and dig trenches for laying supply pipes.
The depth of the pit should be greater than the designed depth of the drainage pit, since space will be required for the drainage pad. It is made from layers of sand and crushed stone, which are carefully compacted.
If you plan to arrange sealed pit, then the thickness of the layers should be 10-15 centimeters. Place pillows on top or reinforced concrete slab, or fill concrete screed.
When installing a filter pit, for better wastewater purification, the minimum layer of crushed stone should be 20 centimeters. Thanks to this measure, the bottom will not silt for a longer time.
Then you need to start strengthening the walls of the sump. To do this, make brickwork, or use plastic containers, or install concrete rings.
In the case when a sealed sump is being built, after the walls have been strengthened, waterproofing should be done.
At the same time, connect the supply pipeline to the tank receiving the wastewater. It is necessary that the connection of the pipes with the tank is both sealed and not rigid: then it will not collapse when the soil moves. Therefore, rubber couplings should be used for connection.
Approximately 40 centimeters from the surface of the earth, a cover for the sump is made. Usually a ready-made reinforced concrete slab with a hole for a hatch is used. If desired, it is quite possible to make such a slab yourself, having previously made the formwork. The ceiling can also be constructed from boards, but it will not be durable.
In order to control the degree of filling of the tank and to pump out sewage, a hatch must be installed in the ceiling. In addition, a ventilation pipe should be mounted on the lid to remove gases (including methane) that are formed during the decomposition of the solid contents of the wastewater. You can pour soil on top of the ceiling, but so that precipitation cannot enter the pit.
When it is planned to create a local sewerage facility, for those home craftsmen who are new to this type of work, it will not be superfluous to know how to make a drainage pit for servicing a country household. Even if hired workers do the arrangement, it will be easier for the owner to monitor the quality of the services.
One of the main tasks that arises before starting dacha construction is laying engineering communications. Without them, you cannot achieve even the minimum level of comfort. How to make a drainage pit (septic tank) with your own hands? This is a question many homeowners ask. In the absence of a central sewer system, it is necessary for the drain to work around the clock and uninterruptedly.
Selecting material for building a septic tank

From building materials, used for a septic tank, depends on the cost of the drainage pit itself, as well as your labor costs. Traditional and completely justified options are:
Septic tank made of plastic tank and plastic components.
Prefabricated septic tank made of reinforced concrete designs.
Drain pit from monolithic concrete using metal inlets and outlets.
Drainage structure made of brick.

Choosing volume future drainage pit, focus on tank capacity of the sewer truck. You will have to call her periodically to pump out the wastewater. The volume of the septic tank must be equal to or a multiple of the volume of the “barrel”. Then you won’t have to order cleaning several times a year.

If in the house you are planning live seasonally, then wastewater disposal is a solvable problem. You need to make the most primitive cesspool from any sealed container. For a family from 3-4 person its volume should be no less 1,5-2 m³. If there is no such container, you can line the hole in the ground with red fire bricks. Schemes of simple drainage structures are shown in the picture above.
But when permanent residence such sewerage arrangement no good. Why - now you will understand. Family life requires the daily use of large volumes of water. These are baths, showers, washing dishes, wet cleaning, washing, natural needs.
Calculation of water consumption is always based on maximum consumption , and this 180-280 liters per day for one household. That is, a group of 4 -x a person spends per day 0,5-1 m³ of water or up to 30 m³ per month. Based on this, even a large drainage hole in 15-20 m³ must be cleaned 1-2 once a month.
Such a sewer will drain your family budget . In addition, the cleaning procedure itself is specific and rare owners have the desire to perform it too often. It's about O unpleasant odors, capable of spreading throughout the area.
Sometimes improvement a drainage pit is carried out by creating holes in the ground so that dirty water leaves through them, filtering naturally. But this method of disposal has many disadvantages, including prohibited by sanitary standards. Therefore, it is necessary to equip a septic tank with natural cleaning liquids.
Fundamental difference a septic tank from a cesspool consists of the fact that in the first there are leaks anaerobic processes of organic matter decomposition.

Particulate matter will linger at the bottom the first chamber, and the second is used for biological processing dirty water putrefactive bacteria. The number of cameras may be large, but the principle of operation itself will remain similar to that shown in the figure above.

First let's decide on water consumption in the house, based on data tables:
Minimum height there must be a septic tank not less than 1.2 meters, otherwise solid suspensions will not settle densely at the bottom of the drainage pit.

In the picture you see a diagram single-chamber septic tank made of reinforced concrete rings with a volume 2 m³. You can make such a cesspool for your home with your own hands.
Inlet pipe must be above the water level by 5-7 centimeters. This will prevent a hydraulic short-circuit between the inlet and outlet pipes. Both pipes must be immersed in liquid for 30-35 centimeters.
Bottom of pipes should be made open, and these ends should be brought above the wastewater level to 20 centimeters so that gas does not enter the pipes, which will be released during the fermentation of putrefactive bacteria.
Channels between both concrete rings The septic tank should be located within 30-60 centimeters relative to the water level. If the channel located between the chambers is lower, then large suspensions will begin to fall into the small chamber. If the channel is higher, then fractions that float on the surface may enter this chamber.
For a septic tank, even the simplest, it is necessary to provide exhaust gases to the outside(ventilation pipe in the diagram above), and also hatch for pumping out liquid(possibly wooden).
Configure cameras the drainage pit can be used in different ways, since their shape and location do not affect on the quality of cleaning sewer water. You just need to follow following proportions : a large chamber should occupy 2/3 from the entire volume of the pit.
Perfect form for a septic tank - round. Such a decision requires 10-15 % less building materials. In addition, the “cylindrical” pit is stronger because it copes better with the force of soil pressure. For cladding and strengthening walls better to use brick.

Water in the pit doesn't freeze, since fermentation processes raise the temperature. But cooling the liquid on the surface inhibits the activity of bacteria that clean sewage. That's why top part still a shallow septic tank it is recommended to insulate. At least half the depth of soil freezing in the region.
Insulation can act expanded clay, which is covered with a layer thickness of 25-40 centimeters, or foam boards PSB-25 thickness from 5 before 10 centimeters.
In most cases, sewerage is not provided at the dacha. Instead, a cesspool is used. There are quite a few options for its construction, and each has its own advantages and disadvantages. Next we will consider in detail standard designs cesspools and discuss how to install them.
What is a drain hole and why is it needed?
A drainage pit, or as it is also called a cesspool, is necessary for private houses that do not have a direct sewerage supply. A proper drainage pit processes waste, allowing some substances after treatment to be absorbed into the ground without harming it.

The popularity of this type of treatment plant is due to the ease of installation and speed of work. One person without assistants is able to complete all the work within 3-5 days, depending on the type of structure.
On the other hand, there are certain difficulties associated with the further operation of the cesspool. First of all, this concerns the issue of pumping out sewage. The correctly selected volume of the pit is no less important.
Drain pit device
The simplest designs that are most often found in rural houses and simple summer cottages- this is digging into the ground an old barrel or tank that has served its useful life. This design will allow for the collection and partial filtration of wastewater, provided that its daily amount does not exceed 1 m³. Such schemes have not received approval from sanitary services, since they can harm the surrounding ecology.
The simplest drainage hole in a private house is a simple design. Through the sewer pipe, although direct entry is often found, sewage enters a container whose bottom is covered with silt. The drainage pit must be equipped with a gas outlet pipe through which the methane generated during waste processing will escape to the outside.
Such a system is completely unsuitable for those houses in which it is planned permanent residence. Considering that the average daily water consumption for a family of four is up to 1 cubic meter, this leads to the need for frequent cleaning of the cesspool, and, accordingly, to financial costs. Previously, there was a widespread method of removing sewage into the soil with its subsequent natural filtration, but in the current realities this method is, for obvious reasons, prohibited by the sanitary service.
However, such a design is quite common and will not have any special alternatives for summer cottages with infrequent traffic. It is not difficult to equip it on your own, but you need to take into account the following points:
- The walls of the pit will require strengthening, as the water will gradually begin to collapse the structure. To prevent this, a tank is installed, or walls are built from brickwork or concrete rings.
- The volume of the cesspool must be at least three cubic meters. The correct calculation is made taking into account the fact that each person will require at least one cubic meter of space.
- Installed ventilation will increase the rate of waste recycling.
- If an overflow pit is installed, it practically does not need to be cleaned, since its design involves the presence of several chambers for waste processing. In this case, sewage enters the first chamber, where it accumulates. After the level of sewage reaches the overflow partition, it will flow into the second pit and there it will be absorbed into the ground. Solid waste remain in the first pit and are processed by bacteria.
Types of drainage pits
According to the type of execution, cesspools are divided into:
- concrete storage,
- brick,
- with receiving capacity,
- temporary,
- with timber formwork,
- without a bottom, with waste moisture discharged directly into the ground.
Making a drainage pit from concrete
It is a quickly constructed solution for receiving sewage and has the following advantages:
- Construction speed. In fact, with a set of factory-produced concrete rings, such a structure can be built in one day. There is only one drawback - for work you will need crane or an excavator.
- Reliability and durability of concrete.
- Minimal installation complexity.
Such a structure is erected quickly:
- First, a hole of the planned depth is dug.
- Next, the site is leveled.
- The first ring is installed using a tap.
- The soil from under the ring is evenly removed, while placing signal supports that prevent the structure from skewing.
- After the second ring has been installed on the first ring, they are fastened together using metal staples.
Installation continues in the same way to the planned depth.
When all the rings have been placed, use a crane to install concrete floor with holes made in it for the hatch and ventilation pipe. The finished structure must rise above the ground at a level of at least 30 cm.
To ensure better tightness, all seams and junctions with sewer pipe carefully sealed with bitumen mastic.
The problem with a sealed structure will be its rapid filling, and the need to frequently call sewage disposal services to pump out sewage. In the same case, if it is allowed to discharge water into the ground, then purchase rings with holes made. The installation technology is no different from that described above.
To give the finished structure a more complete look from an aesthetic point of view, you need to sprinkle the part of the drainage system protruding above the ground surface with soil, while providing plantings that will serve a decorative function. For example, planting an undemanding plant Moorish lawn will allow you to turn the treatment facility into a blooming flower bed. 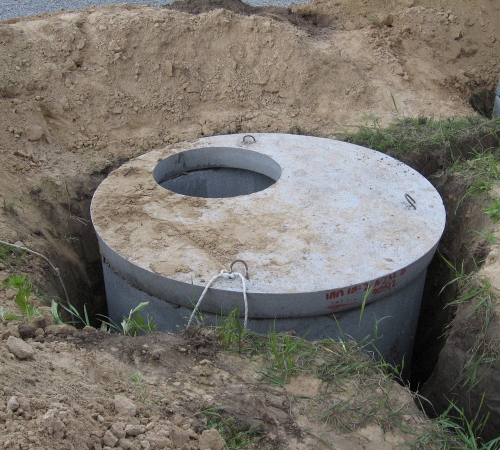
Brick drain pit
According to experts, the best option will be the application ceramic bricks which will ensure the strength and durability of the structure. The process of constructing a brick drainage pit is conventionally divided into several stages:
- placed in a hole dug to the required depth drainage layer 20 cm thick, consisting of sand and crushed stone of different fractions,
- after this, they begin to build the walls, laying bricks in a checkerboard pattern, taking into account a gap of 5 cm between them for better filtration of waste substances,
- on all sides the bricks are covered with crushed stone of large fractions as the masonry grows,
- make the necessary gap in the masonry for inserting a sewer pipe.

There are often conflicting recommendations about the final stage. For example, to reduce costs, it is proposed to make masonry half a brick thick, but it is important to remember that such a structure will hardly take on the weight of the concrete closing cover.
The design itself provides two options for laying bricks:
- to ground level
- 80 cm below ground level.
In the case of laying bricks to ground level, space must be left taking into account the thickness of the covering concrete cover. The recommended design with the completion of the masonry not reaching the ground surface by 80 cm raises some doubts about its feasibility for a number of reasons:
- since the design will require the installation of a closing cover, in the end the drain will still be deepened into the ground by at least 50 cm - which is dangerous due to the possibility of falling into a hole,
- It is recommended to fill the lid with earth up to the surface level, but in this case either access to the hatch will be blocked, or installed cover another pipe will have to be installed larger diameter, rather than the dimensions of the cover - and in this case the system will be subject to additional load.
Masonry is inferior to concrete in a number of factors:
- a concrete structure is erected noticeably faster and ultimately requires less funds for the construction
- brick is more susceptible to moisture,
- To evenly distribute the load on the walls, the cesspool must have a cylindrical shape.
The feasibility of erecting brickwork appears only when it is not possible to call in heavy trucks.

Plastic receiving containers
If the question is how to make a drain hole without resorting to special expenses, is urgent - then you need to pay attention to the option of installing a polymer tank of the required capacity. In this case, all the work boils down to digging out the required amount of earth under the tank, and then placing the collection in the prepared hole. After this, the remaining space is filled with soil. It is important to remember that sealed structures necessarily require the installation of a gas outlet.

The advantages include the following:
- ease of construction,
- minimal costs in terms of labor intensity,
- protecting the air from the release of unpleasant odors,
- durability of the polymer material, which is up to 50 years,
- During use, no waste substances enter the soil.
Among the disadvantages, you need to pay attention to the need for periodic pumping of sewage and the small capacity of the tank, so this option is optimal for use under low load conditions. For example, if the dacha is visited once a week, and a small amount of waste goes into the drainage pit.
Temporary drainage pits
They are made from those that have served their time. car tires. It is important to consider that the internal diameter must be at least a meter, otherwise the pit will quickly become clogged with sewage. In fact, the structure is easy to erect: a hole of the required depth and diameter is dug, after which it is filled with tires, laying them one on top to ground level.

The advantages of the design include the following:
- simplicity of work,
- low price of used tires,
- after installation, the empty space is filled with earth, and no additional finishing is required.
It is worth remembering that the design is suitable for a toilet placed outside and not connected sewer system with the house. Since it is assumed that the load on the pit will be negligible. Despite its name, with infrequent use, such a pit will last up to 25 years.
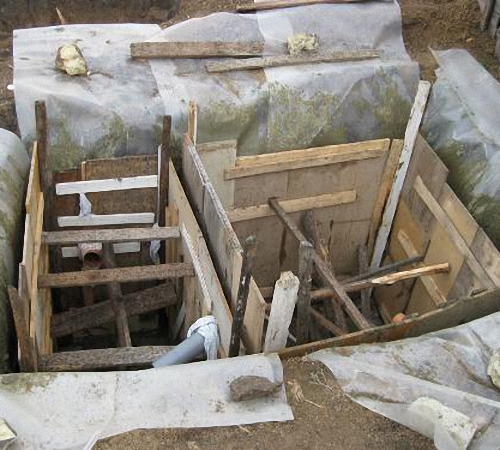
Drainage pit with wood formwork
Like the previous design, the use of wood is suitable as a temporary solution. In fact, this option is still sometimes used in rural areas and in some dachas, but due to the fact that wood, even with high-quality processing will not withstand more than ten years - use wooden formwork doesn't make much sense. Nevertheless, this is a drainage pit, the price of which will be most reasonable and will not exceed 3000-4000 rubles.
Of course, the speed of construction and isolation of the soil from sewage are advantages of the design, but nevertheless, it is inferior to all types of cesspool and for the most part serves as a relic of the past.
Drain pit without bottom
It is a cesspool constructed of brick, with the difference that the bottom of the drain is not treated. In some cases the bottom is covered metal mesh, but chemically aggressive environment it quickly rusts and loses its usefulness. Sewage evenly falls into the ground, but due to heavy silting of the bottom of the pit, additional cleaning is periodically required.
In addition to the above, when arranging a cesspool, you need to pay attention to some tips to increase recycling efficiency and ensure greater durability of the structure:
- It is better to drain the bottom of the pit using coarse crushed stone to prevent premature silting. The layer thickness must be at least 10 cm.
- To improve drainage, asbestos pipes are inserted at the bottom, which are installed with a protrusion at a level of 50 cm from the bottom.
- It is better to finish the walls with clay to reduce the concentration of harmful substances entering the soil.
- In the event that there is one cesspool on the site, but its volume is not enough, it is more advisable to build another one nearby and connect it PVC pipe from the first. In this case, the structure will become overflowing and will need cleaning much less frequently.
- From the first moment of use, it is necessary to use special preparations containing bacteria. They speed up the natural recycling process and reduce unpleasant odors.
- The overlap should extend above the ground level so that in the event of heavy rain, the drainage hole does not overflow with water and its contents do not fall onto the site.
- In any embodiment, the design must have an exhaust pipe to remove accumulations of methane and other hazardous substances.
- Inorganic substances, including low-quality toilet paper- can significantly reduce the service life of the structure and contribute to heavy siltation of the surface.
For the improvement of a private house, cottage and any other residential buildings, the main thing is the equipment of drainage and sewerage systems. An integral element of wastewater disposal is the drainage pit, the construction of which you can do yourself. In this article we will talk in detail about the features of constructing drainage pits, define the main criteria for choosing a location for their creation, and also get acquainted with the basic requirements for this structure on the site.
How to choose the right place to build a drainage pit with your own hands
Do-it-yourself construction of a drainage pit begins with choosing a location for the future structure. To ensure waste disposal is as convenient, safe and of high quality as possible, the following nuances must be taken into account:
- landscape type;
- groundwater placement;
- location of drinking water wells nearby;
- distance from surrounding buildings of at least 6 meters;
- there must be at least 2 meters from the drainage pit to the fence, etc.
Before the beginning construction work, it is very important to become familiar with the nature of the soil in the area, as well as accurately determine the location of groundwater, since the distance from the bottom of the pit to it should be more than 1 meter. When determining the territory for the drainage pit, it is very important to take into account all sanitary standards so that harmful, toxic fumes do not harm either the householders or others.
Determination of the main parameters of the drainage pit. Depth and diameter
After choosing a suitable place for a cesspool, you should decide on its main parameters. The volume, depth and diameter of the structure for this purpose is guided by the following criteria:
- the main material used in the work;
- number of residents in the house;
- type of construction.
Often, consumers choose a septic tank made from plastic cups. This means that the volume of the drainage pit is affected by the number of containers used. The septic tank installation technique requires free space on the sides of the structure (approximately 25-30 cm), which should be covered with earth or clay. In this case, it is worth paying attention to the condition of the earthen cushion on which the plastic vessels will be installed. It is very important that one of the containers is located higher than the other, due to which the drains will move freely in the desired direction.
For example, for waste pits with concrete rings inside, experts recommend preparing an ellipse-type pit with a diameter of 1.5 - 1.7 m.
For drainage pits made of brick or concrete, in the process of determining its main parameters, the volume occupied by the material must be taken into account.
The second criterion by which the dimensions of the drainage pit are calculated is the number of people living in the house. The indicators of the volume of water that one person uses per day on average are taken into account. Considering these indicators, it is still worth taking all the numbers with a margin. So, the formula for calculating the volume of the drainage pit: the indicators of depth, width and length are multiplied by each other. As for the depth of such a structure, it should not be less than 180 cm.
The dimensions of the drainage pits directly depend on the type of structure chosen. The table highlights the main ones.
| Types of drainage pits by design features | |
| Absorption pits without a bottom | Suitable for use in places with a daily waste volume of no more than 1 cubic meter. More suitable for summer use. It is economical to install. |
| Hermetic containers | Most safe type For environment. The installation of such drainage pits requires easy access to the construction of sewage disposal equipment. |
| Storage septic tanks | We have already mentioned this type above. It is distinguished by its comfort and adaptability to use in any private areas. They are single-chamber and multi-chamber. They require regular use of biological products to combat sewage. |
Features of a drainage pit for summer use
The presence of a sewer system is simply necessary for the drainage of waste from the sauna, bathhouse, shower, toilet, kitchen, etc. Drain pits are classified not only according to design features, but also according to seasonal characteristics. In addition, there is a third criterion - this is the type of material used for construction. So, according to seasonal characteristics, drainage pits are distinguished mainly for summer use and all-season structures. Summer-type structures are constructed from available materials, such as:
- wooden boards;
- old car tires;
- plastic and metal barrels etc.
DIY drainage pit made from wooden tires
For equipping a string pit for seasonal use, a material such as wood is ideal. For those new to construction work, the process of mounting and installing from boards will not be as difficult as with other materials. So, to build a summer cesspool, you should prepare the following materials and tools:
- digging shovel;
- wooden boards and nails;
- tape measure, building level;
- wooden supports (pillars);
- metal pipes (as stiffeners);
- crushed stone;
- moisture-resistant polymer materials;
- hammer;
- grinder, etc.
It should be borne in mind that wood absorbs moisture well, even when the material is treated with moisture-resistant agents; this type of drainage structure will not last more than 10 years.
Step 1. Prepare the pit using a shovel.
Step 2. We create formwork from boards according to the intended dimensions (height about 1.5 m);
Step 3. We install supports (wooden beams) and connect them with knocked down wooden panels;
Step 4. Strengthen the structure with spacers;
Step 5. Metal pipes We provide stiffener structures.
Step 6. Cover the hole.
As polymer material, as additional protection against moisture, professionals recommend using polyurethane foam.

Features of a do-it-yourself all-season drainage pit
To create drainage pits for all-season use with your own hands, materials such as brick, concrete rings, etc. are used. Such structures differ from temporary ones in depth, shelf life, volume of wastewater absorption, etc. All-season cesspools require an inspection hatch. Next, we will consider the processes of constructing a brick drainage pit and creating a structure from concrete rings, and we will examine in more detail the advantages and disadvantages of each option.
Features of a do-it-yourself drainage pit made of concrete rings
Drain pits made of concrete rings are a reliable structure that, when correct installation can last for more than a century. The process of working on such a design requires the master to have skills in working with welding machine. A number of advantages of cesspools made of concrete rings include:
- resistance to toxic, chemical effects of waste substances;
- long service life;
- waterproofness of concrete material;
- The placement of groundwater for a concrete structure is practically of no importance.
The disadvantages of this type of cesspool include the fact that working with the structure requires the use of special equipment. This series can be supplemented by the fact that this process work is labor-intensive and increased level pollution.
Drain pits made of concrete rings are divided into two types. The first is structures with a bottom, the second is pits without a bottom. A design with a bottom is considered an all-season and virtually harmless option, since in this case there is no unpleasant odor, no danger to the environment, and, as a result, other characteristic functional disadvantages.
According to the above criteria for choosing a site for construction, we determine the territory, after which we can proceed to the selection of the main material - concrete rings. It is best to use ready-made rings, which can be ordered from suppliers specializing in this. At this stage, you should immediately take care of the equipment (crane) with which the concrete rings will be placed in the pit of the drain structure.
As a rule, construction work begins with preparing the bottom of the pit. At this stage it is used concrete mortar. To prepare the filling mass, we use 1 part of cement and 6 parts of crushed stone. The following installation procedures should be continued after this layer has completely dried (no earlier than 7 days).
After the bottom has completely dried, you can install concrete rings, the seams of which must be treated with liquid glass, thus ensuring complete insulation of the structure.
It is worth paying attention to the type of concrete rings, as they come with or without a lock. The second type is usually reinforced with metal brackets during the installation process. A special ceiling is installed on the last ring, which has a special place for the drainage pit cover and hatch.
Features of a do-it-yourself brick drain pit
Drainage pits made of bricks, as well as those made of concrete rings, can be either with or without a bottom. It’s better to take care of its availability. Brick structures This type has the following number of pros and cons:
- environmental Safety;
- ease of installation and operation;
- does not depend on the groundwater level and type of land cover;
- presence of an unpleasant odor;
- Not long term ministry;
- frequency of pumping out waste materials, etc.
Work on this type of drainage pit requires considerable time and physical investment, and consists of the following stages.
- Choosing a site for construction.
- Calculation of pit dimensions.
- Preparation of tools and materials.
- Digging a pit.
- Bottom preparation.
- Walling.
- Interior finishing of the pit.
- Installing the cover.
To work with brick material and preparing a place for cesspool you will need: bayonet and shovel shovels; a container for mixing mortar, buckets, trowels, construction measuring instruments, pegs and rope for fencing the area.
After the pit has been dug to the required depth and planned dimensions, you need to take care of the walls (level them and eliminate collapses). Next, you can work on the bottom; it should be filled on an incline. After the base has dried, the formwork is prepared for the construction of walls, then we can proceed to brickwork. Experts repeatedly remind us of an additional layer of waterproofing for bricks. Bitumen is used as protective layers different types(modified, or bitumen mastic).
Creating a cesspool with your own hands requires a reliable, durable ceiling. For this purpose they use reinforced concrete structures, since they are able to withstand heavy loads. According to safety rules, hatches must overlap the drainage pits on the sides by more than 30 cm. It is worth taking care of a hole in the hatch for convenient pumping of drains.
How to make a drainage hole on your site
The presence of a cesspool on a farm is undoubtedly an important, necessary and, at the same time, very responsible moment. In order to answer the question of how to make a drainage hole on your site, it is worth familiarizing yourself with some advice from experienced professionals.
Tip 1. Before starting construction work, read the sanitary standards in detail and choose the right place; any violations may lead to administrative penalties and fines.
Tip 2. Use only quality materials to neutralize the formation of harmful, toxic fumes and odors.
Tip 3. Consult with specialists on the issue of pumping out sewage, choose one of the methods (pump, sewer equipment, etc.) that will be most convenient and effective on your territory.
Tip 4. During the installation process, do not forget about sealing and insulating joints and seams.
Tip 5. For durability, environmental friendliness and reliability of drainage pits, install ready-made, sealed septic tanks, which will simplify even the process of neutralizing wastewater.
For more information on the topic, watch the video: