You can make the premises especially cozy using various lamps and lamps. But it’s not always possible to buy a lamp that we like and matches the interior of our home. Therefore, we suggest that you make a lampshade with your own hands at home for a chandelier or floor lamp yourself, step by step.
For lamps with fabric lampshades, it is preferable to use energy saving lamps, because a regular lamp can cause a fire in the fabric. The frame for the lamp can be bought in stores for repairs, or you can make it yourself.

DIY lampshade step by step
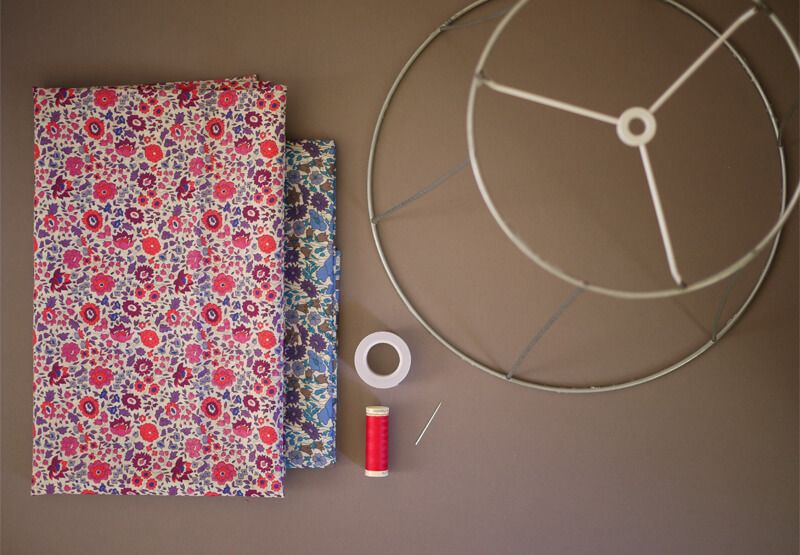
Materials:
So, let's sew a fabric lampshade - for this we need:
- iron;
- pencil;
- ruler;
- material;
- English needles;
- threads in color with the fabric;
- thick paper and whatman paper;
- fabric glue.
Manufacturing process:
First of all, we make a template; it can be made in two ways:
- When the frame is in the shape of a cylinder, measure its circumference and height and transfer it to the fabric. Next, we draw two more sides and cut out the finished pattern.
- And when the frame is in the shape of a cone, then we lay out the paper, and slowly rolling the frame along the paper, we mark the lines of the sides. After the frame has been completely rolled, it is necessary to connect all the lines into one line and cut out the pattern.
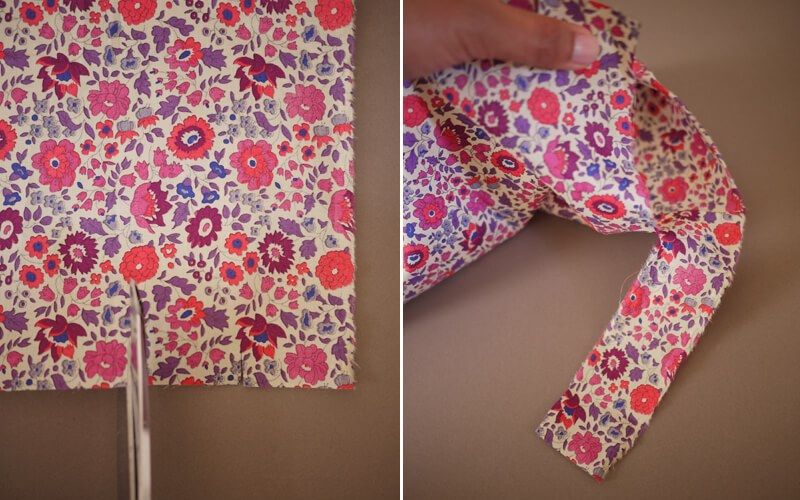
Before transferring the pattern onto the fabric, be sure to attach it to the frame and check that it fits well. After checking, we pin the template to the fabric from the wrong side and trace it with chalk, after that we make allowances of 1.5-2 cm according to the template and cut it out. In the case when the fabric is not plain, the pattern must be laid out correctly so that the pattern is in the right direction.
Now turn on, steam well and iron the fabric, there should be no wrinkled parts.
Next, cover the surface of the table with newspapers, lay the fabric on them, apply glue to it and leave it for the required amount of time according to the instructions for using the glue. After time has passed, glue the lampshade to the frame. We hide all unprocessed sections. Leave the finished lampshade until the glue dries completely. After about a day, the lampshade can be used for its intended purpose.

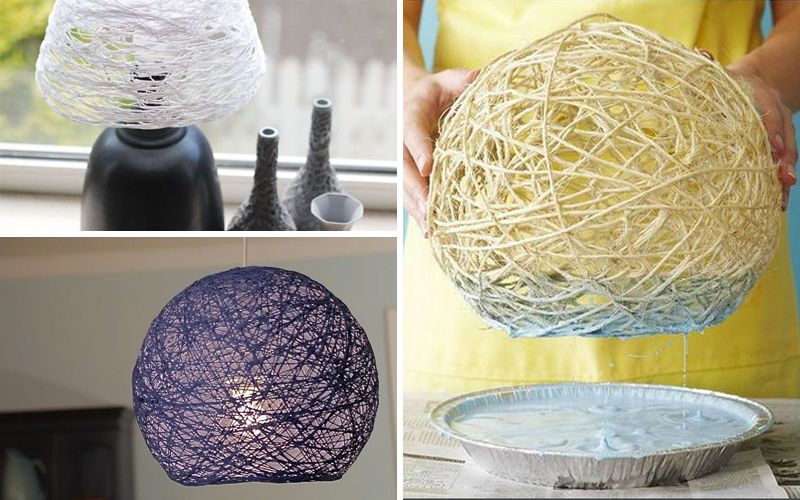
Lampshade made of threads
DIY lampshade made from threads for table lamp looks amazing and always in fashion. A lampshade in this design will give any room a cozy and unusual atmosphere. In our article we will analyze step by step how you can make a lampshade from threads with your own hands.
We will need:
- Balloon
- Knitting threads (3-4 skeins)
- PVA glue 2 bottles
- Wire and other accessories for the lamp can be purchased at hardware stores.
- Bulb
- Scissors
- Oilcloth
- Gloves
- Foam sponge
- The cover is plastic.
Progress:
Inflate the balloon and tie it. The shape of the ball must be round, since the shape of the ball will form the lampshade.
We take the thread and fix it at the base of the ball, this will be the top of the lampshade. Next, we begin to wrap the ball with threads in a cross-shaped manner. We distribute the thread evenly throughout the ball so that the thickness of the lamp is uniform over the entire surface.
If this is your first time making such a lampshade, then you need to focus on the correct application of the threads and pulling them tight. But at the same time, make sure that the ball does not become deformed. This option is perfect for a chandelier or floor lamp.
So, we continue to wind the thread, you should get 5-6 layers so that balloon was hidden by threads. If there are small gaps, it’s okay, they will give the lampshade a finished look and rays of light will break through them.
Now we cut the thread and tie it to a knot on the ball. We cover the table with oilcloth and begin to apply PVA glue to our lampshade blank.
We put on gloves and, using a sponge, apply a generous amount of glue over the entire area of the lampshade. It is necessary to soak each thread well so that not a single thread remains dry. Otherwise the lampshade will not work correct form, otherwise it will completely break.
Leave the soaked ball to dry for 12 hours, preferably hanging. After everything has dried, pop the balloon with a pin. At the top of the ball, around our knots, we cut out a small hole through which the light bulb should pass.
We insert the lighting accessories into the lampshade and screw in the light bulb. We adjust the length of the wire, attach the lamp to to the right place, well, here we are, ready to enjoy the beautiful lampshade and pleasant lighting.

Paper lampshade
Things made by your own hands bring special energy to your home, and also reveal your creative potential. Nowadays, there is a lot of information on the Internet about how to make a lampshade with your own hands. In our article we want to tell you how you can make a lampshade out of paper.
For many, paper evokes feelings of airiness and carefreeness, and a paper lamp will certainly convey these feelings.
China is the birthplace of paper, so we will make Chinese lanterns.
We will need the following:
- rice paper, or, of course, regular paper,
- cartridge,
- light
- diagram - plan of a Chinese lantern,
- Ruler and pencil,
- awl,
- threads
Progress:
- We mark the paper from the inside out using the diagram for Chinese lanterns.
- Next, in the designated places we bend the paper, getting an accordion. There is no need to rush in this matter, since the precise folding of the paper will determine how even the flashlight will be in the end.
- Connect the socket to the light bulb. We make holes at the bottom of the workpiece and pull the thread through it.
- Next, we wrap the lampshade around the socket.
- We glue the edges.
Well, basically all the Chinese lanterns are ready!

Lighting can either transform or make any room uncomfortable. Suffice it to recall cold hospital corridors, and, for example, cafes, where there is always soft warm light.
Especially in winter, people miss the sun, so it is very important that there is always light at home. A special cozy atmosphere can be created with the help of various lamps or floor lamps. However, it is not always possible to choose a lamp that matches the interior of the room. But don’t be upset, because you can do it for any lamp.
DIY frame and base for lampshade
First you need to select a lamp or several lamps for which you need to make fabric lampshades. It is better to use lamps with energy-saving or LED lamps. Regular light bulbs can simply burn the fabric, so it’s better not to take risks.

Before you begin, you need to remove the frame for which the lampshade will be created. If the lamp does not have a frame, then it can be purchased, for example, in a special store or construction department.
Also, the frame for any lamp, be it a floor lamp, table lamp or chandelier, can be made independently. To do this you will need thick wire and pliers.
The base can have any shape. It will be easier to make a lampshade for a cylindrical or cone-shaped frame.

How to choose fabric for a lampshade
First of all, you need to choose a suitable fabric for the lampshade. You can use light, hard or dense material. If desired, you can even make a lampshade from wool, it all depends on the creator’s idea and the interior of the room.
If the frame consists of ordinary wire, it is better to use an opaque material to cover it. Dark silk, cotton and taffeta are suitable.
It is also worth remembering that the color of the fabric can give both cold and warm light. In the first case, you can use blue or green fabric, and in the second, yellow, orange or red.

Necessary materials for making a lampshade
Fabric lampshades can be done different ways. If the new lampshade is glued on top of a regular plain lampshade, then there will be no preparatory work not required.
But if there is only a wire frame, then it is better to first coat it with paint and then wrap it with light or dark cotton tape.
To make the lampshade look neat, you need to sew it on a typewriter.
In addition, you will need:
- iron;
- a simple pencil;
- ruler;
- textile;
- pins;
- threads matching the color of the material;
- kraft paper (or any thick paper, as well as whatman paper);
- glue (you can take a special one for fabric or a universal one).
When all necessary materials and the tools are at hand, you can start sewing DIY lampshade made of fabric.

Master class on making a lampshade with your own hands
First step
First you need to make a template to cut required amount fabrics.
There are two ways: if the frame is cylindrical, then you can measure the circumference and draw one line on the fabric, and then measure the height and draw a second line. After this, all that remains is to draw two more sides of the rectangle and cut out the template.
If the frame is cone-shaped, then you can lay out the paper, take a pencil and gradually roll the frame along the sheet, mark with a dotted line the lines of its sides.
The main thing is that the frame rotates completely; to do this, you can mark a reference point on it using a piece of thread or a pin. After this, you can connect the lines and cut out the template.

Second step
In order not to cut off more, or worse, less fabric, you need to attach the template to the frame of the lamp - it must completely fit. If the template is larger, you need to cut off the excess paper; if it is smaller, you will have to take the measurements again and make a new template.
Third step
When the size of the template matches the size of the base for the lampshade, you can begin to attach it to the fabric. If the material has a pattern, you need to position the template so that the drawn elements “look” in the right direction. You need to calculate everything so that, for example, you don’t cut off the head of a flying bird. Otherwise the lamp will look ugly.
The template must be applied to the wrong side of the fabric, and then it must be secured with pins. After this, you can carefully trace the template along the contour. If the fabric is dark in color, you can use not a simple pencil, but special fabric crayons or a piece of soap.
After this, you need to draw allowances. To do this, you need to draw lines at a distance of one and a half to two centimeters from the boundaries of the template.

Fourth step
Without removing the template from the fabric, you need to carefully remove the pins one at a time and wrap the seam allowances inside. The fold lines must be secured with pins.
Now you need to remove the template and fill sewing machine. The threads must be chosen so that they are almost invisible on the fabric.

Fifth step
Now you need to sew the resulting part on a typewriter. This needs to be done only on three sides - one of the sides must be left untreated in order to then form a seam on the frame itself.
You need to stitch at a distance of five to seven millimeters from the edge. If desired, you can process the sections. But in any case, they will have to be hidden when the fabric is glued to the frame.

Sixth step
After this, you need to turn on the iron and iron the fabric piece well. If wrinkled parts remain, the fabric will not adhere well to the base, and the lampshade will look ugly.
Seventh step
The next part of the work must be carried out in a well-ventilated room. First you need to cover your work surface. waste paper or an old tablecloth and lay out the fabric. Then you need to apply glue to it and leave it for some time, which is indicated in the instructions for the glue.
Eighth step
Now you can glue the fabric to the frame. You need to hide the raw cuts, and make the seam in such a way that the lampshade is covered with a stitched edge.
If the lampshade is attached to a wire base that is wrapped with cotton ribbons, there is no need to apply glue to the entire surface of the workpiece; it is enough only to the part that comes into contact with the frame parts. In this case, you need to stretch the fabric well.

Ninth step
The finished lampshade must be left for some time to dry completely. After about a day, you can put the lampshade on your favorite lamp and enjoy beautiful object, which will definitely decorate any interior.

Fabric lampshade decoration
Table lamp with lampshade looks much nicer than just a regular bare lamp. But if a monochromatic color is chosen for the lampshade, then you can decorate it in an original way. Here are some ideas on how you can make an interesting lampshade decoration out of fabric.

Lampshade in Provencal style
In order to decorate a plain lampshade, you will need a piece of fabric and fringe. Typically used for green, turquoise and pastel shades colors, checkered colors or floral patterns are also suitable.

First, you need to select a suitable fabric for a plain lampshade and cut two strips from it - one to decorate the top of the lampshade. This strip of fabric should be long enough to completely wrap the circle and make a bow. The second strip should be the length of the circumference of the bottom of the lampshade, and fringe must be sewn to it. This can be done on a sewing machine.
All free edges of the fabric must be processed so that it does not fray. After this, using glue or thread with a needle, you need to attach the fringed ribbon to the base of the lampshade so that the fringe hangs down.
Then you need to decorate the top of the lampshade. To do this, you need to glue or also sew a ribbon along the circumference, and tie the free edges with a bow.
For lampshade in provencal style You can also use lace. The good thing about this element is that it can simply be glued to the fabric.
You can make lace flowers, stripes, or completely cover the fabric lampshade with lace napkins.

Lampshade with fabric flowers
Another one unusual idea which will allow table lamp with lampshade to become like a flowerbed - decorating with fabric flowers.
Fabric in delicate shades is perfect for flowers; you can use, for example, organza or chiffon, or you can simply take, for example, an old jacket, cut strips and twist them into roses.
You can decorate a lampshade with just a few flowers, but if you have time and patience, you can make a whole bunch of flowers to completely cover the lampshade.

DIY lampshade made from scraps
If you have many pieces of different fabric at home, you can make a lampshade from multi-colored scraps.
In order to make such a lampshade, you need to use the technique of sewing pieces to a fabric base. The easiest way is to cut a piece of fabric to the size of the frame and divide it into several wedges.

Then you need to sew patches to each wedge the way you like - you can sew strips of fabric diagonally, or make small squares. To avoid delaying the process, it is better to use a sewing machine.
After this, all the wedges with patches will need to be sewn together and glued to the base of the lampshade.
This lamp can fit perfectly into a country style!

Lampshade made of unusual materials
When you make a lampshade yourself, you can give free rein to your imagination and experiment. To do original item, you first need to find unusual material.

For example, in the kitchen, a lampshade made from burlap can look very interesting. This fabric transmits light well. Such a lampshade can be decorated with some wooden parts, for example, clothespins or wooden beads and buttons.
Can also be used to decorate grandma's old lace napkins. You can also write something on such a lampshade with white or black paint, as they usually write on bags.

For a teenager's room, you can sew a lampshade in . For this you will need denim. And you don’t have to buy it, you can just cut up old jeans - every person probably has such a thing.
Such a lampshade can be decorated, for example, with a denim pocket where you can insert artificial flower or a piece of a checkered handkerchief. You can also use applique for such a lampshade. Pieces of leather are suitable for this.

For example, for a lamp that will stand in a girl’s room or bedroom, you can sew a delicate lampshade from mesh. This fabric can be found in any sewing store.
A lampshade made of several layers of mesh will look interesting - it will resemble a ballerina’s tutu or a fluffy skirt.


Fortunately, you don't have to buy a lamp just because of a beautiful lampshade, as you can make one yourself. Yes, one that will cost less than buying a floor lamp, and at the same time it will be much more beautiful..
How to make a beautiful lampshade with your own hands from paper that can be used as a lamp
You will need
- Long stem glass
- Candle
- Rope - can be made from threads
- Drawstring with a tassel at the end
- Decorative tape
- Scotch
- Scissors
- Transparent paper with decorative pattern
- A little sand
Manufacturing process:
1. Make a template from plain A4 paper.

2. Attach the template to transparent decorative paper with a design and trace it with a pencil. Then cut out the resulting image.
3. Glue decorative tape to the edge of the paper.

4. Secure the rope with a tassel at the end with tape on the back side of the paper.
5. Glue the side ends of the paper together.
6. Tie a string to the stem of the glass.

7. Wrap it around the leg as shown in the picture below.

8. Pour sand into a glass, place a candle on top and light it.

9. Place the dome you made on the glass.
And the lampshade with the lamp turned out so beautiful.

How to make a lampshade for a floor lamp with your own hands
You will need
- Patterned paper
- Decorative paper
- An awl with which you will pierce holes on the future lampshade
- Glue and brush
- Scotch
- Ribbon to match the color of decorative paper
- Clamps
- Frame for lampshade
In our case, the frame for the lampshade consists of two parts:


Manufacturing process
1. Tape the patterned paper to the back of the decorative paper.
2. Use an awl to make holes along the contour of the design. In the end it turns out like this:

4. Mark with a pencil the line along which you will glue the decorative paper.
5. Glue the paper with glue.
6. You coat it bottom part glue the resulting cylinder and glue the second part of the frame to it.

To make it stick, press it with clamps.

8. In the same way, glue the first part of the frame to the top of the lampshade.
9. Glue the tape to the top of the lampshade. This is done like this:
- coat a small piece (about five centimeters)
- glue and clamp with clamps
- then coat it with glue and glue the next piece, etc., until you have glued the entire tape

10. Bend the tape so that it covers the frame and glue it.

As a result, you will get this lampshade for the floor lamp:

Using this technology, you can make any drawing.
What can a lampshade be made from?
- Beaded lampshade
- Lampshade made from plastic bottles
- Wicker lampshade in Provence style
- Lampshade made of organza or thread - you can make a hanging version
We will tell you how to make them in the following materials, but now I would like to tell you about...
How to make a lampshade frame with your own hands
You will need
- Welding wire - select the length 3, focusing on the height of the lampshade. At the same time, do not forget to add 3-4 cm for connection.
- The top part is from a jar of vitamins, the neck of which fits right into the lampshade.
- Vacuum cleaner cord return spring.
- Soldering iron.
- An object that can be used to poke holes (an awl, a nail, etc.)
- Pliers
Manufacturing process
- Make a circle of the required diameter from the return spring of the vacuum cleaner cord. Solder the ends.
- Make three holes in the neck of the vitamin jar and in the circle you made. The holes on each item should be approximately the same distance from each other.
- Insert welding wires into the holes and bend their ends with pliers so that they do not come loose.
In the end, this is what you should get:


To relax a little after learning the information, here is a video on how to make a candle from an incandescent light bulb:
Don't switch. Soon there will be a continuation of the DIY lampshade theme. Using these links you can switch to the second and third parts of the article.
It happens that you really want to update your interior, but you don’t know where to start. Sometimes you just need to change the lighting. But buy new lamp expensive, and in some cases it is not even necessary. We invite you to consider several master classes on how to update a table lampshade
What you need to create lampshades
You can update lampshades for yourself with absolutely any materials:
- cloth;
- artificial flowers;
- skin;
- threads and rope;
- paper and so on.
It is also necessary to have tools such as scissors and a glue gun.
A simple and original way to decorate an old lamp
Such lamps are very well suited for a feminine chic style interior. To give the lampshade this look, take the following materials:
- shade;
- artificial flowers (peduncles can be bought in craft stores, but you can buy bouquets and cut off caps from them, sometimes this works out cheaper);
- glue gun;
- scissors.
Master class on how to update a lampshade for a table lamp with your own hands:
- Cut off the excess parts of the stem from the flowers, leaving only the calyx that connects the petals.
- Warm up the glue gun.
- Apply a little hot glue to the calyx of one flower stalk and glue it to the lampshade. Start working from the top or bottom edge. Glue the flowers either in a circle or in rows, pressing them tightly together.
- Hot glue dries quickly, so work carefully.
- When you have covered the entire lampshade, fluff the flower petals.
Advice: interesting lampshades for DIY table lamps are obtained by combining several shades of colors that flow smoothly.
Geographic lampshade
This lamp will look great both in the living room and in a child’s room.
You will need:
- shade;
- map;
- ribbon;
- PVA glue;
- some water;
- brush;
- glue gun

Master class on how to make geographic lampshades for table lamps with your own hands:
- Prepare a map. You can buy it in a store, print it, or it can be special sheets for decoupage.
- Mark the required width on the card and cut out a rectangle. If you don't have enough to completely wrap around the lampshade, add another piece.
- Dilute in a small amount of water.
- Cover the back of the card with glue and carefully glue it to the lampshade. Use your fingers to smooth out any bumps if any appear.
- Wait until the card is completely dry.
- Cut off any excess paper.
- Heat it up and use it to glue the tape along the edge of the lampshade at the top and bottom.
The geographic lampshade is ready!
Book sheets as decor
In the same way as in the previous tutorial, you can decorate lampshades using book pages.

To do this, tear out several sheets from an old book and trim their edges so that they are not frayed. Lubricate each sheet with PVA glue and glue it onto the lampshade in a chaotic manner. The paper should protrude slightly at the edges. When all the sheets are glued, tuck the protruding edges inward.
Warm lampshade with ombre effect
This lamp is ideal for the cold season, as it will bring a note of warmth and comfort to any interior.

List of what you will need:
- shade;
- several types of yarn, suitable friend to a friend by color palette (for example, white, dark blue and turquoise);
- glue gun
Master class on how to do it beautiful lampshade for a DIY table lamp:

- Place a small bead of glue just above the base of the lampshade (about one centimeter from the edge).
- Glue one end of the yarn to the drop. Choose the one with a darker shade.
- Wrap yarn around the lampshade, making sure that each new row fits tightly to the previous one.
- Wind a certain height with one color. The last turns should not fit tightly to each other, but be at different distances, covering the lampshade a little chaotically (picture 1).
- Glue yarn of a different shade with a glue gun. The new color should be at the same level as the old one (picture 2).
- Wrap the yarn around the lampshade, this will allow you to overlap two colors in some rows. This is necessary so that the shades have a smooth transition and do not have a striped pattern.
- When you have wound the required level of yarn in the second color, make a few loose turns (picture 3).
- Wind the third color of yarn, not forgetting to glue the tip.
- Finish wrapping the lampshade. To do this, the third yarn should go in tight rows to the edge of the lampshade, and glue the end (picture 4).
- Turn the lampshade over and wind the yarn to the end.
The warm lampshade is ready!
Lampshade with roses

You will need to take the following tools and materials:
- shade;
- cardboard;
- pieces of fabric;
- green yarn;
- ribbon;
- glue gun;
- scissors;
- pencil.
Master class on how to decorate a lampshade for a table lamp with your own hands (photo of the process is attached):

- Draw flower leaves on cardboard and then cut them out (picture 1).
- Glue the green yarn to the edge using glue gun(picture 2).
- Wind the yarn tightly around the leaf (picture 3).
- Glue the tip of the thread and make a few more leaves in the same way (picture 4).
- Cut several strips from the fabric about one or two centimeters thick (picture 4).
- Fold one strip in half, dripping a little glue inside along the entire length (picture 5).
- Roll the strip tightly, occasionally dripping glue onto the edge to keep it from coming apart (pictures 6 and 7).
- Straighten the edges of the figure a little, and you will get a rose (picture 8).
- Make several roses of different sizes in the same way.
- Carefully glue the roses onto the lampshade (picture 9).
- Don't forget to glue some leaves under the roses in some places.
The volumetric lampshade is ready!
New lampshade with ombre effect

To make a smooth and beautiful transition from one color to another, you need a suitable coating. To do this, it is recommended to make a lampshade with your own hands.
You will need:
- lampshade frame;
- plain cotton fabric (preferably white, beige or light gray);
- small bath or basin;
- paint (watercolor, hair, fabric, gouache and any other liquid);
- glue gun
Master class on how to make a lampshade for a table lamp with your own hands with an ombre effect:

- Take the lampshade frame and fabric.
- Turn on the glue gun.
- Wrap the fabric around the lampshade and carefully glue the edges. Cut off the excess fabric.
- Wrap the top and bottom edges inside the lampshade and glue them with a glue gun.
- Fill a bowl or tray halfway with water and dilute the paint in it.
- Lower the lampshade partially into the bath and pull it out.
- Do this procedure several times, gradually reducing the dipping height. This way the paint will be absorbed more into the different levels, creating a smooth transition of shades of the same color.
- Hang the lampshade in the bathroom and let it dry.
All is ready!
How to make a lampshade from scratch
The previous master class described how to update a boring or outdated lampshade. What to do if there is nothing to work with and there is not even a frame? Then you can easily make a lampshade yourself.

To do this you will need to take:
- textile;
- masking tape;
- large ruler and centimeter;
- pencil;
- scissors;
- plastic sheet (can be found in hardware stores or among craft supplies);
- wire rings;
- large paper clips;
- PVA glue or;
- glue gun;
- special splitter for lamps (sold in lighting stores).
Operating procedure
Master class on how to make a new lampshade for a table lamp with your own hands:

- Take a tape measure and measure the diameter of your wire rings. This will be the diameter of the lampshade.
- Place a plastic sheet on the table and measure the length and width of the future lampshade on it
- Cut off the marked rectangle.
- Unfold the fabric wrong side out on the table.
- Secure the edges of the fabric so that it does not move.
- Cover the plastic rectangle with a layer of PVA glue or double-sided tape.
- Carefully place the rectangle with the sticky side on the fabric.
- Press the fabric onto the sheet and straighten it out.
- Trim off any excess fabric.
- Roll the fabric.
- Glue the fabric together using a glue gun.
- Connect the seam with clothespins and place the piece on the table.
- Place a weight on top of the seam to prevent it from unraveling.
- Wait for the part to dry.
- Place the parts inside the top and bottom along the ring.
- Attach a special splitter to the upper ring.
- Glue the rings using a glue gun.
- Attach paper clips to the edges so that the rings stick better. Leave the part like this for a while.
- Glue a ribbon to the top and bottom of the lampshade, wrap half of it inward.
- Cut a strip of fabric, fold its edges and glue it to the seam.
- Cut two more strips of fabric, also turn the edges and glue them to the top and bottom of the lampshade.
- Wait until all the elements are dry.
A completely new lampshade is ready!
Any interior decor starts with the little things. So, by changing a few details, you can create a completely different interior. Try changing a lamp or lampshade on it, and you will see how the entire interior design changes. Depending on the chosen room, the lampshade can be classic, made of fabric and lace, modern, made of plastic, buttons or paper, abstract, made of feathers or other improvised means.

With some effort, you can get a truly unique item, the likes of which you will not find anywhere else. It is known that designer designer items created by hand are not cheap, since their production takes a lot of time, but the result is something unique and inimitable.

To make a lampshade yourself with your own hands, you will need cheap materials at hand:
- plastic spoons, forks and glasses;
- wooden ice cream sticks;
- fabric scraps;
- ribbons and lace;
- buttons;
- tubes from magazines;
- beads and seed beads;
- cardboard and paper;
- shells and pebbles;
- clothespins;
- plastic straws for drinks;
- threads and twine;
- metal wire for the frame.
Typically, a lampshade consists of two metal rings connected by jumpers (from 3 pieces). The shape of the frame can be trapezoidal, cylindrical or curly.
For the frame, wire made of any metal is suitable: copper, aluminum, steel. Using wire cutters, you need to cut two pieces of wire and make two circles out of them - one larger, the other smaller.

It should be noted that the design for the lampshade pendant chandeliers slightly different from the lampshade design table lamp, but in any case there is always one more inner ring, through which either the cartridge or the cord from the chandelier is threaded.

To work with wire, you will need wire cutters and round nose pliers (in order to make a neat loop to hold the wire together.

But, nevertheless, the most correct thing would be to buy a ready-made frame for the lampshade - fortunately, construction hypermarkets are full of them.
You can make a pattern for a lampshade like this:

So, the frame for the future lamp is ready and the most important thing to choose is the decor of the lamp and the material with which to work. We offer several options for making a lampshade with your own hands.
Lampshade made from scraps of fabric

To make such a lampshade you will need following materials and tools:
- two pieces of fabric of different colors;
- lampshade frame (purchased or made yourself);
- threads with a needle;
- scissors.


And more options for inspiration: fabric lampshades:


Ribbons and lace, buttons and beads, pieces of other fabric and bows are suitable for decoration. Even old pants or other clothes can give life to a designer item.
Most often, such lampshades are sewn according to a template: for this, a pattern is cut out of paper or newspaper, and then transferred to fabric:

Lower and top part products can be decorated by pasting or trimming them with fabric of a different color or with lace or braid.


Paper lampshade - options and ideas
No less interesting can be a lampshade made of paper or cardboard.
Suitable for work:
- pages of glossy magazines;
- old newspapers;
- old unnecessary book;
- notebook (can be covered with writing);
- paper napkins with patterns.
Remember: paper is flammable, so you will have to use either energy-saving or LED light bulbs - they heat up less than incandescent lamps.

To make a simple paper lampshade you will need the following materials:
- base - a lampshade-ball made of paper of any diameter;
- square-shaped note paper;
- scissors and glue.
First, cut out circles from note paper (can be replaced with regular colored paper).

Paste decorative elements from below, row by row, until the entire surface of the lampshade is covered.

Instead of regular colored paper, you can use corrugated or velvet paper, or you can replace them with lace fabric - in this case, the lamp will look lighter and airier.
More options for lampshades made of paper or cardboard, photo:


In order to change the look of the room, just a little is enough: change the pillows or blanket on the sofa, throw in a bright rug or make a lamp with your own hands.
Decorating interior items can be interesting and addictive! Vases, napkins, panels, lampshades - it’s these little things that change the face of the interior!
To avoid buying a designer lamp, make your own lampshade from plates. For this you will need:
- the base for the lamp is a cylinder made of paper or cardboard;
- several sets of disposable paper plates;
- glue gun;
- scissors.
Procedure: fold each plate in half and glue it to the base along the fold line:

A similar lampshade can be used for sconces and pendant lamp, and for a floor lamp. If desired, you can use different colored plates or paint white ones in different shades.(42)
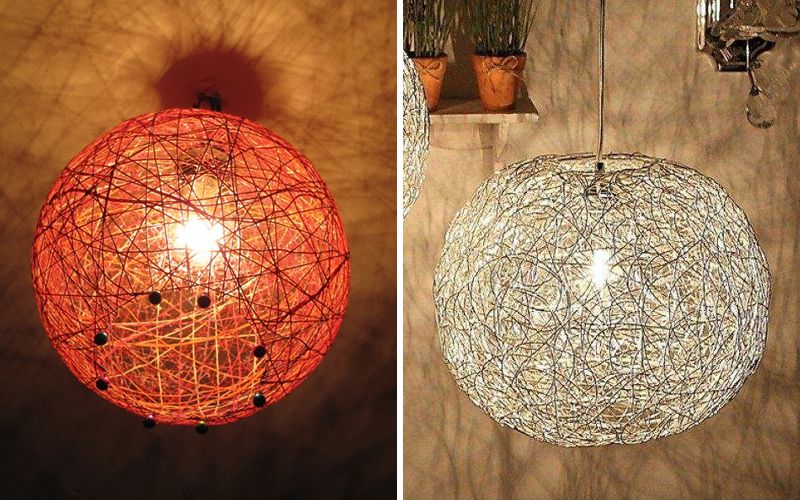
Similar things became popular several years ago. Light and weightless balls of thread, depending on the diameter, can become either Christmas tree toy, either a decorative item or a lampshade. Threads can be used in any color, or you can dye them when the craft is ready. You can also decorate the top with ribbons and lace, beads or buttons - this will make the craft look more elegant.
How to make a lampshade from threads? For work you need materials and tools:
- a balloon (or an inflatable ball that can be deflated);
- a skein of thread (the thicker the thread, the more reliable the lampshade will be);
- PVA glue;


Depending on how often you wind the threads, you can get either a completely airy and light lamp, or a denser lampshade.
Attention! Before winding the threads, the ball must be lubricated with Vaseline - this will allow it to be easily separated from the dried lampshade.
Operating procedure:
- First, you need to inflate the ball - whatever the diameter of the ball, the lamp will be the same. Mark the hole at the bottom that will need to be left open.
- Wind the threads around the ball in any order. Between layers, as well as on top, coat the entire ball with PVA glue and let the glue dry for about 4-5 hours.
- Now the ball can be burst and pulled out. All that remains is to thread the lamp socket and hang the lamp.

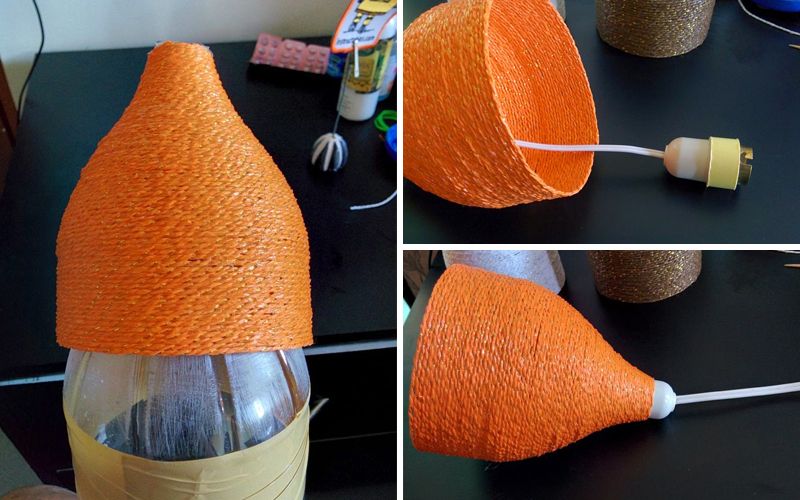
Using threads and glue, you can make a lamp in a different way: instead of a ball, use plastic bottle, and take denser threads. The bottle must first be covered with tape to make the dried lampshade easier to remove. The shape of the lamp will also be different:


More thread lampshades, photo ideas:


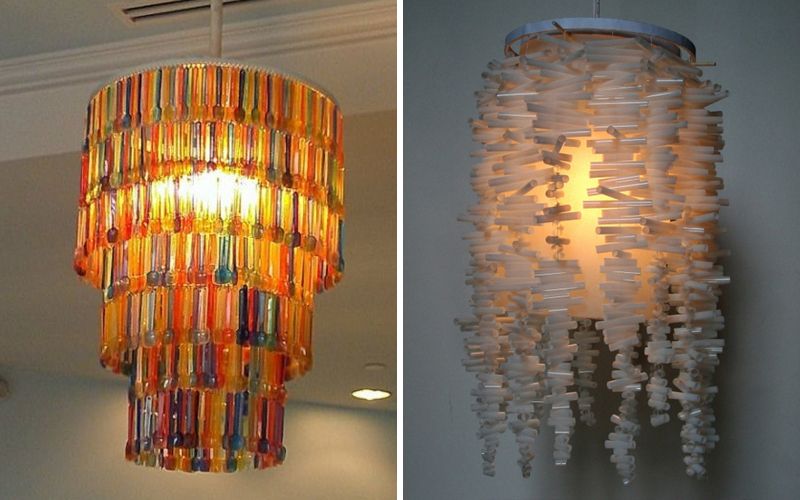
Using some simple techniques and a few packs of disposable spoons or forks? you can create a great original lamp that will decorate your interior. Such lampshades can be used in almost any room - in the kitchen, in the hallway, on the balcony, and even in the bedroom.

To make such a lamp you will need the following materials and tools:
- several sets of disposable spoons (table spoons or tea spoons - it all depends on the desired size of the product);
- plastic 5-liter cylinder;
- scissors;
- glue gun or universal assembly glue for plastic products.
Operating procedure:
- Cut off the lower part (bottom) of the cylinder and degrease the surface.
- Carefully break off (or cut off) the ends of plastic spoons.
- Using a glue gun, glue the spoons to the balloon in rows, starting from the bottom.
- Then make a headband and glue it on top.
- Pass the cord with the socket through the hole on top and screw in the light bulb.


If desired, the spoons can be painted in any color. This way you can make a lampshade for a floor lamp, wall or pendant lamp.
In addition to spoons, you can also use disposable forks or knives for the lampshade - the lamp will be a little different, lighter and more elegant:

Or from plastic cups:

Original do-it-yourself lampshades, photo
With desire and good imagination and with skillful hands you can make a lamp from other available materials - wood, cocktail straws, clothespins, burlap, packaging cardboard, even plastic bottle caps.
We have selected original ideas DIY lampshades, we hope our ideas will help you choose what suits your interior. So, photos of lamps and lampshades made and decorated with your own hands:


