Another mini-stove for a summer residence has dimensions at the base of only 51 * 64 cm, while the depth of the firebox is 50 cm. The model is perfect for a country home or summer kitchen. You can use firewood, coal, peat, and briquettes as fuel.
Design features and materials
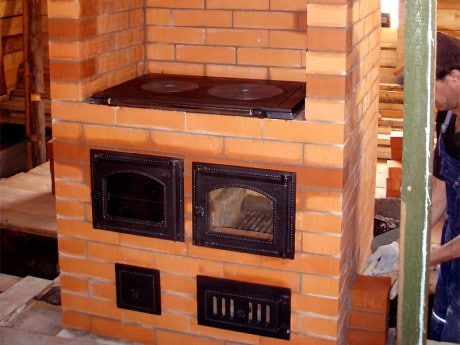
Despite its small dimensions, the compact stove is quite functional and is equipped with a hob and oven, which allows it to be used not only for heating the room, but also for household needs. According to reviews from those who have already built this assistant at their dacha, a kettle on the stove boils in literally minutes.
Compactness was maintained thanks to the vertical placement of all elements. The chimney has a cross-section of one brick. Exhaust gases pass through channels located behind the cooking chamber and then enter horizontal chimney, go around the oven on both sides and go into the chimney.
Mini-oven diagram for a country house or summer kitchen
Materials required for construction:
- red brick – 220 pieces;
- masonry mortar made of clay or ready-made - about 50 liters;
- grate;
- steel sheet (pre-furnace) size 50*70 cm;
- steel strip 4 mm thick with parameters 350 * 25 cm;
- slate sheet 51*30 cm;
- valve – 2 pieces;
- firebox door;
- 3 cleaning doors;
- blower door;
- oven (32*38*42 cm);
- stove (38*35 cm) with one burner.
Laying order
The first row of a mini-brick oven is laid without mortar. After the second row, a blower door is installed, the next row is placed and the firebox begins to be formed. The grate is laid without mortar. The sequence diagram clearly shows where and how the doors, stove, oven and valves should be installed.
 Layout diagram for a miniature stove with a stove
Continuation of the order
 Arranging the top of the oven
To protect ceramic bricks from fire, lining is carried out - fireclay refractory bricks are laid in a separate row
It is important to remember that different types of bricks cannot be tied together - they have different expansion temperatures. Neglect of this rule leads to cracks
 Lining principle
Heating and cooking country stove where to start and how to build
Small-sized stoves, despite their small size, are installed on reliable foundation. Only in some cases can you get by with reinforcing the floor. Experienced craftsmen they work without diagrams and drawings, and beginners are recommended to take the procedures of reputable stove makers as a basis.
Design diagram and materials
This square mini brick oven is ideal for small house, is simple, compact and has good efficiency. The design includes a low chimney with a channel cross-section of 13*13 cm. The stove has an oven that allows you to cook and heat up dishes. The cabinet is made of steel sheet, but if desired, it can be replaced with a ready-made oven of suitable dimensions.
Appearance and design of the furnace
To lay a wood-burning mini-stove, a fire-resistant mortar is required. You can prepare it from clay yourself, but it will take more time, and the result will depend on the quality of the clay and correct definition its fat content. It is much easier to trust the manufacturers and purchase a ready-made heat-resistant mixture in the store - in this case the product will only need to be diluted clean water in the proportions indicated on the packaging.
Dimensions of the compact design: 51*51 cm, hearth height - 175 cm. To strengthen the firebox, be sure to use fireclay bricks - they are not afraid of direct contact with the flame and do not crack. The walls of the mini-oven for a country house are lined with red brick.
Consumption of materials:
- ceramic bricks – 170 pieces;
- fireproof masonry mortar – 35–40 liters;
- firebox door size 23*25 cm;
- blower door (13*14 cm);
- cleaning door (13*9 cm);
- grate (25*18 cm);
- valve (12*34 cm);
- steel sheet;
- steel wire - about 2.5 m;
- roofing felt for waterproofing.
Layout diagram and oven drawing
The first row, as always, is laid out without mortar. On the second row, install the ash door using steel wire for fastening, and lay the ash pan. On the fourth row, a grate is laid, providing a gap of about 4 mm between the grate and the masonry.
 Ordinal masonry scheme
 Top rows and oven drawing
The installation of the fifth row begins with the installation of the combustion door. The door frame is wrapped with asbestos cord, and the door is walled into the masonry using steel wire. This is followed according to the diagram: an oven, a smoke duct, and a pipe are formed.
 Preparing the door
Positive and negative characteristics of a mini-oven
This design has both pros and cons. That is why, before the actual work associated with its construction, you should evaluate all the features of this equipment.
Do-it-yourself mini-oven made of brick, burning wood, has the following positive parameters:
- The resulting design has for a long time service, as a result of which you can get a high-quality and attractive stove for many years.
- Warming up occurs quickly, and also, even after the end of fuel combustion, the stove will continue to give off heat to the room for a long time.
- You can make the equipment yourself, but to do this you must have a pre-designed diagram of the entire structure, following which you can achieve an ideal result.
- The walls of the stove, made of brick, do not become very hot during combustion, so there is a very small chance of getting burned.
- If a structure is being built for a summer house or a small country house, then it can be a mini-stove, so it will not take up much space.
- If desired, you can get a stove that will be equipped with additional elements for cooking and other processes, but in this case a suitable and appropriate scheme must be used, in which all the necessary nuances of construction must be worked out.
- If you watch the training video in advance, the construction process itself will be completed without problems or delays.
- You can make a furnace that will have the desired shape, size and other characteristics, since the process is carried out on your own.
- The design of the future chimney must be especially carefully worked out so that the stove has high efficiency, as well as being reliable and safe to use.
However, mini-brick ovens have not only advantages, but also some disadvantages:
- Even a mini wood-burning oven made of brick needs a foundation, since it is quite heavy, so it will be important to initially devote a lot of time to forming the foundation.
- A clear, high-quality and correct scheme for the future masonry must first be formed, without which many mistakes can be made during work; they can be eliminated only after the complete destruction of the already created structure.
- During operation, it is necessary to always and always use and take into account the safety rules and requirements so that the future oven can be used for its intended purpose without fear of harming the health or life of people.
Additional requirements for choosing a furnace
Since we suggest doing everything yourself, rather than buying a ready-made stove in a store, when choosing the required design, we recommend paying attention to the following parameters:
- Easy to use. The heating process should be a pleasant and uncomplicated task that every family member can handle.
- Economical. This point is especially important if you plan to use only this stove to heat the house on an ongoing basis (in winter time). In this case, one unit of fuel will provide maximum heat transfer.
- Simplicity of design. If a person who does not have experience in masonry takes on the construction of a complex model of a device, difficulties may arise that will subsequently lead to incorrect operation of the stove.
- Appearance. The design of the structure should please the eye and create coziness in the room, so it is worth paying special attention to the quality of the brick.
- Presence of a water circuit. It is known that even a small heating stove with a built-in heat exchanger for heating the coolant is much more productive than other models without this device.
When choosing a heating stove, you should consult with a qualified stove builder. He will tell you which configuration to choose and what you should pay special attention to.
How to make it yourself
At correct location stoves allow you to heat the entire area of the house. When a brick heats up, it retains heat for a long time.
Materials and tools
Before starting work on building a furnace, you need to prepare the tools:

- Containers for mixing cement (special buckets with a volume from 15 l with graduation along the inner wall).
- A spatula for preparing the solution. Can be used mixer attachment for a drill or hammer drill, so the solution turns out homogeneous.
- Master OK.
- Putty knife.
- Level.
- Mallet hammer.
- Pliers.
- Square.
- A grinder with a disc for working on stone.
- Rule or plumb line.
- Roulette.
- Leg-split.
Base
A brick mini oven requires a foundation. Its power depends on the size of the overall furnace structure. For a simple device with dimensions 50*90 cm in the lower part there is enough rubble base. The minimum depth for the foundation is 50 cm, and its dimensions must exceed the area of the furnace at the base by 10-15 cm. The construction of a stone foundation does not require formwork.
Attention! If there is wooden partitions, the oven should be located at a safe distance from them. From floor beams and rafters top part mini stoves and chimney are located at a distance of 12-15 cm
The rubble is placed tightly in the prepared “trough”, fastened in layers cement-sand mortar. Performed at floor level concrete screed, on which, after hardening and drying, a waterproofing material (roofing felt) is laid. Foundation construction is being completed laying two rows of bricks.
Masonry
The construction is carried out strictly according to the drawings of the selected model:
- First row laid out "dry". After that, control measurements are performed to ensure compliance with the parameters specified in the drawing.
- Second and subsequent rows controlled relative to the first row. The internal structure must exactly correspond to the drawings, since errors will lead to disruption of air flow. This is fraught with the penetration of smoke and carbon monoxide (combustion product) into the room.
- If the dacha has 2 residential levels and they are supposed to be fully heated, the masonry should be completed 15-20 cm above the ceiling of the 2nd floor. This will be the basis for the heating outlet into the room.

Photo 1. Option for arranging a brick heating stove. Contains 30 rows for masonry.
- The chimney and chimney with damper are installed on the 2nd floor level. Installation requires care and availability reliable ladder. The hole for the structure is cut with a grinder. The chimney is either made of brick or a stainless steel pipe is installed.
Important! If there are three meters or more from the ridge to the pipe, then its upper part should be located along a line that runs from the ridge at an angle to the horizon of 10 degrees. Otherwise the oven will smoke
Before heating the device, you need to check the draft. To do this, open all doors and dampers and leave them in this position. for 5-6 days. After this time, a small amount of firewood is loaded into the firebox so that it does not come into contact with the walls, and heated within 2-3 hours. Procedure repeat for a few more days to allow the oven to dry completely at low heat. Using full power at once can lead to cracking of the masonry.
Basic designs and options for wood-burning devices
Optimal design - mini oven I.V. Kuznetsov OIK (modifications). A structure with a base 2*2 or 2*3 bricks, consisting of a fuel compartment and an upper hood, can be installed without a foundation in any room.
Possible difficulties during production
When constructing a furnace, difficulties and incomprehensible moments very rarely arise. Quite a lot of questions arise for novice stove makers at the preparatory stage, when drawing up a product drawing.
For adequate heat transfer, the ceiling height must be taken into account, but the ceilings in each house are different, so when working with a preliminary construction drawing I.V. Kuznetsov proposed the following calculation scheme: per 1 sq. m. releases in warm weather 0.5 kW, and in frosty conditions - 0.76 kW. The material from which the firebox is made is taken into account. Steel sheets burn out quickly; for long-lasting use, it is better to purchase material made of cast iron.
When purchasing material, many questions also arise. There are special formulas that allow you to count the number of bricks in a row. But unfortunately, the error in them is as much as 15% , so it’s easier to count the bricks of one row manually and multiply by the number of rows.
Buying or laying with your own hands which oven to choose
In the last century, installing a heating stove in a house was strongly associated with stone or brickwork. Modern manufacturers produce ready-to-install stove equipment for every taste, including small-sized stoves for summer cottages made of cast iron and steel. Factory-made devices do not require much time to install; they can find a place even in the smallest country house. This has not made brick fireplaces any less popular; they continue to be built in permanent and temporary homes.
 The stove is a traditional decoration of the hut
Metal stoves: a barrel of honey and a fly in the ointment
Heating metal stoves have a number of advantages, including:
- ease of installation and dismantling;
- compact dimensions;
- the ability to move the device to another location;
- low weight of the structure;
- housing tightness;
- rapid heating of the room;
- high safety and reliability.
Very interesting are country stoves with a hob and oven in a compact body, comparable to the size of a typical kitchen stove, where all the necessary devices at the dacha are placed at once. Modern heating and cooking devices are equipped with larger long-burning fireboxes, which help reduce fuel consumption and use the unit as a classic fireplace. Glass doors protect against sparks and excessive heat, allowing you to get close to the stove.
Metal heaters have been developed specifically for baths, which heat up the steam room in half an hour. If desired, a steel heater can be lined with brick, thereby increasing heat transfer and safety.
If we compare metal hearths with brick stoves, then the disadvantages of products made of cast iron and steel include:
- danger of burns from touching hot metal;
- short period of work - on average up to 20 years;
- rapid cooling and the need for repeated fires;
- dry air.
Market overview: popular stove models
Metal country fireplaces can be divided into several groups: heating, heating and cooking, fireplace stoves. The smallest of them is the potbelly stove, and the largest functional devices capable of heating water for domestic needs and working as a boiler for water heating. From the photographs it is easy to understand what popular units look like and how they differ.
 Stylish stove in a modern design
 Long-burning stove-fireplace
 Heating and cooking model with fireplace insert
 Corner stove-fireplace
Brick hearths: advantages and difficulties
Even the most compact brick stove for a summer cottage requires a solid foundation, which means that you will have to seriously and thoroughly prepare for its construction. Brick laying is a simple process, but in the case of kiln equipment it is not enough to be able to carefully lay the rows. When working, you should take into account safety rules and strictly follow the diagrams.
 Construction of a brick kiln with masonry diagram
A brick stove has many advantages: it lasts for several decades, accumulates heat and slowly releases it after finishing the fire, does not dry out the air and does not fill the room unpleasant odors. At the same time, brick walls do not heat up as hot as metal and are much less likely to cause injuries.
To heat a small country house, it is recommended to pay attention to the “Dutch”; it is a compact design with several vertical channels connected in series. If you plan not only to heat the house, but also to cook food, it is better to choose a miniature “Swede”, with a hob above the firebox
 Brick “Swede” with hob
Options for small brick ovens

Russian stove with two smoke channels or tube stove
This design option combines a frying panel and a heat source. When you just need to cook food, there is no need to heat the entire surface of the stove. Due to the presence of a direct chimney, the heat from the combustion of wood during cooking goes directly into the chimney, without heating the entire structure. This is an excellent option for a summer house, where the stove is a source of heat and a stove for cooking food. As a frying panel, you can use a cast iron stove with several burners or build in a commercial oven.
It is advisable to build a Russian stove in the central part of the house, so that access to the firebox and hob is from the kitchen, and the warm wall of the stove with a sunbed is located in the residential part of the building.
Rocket stove

The rocket stove is not the most common option in our latitudes. The principle of its operation is the absence of a combustion chamber, and secondary combustion of combustion products in an insulated chimney. This heat source is most effective when heating small rooms. Besides, this system Doesn't require a lot of wood. There are designs with a sun lounger and a cooking board. To build a rocket furnace, you don’t need much skill in masonry, and you can use available materials as building materials: metal buckets, clay, sawdust, broken brick and rubble stone.
We increase efficiency
 In order to increase the efficiency of a metal boiler in a country house or in a bathhouse, You can attach a brick chimney shield to it. Combustion products, passing through the smoke channel system, will provide heating to the brick. And due to its high heat capacity, it will heat the room after burning wood in a potbelly stove. This design is easy to construct and quite effective. A brick panel can have two chimney options: bell-type and duct. In the case of a channel chimney, wood gases, passing through a system of connecting vertical channels, release heat into the room. With a bell-type device, combustion products, as they cool under the roof of the bell, enter the vertical chimney and are discharged outside.
10 basic rules for laying a country stove
- The brick used for masonry must be soaked in water for 5-6 hours so that it absorbs moisture well and does not take it from the cement mortar.
- Always use a horizontal level to ensure correct installation.
- If you feel that you cannot assemble the oven in 1 day, do not mix the entire solution at once.
- The foundation for the stove is made separately from the main one.
- At all stages of installation of metal fittings, take into account the gap for thermal expansion. Place the grate not on the mortar but in the grooves of the bricks. It should be freely removed and removed from the oven.
- To ensure good draft and prevent the formation of condensation, use a short gas outlet path (summer run). Through this path, gases enter the chimney. After the stove lights up well, the damper is closed and it “works” not for heating, but allows you to cook food.
- Start each row from a corner.
Having decided on the location of the stove, be sure to follow all fire safety measures for its further operation. This is especially true for houses with wooden floors.
Choosing a site for construction
If you plan to place the stove in the corner of the room, make an apron around it made of sheet metal or ceramic tiles.
During laying, monitor the thickness of the seam. It should be 5 mm.
We make the seams thin
Pull plumbs of thread at the four corners so that the stove does not “go away” to the side during laying.
Pull plumbs at the corners
 The stove does not require maintenance. To avoid undesirable consequences, you must comply rules for using a mini oven:
- You cannot fire two fireboxes at the same time. In this case, the ash and combustion doors of the unused firebox must be tightly closed;
- Do not use flammable liquids such as gasoline or kerosene for kindling;
- keep the heater damper closed. If there is a need to open it, then first you need to open the ventilation duct valve;
- monitor the amount of ash. Remove it in a timely manner, otherwise there will be no fuel savings, because it will absorb heat and the heating of the rooms will deteriorate. It is better to do this procedure at least twice a week;
- you need to let the fuel warm up well for ten minutes, and only then start cooking food in the oven;
- It is not very practical to use paper for kindling - it burns quickly. It’s better to put wood chips or birch bark in the oven;
- Check periodically for any cracks in your stove. If any are found, they need to be repaired. If the damage is significant, then major repairs will have to be made. A clear indicator of a problem is a decrease in the heating temperature produced by the stove. The house has become colder - inspect the stove;
- It is preferable to carry out repairs in the warm season, when the stove is not used for heating;
- Before burning fuel, you need to close the doors of the ash pit and fireboxes;
- you need to clean the chimney in a timely manner;
- It’s better to start heating the stove during the day, then by the evening the whole room will warm up;
- It is preferable that the fuel be dry. And to ensure that it is not exposed to moisture and water and does not become damp, store it in a specially designated place. It should be dry and closed;
- It is desirable that the logs are approximately the same thickness and length. This is necessary because thin ones burn too quickly, and thick ones, on the contrary. The house will not be heated well enough in this way;
- stack the logs not randomly, but in a certain order. First, rake the coals with a poker closer to the door. Place a log across it. Then thinner firewood is laid obliquely, and thicker firewood is laid on top of it.
Types of furnace designs
No matter how much time has passed since the appearance of the first stove designs and no matter how far home heating technologies have come, the stone stove still does not lose its relevance. Compared to other types of heating (electricity, gas), it is more economical. At the same time, thick stone walls allow you to retain heat for another day after the firewood burns out.

Stove for a summer residence
According to their purpose, furnaces are divided into the following types:
- heating;
- cooking;
- multifunctional;
- combined.
The heating design is perhaps the simplest and most common. As the name implies, the function of such a stove is aimed only at heating.
Oven with hob
Basically, such a stove is chosen for dachas where there is electricity and a stove is used for cooking. Or home owners want to create a special country coziness with the help of a fireplace stove. The design of such a furnace consists of:
- combustion chamber, which is purchased already in finished form, or laid out with fireclay bricks;
- an ash pit where ashes are collected;
- chimney.
This type of design also includes a fireplace with an open or closed firebox. It is used not only for decorative purposes, but also allows you to effectively heat a room of 15-20 square meters. meters.
Depending on the selected material, wall thickness, masonry scheme, heating stoves may have different heat output.
Most popular view The stove is a one-brick construction. This allows the walls to be heated up to 600C. The famous Dutch ovens are laid out according to this pattern.
In terms of dimensions, the heating stove can be wide and flat, or it can have an elongated rectangular shape. It all depends on the area of the room, the style of the interior and the personal preferences of the owners.
For cladding such a stove, tiles, decorative plaster, and decorative stone are usually used.
Brick heating stoves in the form of a three-sided prism look very stylish and original, but a beginner cannot implement this option, since it requires a lot of experience. The greatest difficulty is in cutting bricks and the requirements for maintaining an angle strictly at 600.
Round stoves, which are laid out according to the design of the famous Russian furnace engineer V.E. Grum-Grizhimailo, also look beautiful and unusual. The furnace operates on the principle of free movement of gases. To ensure tightness, the outside of the structure is lined sheet metal. Such a stove can heat a large country mansion and will become a real decoration for any home.
Cooking stove. It is advisable to choose this option for a dacha where the owners visit only in the summer. In this case, heating the house is not needed, and if you equip the structure with an additional water tank, it will serve not only for cooking, but will also create comfortable living conditions.
Cooking oven
Often this option is installed in country cottages where gas and electric heating are provided, but in order to save resources, owners sometimes use a brick oven.
The design of the stove consists of a brick body, inside of which there is a combustion chamber, an ash pan, and a chimney. There is a metal plate on top (an oven can be built in).
- A heating and cooking stove is already a multifunctional design.
This is a more difficult project to implement, as it consists of:
- combustion chamber;
- chimney;
- ash pan;
- hob;
- oven.
The stove looks massive and is usually chosen for dachas where there is no other heating option.
In our country, heating and cooking stoves are the most popular, allowing you to heat the house and prepare a delicious dinner for the whole family.
It can be additionally equipped with a drying chamber, where you can make preparations for the summer: mushrooms, berries, fruits. In cold and damp weather, you can quickly and safely dry clothes and shoes in this chamber.

Oven with drying chamber
By the way, ovens with drying chambers were first invented in the countries of Northern Scandinavia, where hunters and fishermen needed to dry clothes and boots in one night.
Many schemes of heating and cooking stoves have additional devices in the form of a comfortable bench, drying for firewood, an oven, and a water-heating tank.
How to build a brick stove for heating a dacha
 Cast iron stoves are still popular for heating country houses.
They heat up very quickly, which is understandably a big plus for a dacha, since we don’t live there all the time.
But this is also their main disadvantage: such stoves cool down as quickly as they heat up, so they are not suitable for a country house that is poorly insulated, because they have to be heated around the clock to maintain comfortable temperature.
Another disadvantage of such stoves is that the iron pipes of such stoves very quickly become clogged with soot, which, by the way, is unsafe. But even these disadvantages are more than compensated for by their low cost and simplicity of design, which allows even a not very experienced craftsman to install the heating system of a country house in the center of which such a stove can be done with his own hands.
IN last years Some summer residents switched to bulleryans and other “advanced” iron units, but many began to build brick kilns. The main advantage of the latter is their large heat capacity, which allows them to be heated to maintain a stable temperature in the house once, maximum twice a day. In addition, brick ovens are less fire hazardous (subject to the rules of construction and operation, of course). We will talk about one such replacement of an old iron stove with a brick one.
The owner asked me to install a brick stove instead of two potbelly stoves that her husband had installed at the dacha a long time ago. They had clearly exhausted their resource and were no longer able to cope with the heating of the house.
When I saw these stoves, I was very surprised that the house had not burned down yet! On the first floor, the potbelly stove stood close to the wall, which became very hot during the fire. On the second floor, another potbelly stove was installed, connected to the same pipe, which burned out in several places.
The hostess and I immediately came to the common opinion that in place of the potbelly stove on the first floor it was necessary to build a firebox (as we call a stove without a stove) made of brick, and protect the wall near the stove from heat. They decided to simply remove the potbelly stove from the second floor.
Possible difficulties and problems
When constructing stove walls, inexperienced craftsmen do not use a frame made of wooden beams and a plumb line, which leads to deviation of walls from vertical.
If during the construction process it is discovered skewed walls, the masonry should be disassembled and rearranged.

After finishing the work and natural drying, the mini-oven begins to be heated with small portions of firewood.
Wherein stove walls become covered with cracks due to the fact that shrinkage processes are taking place in the heating structure. To eliminate cracks, dilute the solution and cover the seams.
Improper sealing of the door fasteners can cause the door to move. To avoid door misalignment, it is not left open until the fasteners are completely sealed into the seams. If displacement is discovered during construction, the rows are dismantled and the fasteners are sealed again.
Drawing with order
Designed by the famous stove master of the last century, V. Volodin, the combined heating and cooking stove-baby, with a minimum occupied space of 0.47 m2, allows not only to fully heat a room of 30 m2, but also:
- Cook;
- Dry vegetables, berries, mushrooms, herbs;
- Use for drying clothes and shoes.

Distinctive feature design is a separate hood for the brewing compartment. The smell from cooking food or drying clothes does not penetrate into the room.
The stove is not very economical in fuel consumption (based on firewood) - 4–5 kg per firebox. Capable of retaining heat and maintaining a comfortable room temperature for 6–8 hours.
The finished oven looks like this:

Foundation for the stove and dimensions of the firebox
Before starting work, you need to choose a place so that the walls of the furnace are at least 50 cm away from the walls of the room. You should also think about the foundation: you can make a regular foundation of sand and cement. To do this, you need to mix cement and sand in a ratio of 1:3. There must be sand good quality, and if you take ordinary sand, then it must be sifted well. The dimensions of the foundation depend on the size of the stove plus 10 cm for a margin on each side, but the height of the foundation should be about 1 m. It is worth remembering that such a foundation takes a long time to dry.
You can make a foundation of clay and brick for a mini-oven. To do this, we dig a hole, the depth of which must be at least 5 rows of bricks. Then we fill it with clay to a height of a couple of rows of bricks and compact it well. Then we lay roofing material on the clay, and on it bricks, which must be coated with clay. The last row of bricks should be level with the floor, and it also needs to be covered with roofing felt. Only after this we begin to manufacture the stove itself. This foundation option is preferable because it requires less time and effort than the previous option, and the construction of the structure can begin immediately.
Considering that the stove will be smaller than regular ones, the dimensions of the fireboxes for mini-ovens will be smaller, but if desired, they can also have regular sizes. If the firebox is small, then it will be inconvenient to add firewood, so we will consider the option of a mini-brick stove with our own hands with the size of the fireboxes for a regular stove.
How to make a stove
To properly build a stove with your own hands, follow these points:

The stove shown in the photo is called a kitchen stove. Its use is clear from the name - food is cooked on it.
- Select appropriate place for your new mini-stove and put plastic film, roofing felt, hydrosol or glassine in that place. The size of one of these materials should be 78x53 cm.
- You need to pour dry sand onto the bedding (its thickness should be 1 cm) and level it.
- Lay the first row of 12 bricks on top of the sand, which do not need to be fastened together. After which you need to align the bricks to the same level so that they lie strictly horizontally.
- A thin layer of clay must be applied to the first row of bricks, after which the blower door can be installed. It is very important that the blower door is wrapped with asbestos cardboard or cord. The blower door needs to be secured with wire, after which you can begin laying the second row.
- necessary for laying the third row of the mini-oven, upon completion of which you need to install the grate. It needs to be installed above the ash pit if the third row of bricks is already fully formed.
- We lay the bricks in the fourth row, but already on the edge, and in the middle of the chimney we need to lay supports for internal partition ovens. We lay the back wall of the oven with bricks with a protrusion outward and without clay - they are called knockout bricks.
- Next you need to install the fire door. Again, before installing the door with your own hands, you need to wrap it with asbestos cord so that it can open from the bottom up. It needs to be secured with wire and temporarily secured with two bricks. Place the first brick on the back, and the second on this brick and on top of the door.
- The fifth row of bricks needs to be laid flat, and it is important to repeat the contour of the previous row. But the sixth row must be laid edge-on. Next, you need to rub the walls of the mini-oven with a wet cloth and proceed to the seventh row.
- On the seventh row we lay it flat, for the bundle, starting with bricks in ¾ with the next rows. Next, we place two bricks edgewise and begin to make the back wall.
- When you lay the eighth row of the stove with your own hands, make sure that it closes the combustion door above which it ends. It is in the eighth row that it is imperative to install a beveled brick above the firebox so that the flame in the stove is directed to the center of the burner of the cast-iron stove.
- First you need to lay out a slightly moistened asbestos cord so that everything is sealed between the slab and the bricks. Since clay and cast iron have different temperature expansion coefficients, the slab cannot be laid on clay. Next, you can install the ninth row, but you need to move it slightly to keep the door open.
- When laying the tenth row, you need to form a chimney with an extension at the rear. The design of just such a mini-stove does not require a brick pipe that expands at the top, because this type of pipe changes the center of gravity of the entire mini-stove. There are different chimney designs. Chimneys are: straight, horizontal, vertical, direct-flow, counter-flow, bell-shaped and combined. The design of this stove provides a direct chimney.
- When laying the eleventh row, we insert a valve and seal it with an asbestos cord, which is coated with clay.
- Thus, chimney will fit into the metal one. If the chimney goes to the side, block it with three rows of bricks.
- Next you need to remove the bricks from the fourth row and clean the chimney from the dirt that accumulated there during construction.
- whitewashing the stove. It is necessary to protect the metal part and walls of the oven with film. To prevent the stove from turning yellow, you need to add milk and blue in a small amount to the solution. It is important to thoroughly clean every piece of the stove, and especially the joints of the cast-iron surface and bricks.
- You need to properly close the gaps between the floor and the first row of laid bricks so that the sand that you poured under the brick does not spill out.
- Next, you need to nail a plinth around the edge of the stove, which will protect the structure from sand spilling out. The baseboard must be nailed tightly and level so that there are no gaps. Thanks to this, the mini oven will look great.
- After you heat the stove for the first time with paper and wood chips, leave all the burners and doors open for several days so that it dries well. This mini-stove will withstand fairly high temperature changes and will serve you for many years.
Metal and cast iron wood-burning mini-ovens

Cast iron stoves are manufactured at the factory by casting. They are heavy and fragile.
It is advisable to install such structures if the dacha requires heating throughout the cold period.
Metal stoves are used as a temporary heating element and for cooking food.
Different types of metals are used:
- Steel with a thickness of 4 mm or more. When using fuel with high heat output, a steel stove burns out within 2-3 months. The device is easily assembled by welding according to selected sketches.
- Heat-resistant steel. Sheets of thickness are used from 1.5 to 3 mm. Mini ovens made from this material serve more than 20 years. Independent work with heat-resistant steel without special equipment is impossible, since under the influence of conventional welding the material loses its properties and becomes unstable to temperature influences.
Some rules for making a stove
To ensure that the stove turns out well and lasts a long time, before building it, consider:
- materials that you use must be quality. By skimping on high-quality components, you risk providing yourself with long and frequent repairs;
- still better use it instructions for the manufacture of a furnace. The experience of the master will protect you from mistakes and unnecessary expenses during construction;
- the first time after construction, be especially careful - you might not keep track of something during the work. Other problems may only become apparent during operation;
- follow safety precautions. You can get injured during construction. Be careful and don't take risks.
In general, the stove is quite safe for the home and its inhabitants. Spontaneous combustion from a spark or fallen coals is virtually impossible, even if the stove is used incorrectly. And even a beginner can handle the kindling - the stove is very simple.
Construction materials for mini ovens
First you need to prepare the clay. To do this, fill it with water and leave it like that for about a day. You can speed up the process by thoroughly kneading it every five to seven minutes, preferably using a drill mixer, for an hour. Strain through a sieve. The sand also needs to be sifted first.
To fold a mini heating stove, which will take up an area of 0.4 square meters. meters, you will need:
- 20 liters of solution;
- 60 pieces of red stove bricks;
- 38-40 pieces of fireclay bricks;
- firebox door;
- ash door;
- grate;
- hob;
- chimney damper.

Doors, grill and hob must be cast iron.
If you do without fireclay bricks, then it will be a mini-stove model that burns wood rather than coal. Red brick even of the highest quality from high temperatures, which coal fuel creates, will collapse over time.
Design options
They are used in dachas and differ in design features:
- Chamber This type of furnace consists of two compartments: a firebox and an afterburner. In the first, fuel combustion occurs, the products of which, under the influence of natural circulation, enter the chamber, where they finally burn and release heat.
- Duct furnace type - a more complex design. Partitions are installed inside the main chamber, forming channels through which combustion products, moving towards the chimney, gradually transfer heat to the walls of the stove, heating the room.

Photo 2. Diagram of a channel mini-brick oven. Front and side views, the device has a system of channels through which combustion products move.
- Bake bell-shaped It is designed in such a way that the gases rise to the roof, and when they burn out, they fall. Can be achieved 70% efficiency.
Reference. Metal mini ovens are easy to make with your own hands. For this purpose, used cylinders, barrels and other high-grade metal products are used. But such materials have significant drawback: They quickly release heat and cool down.
Advantages of a brick stove
Why does the brick kiln remain competitive, more and more being built, with so many advantages?
It would seem that today there are many alternatives for heating that are much more convenient to use, and according to manufacturers, they have greater efficiency (coefficient of performance). But why are brick ones still in demand in some areas or buildings? One of the reasons is that a brick stove “breathes.”
This means that when the furnace warms up, moisture is released from the base of the structure. As it cools, moisture is absorbed back. Thanks to this, it maintains the normal dew point in the room. It is this indicator that indicates that “a cozy atmosphere is maintained in the house.”

The ability of a brick oven to “breathe” not only has a positive effect on human health, but also allows you to feel comfort even at a non-domestic level. When calculating a house's thermal engineering, temperature indicators during the heating season are set within 18-20 Celsius. Air humidity should be optimal for health. Home oven provides optimal humidity air, at a warm-up temperature of about 16 degrees Celsius. At this temperature, a person does not feel discomfort; clothes and bedding remain dry. At the same time, in panel houses, when using centralized water heating, even at a temperature of 18 degrees Celsius, excessive air humidity may be felt.
For water heating, the optimal temperature range will be 20-23 Celsius. And for electric heating with infrared emitters, the temperature should be even higher (since they greatly dry out the air). It turns out that a brick oven with an efficiency index of about 50% will be more profitable, in terms of savings, than modern systems, with rates of 60-80%. Thus, the savings will be more significant, because the loss of heat in the house depends on the difference in temperatures inside and outside the room.
Miniature stove made from a can
This stove option is perfect for those who like to relax in nature. Ready product has minimal weight and takes up very little space in a hiking backpack. Despite the simplicity of its design, a stove made from a can is very convenient and productive - you can boil a liter of water by spending a few small dry branches.

Miniature stove made from a can
Moreover, such a homemade stove can work not only on branches, but also on leaves, cones and even hay. You definitely won't remain hungry!
The first stage is preparation of components
Prepare three in advance cans various sizes. Canned food containers are perfect. From the largest can you will make the body of the stove, place a medium-sized can in the body, and from a small container you will make an impromptu burner.

Cans
Additionally, prepare scissors, a block, an electric drill and a felt-tip pen.

Wood block
The second stage is making a template
The mentioned wooden block will help you make a mini oven correctly. You will use this as a template for creating holes and other activities.
First step. Insert a wooden block vertically into the largest jar and, approximately at the level of the lid, mark a couple of lines on the wood at a distance of about 8 mm.

Insert a wooden block vertically into the largest jar and, approximately at the level of the lid, mark a couple of lines on the wood at a distance of about 8 mm
Second step. Cut a rectangular recess according to the markings, such a size that the upper edge of the container can freely fit into it.
Insert the block into the jar and draw two lines with a marker approximately at the level of the lid

Drill a hole according to the markings
Third step. Place the block so that the can rests steadily on it, and the upper edge of the large can is held in the previously prepared recess in the block.

We put the jar on the block
The third stage - preparing a large jar
First step. Draw a line over the bottom edge of the largest can. This line will serve as a marking to create ventilation holes. The line can be drawn with an ordinary felt-tip pen.

Making the markings
Second step. Drill holes along the marking line. The optimal number of holes can only be selected experimentally. Excessive ventilation will cause fuel to burn too quickly, and if there is insufficient draft, the stove will simply not be able to operate normally.

Making holes
Therefore, make a small number of holes to begin with, and then, if necessary, drill them after the initial tests of the stove.
Stage four - preparing the middle jar
With the second can, do the same as with the first, with the only difference - the ventilation holes should be under the top edge, and not above the bottom.
Drill holes under the top edge of the middle can
Drill many holes in the bottom of a medium-sized container. Select the size and number of these holes so that the loaded fuel does not fall out in the future. As a result, the bottom of the jar will look like a sieve.

Drilling the bottom of the middle can
Fifth stage - stove assembly
Place a medium-sized jar into the largest container. The connection should be quite rigid, but not tight - a small gap is required between the walls of the two cans for air circulation.

Insert the middle jar into the large one
Stage six - making the burner
To create the burner, use the smallest tin can.
Cut off half of a small can, make holes closer to the edge, as well as one hole in the bottom
First step. Prepare holes in the side of the jar in the same way as you did with previous containers.
Second step. Cut out the bottom of the can using tin snips.
Third step. Carefully align the edges of the burner and clean them with a file.
Stage seven - checking the stove

Stacking the wood chips

Load the wood chips into the middle jar and set it on fire.
Take the main part of the stove (a middle container inserted into a large one) and load fuel into it (cones, wood chips, leaves, small branches, etc.). If possible, load dry branches directly from trees into the oven, because... Fuel from the ground may be damp.
The smallest part is the burner. We put it on top
Light the load and let it warm up. At first you may not be very good at it, but very soon you will learn how to light a stove with just a couple of matches.
We heat up the food or put on the kettle. The camping mini-stove is ready
Let the fuel burn intensely, place a burner on the stove, and a saucepan, kettle or other container on it.
An improved model of a supercharged mini-stove
Video - DIY mini oven
The process of constructing a small-sized furnace
 The small-sized oven occupies only 0.4 square meters. It is laid out from bricks placed on edge or flat. If you know the basic rules for building a stove, then you won’t even need a diagram or preliminary calculations to build it.
Due to the relatively light weight of the mini-oven, it does not require a foundation, but in this case a thick, durable board, well secured to the joists, should be used for the floor.
Order of masonry
- The first stage is traditionally choosing a place and preparing it for the construction of a furnace. To do this, you need to lay a piece of plastic film, roofing felt, hydrosol or glassine measuring 78 by 53 centimeters on the surface. Pour dry sand on top of the litter (layer thickness 1 cm) and level it.
The first row of bricks is laid out on the sand (12 bricks are used without fastening) strictly horizontally, which can be checked with a level. On top of the first row we thinly apply a clay solution and install the blower door. Pre-wrap the door with a piece of asbestos cardboard or wrap it with cord. Secure it with wire.
- Laying it down second row our oven.
- Third row laid out from fireclay bricks. We install a grate on it, which will be located strictly above the ash pit.
- In the fourth row bricks are laid edgewise. And inside the chimney, a stand is mounted on which the internal partition will be installed. When laying the back wall of the stove, do not use clay, but use so-called knockout bricks (for this they should protrude slightly outward).
- The next essential element of any stove is the firebox door. Wrap it with asbestos cord before installation. We secure the door with wire, use two bricks for temporary fixation: one on the back, the second on the first, and install the door on top of them.
- Bricks in the fifth row lay flat, repeating the contours of the fourth row.
- Sixth row bricks place it on edge, and then rub the oven walls with a damp rag.
- When laying the eighth row Keep in mind that he will be the one who closes the combustion door. To direct the flame from the stove to the middle of the hob burner, place a brick on top of the firebox at a slightly slanted angle. To ensure a tight connection between the slab and bricks, lay out a slightly wetted asbestos cord.
The temperature expansion coefficients of clay and cast iron differ significantly, so it is impossible to lay a cast iron hob on top of clay.
- Let's start laying the ninth row, moving it a little so that the door remains in the open position.
- Tenth row bricks gives rise to the formation of a chimney, which will gradually expand towards the rear. The design of such a small-sized stove does not allow the installation of a brick stack pipe, because it will lead to a change in the center of gravity of the entire building.
It is better to install an attached or nozzle pipe made of light iron. This stove provides for the installation of a direct chimney.
- In the eleventh row We install the valve, which we first seal with an asbestos cord coated with clay mortar. This will be the junction of the chimney with the metal one. If the pipe moves to the side, make an overlap of three rows of bricks.
- After this, remove the knockout bricks and clean the chimney from accumulated construction waste.
- Whitewash the stove. Just don’t forget to add a little milk and blue to the whitewash solution. This will prevent possible yellowing of the stove in the future.
- Stove bottom edging a plinth will help prevent sand from spilling out under the bricks. Nail the baseboard evenly and tightly, avoid gaps. This will give the mini-oven a neat appearance.
- For the first time, heat the stove with wood chips and paper to avoid cracks from sudden temperature changes. To dry it well, leave the doors open for a week or two.
For the seventh row lay the bricks flat again. At the same time, in order to ensure a connection between this and the next row, you need to start with three-quarters. Then place two bricks on edge and begin building the back wall.
Arrangement diagram for a small-sized oven
Our mini-oven will subsequently withstand significant temperature changes, last a long time, and bring comfort and warmth to your home. And to build it, you don’t need to pay a high price to professional workers. Its design is so simple that you can do it yourself just fine.
Schemes of brick mini-ovens
Small ovens occupy a small area, dimensions of their bases hesitate from 50 to 70 centimeters in width and up to 65-100 cm in length. Height heating plant is from 1.5 to 2.3 meters. A cooking floor, an oven, and a water heating tank are built into the oven. Stove makers have also developed devices intended only for heating a home.
Small heating structure

This is the simplest heating structure. We will analyze the model in the following sizes:
- width grounds - 51 cm;
- length base (depth) - 89 cm;
- height - 238 cm.
The mini-stove is installed in the middle of the kitchen or against the wall. Optimal heating area - 20-35 meters. Interior partitions are erected around the stove, which allows heating both the kitchen and the adjacent room.
Inside the device are located:
- combustion chamber;
- blower;
- smoke channels leading into the chimney.
Furnace door mini ovens ( cast iron or glass) is selected depending on the aesthetic preferences of the home owners. A door made of heat-resistant glass, through which you can see how the wood is burning, gives the structure a resemblance to a fireplace. In the middle and upper part stoves are installed two smoke valves. There is one door for cleaning the channels. To build this model of the device you will need:
- 260 pieces bricks ceramic;
- 130 pieces of fireclay bricks;
- grate (40x23 cm);
- combustion chamber (30x20 cm) And blower (20x14 cm) doors;
- 2 doors for cleaning holes ( 20x40 cm);
- metal pre-furnace sheet (50x70 cm);
- two sheets roofing felt 60x100 mm in size;
- sand and clay(or ready-made clay-sand mixture for masonry), clay-fireclay mixture.
Reference. Masonry mortar increases the volume of the device by the thickness of the joints.
Base and top The mini-oven is lined with ceramic bricks on a clay-sand mortar. Firebox laid from fireclay bricks on a clay-fireclay mixture.
On long side base fits three and a half bricks, on short - 2 standard bricks 25 cm long. In height the masonry consists of 35 rows.
Small heating and cooking stove

This is a mini-oven model for heating and cooking - convenient and very compact building. Optimal heated room area at sub-zero temperatures - 20-25 square meters.
The device has the following dimensions:
- length base (depth) - 64 cm;
- width grounds - 51 cm;
- height - 215 cm.
The structure is being erected in the kitchen. The device includes:
- blower;
- combustion chamber;
- smoke channels leading into the chimney;
- cooking floor;
- niche for the oven.
Cooking floor made of cast iron has a hole closed with a disk and a circle. Solid flooring is also available for sale. IN niche for oven chamber have a metal oven or hot water tank with a tap. If the niche is left free, it is used for drying things. For the construction of a stove will be needed:
- 222 pieces ceramic bricks;
- grate (40x25 cm);
- door for the firebox ( 20x20 cm);
- door for the blower ( 14x14 cm);
- cooking flooring (35x38 cm);
- metal oven or hot water tank;
- iron pre-furnace sheet (50x70 cm);
- two doors for cleaning holes ( 20x14 cm);
- two valves;
- piece of flat slate;
- steel corner;
- clay, sand or ready clay-sand mixture for masonry.
List of main advantages
The main advantage of the Dutch country stove lies in the simplicity of the design, so it can be built from brick yourself. In this regard, the final price of the structure is low. To make such a heating system yourself, it is enough to familiarize yourself with its features and laying methods.
List of other benefits
- High functionality implies the ability to use the structure not only for heating, but also for other activities, for example, cooking.
- The small dimensions allow the structures to fit into almost any building. If necessary, it is quite possible to increase the dimensions of the heating system to 50x50 cm.
- A small-sized brick stove for a summer cottage, made using Dutch technology, heats up quite quickly and cools down very slowly. For temporary residence this is an invaluable advantage.
- Good heat output makes it possible to heat rooms even with a large area. The total square footage of the heated object may well reach 60 square meters. m.
- During operation, there is no need to carry out regular combustion and preheat after inactivity. The structure can be used for its intended purpose immediately.
- The relatively low weight makes it possible to install such systems on many types of floors. The low weight is explained primarily by the low consumption of base material.

Finished construction in a log building.
Note! When using cheap fuel with increased ash emissions, a lot of soot remains in the chimney, so quite frequent cleaning is required during operation.
Place for a stove in the house
It will depend on where the stove is installed effective work. The best location would be the intersection of all the walls in the house. With no larger area, it will be possible to effectively heat the entire space. The closer the oven is to the exit, the better. The heated air will prevent cold air from entering from the outside. In addition, in this case it will be easier to deliver fuel for the furnace.

Factors to consider:
- The structure must be installed so that all side parts can be reached. This is necessary for proper operation and the possibility of complete cleaning.
- The stove should not be part of the general foundation of the house, since its foundation will experience completely different types of loads.
- The location should be such that the chimney pipe does not rest against the floor beams. This needs to be calculated when building a house or when laying the foundation for the stove.
- There must be a fire-resistant floor in front of the firebox door. (sheet metal or ceramic tiles) to prevent accidental fires.
Selecting a location
Before you begin construction, you should decide where the stove will be located. If there is only one small free area in the house, there is nothing you can do about it. But to obtain maximum heat transfer, it is recommended to place the stove in the central part of the house or room. Thus, none of its elements will touch the street wall, and accordingly, warm air will not escape outside. In addition, when adjacent to the supporting structure, temperature changes may occur, which negatively affects the durability of the heating device and the operation of the chimney.
Types of wood stoves
Having decided on what your heating device will operate on, you should decide what its main parameters will be.
Modern wood stoves are usually divided according to the following indicators:
- Purpose:
- Heating systems, their only task is to heat the building;
- Heating and cooking. They heat several rooms at once and have special design elements (hobs) that allow you to cook and heat food;
- Furnaces-boilers. A water circuit is built into them, which allows them to be used in a water heating circuit, or for preparing hot water. Varieties of such structures are sauna stoves;
- The oven is universal, equipped with a compartment for drying fruit, a hot water box, an oven, a summer chimney and a samovar connection point.
- Material of manufacture:
- Metal, with thin and thick walls;
- Cast iron;
- Brick;
- installation location:
- classic options, designed for installation near a wall;
- corner;
- island. The design of such stoves allows them to be placed in the center of the room;
- burning duration. This indicator is one of the most important. According to it, furnaces are divided into models:
- short-term (up to 3 hours) burning of one stack of firewood;
- long-term (up to 12 hours), which is achieved through a system for adjusting the air supplied to the firebox. The most popular models are the Butakova and Buleryan stove lines.
Also read about how to make it.
In order for the stove to be useful and save money, it is necessary to monitor its condition. Even a minor crack increases the loss of efficiency. For better heating use only dry firewood for kindling. Be sure to close the view.
Major soot cleaning is carried out once- in summer and winter they get by with minor cleaning, but at least 3-4 times per season. Accumulated soot reduces the heat output of the device. If the viewer, valves or door are faulty, you cannot light the stove, because they control the draft and help carbon monoxide evaporate.
Despite all the nuances in the construction and operation of a mini-oven, it acts as excellent heating device, and can compete with modern gadgets in the speed and delicacy of preparing many dishes. It’s not for nothing that our ancestors considered the stove to be the soul of the house and placed the structure in the middle of the hut.
Not even a few centuries passed before she returned to us, only in a slightly different form. But its small size is not the main thing, because in terms of its functions and the wonderful atmosphere that is created in every home, the device very similar to the good old Russian stove.
Rate this article:
Be first!
Average rating: 0 out of 5.
Rated by: 0 readers.
If not central heating, there is a need to search original solutions. A warm mini brick oven is such a solution. With its help, the entire house is heated and money is saved on the purchase of boilers or other complex equipment. The construction of a heating element is a simple and short process that can be done with your own hands.
Convenience and benefits
Mini brick ovens are convenient and easy to use. Available materials are used for heating - wood or coal, which explains the popularity of this type of stove. In addition, they have other undeniable advantages:
- has been in use for several decades.
- It heats up quickly and releases heat into the air.
- Ease of construction.
- The compactness of the design allows it to be laid out even in country houses.
- Equipped with additional devices for cooking.
- The shape and design of the stove are selected taking into account the dimensions and shape of the room where it will be located.
You can heat with pallets or briquettes. This makes the stoves cost-effective.
In the process of preparing for the construction of long-term burning facilities, a detailed diagram. It must take into account all dimensions and weight of the structure. In addition, we must not forget about the base and the chimney. The foundation allows you to lay out a reliable heating element country house. This structure is not a simple heating item for a country house; when certain changes are made to the masonry scheme, it becomes a fireplace. And the heat output of the mini stove is 2000 watts. This value is enough to heat the building and cook food.
Materials for laying mini brick ovens
To prevent moisture from entering the future structure, you need to purchase roofing felt.
To build such a structure, a drawing is drawn and everything necessary for construction is purchased. A small oven will require such materials on hand as:
- fireproof mortar, which is best purchased in the form of a mixture;
- fireclay brick, because it does not crack when in contact with fire;
- small doors for the firebox and ash collection chamber;
- grate (grid);
- steel sheet and wire;
- roofing felt for waterproofing.
To lay a structure with dimensions of 50*50 cm, you will need 200 bricks and 40 liters of mortar. The sizes of the doors are selected depending on the wishes of the owner. A steel sheet with asbestos is needed to isolate the object being built from the wooden floor. If all materials have been purchased, a compact stove for a summer house is installed in 1-2 days.
What tools are needed?
The construction of a heating structure requires quality materials and tools. Professional stove makers recommend keeping on hand a trowel for laying mortar, a hammer-pick, a level and a plumb line to control the angle of inclination of the laid order, as well as a tape measure. These tools will help you complete all stages of creating a stove with your own hands. The list can be supplemented with other auxiliary devices.
How to build a stove correctly?
For a small structure, an asbestos sheet can serve as the basis.
The manufacture of the structure begins with the formation of the base. The second stage is brick laying. Creating a foundation begins with determining the location where the heating stove will stand. A place is selected that is safe and accessible at the same time. Conducted accurate calculations, which are plotted on the structure diagram. If the dimensions of the structure are large, then the floor covering is removed and construction begins with the formation of the foundation. Stove makers recommend providing a place for a heating element in the foundation of the house in advance. If the stove is planned to be compact and will be heated exclusively with wood, then a metal sheet with asbestos is used as the base.
When the foundation is ready, roofing material and sand are laid out on it, and then they proceed to the construction of the box itself. Procedure:
- The formation of the order is carried out from the first row. This process uses 12 bricks. They are securely fastened and adjusted to the level.
- The first row is covered with mortar and the second row is laid. A blower door is installed above it, wrapped in asbestos.
- At this stage, the next row of bricks and mortar is laid.
- The grate is installed.
- The next row is laid on edge, and the back wall is formed with a projection of bricks without the use of clay mortar.
- The firebox door is mounted on top.
- Subsequent rows of bricks are laid flat and alternating on the edge.
- Next, the combustion space is covered with bricks, and a beveled row is laid above them.
- The next order is formed so that the firebox door can be easily opened.
- The last stage will be the formation of the chimney.
To avoid structural destruction, only 1 row of clay bricks is allowed.
There are many options for stoves for cottages and houses. Some of them involve financial expenses, others require direct hands. What should we do for those who have not succeeded either with money or with skill? A simple brick stove that even a “humanitarian” can put together will help out.
The article discusses two options. The first one is suitable for those who want more or less “decent” heating and cooking equipment. The second will be useful to readers who generally do not pretend to be either a penchant for handicraft or any kind of aesthetics of the result.
Figure 1. Simple brick oven
How to make a simple but effective stove?
This option can serve as an alternative to the simplest metal heating devices - for example, a potbelly stove. With the help of this stove you can heat the room, cook food, and even admire the flames.
The structure occupies just over half square meter. Unlike full-fledged brick ovens, this one does not require. The weight of the structure is not so great as to make a strong base - it is enough to lay a strong board.
The oven can be made in just a day. One of the advantages of this option is that starting heating is possible in the evening. Certain skills are necessary, but they do not go beyond the skills of the average male.
On a note! No qualifications are required to build stoves. But it is necessary to maintain order - this will make the design as effective as possible in the context of its potential.
What will you need for the job?
It is not only simple, but also a budget option. To build the structure you will need:
- brick:
- *fireclay – 37 pcs.;
- *red – 60 pcs.;
- ash door;
- firebox door;
- lattice;
- valve;
- hob made of cast iron.
Clay solution is used as a binder. In total you will need about 20-25 liters of the mixture.
It will also be interesting: - types and characteristics.
Preparation
The first step is to decide on the location of the stove. Since the mass of the structure is small, there are no limitations inherent in traditional brick solutions. By securing strong boards or suitable alternative material, the “foundation” is heat- and waterproofed.
Non-flammable material can play the role of an insulator - for example, basalt wool. Polyethylene or roofing felt is placed on top of the base. The size of the latter corresponds to the dimensions of the base plus a small allowance.
A layer of sand 1-2 cm thick is poured on top. The bedding is leveled. It is important to make the base level - the quality of the design and the convenience of subsequent work depend on this.
Masonry scheme
Figure 2. Order of the stove masonryThe oven order is as follows:
- The first row is laid on sand without using a solution. A dozen bricks are leveled strictly. The bricks are coated with a thin layer of the mixture, after which the blower door is mounted at the end. The door is pre-wrapped around the perimeter with an asbestos cord, which compensates for the thermal expansion of the metal.
- After fixing the door with wire, lay the second row according to the diagram. Form a ash pit.
- Fireclay is used (in the diagram it has a yellow tint). After laying, a grate is installed above the ash pit.
- Before this, bricks were laid flat. On this row it is placed on its edge. A smoke exhaust channel is formed, inside which a base for the partition is made. One of the bricks (seen in the illustration) is laid “dry” - it will later be removed. After this, the firebox door is installed, which is wrapped several times with asbestos strips before installation. But this must be done so that the door opens well to the top. The element is fixed with wire and a pair of bricks.
- The brick is laid flat again, duplicating the previous row.
- Again the “rib” row is the second and last row in which the brick is laid in this way. The exception is the next row, in which one of the walls is formed by laying on edge. The walls of the chimney channel should be wiped with a damp cloth.
- The brick is laid flat according to the diagram. The back wall is made using the edge-on format again.
- This row closes the firebox. A couple of bricks should hang over the firebox so that the flame moves to the middle of the hob - in case the stove will be used as a fireplace (without closing the firebox door).
- The bricks are moved slightly towards the back wall to support the firebox door. Strips of asbestos soaked in water are laid in front of the brickwork. Thanks to this, they ensure sealing of the gap between ceramics and cast iron. A cast iron panel cannot be placed directly on a clay solution, otherwise the difference in the thermal expansion parameters of the materials will lead to the appearance of cracks.
- At this stage, the formation of the smoke exhaust pipe begins. The latter, according to the plan, should gradually expand towards the back side. But only the chimney base is made of brick. The rest is made of light metal. Otherwise, the excess mass of the element may lead to a shift in the center of gravity of the stove.
- A valve sealed with asbestos strips is installed here. It is recommended to pre-coat the latter with clay mortar. This is the final row, which is used to complete the construction of a brick oven directly with your own hands. The remaining couple of rows are given to the chimney, which will then be connected to a lighter metal channel.
After this, those bricks that were laid “dry” on the 4th row are removed. At the same stage they clean construction waste smoke exhaust channel and stove surface.
Final works
The simplest stove does not require serious decorations. The only decoration is whitewashing. It is recommended to add a little blue and milk to the composition - this will prevent the coating from forming yellow plaque and bleaching.
Important! Brick and metal should be protected before work. If this is not done (for example, using film), you will not be able to get rid of the stains.
It is necessary to coat the seams between the brick and the metal of the chimney very well, as well as the seams between the ceramics and cast iron.
It is imperative to close the joint between the stove brick and the floor. This will prevent oven sand from getting into the room. It is advisable to cover the joint with an L-shaped sheet. Then they make a plinth edging, which serves both as decoration and as an additional element that prevents the “foundation” bedding from spilling out.
 Figure 3. Functioning oven
 The stove is ready. The entire process took no more than one working day. Now you can try to make a low-power one. You cannot use logs - only wood chips or paper. Wood burning will create too high a temperature and the structure will crack. For the mixture to fully set, you need to give it a week or two. After this, you can already heat it “like an adult.”
This is interesting: ? Review of 10 options.
An even simpler version of the stove
If the previous option seemed complicated to someone (although it is not), we can offer an extremely simplified heating design. You can lay out this oven with your own hands in literally an hour, even if your hands are far from being called golden.
 Figure 4. The simplest option brick ovens
 The operating principle of the structure is simple. Solid fuel burns below, and settles here under the influence of its own mass. Temperature changes create a draft that carries hot air currents upward. In this case, the firewood burns almost without a residue - the smoke is minimal.
For masonry you will need only two dozen whole bricks and two halves. The stove consists of five rows. The design is so simple that there is no point in describing the order. The procedure is clearly shown in the illustration.
 Figure 5. The simplest order brick construction
 If you lay the bricks correctly (and it is very difficult to do otherwise), the result will be similar to that shown in the photo. It is recommended to bind the bricks with clay mortar. But in hiking conditions You can do without any binding material - just put the components on top of each other according to the order. In this case, the stove is built in five minutes.  Figure 6. Masonry process
  Figure 7. Finished mobile brick oven
For those who want an intermediate option, we can recommend a slightly more complicated option.
 Figure 8. Diagram of a simple stove
 According to this diagram, the output is an L-shaped three-section stove. The first compartment is designed for loading firewood. The second is a chamber in which the logs are burned. The third compartment is the chimney duct.  Figure 9. L-shaped stove
To create this structure you will also need 20-30 bricks. This option can be completed by yourself in a couple of hours, if the skills of a mason are completely absent. A specialist will complete the construction in a matter of minutes.
When the question arises about heating a small country house, the best solution a furnace will be erected. This is economical and practical, since heat transfer from properly folded brick kilns at least 90 percent.
Brick kilns have lived up to their purpose for many centuries. And no matter how its design changes and improves, the basic requirements for it remain the same. This is safety in use, ease of use and the ability to keep warm for a long time.
If you really want to, it’s not difficult to build a mini brick oven with your own hands.
What are the benefits of small wood-burning stoves?
Dignity small oven is that it takes a lot small area with high heat transfer. For a country house, bathhouse, outbuildings A mini wood and coal stove is ideal. There are minimal building materials, but if you put a hob on top, you can cook food and heat water. Even today, brick heating and cooking stoves remain quite popular. The most important thing is that making it will not be difficult for a novice master. Having an ordering diagram in front of your eyes, you can put together a mini oven with your own hands in literally one daylight hours. Just need to prepare everything first necessary tools and building materials.

Compared to a “potbelly stove,” a brick mini-stove for a wood-burning cottage looks aesthetically pleasing. Subsequently, it can be decorated with tiles, and it will not only warm, but also decorate the country house.
Sometimes its design is combined with a fireplace, and this will become a mini fireplace stove. You can immediately build in a tank for heating water or provide a niche for drying vegetables and fruits.
There are a lot of options for brick kilns. But it's more complex designs, but you need to start building a mini-stove for your summer cottage with your own hands from the simplest model.
Required Tools
You need few tools; they can be easily purchased at any hardware store:
List of tools:
- trowel, or as it is also called, trowel;
- convenient hammer-pick;
- building level;
- roulette;
- plumb line

In addition, during the work you will need:
2 buckets (for water and solution), a construction sieve, a trough where to sift the sand.
Construction materials for mini ovens
First you need to prepare the clay. To do this, fill it with water and leave it like that for about a day. You can speed up the process by thoroughly kneading it every five to seven minutes, preferably using a drill mixer, for an hour. Strain through a sieve. The sand also needs to be sifted first.
To fold a mini heating stove, which will take up an area of 0.4 square meters. meters, you will need:
- 20 liters of solution;
- 60 pieces of red stove bricks;
- 38-40 pieces of fireclay bricks;
- firebox door;
- ash door;
- grate;
- hob;
- chimney damper.

Doors, grill and hob must be cast iron.
If you do without fireclay bricks, then it will be a mini-stove model that burns wood rather than coal. Red brick, even of the highest quality, will collapse over time due to the high temperatures created by coal fuel. In general, to make a mini Russian oven with your own hands, you just need to follow the recommendations.
Location and foundation preparation
The best location for such a stove, if the dacha room consists of one room, is in the center. In other cases, you need to focus on the partitions or the intersection of interior partitions. It is imperative to take into account fire safety rules.

A foundation is not needed for a structure of this size. However, it is necessary to put a thick, durable board secured with joists at the base, and a fireproof layer on top. This can be an ordinary asbestos cement sheet.
Then a waterproofing layer of polyethylene and roofing material measuring approximately 80 by 55 cm is installed. A thin layer of sand is poured.
The procedure for laying a brick stove with your own hands
The next stage is the construction of the stove itself:
- In the first row the solution is not used. 12 pieces are laid strictly horizontally on the sand. A blower is placed on the clay-sand mortar. The door is wrapped with asbestos cardboard and wrapped with cord. Fastening is done with wire.
- Then lay the second row.
- In the third row, lined with refractory bricks, strictly above the ash pit, a grate is placed.
- The bricks in the fourth row are placed on edge.
- A stand for the partition is provided in the chimney. The back wall is laid out without using mortar. These bricks will then need to be removed. Then they install the furnace door, wrapping it with asbestos cord. A couple of bricks are temporarily used for fastening. Secure with wire.
- The fifth row is laid out flat, like the fourth.
- The bricks of the sixth row go on edge.
- The bricks in the seventh row are laid flat again. For inter-row bonding, you need to start with a brick, chopped off three-quarters the size. Having placed two bricks edgewise, they begin to build the back wall.
- The eighth row will close the firebox door. To direct the fire to the center of the hob, the brick is placed at an angle. Tightness is ensured using a wetted asbestos cord.
- The ninth row is also laid using asbestos cord. The peculiarity of this row is that it is shifted back a little so that the door remains open.
The beginning of the chimney is formed in the tenth row. There will be a place to attach the iron pipe. In the eleventh row, a chimney damper is installed. At this stage, step-by-step instructions will be useful - how to fold a stove with your own hands, which will help you not get confused in the details.
Closing events
Three more rows of brickwork are made to connect to the pipe. Having removed the “knockout” bricks, the furnace channels are immediately cleared of construction debris. The perimeter of the structure is carefully covered with a plinth.
Whitewashing or lining of the stove is done after test firing.
Only after the whitewashed or tiled mini-oven is completely dry can it be used. In order for a mini stove for a summer house to please you for a long time, you should not rush to light it. Let it sit for a week or two with the doors open.
The problem of heating country houses and country houses associated with the lack of a central supply of coolant and gas. Many have already become disillusioned with metal potbelly stoves, but a small brick stove - built with their own hands - gives comfort and warmth, which cannot but rejoice.
Brick stoves for country houses
Advantages

In the last two or three decades, modern metal stoves have taken an undisputed monopoly in individual construction. This is caused by a number of factors:
- Comparatively cheap compared to;
- Easy to assemble and install;
- Short deadlines for installation of the heating device at the place of final operation;
- High efficiency and firewood savings declared by the manufacturer;
- The apparent complexity of building a brick kiln and the difficulties associated with finding a worthy specialist in this field, fear self-construction such a monumental object;
- No need for complex roofing work when installing a chimney pipe;
- Relative compactness, which is important for a country house;
- An advertising campaign by manufacturers of metal furnaces, claiming their undeniable advantages.
However, once the owner of a metal device once finds himself in a room equipped with a stone stove, his views change radically.
It is impossible to deny the fact that the heat produced by such a stove is incomparably more comfortable and pleasant. The room is easy to breathe, has a pleasant smell, a special atmosphere and comfort.

The food cooked in a stone oven is also different. Special temperature regime, the taste of smoke and the oven effect give it a unique taste and aroma.
In addition, there is a lot of data on some medicinal properties thermal radiation emanating precisely from warm clay, heated to 70 - 75 ° C. Let's not go into the jungle of physics and biology, let's note the fact itself.
So, the advantages of a brick kiln, collected in a single list:
- Huge heat capacity and inertia of the device. It is enough to heat such a stove once, and it will continue to radiate heat into the room for a long time. Even in severe frosts, the number of fireboxes does not exceed two per day;
- The stove does not overheat from the outside, and it is impossible to get burned on it, which is extremely important for families with small children;
- The oven does not dry the air the way its metal counterparts do;
- Thermal radiation is much softer, not as aggressive and heavy as from steel and cast iron surfaces;
- Firewood consumption is less (a controversial opinion, but many owners agree);
- Incomparably longer service life;
- The smallest brick stove creates more coziness and comfort than the largest metal stove;
- Easily allows you to heat large volumes of water, and if you install a coil or register, there will always be warm water;
- In the oven and firebox you can bake large quantities of bread and other flour products, as well as prepare porridge and other dishes;
- Even small brick stoves look great and decorate the interior, creating an inexplicable comfort and special ambiance in the room.
Advice! Any wood-burning heating device is a potential source of danger, as it produces carbon monoxide. Therefore, you should not take on complex large ovens, but DIY small brick oven- a very real option.
Naturally, nothing is ideal or absolute, so it is necessary to talk about the difficulties and disadvantages of stone heating devices.
Flaws

Since we have listed the advantages brick stoves, let's be fair and remember the shortcomings. We do not conduct advertising campaign, so we are not afraid of objective assessments.
So, among the disadvantages of stone stoves, the following features can be listed:
- A very labor-intensive construction, especially for a person who has no experience in the construction of such products;
- This is quite a costly undertaking, especially if you hire an experienced stove maker; the price of these guys’ efforts and skills is definitely high;
- There is a risk of unsuccessful construction, and remodeling a stone monolithic structure, as you understand, is not the easiest task;
- The danger of operating a faulty or improperly constructed stove is associated with carbon monoxide poisoning, which can lead to very dire consequences;
- Requires more space in the house than its metal counterpart, although today everything appears more projects small stoves that practically eliminate this disadvantage;
- High inertia is associated with a fairly long warm-up and kindling, so it may take several hours to heat the room well.

Advice! If you use your dacha for rare raids of a day or two in the warm season, and also in the cold season, then there is no point in starting the construction of a brick oven, since warming up will take three hours, and in the meantime you will be packing back. A brick stove is needed by people who love country holidays and allow themselves to spend long winter weeks at their dacha.
This is where the question of the purpose of the stove arises. Obviously, stoves come in different designs, sizes, and functions.
Purpose of furnaces

Another important point- this is the correct choice of configuration, design and purpose of the stove. Since we are talking about a dacha, we should proceed from the requirements of temporary suburban housing.
In general, there are four main types of stoves:
- Heating;
- Cooking;
- Baths;
- Mixed.
Strictly speaking, sauna stoves can be classified as a specialized subtype of heating devices. But we will not delve into the intricacies of classification, since this activity is, in general, useless.
Let's just say that for a dacha I would like to have a mixed type - something like, since it is irrational to arrange a separate heater and stove from the point of view of saving space.

Therefore, we can voice the requirements for a country brick stove based on all of the above:
- Simplicity of design so that you can master the construction with your own hands;
- Compact size, this is a dacha, not a castle or residence;
- Multifunctionality, that is, a mixed-type oven with which you can cook food, heat water and warm up the house.
Construction of a country stove made of bricks
We will need a clay-sand solution, building brick(double sand-lime brick M 150 will not work, you need a clay one), trowel, bucket, mixing trough, plumb line, level, asbestos cord, fireclay brick, doors, valves and other stove fittings, galvanized steel wire, hammer with pick, grinder with disk on concrete.
The oven will take up 0.4 m², and its weight will be insignificant, so you can do without a foundation. If your floor is weak, then it is better to make a screed under the masonry.
So, laying a small country stove step by step:
- On the place chosen for the stove we place roofing felt or glassine measuring 530x780 mm for waterproofing;
- Pour sand one centimeter thick on top and level it;
- According to scheme No. 1 (the figure at the beginning of the paragraph), we lay out the first row of bricks without fastening them together, and level it using a level;

- Apply a thin layer of clay mortar. We take the blower door, wrap it with a double layer of asbestos cord and secure it with twisted wire.
- Lay out the second row of bricks.

- We take fireclay bricks and lay out the third row. After its formation, we install the grate. We maintain gaps for thermal expansion of materials of up to 1 cm.

- Using a brick placed on an edge, we lay out the fourth row. Inside the chimney duct we make supports for the internal partition. We place the “kick-out bricks” of the rear wall without clay with a slight protrusion outward.
- We install the combustion door, pre-wrapped with asbestos. We fasten it with twisted wire and temporarily fix it with two bricks: we put one on the back of the butt, the other on it and the door on top.

- We lay out the fifth row flat along the contour of the fourth, and the sixth on the edge. We wipe down the chimney walls with a wet rag.

- We lay the seventh row flat from three-fours (we cut off 3/4 of the whole brick with a grinder) to connect with the eighth row. Back wall again on the edge.

- In the eighth row, we close the firebox door with two bricks above it. We install a beveled brick above the firebox to center the flame under the burner.

- We place the ninth row offset back (slightly) to keep the door open. Before laying, we lay out wet asbestos cord to seal the joints of the brick and the hob.
- In the tenth row we begin the formation of a chimney, which will gradually expand backwards. We will make an attached pipe, so as not to displace the center of gravity of the structure, or a mounted one made of light iron.

- In the eleventh row we lay a valve, seal it with an asbestos cord coated with clay.

- Next comes a quadruple chimney, which is connected to a light metal pipe.

- Now we take out the knockout bricks and clean bottom part chimney from debris.

- We close the gap between the first row of bricks and the floor with a metal L-shaped sleeve and nail the baseboard.
- We whitewash the stove or cover it with stove varnish, seal all the joints between the metal and the brick. Metal parts can be painted with black fireproof paint.

- We make a test fire with paper and small branches, then give it 2 weeks to dry.
As you can see, all the manipulations are not so difficult to do on your own. Material and labor costs are relatively small, and the construction does not take up much space.
At the same time, we received a heating and cooking device that will perfectly heat a small country house, give your cooking a unique taste and aroma of smoke, and create a pleasant atmosphere and comfort.
Advice! If there is an opportunity to invite a person more or less experienced in the stove business, at least as a consultant, be sure to take advantage of it, since building stoves from a book is quite difficult, it’s better to see it once.
Conclusion
Brick stoves are considered bulky, expensive and difficult to build. However, it is easy to verify specific examples that these opinions are somewhat exaggerated, and you can build an inexpensive, compact country stove out of brick, and do it yourself.
In the video presented in this article you will find additional information on this topic.