For obvious reasons, we grow more often in a grow box than under open air. Fortunately, there is nothing easier than to do DIY growbox, and the diagram of a cannabis growbox is elementary. This is a cabinet in which a lamp is suspended from the ceiling, an exhaust fan is installed on top or side, and at the bottom there are holes through which air flows. Fresh air. No drawings required. Specific decisions on the design of the box and configuration are made locally and depend on a number of points, which we will consider below.
But first, a few words about the requirements that ANY cabinet for growing grass at home must meet:
- It should not have gaps through which light can leak out when the lamp is on and in when it is off.
- The walls must be covered with a special reflective material or white matte paint.
- The type and power of the lamp must correspond to the size of the box, primarily its area. The guideline is 400-600W per m2.
- The fan must refresh the entire volume of air every 3-5 minutes and effectively remove the heat. The calculation is easy to do if you know the volume of the grow box.
In addition, there are two additional requirements to a stealth growbox, that is, one that pretends to be an ordinary cabinet not related to the cultivation of marijuana: a) on exhaust fan a carbon filter should be installed to combat the pale odor; b) fans should not be heard outside.
Everything else is arbitrary and entirely up to you: what kind of harvest you expect to harvest, how many hemp bushes you are ready to grow at the same time, how much space you can allocate for planting. This could be a mini growbox, including one from a system unit, a bedside table, a storage room, or even an entire room in your house - circuit diagram growbox does not depend on its size.
So, let's say that we decide to use a cabinet for cultivation.
The first thing we do is make a list electrical equipment(which one - see below), we determine what will be placed inside, and what (mains filters, ballasts and starters for lamps, timers) - outside, for example, in the next compartment of the cabinet. We drill a hole into which we will later pass all the wires going into the box.
Then we make holes through which fresh air will flow into the box. They are made as close to the floor as possible, and total area should be equal to the area of the exhaust opening. It is recommended to install a filter here to prevent mold and fungus spores, eggs and larvae of pests from entering the growbox from the outside. You can also install a fan that will help pump fresh air into the cabinet, but this is not necessary.
We make an exhaust hole in the ceiling or in the upper part of the wall, into which we place a duct fan (duct fan). Use rubber gaskets and O-rings to reduce vibration and therefore noise. You can attach a corrugated pipe to the fan and use it to remove exhaust air, including to the street. To combat odor, a carbon filter is placed on the duct.
Then the walls of the box are painted with white matte paint or covered with reflective material, such as mylar or penofol. To prevent light leakage from the grow box, the material is overlapped over all cracks.
Advice: Since you will inevitably spill water when watering, take care to waterproof the floor and lower part of the walls. It is not difficult to buy and apply a waterproofing film.
The lamp is mounted to the ceiling in two ways: either you rigidly fix the lamp (with a reflector and a hood) and then use stands so that you can raise and lower the cannabis pots, or you hang the lamp so that it itself can be adjusted in height. The point of all this is clear - you should be able to change the distance from the lamp to the tops of the marijuana by different stages its development or, on the contrary, always maintain the same distance to the tops, despite the fact that the plants are constantly growing in height.
Now that the lighting and exhaust ventilation, consider your home grow box ready to go. However, there is also optional equipment:
- a fan (preferably rotating) that will blow on the tops of the plants,
- thermometer,
- air conditioning (if you are using a powerful lamp and are going to grow in the summer heat),
- heater (if the box operates in the cold season in an unheated room),
- hygrometer (humidity meter) and humidifier,
- ozone air purifier to combat odor,
- various types of devices to increase CO2 levels.
Some of the above, such as a blowing fan and a thermometer, are worth having for every cannabis grower. Other devices, including a CO2 generator, are used only by very experienced growers, usually as part of a complex automated system with sensors and timers.
In any case, for convenience, all additional equipment should be hung on the walls, and direct light from the lamp should not fall on the thermometer.
When making a growbox with your own hands, do not forget about fire safety: use non-flammable materials or special impregnation, and most importantly, install the electrical wiring correctly.
Below you will find some photos from ready-made solutions. These will give you a better idea of how to make your own grow box:
For obvious reasons, we often grow in a grow box rather than outdoors. Fortunately, there is nothing easier than to do DIY growbox, and the diagram of a cannabis growbox is elementary. This is a cabinet in which a lamp is suspended from the ceiling, an exhaust fan is installed on top or on the side, and there are holes at the bottom through which fresh air enters. No drawings required. Specific decisions on the design of the box and configuration are made locally and depend on a number of points, which we will consider below.
But first, a few words about the requirements that ANY cabinet for growing grass at home must meet:
- It should not have gaps through which light can leak out when the lamp is on and inside when it is off.
- The walls must be covered with a special reflective material or white matte paint.
- The type and power of the lamp must correspond to the size of the box, primarily its area. Guideline - 400-600W per m2.
- The fan must refresh the entire volume of air every 3-5 minutes and effectively remove the heat. The calculation is easy to do if you know the volume of the grow box.
In addition, there are two additional requirements for a stealth growbox, that is, one that pretends to be an ordinary cabinet not related to the cultivation of marijuana: a) a carbon filter should be installed on the exhaust fan to combat the pale odor, b) it should not be heard from outside. fans are running.
Everything else is arbitrary and entirely up to you: what kind of harvest you expect to harvest, how many hemp bushes you are ready to grow at the same time, how much space you can allocate for planting. It can be a mini growbox, including one from a system unit, a bedside table, a storage room, or even an entire room in your house - the basic design of a growbox does not depend on its size.
So, let's say that we decide to use a cabinet for cultivation.
The first thing we do is make a list of electrical equipment (which one, see below), determine what will be inside and what (mains filters, ballasts and starters for lamps, timers) will be outside, for example, in the next compartment of the cabinet. We drill a hole into which we will later pass all the wires going into the box.
Then we make holes through which fresh air will flow into the box. They are made as close to the floor as possible, and their total area should be equal to the area of the exhaust vent. It is recommended to install a filter here to prevent mold and fungus spores, eggs and larvae of pests from entering the growbox from the outside. You can also install a fan that will help pump fresh air into the cabinet, but this is not necessary.
We make an exhaust hole in the ceiling or in the upper part of the wall, into which we place a duct fan (duct fan). Use rubber gaskets and O-rings to reduce vibration and therefore noise. You can attach a corrugated pipe to the fan and use it to remove exhaust air, including to the street. To combat odor, a carbon filter is placed on the duct.
Then the walls of the box are painted with white matte paint or covered with reflective material, such as mylar or penofol. To prevent light leakage from the grow box, the material is overlapped over all cracks.
Advice: Since you will inevitably spill water when watering, take care to waterproof the floor and lower part of the walls. It is not difficult to buy and apply a waterproofing film.
The lamp is mounted to the ceiling in two ways: either you rigidly fix the lamp (with a reflector and a hood) and then use stands so that you can raise and lower the cannabis pots, or you hang the lamp so that it itself can be adjusted in height. The point of all this is clear - you should be able to change the distance from the lamp to the tops of the marijuana at different stages of its development, or, conversely, always maintain the same distance to the tops, despite the fact that the plants are constantly growing in height.

Now that the lighting and exhaust ventilation are installed, consider your indoor grow room ready to go. However, there is also optional equipment:
- a fan (preferably rotating) that will blow on the tops of the plants,
- thermometer,
- air conditioning (if you are using a powerful lamp and are going to grow in the summer heat),
- heater (if the box operates in the cold season in an unheated room),
- hygrometer (humidity meter) and humidifier,
- ozone air purifier to combat odor,
- various types of devices to increase CO2 levels.
Some of the above, such as a blowing fan and a thermometer, are worth having for every cannabis grower. Other devices, including a CO2 generator, are used only by very experienced growers, usually as part of a complex automated system with sensors and timers.
In any case, for convenience, all additional equipment should be hung on the walls, and direct light from the lamp should not fall on the thermometer.
When making a growbox with your own hands, do not forget about fire safety: use non-flammable materials or special impregnation, and most importantly, install the electrical wiring correctly.
Below you will find several photos with ready-made solutions. These will give you a better idea of how to make your own grow box:


Subscribe to our Telegram channel and you will be promptly informed about new publications on the site:
Today, grow boxes, also known as mini-greenhouses, are considered the most popular inventions for home grown plants. Often, growers do not want to purchase a ready-made “growing cabinet”, but prefer to make a growbox with their own hands. This allows you to save a significant amount of money, which will be needed to purchase seeds of valuable plant species. Today, there are many options and ways to build a grow room so that it has the same functions as a factory one. Let's consider the main types of manufacturing mini-greenhouses and how to make a growbox with your own hands.

Growbox from a closet - a universal model
The popularity of a grow box made from a closet or an old chest of drawers is due to the fact that this furniture has optimal size for growing not just one crop, but several necessary plants at once.
To create a mini-greenhouse from a closet you will need a minimum number of tools:
- putty, knife, mallet, hammer, stapler, tape measure, marker, scissors;
- sandpaper, PVA and drill.
- Such a set is available in almost every home.
- To create the greenhouse itself you will need:
- ESL lamps, 2 fans (coolers),
- wires, switches, thermometer, plugs, cartridges,
- Fiberboard, White paint or foil.
Once all the tools are collected, you need to remove the extra shelves in the cabinet, leaving only room for growing and storage space for all electronics.

Sticks are attached to the bottom of the cabinet, and a layer of fiberboard with cut out circles for pots is placed on top of them. The cabinet area is covered with foil or white film (oracal). Then lamps and fans are attached to the sides, one for air outflow and the other for inflow. Making a growbox is not that difficult; it is important to connect the electronics correctly and equip the future greenhouse with a high-quality ventilation system.
Electrical connection diagram

Growbox from the system unit - as easy as shelling pears
Making a grow box from an old system unit is the simplest and most straightforward way. The main goal of this greenhouse is to be invisible to surrounding eyes. The goal of a stealth growbox is the maximum amount of light in a minimum space.

The system for constructing a mini-greenhouse from a system unit is quite simple. To make it, you will also need the tools and materials indicated above, but without fiberboard and boards. The inside of the system unit should be covered with reflective film (foil, penofol), lamps should be connected, and coolers may be moved. Timers, switches and sensors are connected. Place either a tray with soil or a pot.

Growbox from the refrigerator - convenience and practicality
For these purposes, you can take an old broken refrigerator that no longer functions as it should. Its convenience is that you can easily install shelves for growing, and separately for electronics. Also, a sealed rubberized door makes it possible to get quality harvest, keeping warm. This mini growbox is quite practical and very convenient for home use.
Of course, homemade grow boxes are not strong and reliable enough; they are recommended to be used only permanently, and often not to be transported. If you approach the manufacture of a grow box wisely, then in 1-2 days you can get an inexpensive and productive mini-greenhouse for home growing.
Calculation of lighting in a grow box
We suggest that you familiarize yourself with the table for calculating lamp power based on the box area:

Calculation of lighting for two box dimensions:

Be the first to know about upcoming promotions and discounts. We do not send spam or share email with third parties.
DIY growbox
A growbox is a closed structure that is designed to create optimal microclimate for growing plants. Its size may vary, depending on how many plantings the grower plans to place in it. Quite often, growers use ready-made furniture, for example, a wardrobe or a pantry, to create a grow box. There are a lot of options for what to make a growbox out of.
In this article we will talk about how to make a growbox at home with your own hands from scratch. However, it contains helpful information and for those who have already taken note old furniture wanting to breathe into her new life. So, now first things first. We present step-by-step instructions on “How to make a growbox with your own hands.”
Growbox design and material
The most affordable and common material for creating a grow box is chipboard. It can be used new or previously used, the main thing is to cut it to give it required sizes. The dimensions of the grow box can be purely individual. It all depends on how many plants the gardener plans to grow in it and the availability of free space in the room.
Its height is very important, since it is this that will limit the vertical space for the growth of flora representatives. If a grower plans to grow something large in size, then the height of the grow box must certainly be selected based on the maximum growth of this crop. In most cases, a height of 1.5-2 meters is sufficient. And if the grower plans to grow low-growing plants, then he will have to make a stealth growbox, the height of which can be only 0.8-1 meter. The main thing here is to take into account the fact that the light source will occupy about another 30 cm of vertical space.
So, the grower decides on the dimensions, and then orders cutting of the chipboard sheets. Then, using any fasteners, the structure is assembled. It would not be superfluous to create in its upper part a small technical compartment 10-20 cm high, in which all the electrical equipment will be located. It is also likely that the doors will have to be sealed with a special material so that light does not enter or exit the structure. Having a lock on the door will also not be superfluous, especially if the gardener has small children.
We won’t tell you how to make a growbox from a closet or other furniture. To do this, the grower will only need to go to the second point of our instructions on how to properly build a growbox.

When the growbox design is ready, you can begin arranging it. The first thing the grower has to do is cover the inside walls of the grow box with reflective material. You should not use foil or penofol, as the light will be refracted; if your budget is limited, it is better to cover the walls of the box with regular white matte paint. The best option There will be Mylar Diamond ECO reflective film. Mylar film can significantly reduce the loss of light rays due to irrational scattering. It distributes light evenly over the entire cultivation area. This feature is possible thanks to the diamond-shaped three-dimensional pattern, which does not allow light rays to concentrate in one place (usually creating hot spots that cause burns to plants). Its reflection coefficient is 97%. The material of the product has a high tensile strength, and therefore can last for many years.


Now we move on to the question of how to equip a growbox. The first thing we'll start with is lighting the growbox. There is no way without it, because any plant cannot live without light for several days. Even when the grower was just thinking about how to build a growbox, he had to take into account the dimensions of the lamp. Even if you hang it from the ceiling itself, it will take up about 30 cm of vertical space. And if you use a rod or other hanging fasteners, then this is all 40-50 cm. This distance will directly depend on what lamps the grower chooses to illuminate the growbox.
Now to the most important question - how to choose lamps for a grow box. Their choice will directly depend on the dimensions of the structure and the number of plants that are located in it.
For small home structures, which includes almost all grow boxes and stealth boxes, we recommend using neon lamps. They practically do not heat up during operation, which makes it easy to maintain the temperature inside the structure at a level favorable for plants. They are also quite compact and consume relatively little electricity, which undoubtedly has a positive effect on bills.

For the vegetative stage suitable option will be the TNeon 6500 K Growing lamp. The spectral composition of the lamp is ideal for plant growth. The dominant blue light takes an active part in photosynthesis, allowing crops to grow leaf mass. For the flowering stage excellent option There will be a similar lamp, only with a different spectral composition, in which red light dominates - the TNeon 2100 K Blooming lamp.

It has a beneficial effect on crops, allowing them to form inflorescences and fruits. Both lamps are made of high quality alloys that guarantee a long service life. It is recommended to use them in pairs, installing them in a TNeon 2x55W lamp.
With its help, plants will receive light of a favorable spectral composition during any stage of their life. Both lamps are powered independently, allowing you to turn them on separately. The device is made of durable steel sheet and covered with durable paint and varnish material white, effectively reflecting light. It can be hung using special hooks. It is also equipped with electronic ballast, 2G11 socket and three-pin power connector.
For full-fledged grow boxes with a height of 1.7 meters or more, we recommend choosing HPS lighting. It is worth noting that the greater the lamp power, the more area it provides illumination, however, it also generates more heat, so we recommend purchasing a closed-type pendant lamp CoolMaster.
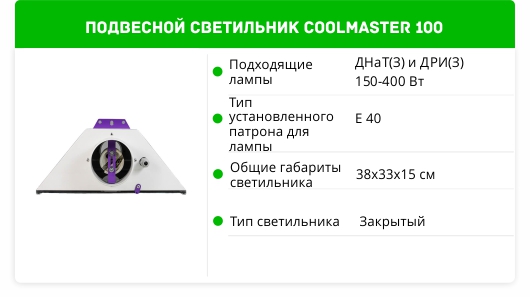
To illuminate 1-2 medium-sized plants, we recommend purchasing a 250 W HPS lamp, which illuminates about 0.36 m2.

To start the lamp you will need an electronic ballast corresponding to the power of the lamp.

Growbox ventilation
Ventilation is a very important component of any grow box. It allows not only to renew the air inside the structure, providing an influx carbon dioxide, but also output hot air, which occurs due to heating of lighting fixtures during operation. This makes life much easier for the grower, because it becomes much easier for him to maintain a favorable temperature inside. Also, do not forget that with the help of ventilation you can regulate the humidity inside the grow box, a favorable indicator of which is the key to effective fight with mold. Lastly, ventilation allows the grower to eliminate various types of odors and pollen. To do this, a carbon filter is installed in it, which does not allow aromatic compounds to escape.
How to calculate ventilation in a grow box?

Ventilation in the grow box is calculated based on the volume of the internal space. To prevent odor from being heard outside the structure, the air inside it must be completely renewed within 3-10 minutes. The volume is calculated by multiplying the height, length and width of the structure. Next, it is calculated how many times within an hour the fan will have to refresh the air inside. To do this, 60 minutes are divided into the selected interval. Depending on the number obtained, we calculate the required power fan, multiplying it by the volume of the growbox. We add 20% to the new number, thus taking into account losses due to air movement. We choose a carbon filter with the same or increased performance. Please be reminded that the outlet ventilation system should be at the top of the grow box, as hotter air always rises.
Components of the ventilation system
First of all, the basis of any ventilation system is a fan, which is installed to exhaust air outside the grow box, attached to outside its walls. As an example, I would like to give the duct fan model TD-MIXVENT 160/100.

Its productivity of 160 m3/hour will be quite enough for a stealth box and a small full-fledged grow box. It works almost silently. Its engine is protected from negative influences external factors in accordance with protection class IP 44, which provides it with a long service life. In case of overload, the fan can turn off on its own. The grower can also regulate the voltage supplied to it, which allows you to change the operating speed.
The MagicAir 160/100 m3 carbon filter will work perfectly in tandem with this fan, allowing you to clean the air inside the grow box.
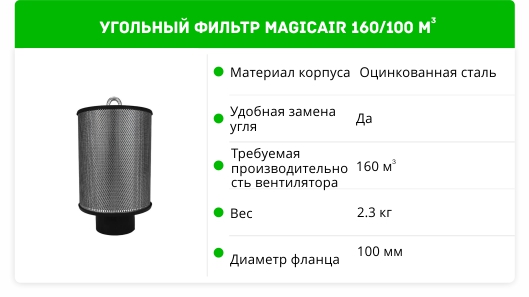
All thanks to a cartridge with high-quality activated carbon, which is recommended to be changed only once a year. The model is equipped with a replaceable fabric pre-filter, which can significantly extend the working life of the cartridge by trapping dust, pollen and other small particles. It lasts for 3 months of work, after which it is enough to simply wash it. The material does not lose its qualities within 3 washes.
The last element of the ventilation system is the air duct. For the ventilation elements already mentioned above, an Aludec DA3 air duct with a channel diameter of 102 mm would be suitable.
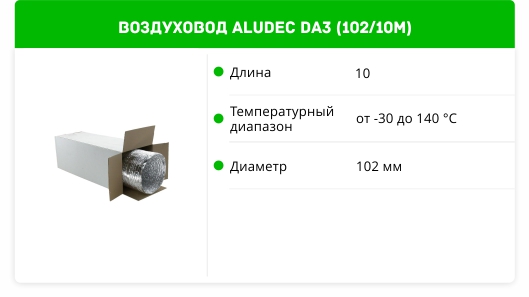
It has a layered structure consisting of aluminum foil and polyester, which is based on steel spirals. The corrugated surface provides the air duct with ideal flexibility. Its total length is 10 m. It is secured using ordinary clamps.
Growbox automation
In conclusion, I would like to talk a little about automation, with the help of which the grower does not have to control everything on his own. To automate the lighting mode, an excellent solution would be the TM 24 electric timer, which will independently turn the light on and off in accordance with the established schedule.

It is capable of operating in several modes, and the entire process of setting it up is displayed on a small display. Setting it up is quite simple; just follow the instructions that come with the kit. Its body is protected from mechanical damage and falls, which guarantees long term operation.
You can constantly be aware of the level of humidity and temperature in the grow box using the Garden Highpro Medium weather station.

Regardless of what temperature should be in the grow box, this device will always show the grower it exact value in the range between 0 and 50 degrees Celsius. It also measures humidity levels between 25 and 90%. With the help of a 1.5 meter long remote probe, all these indicators can be measured outside the structure. The advantages of the weather station include a large three-line display, simple system settings and controls, compact size and light weight.
show allAdvice from Agrodom

Job TDS meter based on the electrical conductivity of water - electrodes immersed in aquatic environment, create an electric field between themselves. Pure distilled water itself does not conduct current; it is formed by various impurities and compounds dissolved in water.
A growbox (from the English grow box, which means “growing box”) is nothing more than a specially equipped small-sized room in which plants are grown. Small size and convenient operation allow the grow box to be a winning and attractive option, which is preferred by city residents who have chosen growing plants as a hobby, but do not have the conditions and opportunities for arranging and maintaining a greenhouse or winter garden. Options for the design and installation of grow boxes in residential premises are very diverse, allowing any city dweller to cultivate any type of plant.
To do this, you just need to know how to make a growbox with your own hands. The versatility of the technology allows you to grow plants all year round. Even if you have a summer house, you can’t dream about it, and only grow boxes provide the opportunity to enjoy your favorite pastime and do not limit the time of any experiments in the field of plant growing.
The history of growboxes
To the question “When did the first grow boxes appear?” there is no clear answer. It is believed that around the end of the 50s of the twentieth century, when indoor crop production was mastered under LDS-type light sources. But only the arc ones that appeared high pressure led to the rapid development and spread of growbox technologies. The first serious results were obtained by American and Western European scientists in the mid-seventies of the last century. This was a breakthrough in home cultivation of vegetables, fruits and ornamental crops, exotic and plants necessary for medicine, as well as rare species included in the Red Book of World Flora.
Currently, growbox technologies are widespread throughout the world. They are used by botanical gardens, agricultural enterprises, medical industries. Great amount lovers of plant growing have also mastered these devices. Let's try to understand why this technology of plant cultivation has gained such popularity and recognition.
Self-created
You can make a growbox with your own hands; many materials are suitable for construction, including used chambers, system units. The structure can be assembled from chipboard sheets, which is the simplest.

The size of the “box” depends on the plants you choose to plant in it. In this regard, grow boxes can be of three types:
- Small (from half a square meter to 1 meter) - for small plants, any cacti, they are also excellent for germination and accelerated forcing of decorative, fruit and vegetable seedlings.
- Medium-sized (from 1 to 1.5 m2) - very spacious boxes for growing medical plants, vegetables and fruit crops and even bushes small size. They are also used for germination and forcing of large volumes of vegetable, fruit and berry and ornamental seedlings.
- Large (from one and a half square meters and ad infinitum, but in reality they are limited to three meters) - in boxes of this size it is permissible to keep almost any exotic plants and even shrubs down to small trees, which in such large boxes can successfully vegetate and bear fruit all year round.
Stages of growing a growbox
To build a grow box with your own hands, it is important to follow the technology at all stages. And the first stage is the choice of material. It is necessary to carefully calculate all dimensions and, in accordance with the specified parameters, purchase materials (for example, chipboard sheets), from which the box will be assembled with a door on hinges, allowing operations in the structure itself. To build a grow box with your own hands, drawings are simply necessary; you will need them at the planning stage. Next, following these drawings, begin creating your greenhouse. The inside must be covered with foil (with the matte side facing out). Better to use whole pieces foil.

Next, you need to make electrical wiring, ventilation and, most importantly, install lighting in the box. If you do not have special skills in these areas, then in order to build a grow box with your own hands, you will definitely need instructions.
Growing and propagating plants at home using hydroponics is not only fun and practical, but also an art and even a science. It is necessary to take into account and maintain at the proper level such parameters as humidity, temperature, ventilation, lighting, while they are individual for each individual crop. Let's get acquainted with the basics of arranging such a greenhouse, which are necessary in order to make a growbox with your own hands.
Ventilation
Growbox ventilation can be forced or natural. For some crops, with the right container, you can get by with a few holes drilled in the body, while for others, special equipment may be required. If the growbox is small, then, for example, a computer cooler is suitable for use. Also, to create a good atmosphere, a fan is installed; it is responsible for air exchange and drives away excess heat from the lamp. Since the blades, as a rule, make a lot of noise, craftsmen who create a growbox with their own hands hang the fan on special belts, which reduces the influence of this factor.
Temperature and humidity
Humidity and temperature indicators in the grow box cavity are also selected individually. It should be remembered that when high humidity plants are prone to rotting, and when high temperature may burn out. To maintain an optimal environment inside, you need to install two devices: a thermometer to control the temperature and a hygrometer to control the humidity.
Lighting
A properly equipped grow room cannot do without proper lighting. To do this, you need one or more (their number depends on the size of the room). The lighting element is placed on the wall of the housing (at the top) or on an improvised ceiling.

The power of the lamp and the distance from it to the plant are calculated very carefully so that the plantings do not die from excessively intense lighting. If leaves curl or dry out, the work lamp must be replaced. lighting device less power or secure it as far as possible. If thin shoots, long internodes, and faded greenery are noticed, this indicates insufficient light. Even if the lamps are selected and placed correctly, there is no need to illuminate the plants all the time.

Even if you keep the growbox on, provide periodic artificial “night” for the plants. To do this, the lamps must be equipped with a connected timer, adjusted to the required time mode, which depends on the type of crop being grown.