Outdoor toilet With cesspool is gradually becoming a thing of the past. New house and even small dacha should delight owners with comfort and amenities normal for the 21st century. The device is a completely affordable and safe event for construction, if you approach the design wisely and use it modern materials and technology. When building a house, the drainage system is laid out at the design stage, along with other engineering communications, but even in an old house it is quite possible to organize the construction of a bathroom with an urban level of comfort.
All private houses can be divided into two categories - those that can be connected to a centralized city or village sewerage system, and those that cannot. The progress of work and the installation of communications inside the premises will be the same for these cases, the only significant difference will be in the organization of drainage Wastewater.

General principles for installing sewerage in a private house
Fundamentally, the sewer system in a private house, as in a city apartment, consists of a vertical riser and pipes of smaller diameter, through which wastewater from a sink, toilet, etc. flows into it by gravity. Then the wastewater flows into horizontally located large-diameter pipes, and from them into a centralized sewerage system or local autonomous treatment facilities.
When planning a sewer system in a house under construction, it is worth placing the kitchen and bathrooms nearby, better nearby with the place where the sewer goes out onto the street. If the house is two-story, then the bathrooms should be located one below the other to reduce the number of risers and simplify the installation of the system and its subsequent maintenance.
IN big house with a large number of bathrooms and a complex sewer system, it is rational to install a sewer pump. A pump may also be needed if the area has absolutely no slope.

When designing a sewer system, the following are also taken into account:
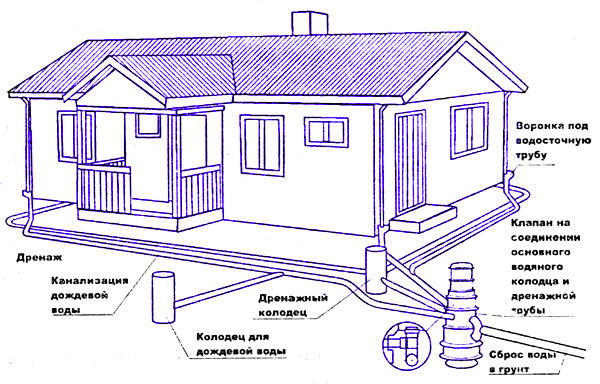
- landscape of the site - wastewater flows downwards and the septic tank or cesspool should be located at its lowest point,
- the type of soil, its freezing and the height of groundwater - the depth of the external sewerage pipes and the choice of treatment facilities depend on this
Selection of materials
On modern stage polypropylene or polyvinyl chloride – best option. They are inexpensive, easy to transport and install, and do not require assembly. welding machine. In addition to pipes, you will need connecting elements: elbows of various configurations, fittings, tees, inspection hatches. The joints are additionally treated with sealant.
The diameter of the pipes depends on the volume of wastewater and the number of devices connected to the system. In any case, the diameter of the pipe from the plumbing fixture must be equal to or greater than its drain pipe. The diameter of the pipe for the riser should be from 100 mm if a toilet is connected to it, and from 50 mm if there is no toilet. The length of the pipes from the device to the riser should not exceed 3 m, and from the toilet - 1 m. If this distance needs to be increased, then the pipes are taken larger diameter.

Installation of pipes and plumbing connections
Before assembling the system, it is better to draw it in detail or design it in a computer program. All horizontal pipes internal sewerage should slope from the device to the riser at the rate of 2-15 cm per 1 m. If you need to turn the pipe 90 degrees, it is better to do it smoothly, using 2 elbows at 45 or 3 elbows at 30 degrees, to prevent blockages.
The toilet is connected to the vertical riser separately to avoid emptying the siphons in the plumbing when draining the water. Moreover, the remaining devices must be connected above the toilet to prevent waste from entering them.
The sewer risers on each floor in the lower part are equipped with inspection hatches. For sound insulation, they can be wrapped in a layer of mineral wool or covered with a plasterboard box.

Sanitary fixtures are connected to the pipes through a U-shaped siphon, the lower part of which always contains some water. Foul gases from the sewer system cannot pass through this barrier. Some sinks and bathtubs are sold already with a siphon, for others you will need to purchase it additionally; toilets have a built-in siphon.
The riser is connected to external pipes using horizontal pipes of the same or larger diameter located in the basement, basement or under the floor. Such pipes are also equipped with inspection hatches (mandatory at turns). When connecting them, you should avoid right angles and complex turns. If the pipe runs in the ground or unheated room, then it needs to be well insulated. At the point of exit from the house, all sewer pipes are collected together and connected through a hole in the foundation. external sewerage.
Sewer pipes are attached to the walls using clamps. Additional fastenings are installed near the points of insertion into the riser, connections and transitions.
Sewage ventilation
A large amount of abruptly drained water, for example from a toilet cistern, moving through a pipe, creates an area of discharged space behind it. If there is no air entering the system, water leaves the siphons of plumbing fixtures along this pipe, and an unpleasant odor appears. For this reason, the sewer system must be equipped with its own ventilation.
For the pipe, the risers are extended to the roof; the upper end is not closed, but is reliably hidden from precipitation and debris. You can do it differently; an aeration valve is installed at the top of the riser, which does not release odors, but conducts air inside, which prevents the air from being discharged in the pipe.

External sewerage
Outside the home it is also optimal to use polymer pipes. To lay them, a trench is dug to the depth of soil freezing, a sand cushion is poured onto its bottom, and then pipes are laid at a slope of 2-3%. If it is impossible to ensure a sufficiently deep burial, then it is necessary to carefully insulate the pipes.
At the point of connection to the house and near the junction with the central sewer or autonomous treatment facilities are installed inspection hatches. It is advisable to install it in a pipe check valve. It will protect the house sewer system from the ingress of sewage from the outside, for example, when the cesspool overflows, and from the penetration of rodents through the pipes.
Treatment plants
Autonomous sewerage at the end may have:
- cesspool,
- biological treatment station.
Each of these options has its own advantages and disadvantages, but, in general, a cesspool can only be recommended for dachas where people do not live permanently, or for small houses for 1-2 people. A biological treatment station is expensive, but after its installation, maintenance and emptying will have to be resorted to extremely rarely. The septic tank is the best option, it can be purchased at finished form or do it yourself.
A properly designed and installed sewer system will make living in own home even more comfortable.
It is difficult for us to live without amenities, even if we are in a private home. We strive to provide maximum convenience by creating for our family optimal level life. For this, it is very important to think through the issue of construction in advance.
When building a sewer system with your own hands in a private country cottage, You can save money, but you need to carry out this work in accordance with construction and installation requirements.
Sewerage installation in a house involves the arrangement of external and internal sewerage systems.
The internal part is pipe routing, installation of a drain pipe and a riser.
External refers to a set of pipes running from the house to the septic tank or station deep cleaning.
Internal sewerage diagram

This septic tank has three chambers connected to each other. Water enters the first, settles and leaves in sediment solid waste. Then it is pumped into the second, which is an aeration tank, where the water is mixed with activated sludge from microorganisms and plants. All of them are aerobic, and forced aeration is necessary for their life.
Then the water and sludge enter the third chamber, which is a deep cleaning settling tank, after which the sludge is pumped back into the aeration tank.

The aeration tank is quite expensive, but there are no restrictions on its installation. Of the minuses, we can only say about the need for electricity, and permanent residence so that bacteria do not die.
When designing and installing internal sewerage for a private home, no one is immune from mistakes that can lead to unpredictable consequences, from the appearance of an unpleasant odor to complete inoperability of the system. Let's consider in this article the concept of internal sewerage in a private house: design and installation rules + analysis common mistakes, arising in the process of all this.
General characteristics of a modern internal sewerage system
Today, the construction of private suburban housing is experiencing a real boom. Therefore, there was a need to create a convenient and modern system sewer system that could be installed by an ordinary person without construction education. Such a system should have good performance, since the number of plumbing fixtures producing domestic waste increased significantly. After all, with the advent of automatic washing machines, dishwashers, Jacuzzis and showers, the water consumption of a typical household increased to 200 liters per person per day.
An increase in the number of plumbing fixtures leads to a significant complication of the pipeline networks themselves. Fortunately, today they use PVC pipes, which are supplied with auxiliary fittings, with the help of which the installation of the pipeline becomes impossible more difficult to manufacture crafts from children's construction sets. All these parts are equipped with O-rings, which can be easily replaced if necessary.
Internal sewerage is a set of plastic pipes and fittings for their connection, which serve to drain wastewater from plumbing fixtures. The devices themselves are equipped with siphons necessary to prevent odor from penetrating into the premises. Pipe laying is subject to strict rules, non-compliance with which can lead to disruption of the entire system.
Rules for laying pipes during the construction of internal sewerage
The riser serves as the central drainage channel in the entire sewer system of the house. There can be one for the whole house. If the house is too large or the bathrooms are located at a considerable distance from each other, then two or more risers are made. They are vertically installed pipes that start in the basement and end on the roof. Bottom part The riser is connected to an inclined pipe of the same or larger diameter, which goes outside into a wastewater storage tank or wastewater treatment plant. Top part the riser rises above the roof by at least 0.5 m. It is open or equipped with a check valve. Why this is needed - we will consider further. All inlets leading from plumbing fixtures are connected to risers.

Hydrodynamics of liquids in pipes
The pipe is a cylinder with water moving inside it. When the pipe is completely filled with water, a piston effect occurs. This means that at the top of the water plug the pressure drops sharply, and at the bottom, on the contrary, it increases. In a situation where there is an explosive flush from the toilet tank, the resulting vacuum can suck out all the water from the siphons. This is fraught with the appearance of odors in the premises. On the contrary, as the liquid moves, excess pressure arises, which can push sewage out of the devices located below the toilet.
Ignoring the laws of hydrodynamics leads to two common mistakes when designing and installing sewer systems. The first mistake is not using a ventilation device. The background pipe running from the riser to the roof not only removes unpleasant odors, but also serves as a pressure compensator in the system. Indeed, if it is present, the reduced pressure above the water piston will not suck water out of the siphons, but will ensure that air enters the system from the atmosphere, which again levels the pressure.
The second common mistake is that all plumbing fixtures are connected through supply pipes to the riser below the toilet. This is unacceptable, as it will certainly cause sewage to pour into the sink or shower stall when flushed. Similar problems arise when the supply pipes are longer than what is allowed for them. To avoid such troubles, it is necessary to formulate some important rules for installation of intra-house sewerage.
Rules for the installation of intra-house sewage systems, the violation of which is unacceptable
Attention! Violation of the following rules may lead to serious disruption of internal sewer system or the occurrence of an emergency.
- The connection of the toilet to the riser must be carried out separately from other plumbing devices.
- All other plumbing elements are included in the system above the toilet connection point. Several devices can be located on one supply pipe if their performance allows.
- Any supply pipe must have a diameter no less than that of largest diameter liner from the device.
- The outlet from the toilet has a diameter of 100 mm, therefore, the riser should not be thinner than it.
- The toilet is installed at a distance of no more than 1 m from the riser, and other devices no further than 3 m.
- If the house has a supply pipe longer than 3 m, then it should not be thinner than 70 mm. The liner, which is longer than 5 m, is made from a 100 mm pipe.
If increasing the diameter of the supply pipes is for some reason impossible, then there is a way to circumvent this rule. To do this, it is necessary to bring the end of such a pipe to the roof and provide vacuum valve or loop it onto a riser above all other devices.
Quantitative characteristics of sewer pipe laying parameters
I exist important nuances, compliance with which will ensure the operation of the sewage system in optimal mode:
- The inclination of all horizontal pipes depends on the diameter of their cross-section. The standards say that a pipe with a diameter of 50 mm should be lowered by 3 cm each linear meter length, having a diameter of 100 to 110 mm per 2 cm per meter. Pipes with a diameter of more than 160 mm can be tilted no more than 0.8 cm per linear meter.
- An indicator such as the height difference for a toilet should be 1 m, and for other devices 3 m. Exceeding these parameters should be accompanied by the organization of ventilation at the ends of the corresponding inlets.
Another common mistake is incorrect registration corners If you make 90-degree angles, then as a result of the rebound, a blockage of waste will form in this place, and the pipe will quickly clog. For this reason, it is necessary to create a smooth flow of water at the corners. For this purpose, shaped parts are used that have an inclination angle of 135 degrees.

The fourth mistake is that the vent pipe is not brought to the roof, but to the general house ventilation. Such a device will create an unforgettable “aroma” in the entire house, which can only be gotten rid of by redoing the entire system.
In order to prevent the sounds of water moving through the pipes from being heard, it is necessary to arrange sound insulation. To do this, the pipes are wrapped with mineral wool and placed in boxes made of plasterboard sheets. For timely and convenient preventative work pipes are equipped with inspection hatches every 15 m. The same applies to all turns.
Fifth mistake. There is no check valve installed in the pipe connecting the in-house sewerage system and the septic tank. In this case, if the external disposal devices overflow, water may rise up the pipes and flood basement.
Errors related to connecting siphons
Any plumbing fixture is connected to the sewer system through siphons shaped like the letter U. This curved shape allows water to constantly remain in it. It forms a water barrier and prevents odors from penetrating into the room. However, this system stops working when certain errors are made. The main mistake is the lack of ventilation. In this case, the vacuum simply sucks the water out of the siphon, allowing odors to wander freely throughout the house. Another reason for the appearance of an unpleasant odor is the banal evaporation of water from the siphon. This happens when the device is rarely used. You just need to plug the rarely used device with a rag.

What calculations are made when planning internal sewerage
Work on designing internal sewerage must be carried out strictly in accordance with the above rules. In addition, to comply with them, certain calculations are required:
- On general scheme indicate the places where this or that device will be located. Its distance from the riser, the diameter of the supply pipe, the mounting option and connection to the sewer are thought out in advance. At the same time they calculate required amount materials.
- Determined by the type of sewer system itself. They are pressure and gravity. Typically, due to simplicity, a system is used in which water flows under the influence of Earth's gravity. The main thing here is to calculate the slope of the pipes according to the rules outlined above.
- According to technical specifications of each sanitary fixture, its instantaneous flow is calculated. The thickness of the supply pipe depends on this indicator. In most cases, a 50 mm pipe is suitable for all devices except the toilet
- Calculate the most optimal place for installation of a riser. Most often these are toilets. If there are two of them in the house, in different vertical planes, then it is better to make two risers.
- The sewerage scheme must be calculated in such a way as to minimize the number of available rotation angles. This will significantly reduce the risk of blockages.
The above calculations, performed correctly, will make the sewage system more efficient and effective even when overloads occur.
What is needed to build an in-house sewerage system
As mentioned above, the main thing in installing a sewer system inside a house is drawing up a detailed drawing indicating all the devices and dimensions of the elements. For installation, sewer pipes made of polyvinyl chloride are used. The arrangement of their ends is such that two pipes can be connected by placing the end of one into the socket of the other. Pipes with a diameter of 100 mm are used for risers, and 50 mm for other devices. To connect to external sewerage, a corrugated pipe is used due to its better resistance to soil movement.
The tools usually used are: a saw for cutting plastic pipes, sharp knife and rubber mounting seals. The pipes are cut with a saw, the cuts are aligned and chamfers are made with a knife. Rubber seals are inserted into the sockets. Various fittings are used to connect pipes into the system:
- Bends or elbows that are needed to form corners. They are produced with a bend of 45 and 90 degrees. Their ends are also equipped with sockets with seals to create tight connections.
- If it is necessary to connect pipe scraps of the same diameter, transition bends are used.
- Tees various types are fittings for organizing pipe branches.
- Transition couplings are needed to create transitions between pipes of different thicknesses.
A common mistake when installing plastic sewer pipes– this is ignoring their heating. To make the pipes fit easier and more tightly into each other and into the connecting fittings, the sockets must be heated in hot water.

Sequence of work when installing internal sewerage
Installation of the sewer system inside the house is carried out in the following order:
First, they install risers, leading their ends to the roof and into the basement. They should be located in close proximity to toilets. In the basement, they are connected to an inclined pipe that goes outside into the septic tank, and the upper ends are left open or equipped with check valves.
Secondly, the supply lines from the toilets are brought to the riser. They must be separate.
Thirdly, they connect the supply lines from other devices above the toilet entrances to the risers.
Fourthly, siphons are installed on all devices.
Fifthly, the siphons are connected to the connections.
In conclusion, let’s say that a properly designed and assembled sewer system will work as expected. for a long time without serious problems.
The durability and uninterrupted functioning of the sewer system depends on the installation and quality of the materials used. It is not at all necessary to hire craftsmen for the work; you can make a durable structure with your own hands, if you take everything into account important points. If you decide to entrust the work to professionals, you will be able to control the process without any problems and thus avoid shortcomings and omissions.
The initial design of a house involves calculating the location for future wastewater treatment facilities. This indicator will make it possible to place them in the most compact way in the home, so that the plumbing equipment is located in one zone and connected to one collector.
Since the system’s main route runs inside the home and in the yard, two separate plans must be created.
To work you will need:
- graph paper;
- ruler;
- roulette;
- simple pencil.
Sequencing:
- Drawing up a building project to scale, using known or measured parameters.
- Determining the location of risers.
- Conventional placement of plumbing fixtures, taking into account its size and methods of connection to openings.
- Marking connecting pipes (tees, connections) and pipes going from fittings and sumps to plumbing fixtures and elements.
- Installation of risers and drain pipes connecting the sewer system to the atmosphere.
- Combining all sewer lines inside the building, counting their length and quantity.
- Design of an external main, starting from the outlet pipe and ending with the well, its type and size.
When drawing up a sewerage project, it is necessary to take into account the following factors:
- If the building is multi-story, separate markings are made for each floor.
- The parts of winding pipelines from the entire building can be combined through the basement or brought into different parts buildings and then connected at one underground point.
- For greater efficiency in the operation of hygienic zones, it is better to make all pipeline lines as short as possible.
Regardless of type treatment plant, pipes will be needed to install the entire system. But since the internal and external markups are in different conditions, then different materials need to be used for them.
For the installation of internal sewerage systems are used gray pipes made of polypropylene and polyvinyl chloride with the following diameter (in mm):
- 100 - main riser and toilet outlet;
- 65-75 - vertical forks of the riser;
- 50 - general drainage of waste from the bathtub and sink;
- 45 - individual drainage from hygiene accessories;
- 32 - outlet from the kitchen and bidet.
For external lines, orange PVC or asbestos pipes are used, which are characterized by increased strength. They are tasked with withstanding loads while being under a layer of earth.
For sewerage in a private house, two types of pipes are used: plastic and cast iron.
Cast iron pipes
Durable, able to withstand heavy loads. However, over time, the insides are destroyed by corrosion and can become clogged. In addition, they are expensive, weighty and fragile.
Plastic pipes
They are divided into three subspecies based on composition. Choose the most suitable ones depending on the place of use and load.
Polypropylene (PP)
If everything is done according to technology, they have practically no disadvantages. Lightweight and flexible, therefore the most common. Can withstand high and high temperatures without difficulty low temperature sewer water.
Polyvinyl chloride (PVC)
Used for external sewerage pipelines. Affordable and lightweight. Their disadvantages: fragility, and also not resistant to high temperatures(burst).
When choosing, pay attention to appearance products. High-quality building materials have smooth edges and joints without burrs. Quality can also be determined by the weight of the pipe: the heavier it is, the greater the thickness of the plastic and the composition of the material.
Polyethylene
Used for installation of the external part of the sewer system. They can be of any diameter, suitable for laying in the ground at a depth of up to 15 meters. Not heat resistant, may expand when exposed to temperature.
The entire sewer line is divided into two parts: internal and external, the arrangement of which must be dealt with separately. Part of the system inside the house consists of pipes running from the plumbing to the riser, which goes to the external outlet. The basic rule when laying it is to combine all the forks in such a way that the drainage of waste liquids is as smooth as possible. In order for the structure to serve for a long time and efficiently, you should not skimp on building materials.
Necessary components for sewerage:
- bends;
- tees (for branching);
- reducers or adapters (for assembling branches different sizes);
- plugs for sockets (to plug extra holes);
- fastenings for fixing bells;
- silicone in a tube for lubricating rubber seals - seals the connection and facilitates the joining of parts.
Sewerage in a private house - stages of laying pipelines
The sequence of laying sewer drain lines must be strictly followed.
- Release. This is the boundary part of the system, which combines pipes coming out of the wall of the home and going to the storage tank. Installed first of all to prevent possible inconsistencies between planes on late stages and provide the required slope (2 cm by 1 m).
An opening is made in a wall or foundation. A retreat pipe with a sleeve is placed in it (a protective segment with a diameter of 110-130 mm; the length depends on the thickness of the wall: it is better to choose 10-20 mm longer than the thickness) and fixed with cement-sand mortar. The sleeve is predominantly metal.
- Connecting the plumbing with a water seal (will protect the home from unpleasant odors) and a snake-like tube.
- Connecting the first socket to them.
- Using a pair of angled (45 degree) knees to vertical pipe horizontal is connected.
- If one or another accessory is located far from the riser, pipes to it are laid at an angle (3 cm by 1 m).
- The gap of the required slope is adjusted by clamps that are attached to the wall or floor and support the markings in a suitable position. The gap between the clamps is maintained at approximately 2 meters.
- If the drain branches are located above the floor level, then after each turn an inspection is installed (a part with a cover for removing blockages).
- In multi-story buildings, the same bolts are installed on each riser.
- The connection of pipes with diameters of 5 and 10 cm is made using a special adapter.
Important points when installing sewerage:
- To ensure that the pipe joints are compactly connected, they are treated with sealant, with the external ones lubricated from the inside, and the internal ones from the outside.
- Ventilation must be provided for the riser, so its height must correspond to the height of the building. The upper hole is brought out onto the roof and covered with a grille twice the diameter of itself. This background pin will not only serve as ventilation, it will support Atmosphere pressure and will extend the service life.
- The slope of a tube with a diameter of 5 cm should be - 3 cm per 1 m of length; and 10 cm is 2 cm per 1 m.
Before moving on to further stages of sewer construction in a private house, it is necessary to identify:
- number of residents;
- total volume of water used daily;
- depth of groundwater;
- area of the site and place for installation of sewerage structures;
- soil type and its structure.
Then you need to navigate the types of waste containers.
Cumulative
TO waste containers storage type includes a sealed tank and a cesspool without a bottom.
Cesspool without bottom
Often used for arranging sewerage in a private home. It is a well paved with concrete or brick. Liquid waste that gets into the container seeps into the soil, and organic matter and feces settle.
Over time, they accumulate and are pumped out using special equipment. If the daily mass of waste exceeds one cubic meter, it is better to choose a different design.
Sealed container in the form of a tank
Making such a sewer system in a private house with your own hands is very simple:
- A hole is dug in the ground.
- Its bottom is concreted.
- Stacked on top concrete rings on top of each other, pre-treated with cement or sealant.
- Covered metal lid, in which there is a hole for a corrugated tube.
The main thing is that the container is completely sealed. The volume of the tank depends on the average amount of water used per day, but its depth should not exceed 3 m, otherwise the hose will not reach the bottom (when cleaning). Suitable for areas where groundwater are situated in upper layers soil (5-10m deep).
Disadvantage: you will have to empty it often by hiring a special vehicle, so you need to provide access for transport.
Septic tanks
They are an underground sewage settling tank with one or several compartments through which wastewater passes and is mechanically and biologically treated. After this, they enter the filter drainage, where they are cleaned with a layer of crushed stone. Suitable for filter soils (sand, sandy loam) with a burial depth of at least 2 m.
Do-it-yourself sewerage installation in a private house from monolithic concrete
- A pit is dug corresponding to the size of the cement chamber.
- The bottom is compacted and leveled.
- A shock-absorbing cushion of sand, 30 cm thick, is made.
- A mesh (20*20 cm) of reinforcement (10 mm in diameter) is laid.
- A 3-centimeter ball of concrete (grade B15) is poured on top.
- Aged for 14 days until completely hardened.
- Filling the walls. The wall thickness is 20 cm, and internal partitions - 15.
- After drying, the floors are built. Installed wooden formwork with supports and a mesh of metal rods (12 mm).
- Sloping filtration fields (drainage) made of crushed stone and gravel are equipped, into which processed liquid will flow by gravity for post-treatment.
Regardless of which concrete structure you choose for the sewer system (ring or monolithic), it is advisable to treat it from the inside for waterproofing. For coating, waterproofing is used, for example LAKHTA or Penetron. Heated resin is also used, but it peels off over time and does not saturate the walls of the structure.
Bottom line
The question of how to make a sewer system in a private house is very relevant, but does not present any particular difficulties. Installing and equipping a drainage structure is actually easy - follow our instructions and you will succeed.
July 7, 2016Specialization: master of internal and exterior decoration(plaster, putty, tiles, drywall, lining, laminate and so on). In addition, plumbing, heating, electrical, conventional cladding and balcony extensions. That is, renovations in an apartment or house were done on a turnkey basis with all necessary types works
Of course, it is best if the sewerage installation in a private house is done with your own hands simultaneously with laying the foundation, even before the construction of the building frame. Of course, this requires preliminary design and planning, but this way you can avoid difficult passages through the foundation strip and dismantling the floor covering.
But, despite such features, there are certain requirements for laying the pipeline, which I want to talk about in more detail and invite you to watch the video in this article.
Installation of sewerage pipeline
Five important requirements

First, I want to list you five basic requirements, without which not a single installation of sewer pipes in a private house can be done. But I will do this briefly in order to concentrate your attention on further installation instructions.
- In any case, no matter where you lay the sewer pipeline - in a house, in an apartment, in a basement, by air or underground, you will have to maintain a certain slope, and different for each diameter. Of particular importance are the main pipes leading to a storage or flow tank - the quality of the drain depends on the correct slope. If you make it more than necessary, then the water will wash the feces without washing them away, and if it is less, then again the preconditions for clogging will be created due to the low intensity of fluid movement.
- If this is a sewerage installation in an apartment, then there are short sections of pipeline, but in a private house they increase significantly, which requires inserting revisions. In addition, in cases where the length of the route on a site exceeds 10 m, inspection wells should be installed there.
- When laying a sewer system in a private house (underground installation is meant), certain distances to objects and structures must be observed, which are discussed in SNiP 2.04.03-85 and SNiP 2.04.01-85.
- To prevent the system from freezing, winter period The pipeline must be laid at or below the zero freezing point of the soil. But since in some regions of Russia this limit is deeper than two meters, in such cases they often resort to installing thermal insulation.
- Pipes should be laid only on a sand cushion and covered with it, as shown in the photo in the subtitle. This protects PVC from deformation and damage from sharp stones and metal objects.
Indoor sewerage

First of all, you should firmly understand that the sewerage layout in a private house or apartment, that is, indoors, remains the same in principle. In 99% of cases, the most extreme point will always be the toilet flush - this is a 110 mm pipe, into which all other bathrooms are inserted - an example of such a device is shown in the top diagram.
In any case, at the exit from the room, be it a riser or a sun lounger, a 110 pipe is used, although on the street or in the basement the diameter may increase if other waste systems are connected there.

Of course, the slope in the room is also important - this does not apply except to the automatic washing machine, where the drainage is forced - a counter-slope is even possible there if the characteristics of the room require it.
In addition, the room may have risers between floors or leading to the main drainage line - here, too, a diameter of 110 mm is used for polyvinyl chloride. But for the correct distribution of slopes, you better use the table that I give below.
Table of optimal and minimum slope for sewer pipes

To connect pipes to each other, to make turns and to change to another diameter, special fittings and rubber reductions are used - with their help, all, even the most complex, connections are made. Basically, the sewerage is installed in the bathroom and toilet, that is, where most of the plumbing is located, but a tie-in from the sink and dishwasher is also added there.

An automatic washing machine can be installed both in the bathroom and in the kitchen and it is not at all necessary to make a separate drain for it. Currently, siphons with a special outlet are produced, as shown in the top photo.
By and large, a dishwasher can also be connected to such an outlet, but I personally prefer to make the drain for this with a 32 mm pipe, cutting it into a 50 mm one through a tee and a rubber reduction - it’s more reliable.

The pipeline to the wall or floor must be fixed with metal or plastic brackets - they are sold in stores for any diameter you need. But such consoles occupy a certain place, and if the wiring is done in the basement or other technical room, which does not have to be decorated, then this is exactly the fastener.
If you need to hide the pipes, then certain inconveniences arise. Personally, in such cases, I resort to perforated metal strip hangers - I simply pull the pipe to the plane with them, like a clamp - this saves space.
It happens that during assembly, one pipe fits very tightly into the socket of another, crushing the rubber sealing ring - this usually happens when elements are connected from different manufacturers.
In such cases, I lubricate the rubber ring liquid agent for washing dishes, and all problems are left behind.
Underground pipeline installation on the street
| City and surrounding areas | Depth in cm |
| Khanty-Mansiysk | 240 |
| Novosibirsk, Omsk | 220 |
| Ukhta, Tobolsk, Petropavlovsk | 210 |
| Orsk, Kurgan | 200 |
| Magnitogorsk, Chelyabinsk, Ekaterinburg, Perm | 190 |
| Orenburg, Ufa, Syktyvkar | 180 |
| Kazan, Kirov, Izhevsk | 170 |
| Samara, Ulyanovsk | 160 |
| Saratov, Penza, Nizhny Novgorod, Kostroma, Vologda | 150 |
| Tver, Moscow, Ryazan | 140 |
| St. Petersburg, Voronezh, Volgograd | 120 |
| Kursk, Smolensk, Pskov | 110 |
| Astrakhan, Belgorod | 100 |
| Rostov-on-Don | 90 |
| Stavropol | 80 |
| Kaliningrad | 70 |
| Khanty-Mansiysk | 240 |
| Novosibirsk, Omsk | 220 |
Table of soil freezing to 0⁰C in Russia
As you can see from the table above, the depth of soil freezing in different regions Russia is very different from each other. Moreover, this indicator may differ in the same area - this change is determined by the height of the area above sea level and the condition or type of soil.
Therefore, I recommend that you use existing experience to determine the freezing depth. That is, simply find out from neighbors or friends at what depth their water supply is laid and whether it freezes - this is the best guide.

As I already said, instructions for deepening a pipeline can sometimes be too difficult to follow due to the level of soil freezing in some regions. Therefore, if the route is installed at a depth accessible to negative temperatures, you will need thermal insulation - extruded polystyrene foam, polyethylene foam or mineral wool can be used for this.
There are also special insulation materials that are produced in the form of a shell (with or without a foil coating) - they can be made of two halves, or in the form of the same pipe, but with a longitudinal cut for installation.

I resort to shells only if the owner of the property wants it, since they are quite expensive, although of high quality. It is much cheaper to do this with mineral wool - wrap the pipeline, fix the wool with nylon thread, and then cover the whole thing with roofing felt, like a bandage - it is better to fix it with tape or wire.
Only here you need either basalt or glass wool - slag wool has iron particles that rust, causing the insulation to sag.

You will nullify everything if, having insulated the route, you leave inspection wells without insulation, storage tanks and a septic tank - you will end up with bare areas that will... You can also use them to insulate them. mineral wool or polystyrene foam, but it is much cheaper to do this with expanded clay, but it also requires waterproofing - just cover the hole with roofing felt.
Table of required distances between various objects and sewerage
In the third paragraph of the title about important requirements, I mentioned the norms of distances that must be maintained between the sewerage system and various objects and structures - these norms are indicated in the table above. But, unfortunately, it is not always possible to strictly adhere to such provisions, or your “well-wishing” neighbors may unreasonably claim this.
Therefore, you can formalize all this by inviting representatives of the BTI and signing an act of acceptance of the system and internal sewerage outlets - this will solve such problems.

Laying stages: 1 - pour a pillow; 2 - lay the pipe; 3 - cover it with sand
And now I will tell you how the process of laying a pipeline in a trench with your own hands to a storage or flow tank occurs - the essence of the process is shown in the photographs above. After you have dug a trench, you need to pour a sand cushion with a thickness of at least 29 mm into it and level it in accordance with the required slope (18-20 mm/m linear for the 110th pipe).
Then you lay the main line itself, check the slope again and fill it with sand again so that the thickness of the layer above the upper wall reaches 5-6 cm - this will prevent sharp stones from metal objects pierce the pipe under soil pressure.
Before filling the trench with soil, you need to compact the sand, but due to the instability of the material, this is quite difficult to do.
I do it differently - I water the sand generously, and it immediately sags to the desired state, after which you can immediately pour in the soil.
Conclusion
In conclusion, I would like to add that you may need pipeline insulation not only underground, but also in the house if the walls are not thick enough. In addition, thermal insulation does not replace the sand cushion. But if you still have questions about this topic, ask them in the comments.
July 7, 2016If you want to express gratitude, add a clarification or objection, or ask the author something - add a comment or say thank you!