The house is interesting design solution when arranging a children's room. Such a colorful and bright design can be easily and simply built with your own hands if you stock up on detailed plan- diagram, consumables and tools.
Of course, such a product can also be purchased at finished form in the shop. But it will be different high cost. In this article we will take a closer look at how to make a stylish, functional and practical bed house for your child.
To the benefits self-made It is also worth mentioning the possibility of constructing a product in any proportions, using different color solutions, and suitable sizes.
You can make a bed house for a child with your own hands different designs. It can be single or design. Products for boys can be painted blue and thick curtains hung on them.
And cribs for girls can be equipped with a canopy made of airy tulle, decorated with flags, ruffles or balls.
Before deciding on the type of design, you need to choose the shape of the product, its dimensions and design. For very young children, it is worth choosing low single-tier structures. If there are two children in the family, it is recommended to do bunk bed- a house with stairs.
Any house bed design will consist of the following elements:
- rectangular bottom base;
- vertical supports;
- wall-ribs;
- roofs.

Important: any children's furniture should be practical, durable and safe. Safety isn't just about choosing environmentally friendly and natural materials, but also in the stability of the product, the absence of sharp corners, and the presence of sides.
Materials for children's furniture
The choice of materials for making a house bed depends on your personal wishes, the shape and design of the product, and the features of the children's room.
You can make such furniture from:

Advice: to save on making a bed house, you should make the product in the form of a tent. The walls and roof of this design are made of a frame, and a canopy made of organza, tulle or chiffon is fixed on top.
Drawing
Making a house bed for children is a responsible process. Here it’s worth thinking through everything to the smallest detail and doing good drawing future product. On this drawing you must enter number of all individual elements products, their sizes, mounting options.
Attention: the size of the frame is adjusted strictly to the dimensions of the mattress. Before starting to make a bed, it is recommended to purchase a mattress in advance.

The size of the bed will directly depend on the age of the children:
- for preschoolers product dimensions will be: 1300 by 750 by 1400 mm;
- for schoolchildren— 1600 by 900 by 1700 mm.
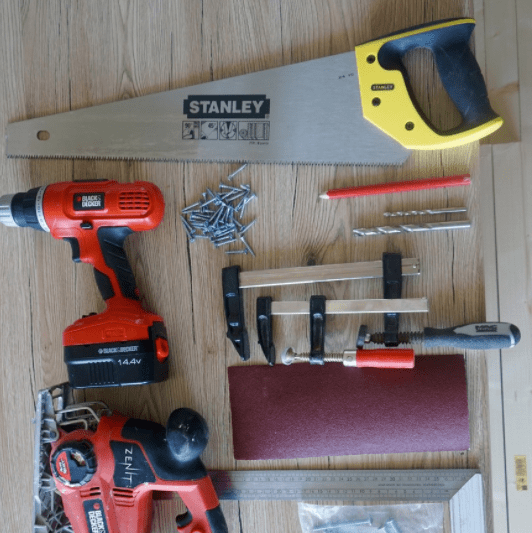
Tools
For high-quality and efficient assembly of the product, you will need to prepare materials and tools in advance. From tools The following will be useful in the workflow:

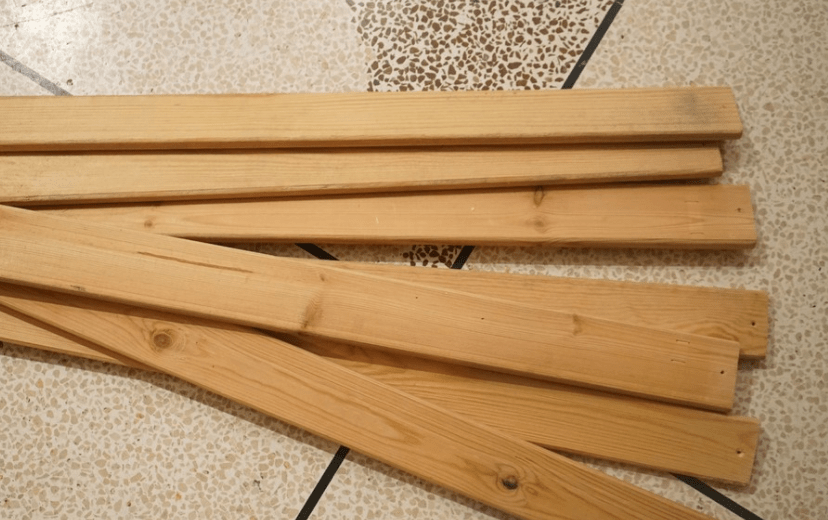
From materials you will need:
- for vertical supports;
- plywood;
- slats;
- self-tapping screws;
- sandpaper;
- tassels;
- paints and varnishes;
- stain.
How to make and assemble from timber with your own hands?
The sequence of manufacturing parts and assembling the structure is as follows:

When making and assembling a house bed recommended:
- screw in the screws slowly and carefully to prevent cracking of the wood;
- use a vice when drilling holes;
- use modern drills;
- clean lumber with sandpaper.
Finishing furniture for a boy or girl
 After making all the components of the house bed and assembling them, you can begin finishing. Products carefully cleaned with a grinder and must be treated with antiseptic compounds.
A simplified version involves opening the wood with stain and varnishing it. But since this bed is intended for small children, its design should be made bright and interesting. Decoration sleeping place depends on general interior rooms and the personal preferences of the children. For boys, blue, gray or blue colors are used, for girls - pink and pastel colors.
Advice: You can decorate the house bed with your own hands with garlands in the form of stars or balls, or hang a canopy.
 Depending on the personal wishes and preferences of the children, the bed house can be made open or closed type. In the first version, the design will be an imitation of walls and roof.
Such products look light and do not clutter up free space.
And the second are more functional products, which have a roof, fencing, walls and even lighting. This type of crib can become not only a great place to sleep, but also a whole playground.
Use your imagination and make your kids real works of art in their room using original decoration sleeping place. You can build a bed house on your own:
- stylized as a princess castle;
- for exciting sea adventures;
- in the form of a fortress for young boys.
Photo
The result can impress not only children, but also their parents:


Useful video
The entire manufacturing process can be seen in the following video:
Conclusion
In conclusion, it is worth noting that by making a house bed with your own hands, you guarantee your kids a comfortable and cozy sleep on soft and beautiful place, give the opportunity to feel like princes and princesses and simply decorate the interior of the children's room, bringing into it a truly fairy-tale atmosphere.
In contact with
The Scandinavian style for children's rooms is gaining more and more popularity, and a do-it-yourself bed-house is a real manifestation of parental care, skill and imagination. Original project a bed made taking into account the size of the room and the age of the child is beautiful, safe and economical. Adults can be confident in the reliability of the bed’s design, and children can have a place to rest, just like the heroes of fairy tales.
There are a lot of options for how to make a bed-house. In respect of construction work increasingly standard, it is important to draw up a diagram of the proposed product, preparing the necessary materials.
Tools
House walls
First of all, drawings are made for the bed-house using a simple pencil and a square. To build the walls of the described bed, four wooden beams are taken, each of which is 1 m 20 cm. These will be the supporting parts for the vertical structure of the house bed. To add aesthetics gable roof, the edge of all supports is sawed off from above to form an angle of 45 degrees.

Marking

Details of the walls of the house

The edges of the supports are sawn off at an angle of 45 degrees.
Roof
This part of the bed-house will also require four bars and the same steps, including finishing the edges at an angle of 45 degrees. All processed bars are assembled, the upper ridge is attached using wood glue. The parts can also be secured with a self-tapping screw, which should be screwed in at a distance of 3 mm from the border of the junction of two wooden parts. We advise you to follow some rules when working:
- It is recommended to clean all cuts with sandpaper;
- the self-tapping screw must be screwed in slowly so as not to delaminate the wood;
- When drilling, it is recommended to use a vice to secure the product;
- Optimal modern drills and a slow process are the key to quality work.
When two slats are fixed to the two supports of the future bed, the end result is the frame of the house. Repeating the procedure will lead to the appearance of two equal frames - the end walls of the bed.


Gluing parts

Connecting parts

End frame attachment
To complete the manufacture of the end frame of the bed, a block of 8.2 cm is screwed at the bottom to support vertical racks and stabilization of the entire structure. For bed assembly, an eccentric tie of the side components is preferable. It is very important to make an accurate design for the desired hit. Self-tapping screws will help make the task easier. The structure is also attached to simplify assembly and save time with flat corners - squares with a side of 3 cm. All accessories for the procedure are available at a hardware store.
When making this tie, drill holes in the crossbar with a 10mm drill bit. They should be located on its midline, not through and have a depth of 12.5 cm. The diagram shows how to fix their outer edges 3.5 cm from the edge of the crossbar.
A 6mm drill bit helps create the hole on the side. It is fixed exactly in the middle and falls into a pre-prepared recess. The eccentric then firmly secures the required appearance of the screw. It is also possible to use wooden parts on long self-tapping screws with pre-gluing. We should not forget about stabilizing the connection using corner brackets.

Attaching the end crossbar


Finished end frame
Assembling the basis of the structure
Two thick bars are prepared as the sides of the bed. Inner side The timber accommodates thin strips using self-tapping screws and involves screwing in the screws at an equal distance from each other. These parts will support the frame of the future bed of the house, which will make it possible to secure the slatted bed bottom.
For accurate work, it is important to make a template measuring 6 cm with holes for self-tapping screws - 2.5 cm. Use a pencil to mark the positions of the holes on all racks so that the upper edges completely coincide with the crossbar. A 6 mm drill is an assistant in organizing through holes in the marks. The procedure is fourfold: in this way, all the posts are connected to the sides of the bed.
Next, prepare the hole for the eccentric on the longitudinal post inside. Long self-tapping screws are screwed in from the outside, which should smoothly connect the side components of the bed and the vertical support with possible gluing of the joining point. The eccentric is inserted into the holes from below and the bolts are then tightened. Repeat the procedure to connect both frames to the sides of the bed.
After fastening the sides of the product to the ends of the house bed, the frame is supposed to be fixed, thanks to the three longitudinal components of the roof. Three beams according to the size of the sides are attached using an eccentric or self-tapping screws and glue. When choosing the latter, the bed-house must be strengthened with corner fasteners.

For assembly you will need two thick timbers

Thin strips will support the frame


The frame is assembled using an eccentric tie

Connection of side supports with crossbars

Slatted bottom
The slats are screwed to flat strips, which in turn are secured to the frame sides. It is important to carry out the correct tightening to hide the screws. The interplank interval is on average 7 cm, 13 parts go to the bottom. The remaining slats will be suitable for the safety side, assembled using corner brackets, but this is not necessary.
These slats can be borrowed from other sleeping places. There are new types of bed slats on sale. There are also ready-made models that are inserted directly into the bed frame. This option is suitable for standard size beds.

Fastening the slats

Decoration
A do-it-yourself house bed has an undeniable advantage - it includes the author’s proportions, color scheme and sizes. For the boys' version, you can use a sea-colored canvas or thick curtains to organize a military headquarters, and for girls - decor with flags and a canopy made of organza or tulle.
All parents know that a child's bed should be comfortable so that the child feels comfortable. This is especially true for beds for newborn babies. The child should feel good while sleeping. For this reason, the choice of this item should be treated with special care. responsibility but do it yourself. Moreover, a do-it-yourself children's bed will be a source of pride for the parent, because it is made with special love and warmth, which means it will be, first of all, comfortable. How to make a bed for a child? Let's look at the detailed manufacturing diagram.
Drawings and diagrams
It is advisable to draw a drawing yourself in advance, a diagram on which the future design of a crib for a girl or boy will be displayed. If you plan to make a house or dolphin bed, then everything will be much more complicated. It is better to use in these cases finished photos and drawings. The photo shows all the necessary measurements and locations of each element. When making diagrams, you should follow everything exactly down to every millimeter; the strength and appearance of the bed will depend on this.
Assembling a crib for a girl and a boy with my own hands– this is a rather complex task that requires great responsibility. Therefore, many people prefer to purchase a ready-made product. But still, you can do it much better on your own; for this, the main thing is to follow the entire manufacturing scheme and do not forget to use the drawings. And if you show your imagination, you can make a bed, a house or a car.
Drawing

 Side diagram
  Diagram of a children's bed with drawers
 Materials and tools
The work will require a number of materials and tools, as well as important details, which are worth stocking up on in advance.
Materials
Baby cots are too expensive, and sometimes their cost depends on appearance and purpose depending on gender - for a girl or a boy, so it is better to make it yourself. Before you start making this piece of furniture, you need to develop a project, purchase required material. The main thing is to have an idea of the structure of this element. If you have basic dexterity skills, you can make premium-class furniture, while spending a small amount of money, which would be enough to purchase a simple crib made of MDF or chipboard. It is advisable to first complete a drawing or project. Drawings and a project will help facilitate the entire process of assembling a product for a child.
Before you begin the project of making a crib, you need to purchase the following materials:
- edged boards - they must have a wood base coniferous species: spruce or pine;
- bars that have cross-sectional dimensions of 50x100 mm. These elements will be needed to make the main frames and legs;
- slats with cross-sectional dimensions of 20x20 mm. These components will be needed to make the filling;
- You definitely need to buy plywood. Its thickness dimensions should be approximately 5 mm.
What type of bed was not made for a house or car, you need to remember important rule- bars and slats should be chosen from wood of special strength. The quality and further wear of the product depend on them.

Required Tools
The crib has a very simple design; a beginner in this business can assemble it, but it’s still worth preparing necessary set tools, without which the entire work project would be impossible. Be sure to prepare the necessary equipment for making a crib for a girl or boy:
- you will need an electric jigsaw or saw for cutting boards and beams;
- grinding machine;
- you will need a manual router that has many attachments;
- It is advisable to purchase a file designed for woodworking;
- drill or screwdriver;
- tools for measuring work - tape measure and level;
- you will need clamps with which to glue the workpiece elements;
- brushes and rollers for finishing works– painting, varnishing and decorating.
 Tools
Tools  Application hand router makes work easier
 Details
In addition to the basic materials, you also need to purchase related items. Without them, the work of making a crib would simply be impossible. So, what will you need to purchase from related materials:
- you need to buy screws. Preference should be given to phosphated type products that are intended for woodworking;
- prepare wood glue;
- special putty mixture for finishing work on wood;
- corners made of durable steel, which are needed to fasten all the parts;
- be sure to buy stain to impregnate the wood and protect it from moisture. Otherwise, the product will not last even a year;
- You will need varnish for painting furniture or paint for interior finishing work.
Don’t forget about decoration, it is advisable to decorate it, as you can see in the photo. You can make a bed for a house, a dolphin, a car. It can be decorated in the form of these products. If the crib is used as a house, then you need to purchase appropriate decorative elements and textiles. If the product is made to look like a dolphin, then preference should be given to blue decoration elements. If it is intended for a girl, then it can be decorated with various pink ribbons, flowers, and a pink canopy made of multi-colored textiles with patterns can be hung at the edges. If for a boy, then you will need to use the same ribbons, only in blue, light blue, and green.
You definitely need to buy a mattress. It’s better not to skimp on it; the child’s continued comfortable stay in bed depends on it. It is advisable to purchase orthopedic products in specialized stores. It has a beneficial effect on the formation of the spine of a growing organism.
 Accessories
  To assemble the parts you need furniture ties and a special drill
 Manufacturing instructions
To obtain a high-quality and functional product, we advise you to follow the instructions below in detail.
Frame
The frame of the crib consists of the backrests and the base itself, on which the mattress will later be laid. The width of the frame should be calculated based on the size of the mattress. The frame is made of two crossbars. We make these crossbars from edged boards. The length of the bars is calculated independently, it all depends on the age up to which the crib will be used for a girl or boy. Typically the standard length is 120 cm.
How to make a frame:
- measure the required length of the crossbars using a tape measure and make notes with a pencil;
- with help electric jigsaw sawing off boards for crossbars required length, there should be only two of them;
- from the edges of the crossbars you need to attach a 25x50 mm strip to glue and screws;
- it is 10 cm shorter in length, so we leave dimensions of 5 cm at each end;
- You need to drill a hole for the screws; it should be drilled close to the edge so that the wood does not burst;
- using corners we connect the frame with the headboards. Secure with self-tapping screws and glue. We fix it in 4 corners;
- At the end of the fastening area, cover with wood putty mixture.
 Frame
Frame  Location of fastening strips
  Footboard
 Base
Next, a base is made on which the mattress and other bedding will be laid in the future. It is advisable to use a material of good strength that can withstand heavy loads.
How to make a base:
- from 20x20 slats you need to cut boards that will serve as filling for the base;
- they should be cut so much that they completely fill the entire base. You should not save, if there are few of them, in the future they will quickly break;
- they should be attached to the frame slats. They need to be attached with emphasis;
- the installation step should be 10 cm, 2 screws should be used for each plank;
- For installation of each self-tapping screw, a hole should be drilled in advance. When tightening the self-tapping screw, its head should go completely into the wood;
- the holes should be coated with wood putty mixture;
- After the putty dries, everything needs to be sanded.
 Plank fastening scheme
  Installing the strips
  Cutout for bed foot
  We fasten the cross bars
 Legs
Instructions for the process of making a crib for a child are not complete without making the legs. The legs of the crib are made according to the following scheme:
- You need to cut blanks from 50x100 timber. They should be long under the head, and shorter under the foot;
- you need to complete 4 blanks. 4 for the headboard and 4 for the footboard;
- Using glue, you need to glue the blanks in pairs. To do this, you need to take one workpiece, attach it to another and make sure that they are inserted evenly;
- we twist them using self-tapping screws;
- when fastening workpieces with self-tapping screws, the heads of the screws should be recessed deep into the wood so that they hold tighter;
- We seal the fastening points with wood putty;
- when everything is dry, the surface of the wood should be thoroughly sanded.
 Coat the boards with glue and fold them in pairs
  Finished legs
 Holes for dowels
For the headboards you will need boards that have a groove with a width of 25 mm. If you have a router available, these holes can be cut and turned yourself or in a carpentry shop. Holes for dowels must be drilled at the ends of the planks with grooves. During drilling, it is necessary to determine with particular accuracy their distance from the edge - they must be strictly at the same level on all planks.
The holes should have the same depth, which is equal to half the length of this piece of wood. These holes need to be drilled with a drill. And in order not to make a mistake, you need to mark the size of the recess on the drill and stick a piece of paint glue.
 Holes for dowels
 Headboard
The headboard should be made according to the instructions:
- From edged boards you need to cut planks that have the same length dimensions. They are needed to fill the headboard and footboard;
- the groove for inserting the slats under the headboard must be filled in advance with glue;
- insert the planks into the grooves and fix them evenly;
- Holes for dowels should be drilled in the leg. It is better to attach the backrest and mark the insertion points with a pencil;
- drill holes in the marked places and pour glue into them;
- we place the backrest in these holes, this must be done tightly so that there are no cracks or distortions;
- we make the second back.
An important point regarding gluing parts. After gluing, all elements will be movable, so it is important to set everything exactly 90 degrees and leave it until dry. Otherwise, during further assembly, you can simply damage the entire structure.
Headboard diagram
The headboard can be any shape
Decorative headboard with legs
Finished bed sides
Assembly
After all the elements of a children's bed for a girl or boy are ready, you need to check for chips and various defects. Features of preparing bed elements for assembly:
- if there are any chips, they need to be repaired with a putty mixture;
- when everything is dry, all elements need to be sanded;
- After sanding, the components must be treated with a primer or stain. This will protect the material from moisture and preserve its properties for a long time;
- When all the elements are dry, everything needs to be painted. The color of the paint depends on the gender of the child; for a girl, you can use gentle tones - pink, red, white, light green, yellow. And for a boy, blue, blue, green, yellow are suitable;
- We paint all the elements with paint, you can use multi-colored paint. Perform this step as you wish;
- if the bed is made to look like a house, then you need to use your imagination and draw everything necessary elements. If the bed is a house, then you need to mark the windows, roof and others important elements. If it’s a dolphin, then you need to show all your artistic skill and paint it in the form of this animal;
- after drying, you need to purchase textiles for a bed for a girl or boy desired color and drawing.
 Attaching the headboard to the bed leg
We are moving the children into the nursery; we first planned to buy a ready-made bed, but we couldn’t choose until we came across an online store with house beds. I was excited about this, but it was expensive to buy (from 50k), and taking into account my own nuances, I decided to do it myself. Everything was bought at Leroy, the price was about 10,000 rubles (+8,000 for the trimmer and sander). Net time days 7.
The project was drawn in visio. I did cutting and sanding in the apartment without repairs, assembled and painted at home. Acrylic paint on water, almost no smell. Assembly on confirmations, then covered with facades using furniture bolts. All holes were puttied and painted. Colored colors for multi-colored planks.
In the end, if you have the time and place, it’s not very difficult. The children are happy, they moved with pleasure:)
We begin to assemble the tool table. Tools: cross-cut saw, eccentric sander, hand router, hand saw, square, 4 small clamps, screwdriver, also known as drill.

Homemade milling table. Fraser lent it. The table is old for renovation, no problem.
In general, all the boards had a factory rounding - a chamfer. But there are no bars, I had to chamfer it this way.

Trimming thing!

The grinding turned out to be the most painful. It’s better not to start without a sander. And do not do it in a residential apartment. Fine dust everywhere.


Wallpaper, you can decorate it.

Frame assembly. Bar 50x50. For confirmations.

Facades on furniture bolts.


Painting with a velor roller White color in 3 layers.


The base color is ready. Later I cut out another window by removing 4 boards.

The size of the lower bed is 90x200, another 20 cm near the wall in the form of a shelf for pillows. Thus Bottom part extended by 20 cm, when you sit down you don’t hit your head. From the lower base to the upper 110 cm.

The staircase was specially made from the inside so that it would not take up space in the room, which is already not enough. The size of the upper berth is 90x160. What’s new to me is that I discovered that it’s extremely easy to make a children’s staircase, just a block, a feather and a round profile on PVA.

The screw caps were then puttied and painted separately, so in the end everything was fine.

The final - back wall made of 12mm plywood covered with wallpaper. Ikea shelves have been waiting in the wings for a long time. The backlight is temporary (for a long time), I will finish it. You can sit on the bed like you would on a sofa, just add more pillows.
