How to repair a ceiling? This question is often asked by owners of houses and apartments who plan to renovate their premises on their own. There are a lot of finishing methods, so choose suitable option difficult. The problem of finishing the ceiling can be solved by installing a suspended structure or installing a stretch ceiling. If you do not want the ceiling height to become smaller, it is best to give preference to traditional technologies.
Of course, plastering work today is not chosen as often as it was before, and there are several reasons for this.
- Finishing the ceiling is a rather complex process. A person who has no experience in construction industry and has not been trained and is unable to perform quality work. But to carry out the installation plasterboard ceiling maybe even a novice builder, although the quality of the installation remains in doubt.
- Plastering the ceiling is one of the jobs that can be called dirty. Craftsmen use liquid solutions when finishing. When applied to a surface, splashes can stain clothing, hands and face. The solution often ends up on the floor and walls.
- Some houses have very uneven ceilings. If the height difference is large, then be prepared to spend a lot on leveling materials.
- You can do all the work on your own, but if you don’t have the skills, you can’t do without the help of specialists.

What to pay attention to
Plastering a ceiling is a renovation process consisting of a number of stages. If you don't want the result plastering works If you are disappointed, then you must take into account all the nuances. Preparation is very important, and the plastering process itself must be carried out in strict accordance with technology.
Start by carefully inspecting the ceiling. You must choose the best way repairs, taking into account the recommendations of specialists. Please pay attention to the following points.
- If the ceiling is uneven, the height differences at different points are more than 5 mm, then it is better to choose putty rather than plaster. The fact is that plastering such a surface will require large financial costs.
- If the height difference is more significant, for example, when the difference between two points reaches 5 cm, you should not choose plastering. The easiest way is to choose tension structure or install a suspended ceiling.
If you examine the ceilings in rooms, most often a small difference is recorded. It makes sense to use plaster if it is from 2 to 5 cm. Remember that plastering is a rather complex process. As the layer thickness increases, you will have to spend more time and effort on the work.
How to prepare a ceiling for plastering
The easiest way to make repairs is if you bought a room in a newly built house. You can plaster a reinforced concrete slab in a new building in a short period of time. But most often situations arise when it is necessary to repair the ceiling after numerous paintings.
Plaster prices
plaster

The work is complicated by the fact that in most cases you have to deal with mold and large differences. In addition, to form a smooth ceiling, it is necessary to remove deep cracks that can often be observed between the slabs. It is impossible to make the ceiling level if you see that the old plaster has chipped or is crumbling. All of the above shortcomings need to be eliminated; only after that does it make sense to begin repair work.
Table. Removing old plaster.
| Steps, illustrations | Description of actions |
|---|---|
| First you need to wet the ceiling well with water. Once done, wait 2 or 3 hours and then wet again. This method is very effective. Firstly, you will remove dust from the surface and it will be comfortable to work with. Secondly, the old plaster will soften well. |
| Take a hard spatula and use it to remove old plaster, carefully scraping it from the surface. Remove the plaster until the concrete floor appears. If the plaster does not come off easily, use a hammer drill. Special attention pay attention to the seams between the plates. |
| Rinse the ceiling thoroughly. This can be done with a sponge, which must first be moistened in water. This will effectively remove dust remaining from lime or cement. |
| Allow time for the ceiling to dry. Buy an antiseptic solution and apply it to the surface - this will remove the fungus and prevent the appearance of mold. The antiseptic should be poured into a separate container. To apply it to the surface, buy a foam roller. When renovating, many property owners apply antiseptic only to the affected areas. But experts recommend treating the entire ceiling with an antiseptic solution. The cost of purchasing an antiseptic is minimal, and the effect of its use is long-lasting. It is best to use an antiseptic primer. |
| After applying the antiseptic solution, wait until the ceiling is completely dry. After this, apply primer. Choose one that penetrates deep into the pores. This material has excellent adhesion, significantly strengthening the surface. |


How to choose the right materials
Modern plastering methods have nothing in common with the old ones used previously. Back then, builders preferred mixtures of sand and lime. It was difficult to work with such solutions; labor costs were very high. Only experienced craftsmen could plaster the ceiling with high quality.
Nowadays everything has changed. Manufacturers offer gypsum solutions that have significant advantages.
- Such plaster solutions rarely form cracks and are not afraid of building shrinkage.
- It doesn't matter what surface you are going to apply the plaster on. Adhesion is strong, this is very important if a beginner is doing plastering.
- The material is environmentally friendly and has no impact on health. You can safely use gypsum solutions when repairing the ceiling in a children's room.

Primer and gypsum plaster for interior work"Knauf Rotband"
You can buy the solution in a specialized store, the prices for the products are affordable. All mixtures are supplied to the market already finished form, you just need to add water, observing the proportion.
Prices for Knauf Rotband plaster
plaster "Knauf Rotband"
Table. Composition of various plastering solutions.
How to install beacons
To ensure that the surface is perfectly smooth, install special beacons. With their help you can easily determine horizontality. It is the installation of profiles that guarantees that the ceiling will be without changes and the quality of the surface will be high. Today you will find perforated metal profiles on sale.

The installation of beacons is carried out in stages.
First, determine where in the room the ceiling is lowest. Measure the height carefully to find out the distance from the floor to the ceiling. Determine the lowest angle - this will be the starting point. Install laser level, with which you determine the horizontal.


After this, install the profiles; they need to be placed on the ceiling near the walls, mounted on opposite sides. Use gypsum plaster to secure the profiles in place. It is best applied with slaps. Wait a little, and then pull the thread between the two profiles. Make several rows - this way you will get a new plane.
The next step consists of installing intermediate beacons. They need to be mounted with a certain pitch (from 20 cm to 180 cm). Many people are interested in why it is necessary to set aside no more than 180 cm? The fact is that the largest rule comes in a length of 2 meters. The remaining 20 cm can be considered a reserve. This way you can easily cover the distance between two lighthouses located next door.

How to apply the solution to the surface
Buy ready mixture. Add water to it, following the manufacturer's instructions. Please note that it is the mixture that is added to the water, and not vice versa. To stir the mixture, it is recommended to use a special construction mixer. If you don't have it, you can take it a regular drill, but in this case you will need a mixer attachment.
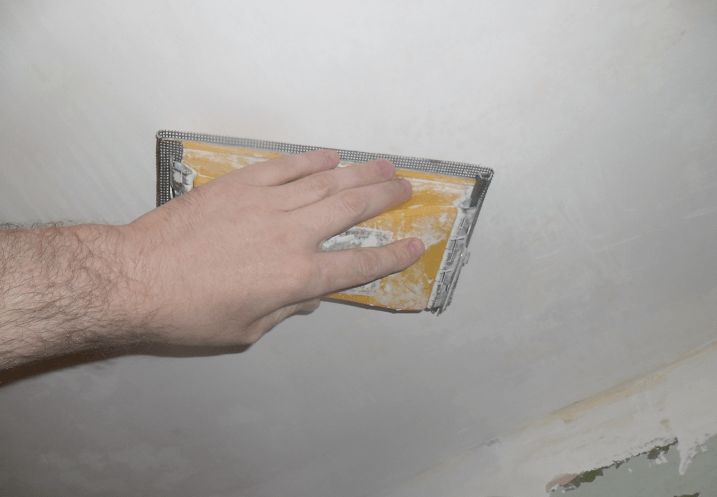
The plastering solution should be applied to the space between the beacons. The easiest way to work is with a spatula; choose a product of medium length. Repeat the procedure as many times as necessary until the surface is completely filled. It is recommended to ensure that there is a slight excess of leveling material. It is very good when it protrudes a little beyond the beacons. Subsequently, you can remove the excess using the rule. To do this, move it in a zigzag manner, moving it towards you.

You should not make a layer thicker than 2 cm. If the height difference is more pronounced, then it is best to apply the mixture in 2 layers. After you apply the first coat, wait. The plaster must be completely dry. Only after this can you begin to re-apply the solution.
If you want to increase the strength of the plaster and ensure that it does not peel off, then you need to put a mesh between the layers. It is placed after applying the first layer of solution, without waiting for it to dry.

When laying synthetic mesh, pay attention to the junction of two strips. Place the material so that an overlap of 10 cm wide is formed.
Then, when the solution dries, remove the beacons, and fill the voids remaining in their place with the same solution.
Leveling the surface
After the gypsum solution has dried, you can begin the final stage. It consists of carefully polishing the ceiling, without which the surface will not be perfectly flat. After this, you need to apply another type of plaster, which is called finishing.

This material is consumed minimally, because the mixture must be applied in a very thin layer. To level the surface, use sandpaper. Buy sheets with a fine fraction; the grinding process will not require much effort. Finished ceiling coat with primer.
Prices for finishing plaster
finishing plaster
What to pay attention to
Many craftsmen suggest using Venetian plaster. But the mixture should not be used for finishing surfaces in the toilet and bathroom. The fact is that if even a small amount of water gets in, such plaster will be damaged. The coating will have to be completely redone.
Prices for Venetian plaster
Venetian plaster

Video - How to plaster a ceiling correctly
In any room, the ceiling occupies the most prominent position. This is the first thing that catches your eye, and it appearance creates the first impression of the entire house. Plastering the ceiling yourself can improve the impression.
Plastering the ceiling allows you to eliminate surface defects and renew it.
During construction, various defects and irregularities occur on the surface of the ceiling. In a residential building, stains, cracks, etc. appear on the ceiling over time. Plastering the ceiling with your own hands allows you to eliminate surface defects and renew it.
Selection of material for plaster
Plaster is a thick mixture that is intended for finishing various surfaces. The process of plastering a ceiling involves applying plaster to the ceiling to create a flat, smooth surface. IN general case this process can be divided into plastering (primary elimination of unevenness) and putty (finish leveling of the surface). The main requirements for the materials used: good adhesion to different materials used in construction; possibility of forming a smooth surface in simple ways; solidity; resistance to external influences.

Plasters can be divided into two large groups - cement-based and gypsum-based mixtures. To increase the functional properties and manufacturability, various substances are added to the mixture. Cement mortar is a mixture of cement and sand in a ratio of 1:(3-4). To increase elasticity, cement-based mortar, when lime milk is added to a mixture of cement and sand (0.7-1 part of slaked lime, diluted in water to a liquid state). Pure gypsum mortar is usually not used for plastering. Lime-gypsum mortar is widely used. It is a mixture of gypsum and lime mortar in a ratio of 1:(3-4). In turn, lime mortar is prepared in the form of a mixture of slaked lime and sand in a ratio of 1: (4-6).
Self-prepared solutions allow, but cannot provide the desired reliability. Currently, dry construction mixtures are being sold, which significantly increase the reliability and quality of the material. This mixture contains mineral and polymer additives that increase their elasticity and strength. Their basis can be cement and gypsum.

For plastering ceilings, dry gypsum-based building mixtures are most often used. However, in rooms with high humidity and other influences of various factors, mixtures should be used for cement based for interior work. For decorative plaster Colored building mixtures are produced. In addition, mixtures differ in the granularity of the additives, which should be taken into account when choosing a composition for plaster (grain size can exceed 2.5 mm) and putty (grain size no more than 0.3 mm). In general, dry building mixtures are divided according to purpose into the following types:
- plaster leveling;
- protective covering;
- putty;
- primer;
- adhesive layer;
- color decoration.
Return to contents
Step-by-step instructions: preparing the ceiling
Plastering the surface with your own hands begins with preparing the ceiling surface. Preparation consists of cleaning the surface, removing obvious defects and old ceiling covering (during repairs). First of all, you need to take measures to protect yourself - when cleaning the ceiling there will be a lot of dust. It is necessary to use goggles and a respirator.

Before applying plaster, it is necessary to clean the ceiling surface and remove the old ceiling covering.
Old coatings are removed using a sharp, hard spatula. First, the paint and previous plaster are removed as much as possible. If it is not possible to completely remove the old coating with a spatula, then you should use an emery mesh, grinding machine or coarse sandpaper.
You should check the quality of the sealing of the seams between the floor slabs. If the plaster is loose or crumbling, it should be removed. Plaster that does not give way when touched with a spatula remains in place. Difficulties can be caused by paint applied directly to concrete. If it does not lend itself to a spatula, then you will have to use special solutions. So, you can use an aqueous iodide solution (25 ml per 10 liters of water). The solution is applied to the remaining paint and soaks it. After this, the paint is removed with a spatula.
Sometimes there are cases where, after getting wet, mold or fungi appear on the ceiling; to remove them, it is necessary to treat the affected area with a solution copper sulfate(5 g per 1 liter of water). After all work on the ceiling, its surface is dried and thoroughly cleaned of dust.
Return to contents
Plastering tool
Plastering the ceiling is done using a specialized hand tools. To plaster the ceiling, you will need the following tool:

- putty knife;
- grater;
- grater;
- falcon;
- plaster trowel;
- plastering spatula;
- corner leveler;
- rule;
- trowel (malka);
- scoop;
- ironer;
- level;
- hatchet;
- paint roller or brushes;
- sanding mesh;
- sandpaper.
For ease of use, you should prepare a set of spatulas of different hardness and width from 50 to 120 mm. In addition, it is advisable to have a comb spatula. To prepare the solution, you need a container for the mixture, a mixer or a drill with a mixing attachment. Quality control should be carried out using a level.
Return to contents
Ceiling leveling
Independent plastering of the surface begins with leveling it. The first step in leveling the ceiling is priming the surface to cover large defects and ensure good adhesion. The ceiling is primed in two layers. The primer mixture is applied to the entire surface of the ceiling with a roller, and in the corners with a brush. The primer layer must be completely dry before applying the plaster.

The plastering mixture is prepared as follows. Water is poured into the container and the dry mixture is poured in the proportion specified in the instructions. Using a drill with a mixing attachment, the mixture is mixed and then allowed to settle for 5-10 minutes. After this, the final mixing of the solution is carried out with a drill until a homogeneous mass with the consistency of thick sour cream is obtained.
The plaster is applied to the ceiling surface using a spatula and trowel. You should start plastering the ceiling from the corner from the wall with the window. The solution is applied to the surface and immediately leveled with a spatula. The ceiling is plastered evenly over the entire surface of the ceiling. The thickness of the coating is about 5-10 mm.
The work is completed by applying putty on top dried plaster. The putty mixture is prepared in the same way as the plaster mixture. Apply a thin layer of 3-5 mm and carefully level with a spatula. After drying, it is sanded with emery cloth.
Any renovation in a house or apartment begins with an inspection of the field of activity. Key aspect, which determines the future scope of work, is the assessment of the condition of surfaces in residential premises. In most cases it is required additional work, the main purpose of which is to level the base surfaces and prepare them for subsequent finishing. Despite the emergence of new technologies and the use of new finishing materials, plastering ceilings and walls in this regard continues to be one of the most effective ways alignment. Why is that? Let's try to answer this question in more detail.
The simple and uncomplicated technology of plastering ceilings is well known to people of the older generation. Despite the fact that technical progress has stepped forward, many experts recommend in some cases to plaster the ceiling, achieving the desired result.
What you have to deal with
A smooth ceiling surface is the key to the success of all subsequent renovations in a residential area. All finishing work begins from the ceilings. The condition of the rough surface of the ceiling part determines what type of ceiling design can be used in each individual room. It is extremely rare that we have to deal with good condition floors. Various defects, cracks, height differences spoil the whole picture and force you to look effective way leveling the ceiling. Plastering an apartment ceiling is most often able to technically solve the problem that has arisen.
Why plastering surfaces continues to be a popular technology in apartment design. The thing is that this is perhaps the only way to achieve a flat surface on the ceiling, while keeping the internal cubic capacity of the living space intact. This is especially true for residents of city apartments, where there are height restrictions. Ceilings of 240 and 250 cm do not allow the use of suspended ceiling structures. Even conventional upward installation plasterboard will steal 3-4 precious cm of height from you in the room. Plastering the ceiling will keep height loss to a minimum, ensuring subsequent performance design solutions.

There are two types of plaster - dry and wet. In the first case we're talking about about installing plasterboard on the ceiling. This option is usually used in private houses and cottages where there are no technological restrictions on height. If you want to avoid wet work, use this technology. GVL sheets will cover the entire area of the rough surface, covering all existing technological shortcomings and creating a continuous, flat surface. All that remains is to putty the seams between the sheets and you can proceed directly to painting the ceiling or wallpapering it.
On a note: in new buildings, as a rule, housing is rented with minimum set interior decoration. Walls, floors and ceiling surfaces already have a base, rough layer of plaster. The only thing you need to pay attention to is the quality of the plastering work.
In the second case, the leveling process involves applying a thin layer of lime-cement mixture to the base surface, thanks to which all existing defects are hidden. The process is painstaking and, in some cases, time-consuming. However, in most cases it will not be possible to avoid it, especially for owners small apartments in houses old building. The joints between the panels look very unsightly, and in the worst case, due to mismatch structural elements There are noticeable differences in heights on the ceilings.
What are the advantages and disadvantages of plastered ceilings?
The very first thing to start with is efficiency. Not every one of us can afford to spend money on installing a complex hanging ceiling structure, not to mention stretch ceilings. In terms of materials costs and labor costs, plastering the ceiling is considered the cheapest way to bring the ceiling part into proper shape.

Advantages
Here it would be appropriate to talk about the advantages that plaster has. This technology has the following advantages:
- environmentally friendly (lime-cement and gypsum mixtures are absolutely harmless to humans);
- the plastered layer does not reduce the height in the room (the maximum permissible layer thickness is 5 mm);
- durability (a properly made solution guarantees the integrity of the plaster for 7-10 years).
For reference: it would be fair to note that suspended structures are also quite environmentally friendly (plasterboard, stretch ceiling) and with proper calculations do not greatly affect the height of the room.
Against this background, you can correct the idyllic picture by mentioning the shortcomings that plaster for ceilings in residential premises has.
Flaws
It should be said right away that do-it-yourself repair– this is always a significant cost savings. However, when you do the plastering work yourself, only your skill and skill can guarantee you good quality execution of work. If you hire professionals for such work, plastering ceiling surfaces will become an expensive pleasure for you. Do-it-yourself plastering of an apartment ceiling will cost you more in terms of labor costs than installing a suspended ceiling system made of PVC panels or plasterboard.
Let's return again to the manufacturability of plastering panels. Existing limitation the thickness of the applied layer of 5 cm will not eliminate significant level differences on the ceilings.

Important! A thick layer of plaster will lead to excessive consumption of finishing materials. The likelihood of the plastered layer collapsing under its own weight increases, which is fraught with danger to the life and health of the inhabitants of the house.
And one last thing. Plastering a ceiling with your own hands is not as simple a task as it seems at first glance. To do this, you need to have certain skills and abilities, an idea of how painting and plastering work is carried out. When you start plastering a ceiling surface for the first time, it is difficult to achieve a perfectly smooth coating the first time. When working with suspended structures the result the first time may be more or less tolerable.
Selection of materials
The main work in this case is related to the use traditional materials. Typically, lime-cement mixtures are used for plastering work. In the context modern technologies It is customary to work with gypsum materials. From the point of view of efficiency and manufacturability last option more preferable. Before you plaster your ceiling, you should figure out what material will be the best option for a particular room and how technologically advanced the process of applying the solution will be.
For modern country houses, cottages and other residential buildings, where there is a combination of different building materials, shrinkage of the main building inevitably occurs. Gypsum mixtures are able to withstand technological loads, while conventional lime-cement mixtures are more rigid and not plastic. Gypsum plaster has better adhesion (adhesion to the base surface).

For reference: gypsum mixtures are used for plastering wood panels and floors. Lime-cement mortars have better contact with concrete panels.
In addition, both materials differ in the method of application. Gypsum solutions can simply be spread on the work surface, while cement-lime plaster will have to be thrown onto the ceiling. For dry rooms, gypsum-based mixtures with the addition of plasticizers are good. In rooms where there is increased level humidity, it is better to use a traditional cement-lime mortar.
Options for plastering work
In order to know how to plaster a ceiling and in what ways this is done, it is enough to get acquainted with traditional technologies in this area. There are two real ways:
- plastering of ceiling surfaces with beacons;
- applying a layer of mortar without beacons.
The first method is classic and is recognized by experts and specialists as the most effective and competent. Thanks to the beacons, you can create an even and smooth ceiling part. In cases where there is a large difference in height and it needs to be hidden, they work without beacons.

On a note: when working with beacons, you will need to apply a layer of solution more than 5 cm thick, which is strongly not recommended by experts for safety reasons.
Correcting the curvature of ceilings will require work without beacons. From a classical point of view, this is wrong, but this is a real way out of the situation. The main idea of the whole idea remains the same - to make the ceiling in a certain area even and smooth. How different will the distance from the floor to the top be as a result? different angles, on this moment not significant. A human eye cannot see such errors. The main thing is that the ceiling and walls have a rectangular joint.
Stages of work
After inspecting the old ceiling and making sure of its condition, you choose a finishing method, with or without beacons. Traditionally, the work surface must be prepared for plastering.
Preparing the rough surface

To do this you need to remove old layer cladding. How to plaster a ceiling if there is mold on the walls and ceilings and the surface is affected by fungus? It's OK. We clean the affected layer of the ceiling surface, and then treat it with antiseptics. Such solutions are commercially available today. To make it easier to remove old plaster, moisten the surface with water. In addition, in this case there will be less dust during work. Cleaning is carried out until the old material is completely removed from the floors.
Remove any remaining lime and cement dust with a wet sponge.
On a note: in damp rooms it is better to treat the entire ceiling surface. You can also remove mold with a bleach solution, however special means not only kill fungus and mold, but also prevent its reproduction for many years.
After cleaning, it is best to walk over the prepared ceiling with a primer. Thanks to the primer, you will get better adhesion to the solution.

The main process is applying plaster
Traditionally, we work in the traditional version, with beacons. This is the method recommended by those who know how to properly plaster a ceiling. Using levels (laser or water) the lowest point on the base surface is located. Having stepped back 10 mm from this place, we beat off the level of the future plaster on the wall and fix the beacon profiles. Next, the work is done according to a simple and well-established scheme.
The step between profiles should not exceed the length of your rule. As a rule, the step is 15-20 cm less than the length of the rule.
On a note: A short rule is more convenient to work with, but a longer tool produces a smoother surface.

The presence of beacons helps to stabilize the thickness of the plaster layer. A layer of solution is applied with a spatula so that each new stroke protrudes beyond the beacons. Excess is removed by rule. Always worth remembering important detail– the thickness of the layer in one go should not exceed 2 cm. When eliminating large irregularities, it will be necessary to re-apply a layer of plaster.
Finishing work is the final stage and comes down to processing finished surface putty. Gypsum plasters are very convenient in this regard and do not require applying a thick layer of putty.
Conclusion
Despite the archaic nature of plaster in finishing works, this technology continues to be in demand today. Ceiling plaster, made at home with your own hands, due to numerous positive qualities, will certainly make your living space clean, beautiful and cozy. In order to achieve this, you should remember a number of basic aspects:
- Plaster is environmentally friendly clean look finishing
- This technology is suitable for working with ceiling parts in low-height rooms
- Plaster is the most accessible and cheapest finishing method
- Gypsum mixtures and cement-lime mortars are used
- There are two ways to lay the solution - using beacons and without them
- The stages of work are divided into:
- preparatory;
- basic;
- finishing.
A flat ceiling is one of the components modern renovation. One of the leveling methods is to plaster the ceiling. The technology is not very complicated, but it requires care. WITH modern materials and tools, you can do this work yourself. This is not to say that it will be easy, but it can be done without the skills of a plasterer.
With or without beacons
There are two technologies for ceiling plaster - with and without beacons. The right thing to do is to do it with beacons. Then the ceiling surface is in one plane. However, there are ceilings with very large height differences. Throwing a 5 cm thick layer of plaster on the ceiling is dangerous: it may fall. Even if you make several layers with a primer after each, there is still no guarantee that such a large layer will stick.
The whole idea is to make the ceiling smooth in some area. It will not have noticeable differences and will visually look smooth. And the fact that in different corners the distance to the floor will differ by several centimeters cannot be determined by eye. With this technology, the main task is to make the junction of the ceiling and walls even. This line is very clearly traced and should be straight. If you choose this technology for plastering the ceiling, you need to start plastering from the walls, towards the center.
The better to plaster
To plaster the ceiling, you can use ordinary cement-sand mortar, or the same, but with the addition of lime. But it is advisable to apply a small layer. Although this mixture turns out to be the cheapest, recently it has been used infrequently - it may fall or crack.
The place of conventional mortar has been taken by plasters based on polymers, which have better adhesion and are less likely to crack. Their disadvantage is their high price. But redoing the ceiling after the applied layer falls will not be cheaper. Therefore, they prefer to immediately make flow plaster from modern mixtures. Some types of similar materials recommended for ceilings are shown in the table.
| Name | Purpose | Color | Layer thickness | Binder type |
|---|---|---|---|---|
| Knauf Rotband plaster mixture | For plastering smooth surfaces of walls and ceilings | White gray | 5-50 mm | Plaster with polymer additives |
| Plaster-Adhesive Mixture Knauf Sevener | For restoration of old plaster surfaces, including facades | Grey | Portland cement with polymer additives and reinforcing fibers | |
| Plaster Bergauf Bau Interier | For plastering in rooms with normal humidity | Grey/White | 5-40 mm | Cement with polymer additives and perlite filler |
| Plaster Volma-Canvas | For interior spaces with normal humidity | 5-50 mm | Based on gypsum with chemical and mineral additives |
If you have little experience in plastering work, when choosing a composition, pay attention to the time before the mixed solution hardens. During this period, it is necessary to apply and level the entire solution, because then it begins to harden and loses its elasticity. Of the plasters listed in the table, Volma has the longest “life” period. But not everyone likes to work with it, many say that with Knauf it is easier, although they have a shorter drying time - 50-60 minutes, but it is more than enough even with no experience.
Primer, why it is needed and which one is better
You won't be able to properly plaster the ceiling without a thorough primer. It improves the adhesion (adhesion) of the plaster mixture to the base. Basically, all problems with falling and peeling finish on the ceiling are due to the fact that the base was not primed. That’s why we don’t skip this stage. Moreover, if there are several layers of plaster, it is advisable to treat each of them with a primer (with complete drying).
First, we prepare the base - we clean it of old coatings, and then treat it with a primer. To do this, pour the composition into a paint bath, take a roller on a long handle (telescopic rod) and distribute the composition over the ceiling. If there are any depressions - recesses, defects on the surface of the ceiling, into which the roller simply does not fit, we pre-treat them with a brush dipped in primer.

Now about which primer for the ceiling is better. According to the craftsmen, this is “Betonokontakt” from the Knauf company. After drying (24 hours), a rough, sticky film remains on the surface. The putty “clings” to it perfectly. Just one thing: you need to make sure that while the primer is drying, no dust gets on it. Otherwise, there will be no effect from such processing. It can only get worse.
How to seal slab joints and rustications
When plastering a concrete ceiling from reinforced concrete slabs The main problem is sealing joints and rustications - recesses at the joints. They are sealed a few days before the general plastering of the ceiling begins - it is necessary for all the materials to “set”.
First, everything that comes out is removed from the joints. Then, with a brush, everything is cleaned of dust and sand. The prepared joints are coated with a primer. Most often they recommend “Betonokontakt”. This treatment significantly reduces the possibility of peeling off the applied plaster layer. If this option is not suitable for some reason, you can use any deep penetration impregnation, but the effect will not be the same.

Such seams on the ceiling are not uncommon.
After the impregnation has dried (24 hours from the date of application), the solution is applied. If a layer of more than 30-35 mm is required, it is better to apply it in two layers. Having laid the first one, a relief is formed on it with a notched trowel. A day later, when the solution dries, apply a second layer. It is already leveled with the ceiling.
With a large layer of plaster, the joints of the slabs are sometimes reinforced with a layer of painting compound. It is needed so that during seasonal movements of the slabs, cracks do not appear at the seam. It is unlikely that anyone will nail the mesh to the ceiling; it is usually simply attached to the composition. In this case, after applying the first layer of plaster, a strip of polymer is laid plaster mesh, they pass along it with a notched trowel, deepening it into the solution and, at the same time, forming a relief for applying the second layer.

Sometimes the rust (crack in the seam) is very deep and it is not possible to repair it with mortar. It is also pre-cleaned of crumbling parts and sand and treated with “Betonokontakt”. Then there are two options:

The question may also arise about how to seal the joints of the slabs on the ceiling. Usually one of the compositions with polymer additives is used, and you can also use a good tile adhesive. It also contains a considerable amount of polymers. They say that after such sealing the joints do not crack.

Do-it-yourself ceiling plaster on beacons
If you ever find it easier. The ceiling plaster, although slightly different, is not radically different. The biggest difficulty is that you have to keep your arms raised up - they get tired, and your neck also gets tired - you have to throw your head back.
Preparation
First, the ceiling is cleared of all existing finishing materials, down to bare concrete. Afterwards, dust is removed from the surface. If there construction vacuum cleaner(not household, it will clog), it’s convenient to work with it, if not, just remove all the dust and sand with a large brush.

If the ceiling is made of reinforced concrete slabs with large rustications, they are repaired. After the solution has dried on the rust, a primer is applied to the clean surface. After 24 hours you can continue working.
The first stage of ceiling plastering is the installation of beacons, but first you need to determine the maximum and minimum height difference. It is more convenient to do this using a laser plane builder. It is installed under the ceiling and turned on the horizontal plane. They measure at a certain number of points and measure the distance from the ceiling to the luminous beam. In this way, the maximum and minimum deviations are found. The thickness of the plaster layer should be slightly greater than the most significant deviation.
The same operation can be done with a water level, but it will be much more difficult. First, you need to apply a horizontal line along the perimeter of the walls at some arbitrary distance from the floor. We fix one end of the level at this mark. With the second one, we go around the room, measuring the distance from the water column in the level to the ceiling. So calculate the same maximum and minimum points.
Having decided on the thickness of the layer, we select the beacons. These are galvanized perforated strips with a protruding back. These backs will be the supports when leveling the solution. The height of the back of the lighthouse can be 6 mm and 10 mm. We choose the one that is slightly larger than the found maximum deviation.

Beacons are placed in increments slightly less than the length of the rule - the tool used to level and cut the mortar. With a rule length of 1.5 meters, the beacons are placed at a distance of 1.1-1.3 m. Longer ones are difficult to work with if you are not used to them; shorter ones are not worth it - there are too many seams. First, the outer beacons are placed, retreating 20-30 cm from the walls. The remaining distance is divided so that the distance between the beacons is within the specified limits.
Attach the beacons to the gypsum mortar and mix it thickly. Islands of this solution are applied along the beacon installation line (can be drawn on the ceiling). The beacon strips are pressed into it, exposing their backs in one given plane. If you have a plane builder (level), everything is simple - set it according to it - the beam should slide along the back.
If we work with a water level, we transfer the required “finishing” level of the ceiling to the walls, stretch several cords so that they are directed along the lighthouse. Using these cords we insert the backs of the slats. Having set all the beacons, check the plane using a rule with a bubble level installed on it.

The distance between the beacons on the ceiling is 1.1-1.3 meters
After the plaster has set (this should take several hours), you can begin plastering the ceiling.
Applying and leveling plaster on the ceiling
At this stage, the work will require stable construction trestles with a large platform between them. The tools include a small spatula and a construction falcon - a platform with a handle.
Breed the selected plaster mixture strictly according to the instructions. The solution should be homogeneous, without lumps. The solution is applied to the falcon from the container, then it is placed on the ceiling in portions using a small spatula. It is probably more convenient to apply the solution with a sharp movement of the brush, but you can simply “smear” the solution onto the ceiling. Here everyone chooses their own way.

The distance from one lighthouse to another is filled with plaster. The width of this strip to begin with is 50-60 cm. When laying, you should not achieve a uniform surface. It is filled with chaotic strokes.
We take the rule, rest it on the beacons, move it towards us, swaying from side to side. With this movement, a certain amount of solution remains on the bar.

We remove it with a small spatula and send it to the ceiling - to the unfilled part or where holes are found. Having filled the holes, we pull the rule again. These are the basic techniques for plastering a ceiling; we repeat them until the area becomes level.

So, gradually, one strip is filled, then the second, and so on - the entire ceiling. We leave it to dry for 5-8 hours.
Removing beacons and sealing rusts
When the solution has set, but has not yet dried, remove the beacons. If you leave them, the metal will begin to rust, and rusty stains may appear on the ceiling.

The rusts remaining after the beacons are filled with the same solution and leveled to the same level as the ceiling plane using a wide spatula. There is no point in using a melting pot - it is too long. After this, you can consider that plastering the ceiling with your own hands is finished. All you have to do is wait for it to dry completely. This will take from 5 to 7 days, depending on the composition.
- Plastering the ceiling
- Grouting the plastered surface
In order to describe as clearly as possible how to plaster a ceiling with your own hands, let’s take a small room as an example. For this we will need the following materials:
- laser or water level;
- rule;
- lighthouses;
- gypsum plaster;
- self-tapping screws with dowel;
- gypsum plaster.
Tools for applying plaster.
Before you start plastering, you need to carefully mark and prime the surface.
Marking the ceiling surface and priming it
First you need to correctly mark the ceiling.
Beacons on the ceiling should be placed in the direction of light falling from the window.
This is necessary so that if some error occurs when installing the beacons (most often the average beacon is installed incorrectly), it would not be so noticeable. It is necessary to take into account such subtleties, because when placing beacons across the room, the light falling from the window will reveal such an error.

Scheme for marking a room with beacons.
Depending on the width of the room, beacons are installed. Up to three meters - two rows of beacons are installed, each row is installed at a distance of about 60 cm from the walls. The process of plastering ceilings with your own hands takes place in the following sequence: first plastering middle lane, then two side ones. In rooms with a width of 3 to 5 m, beacons are placed in three rows. If the width of the room is more than 5 m, then there can be four rows, etc.
As an example, we took a room with a width of 3.5 m, so we will need to install three rows of beacons. We install two rows near the walls, retreating about 20 cm from them, and we place the last one along the center of the room, thus as if dividing it in two. In this case, you can begin the plastering process in the direction from the center of the room to its wall. In this case, the length of the rule allows you to do this. The first beacon in each row should be about 2.5 m, slightly less than the length of the rule for plaster. The second one can be any size.
Then you need to note in which places the screws will be screwed in; they are needed to correctly mark the height difference in the room. For your convenience, you can immediately write on the ceiling where each beacon will be located, so as not to re-measure them. After the marks for the screws have been made, use a puncher to make holes in the places of the marks and install dowels into these holes.

The sequence of applying primer layers to the ceiling: 1 – first layer; 2 - second layer; 3 – direction of light rays from the window.
Before you start screwing in the screws, you need to prime the entire ceiling. There are a great variety of primers for plastering work in construction stores, so choose it in accordance with the surface that you are going to plaster. If the surface is smooth, then a stronger primer is needed, for example betokontakt. When treating the surface, you should not skimp on the primer. After you have completely treated the entire ceiling area, you need to let it dry.
Once the primer has dried, you will need to find the lowest point in the room. To find this point, you can use a laser level; if you don’t have one, then a simple water level will do. To measure with a water level, you need to tie it to a rule and measure starting from the corner of the room, while noting the height level of each section near each hole for the screws. The purpose of these measurements is to find the lowest point where the thinnest layer of plaster will be. If you make a mistake when measuring, then overuse of plaster may occur and the layer will come out very thick. Or at the end of the work you may come up against a ceiling plane on which it will not be possible to apply even the thinnest layer of plaster.

Methods of applying decorative plaster to the ceiling.
When the lowest place near the drilled holes is found, we screw the self-tapping screw there so that it protrudes about 5-7 mm. This is the thickness of the plaster beacon. Since the screw was screwed into the lowest place in our ceiling, the other screws will stick out a little more. We take the second screw and screw it in approximately at the same level as the first. We check the horizontal between them using the rule, using a water level we check the second self-tapping screw relative to the first.
Depending on what the level shows, we screw in or unscrew the screw, while not forgetting to check each action with the level. We adjust the following screws in the same way, be sure to check the level between them. To mark using a water level, you will have to spend about 2 hours of your time. With laser, everything is much simpler; the whole process will take about 20 minutes.
Return to contents
Plastering the ceiling
Rotband plaster has the following features: you cannot apply more than 1.5 cm of plaster, and you cannot apply a second layer either. Such rules exist in European countries. With us, everything is much more prosaic; most often they apply a second layer up to 5 cm thick.
The principle of plastering the ceiling is the same as that of plastering walls, that is, apply plaster to the ceiling and remove excess. You can apply the solution different instruments depending on the thickness of the layer. If the layer thickness is less than 1.5 cm, then it is better to use a steel trowel.

Scheme for applying plaster using a crumb thrower.
You need to apply a small amount of solution on it and carefully spread it across the ceiling with light movements and pressure. If your layer is more than 1.5 cm, then it is better to work with a spatula. When you mix the solution, you need to remember that a solution that is too thick will not apply well to the ceiling and will fall off under its own weight. Therefore, the solution should be made not very thick so that it sticks to the surface better.
If the solution is thick, so-called bubbles may appear. These are places where the solution did not adhere to the surface of the ceiling; it sagged under its own weight, and thus an air bubble formed. Most often, such bubbles appear in the corners. To avoid this, you must first apply a thin layer of plaster, and then apply the main one. The point is that the solution sticks very well to the solution and no voids are formed.
The second layer must be applied before the first dries so that the layers can bond better. If you apply a second layer after the first has dried, cracks may form on the surface of the plaster, and you will have to remove the entire layer so that it does not fall off on its own in the future. And with bubbles it’s even easier, you need to wait until the solution dries and use a spatula to remove the place where it forms down to the very base. And then put new plaster on this place.
It is better to carry out the plastering process with your back to the window, so the light will not disturb you. Removal of excess solution occurs by moving the rule or trowel towards you. The finishing movement, on the contrary, is done on your own, so the light from the window will allow you to see the gaps between the plaster and the rule and quickly respond to possible problems.
After applying plaster to the main areas of the surface, there may be places along the walls where plaster has not yet been applied; you also need to remember to unscrew the screws. They may prevent you from leveling the mortar with the rule, and after grouting they may be visible even under a layer of putty. The holes from them and places along the walls are sealed after the plaster has dried. After this, we remove all the beacons and seal the resulting furrows.