The craze for plastic windows is not accompanied by a corresponding increase in knowledge among owners in servicing window mechanisms. Even such a simple question: is it necessary to adjust plastic windows for the winter, is unexpected for 95% of respondents. What about what can be regulated? plastic windows with their own hands, only a few know.
In reality, the process is very simple. It is important to know where, why and how to twist. Let's try to understand the instructions together using photo and video materials.
Difference between summer and winter mode
For the first few years after installing plastic windows, customers experience complete euphoria in the winter: warm, cozy, no drafts anywhere. However, over time, in severe cold weather, a barely noticeable flow of cold air begins to be felt near the closed sash. Every year it gets stronger. Immediately there is a desire, like in the good old days, to cover all the cracks with a paper strip. Some people do this out of ignorance.
But window manufacturers foresaw this situation and provided for the adjustment of windows for “winter-summer”, when the force with which the sash and frame are pressed against each other changes. In the first few years after installation, carrying out such work is not only unnecessary, but harmful. Firstly, sealing rubber it perfectly maintains tightness even in a neutral position; secondly, strong compression of the rubber leads to the loss of its elasticity at negative temperatures.
Over time, the seal wears out and begins to let cold winter air into the apartment. The professionals who install windows do not explain what needs to be done about the appearance of drafts, but offer paid annual maintenance, which most customers refuse, which, by the way, in our opinion, is correct.
It is not necessary to call professionals to adjust plastic windows for the summer (winter). Apartment owners can do the work themselves.
Adjustment Tools
Adjusting plastic windows yourself is impossible without a few simple tools:
- Furniture key No. 4 - always included with a screwdriver. If you don’t have such a tool at home, you can purchase it in stores that sell furniture fittings(costs from 70 rub.);
- Several screwdrivers with a Phillips head (you need crosses of the shape and size TX and T);
- Slotted screwdrivers 4-5 mm wide;
- Pliers or pliers;
- Star-shaped keys are not needed for all types of windows.
Instructions for regulating PVC windows
Before installing windows, window manufacturers carry out a full cycle of work to adjust the locking and clamping mechanisms. However, over time, parts wear out, changing the original settings, which requires adjustments to the operation of window mechanisms.
Preventative work may be required in the following cases:
- difficult movement of the sash when opening or closing - it touches the frame from below or from the side;
- penetration of cold air from the street in winter (drafts);
- the handle does not fix the sash in the “Closed” position - it does not turn;
- loose fittings (most often a handle);
- transition from summer to winter;
- sagging window sash (balcony door).
Sash pressure
Let's start with the simplest thing: adjusting the sash pressure for winter mode. When installing windows, installers use the standard pressing force of the sash against the sealing rubber of the frame. However, in winter, due to a not tightly closed window, cold comes in from the street. You can fix the problem by simply turning the locking pin - the window will close very tightly.
The trunnion is located at the end of the opening sash and has three types (see photo):
- a locking pin that regulates the clamping force - the first one (on the left) in the photo;
- anti-burglary locking pin with adjustable clamping force - middle in the photo;
- locking anti-burglary pin with adjustment for pressure and height - third in the photo.
Attention: carefully inspect the opening doors from the top, bottom and back. In some models, the clamping eccentric may also be there. Also, a number of companies put 2-3 pins per sash. In this case, you need to adjust all the eccentrics at once, otherwise the window will warp.
The window trunnion can occupy three positions:
- standard, also called neutral, with medium pressure;
- summer - the pressure is weak;
- winter - the maximum possible pressure.
You can determine for what period of the year the window is adjusted by the location of the eccentric. If it is an oval, then the vertical position indicates weak pressure (summer mode), at an angle - standard, horizontal - strong pressure ( winter option). The round pin has a notch. If she looks outside - summer option clamp, into the apartment - winter, up - standard.
You can change the position of the eccentric using pliers or a furniture key. Sometimes, to turn a trunnion, you need to pull it towards you.
Pliers will be required for accessories from Maso, where the pins are oval. A wrench can also come in handy here - you can also use it to turn the eccentric. The Torx eccentrics should be moved from one position to another using a hex wrench or a flat-head screwdriver. Roto locking mechanisms must be adjusted using a furniture key.
We emphasize once again: it is necessary to increase the pressing force of the sash to the frame only if the tightness is lost. You can check this in several ways:
- light a match or lighter and bring it to the closed door. Flame deflection indicates a draft. In this case, adjustment for “winter-summer” is required;
- insert a sheet of paper between the frame and the open sash and close the window. If after this the sheet can be easily pulled out, the fit must also be adjusted.
Important: adjustment of plastic windows “winter-summer” is not carried out just installed windows— in winter mode, the new sealing rubber may lose its elasticity due to strong pressure.
With the departure of frost, the clamping force should be weakened. This solves two problems at once:
- the elasticity of the seal is maintained;
- ventilation of the room is ensured through a loosely closed sash.
Preparing for the summer season is easy for any family member:
- select a tool for the trunnion;
- open the window and determine the location of the eccentrics;
- turn all the trunnions counterclockwise (oval - to a vertical position, round - to the "outside" position).
As often happens, when the condition is too advanced, the patient has several diseases at once. Same thing at the window. It may turn out that after adjusting the trunnions, drafts still circulate near the sashes (the result of long-term operation without preventive maintenance).
Then further adjustment of the window mechanisms, or more precisely, the upper and lower hinges, will be required. To do this, you need to know how to adjust plastic windows yourself for the winter if there is a need to adjust the position of the upper and lower hinges.
Top loop
When a window closes poorly, catches on the frame, or fits unevenly to the seals (skewed), there is always an influx of air from the street. In this case, the hinges are subject to adjustment. Here it is possible to change the position of the sashes in two planes: up and down, left and right, as a result of which they can be perfectly aligned with the frame. By tightening the bolt on the scissors at the tilt-and-turn window, you can tighten the upper corner of the sash to the frame.
U different manufacturers, for example, "Rehau" and "Veka", appearance The hinges can be different, as well as the tools used to adjust them. But the principles are the same, as can be clearly seen in Fig. below.
Adjusting the top hinge allows you to move the sash in a horizontal plane - left or right. Such manipulation is necessary if the window sash has sagged and it begins to cling to the impost. The adjusting screw is located in the loop. To access it, the window must be opened at least 90 o (a smaller angle is also allowed, but working in such a situation is extremely inconvenient).
Rotate the adjusting screw carefully so as not to damage the locking mechanism when closing the window. Experts advise closing the shutter after each half-turn of the screw and checking how the bolt bar hooks fit into the strike plate. At the same time, you can see how the sagging corner fits to the frame.
By rotating the key counterclockwise, the lower opposite edge of the sash rises. In this case, it is necessary to monitor the trunnions (hooks) - they can rest against the striker. In order to maintain balance: raise the angle and ensure normal entry of the hooks into the striker, sometimes you have to rearrange the striker (in the language of specialists, the striker).
Accordingly, turning the adjusting screw counterclockwise lowers the lower opposite corner.
Attention: many works erroneously indicate that when the top hinge adjusting screw is rotated clockwise, the sash moves away from the frame. We especially note that it is not the clamping force that is regulated, but the position of the sash in relation to the frame. In this case, the upper corner of the sash in the hinge area does not move away from the frame, but, on the contrary, is attracted to it.
Often, adjusting the top hinge does not produce results - the corner in the hinge area does not adhere tightly to the frame. In this case, it is necessary to adjust the tilt and turn mechanism, and specifically, tighten the bolt on the scissors. To access it, the sash must be opened simultaneously in two planes.
To do this, first open the window in the usual way - turning it. Then, pressing the blocker to the sash, move the handle to the “ventilation” position. After this, the window is loosely covered and tilted back. The sash hangs on the bottom hinge.
On one of the plates there is a bolt with a hex head. By turning it clockwise, the pressing force of the sash profile to the frame increases. Accordingly, by rotating the bolt in the opposite direction, the fit of the corner to the frame is weakened.
Bottom loop
The bottom hinge has two adjustment screws. One of them is responsible for moving the sash horizontally (left-right), like the top hinge - located at the bottom. By tightening this screw, you can raise or lower the upper opposite corner of the sash.
The second type of adjustment (vertical) can be found on top of the hinge - to do this, you need to open the sash to the tilt position and remove the decorative trims. By tightening the screw, the sash can be raised (clockwise) or lowered (in the opposite direction). For example, horizontal adjustment did not allow us to eliminate the touching of the lower corner of the sash from the side of the handle to the frame profile from below. Raising the entire sash solves the problem.
Pen
The handle of a plastic window has only one function - using the hooks on the locking bar, pull the sash to the frame or, vice versa, release the clamps to open the window. Therefore, it does not have any adjustments either for the degree of pressure or for changing the position of the sash in the frame. However, this does not mean that the window handle does not have problems. She can:
- break;
- to become loose;
- jam;
- turn tight.
All of these problems can be easily corrected yourself.
The handle is broken. To replace the handle, simply pull the decorative strip covering the trim towards you and turn it 90 o (see photo). Use a Phillips screwdriver to unscrew the screws and remove the broken handle. The new handle is placed in the same position as the old one. Fastening is done in the reverse order.
She became loose. It’s even simpler here: move the cover and tighten the screws.
Jammed. The most unpleasant situation when the handle does not turn is jamming. This happens due to careless opening of the sash: the position of the handle was changed too sharply, as a result of which the locking mechanism did not work.
A lock is installed on each window to protect the locking mechanism from accidental turning of the handle in the open position - leading to inevitable damage to the fittings. Blockers are installed at the end of the sash, immediately under the handle (there are modifications of the fittings where the blocker is located at the bottom of the sash). They are different for different hardware manufacturers, which is clearly visible in the photo.
You can disable the lock when the sash is open. On Maco fittings, you need to press the locking tongue and move it to the “parallel to the sash” position, then change the position of the handle. For other types of locking mechanisms, it is enough to press the locking latch against the sash and turn the handle.
It's hard to turn. The handle turns tightly if there is no lubrication in the bolt mechanism. The problem is eliminated after performing preventive maintenance of the fittings, during which all metal parts cleaned of dirt and lubricated (lubrication of PVC windows is discussed in detail in the work: “”).
Attention: if the handle turns tightly in the final part of the “closed” position, you need to adjust the trunnions - the sash is pressed tightly against the frame. Loosening the pressure will weaken the movement of the handle (it will also save the seals from premature wear).
What to do if the window does not close
Often it is not possible to close the window tightly (sometimes it does not close at all, i.e. it is pressed against the frame, but is not fixed with a handle in the closed position) after all the adjustments. Here the reason is the deformation of the sash profile inward or the frame outward (opposite deformation options are possible, but they do not create problems), as a result of which the hooks of the bolt bar (trunnion) simply do not reach the counter bar. There are two ways to fix the problem:
- align the sash profile;
- compensate for the bending of the frame profile with a lining under the strike plate.
Deforming towards the glass unit, the sash profile pulls the shutter bar behind it. There is a gap between it and the counter plate that needs to be eliminated. This work is performed step by step in the following sequence:
- The side bead is removed from the sash (one is enough, on the hinge side). How to remove them correctly and put them in place, see the article: “”;
- The amount of deformation is determined: a level or any long, even object is applied to the side of the sash and the amount of the gap is measured;
- A gasket is selected between the sash and the glass unit - its thickness should compensate for the size of the gap;
- Using a smooth and thin plastic or wooden (not metal) object, the sash profile is carefully pressed from the glass unit just below the installation location of the gasket;
- A gasket is placed in the resulting gap;
- The bead returns to its place.
Aligning the frame profile is much more difficult. Therefore, here experts take a different route: they install linings under the striker, as a result of which it moves towards the sash. Use plastic 3 mm thick (this is enough). Under the bar you need to cut 2 linings: narrow and wide. To install them, the counter strips are removed from the frame and then installed with a gasket. This process can be seen in the video.
Is there a difference with adjusting PVC balcony doors?
Operating principle of the fittings metal-plastic door leading to the balcony, the same as the PVC window. Therefore, the adjustments are almost identical:
- Horizontal door movement to the right or left is carried out by tightening the adjusting screw located in each loop under the decorative trim. If the door leaf clings to the doorway along its entire length from the handle side, you need to tighten the screw 1-2 turns clockwise in each hinge (top, middle, bottom). If the door at the corner farthest from the hinges catches the threshold, the screws are adjusted at the top and in the middle;
- Vertical adjustment changes the position of the door in relation to the opening in height. To do this, tighten the vertical adjusting screw in the lower loop. Turning the furniture key counterclockwise moves the door down, clockwise moves it up. Unlike the window, you need a “furniture key” with a diameter of 5 mm. After lifting the door two full turns, it is necessary to lift all the strikers on the sides of the door frame (you need a “furniture key” with a diameter of 2.5 mm). After this, you will have to lift the main and additional locking bars;
- Front adjustment is responsible for the force of pressing the door against door frame. For these purposes, the trunnions are rotated, as in a plastic window. However, there are also differences. In some types of fittings, the clamping force is changed by the strike plate - for this, an adjustable screw with a hexagon head is placed under it (option “A” in the photo “Types of strike plates”).
In order for windows to serve for a long time without losing their characteristics, before the start of the new season they must be:
- Thoroughly remove dust and dirt and then wash. First, use a toothpick to remove dirt from drainage channel, and with a hard-bristled brush from the fittings. Then the slopes, profiles, double-glazed windows and window sill are washed. The glass unit and profiles are washed from both sides: from the street and indoors. You can dissolve detergents in water without abrasive materials and aggressive chemical substances(alkali, weak acid solution, etc.). Glass requires special removers. Wipe plastic with a soft sponge, and glass with paper or a rubber scraper;
- Lubricate after drying shut-off valves and window seals. The work “” shows where, with what and how PVC windows are lubricated;
- Adjust the trunnions for the coming season.
The fittings for plastic windows from different manufacturers are almost identical, and therefore the preparation for the start of the season is the same. If any difficulties arise in preventive maintenance or adjustment, you can always look at the manufacturer’s instructions, which describe how to properly handle and adjust their products.
Conclusion
Manufacturers of plastic windows and doors are well aware of the problems that arise during the operation of their products. To solve them, various adjustments are provided in the window fittings.
- The degree of pressing of the sash to the frame is regulated by trunnions. Wherein proper care maintenance of fittings at the beginning of each new summer or winter season extends the service life of both the window as a whole and the seals.
- The horizontal adjustment of the sash, when it sag, is carried out by tightening special screws in the upper and lower hinges.
- You can raise the sash without changing the position of the corners in relation to the frame using the adjusting screw located inside the lower hinge.
- Deformation of the sash profile is eliminated by placing a spacer between it and the glass unit. The bending of the frame towards the wall can be compensated by using a spacer under the striker plate.
We will send the material to you by e-mail
The air temperature in the room largely depends on the tightness of the window system. Timely regulation allows you to create the most comfortable conditions in each room. As part of today's review, we will look at how to switch windows to winter mode so that you can do it yourself.
Windows can be operated in different positions
The mode of modern plastic windows determines the degree to which the sash is pressed against the frame. May be:
- standard, at which the sash has an average clamping position, optimal for. The window system can work effectively in winter and summer. The eccentric occupies a central position;
- winter The tightest fit of the sash to the frame is ensured. The winter position of plastic windows allows you to more effectively retain heat inside the house;
- summer The sash is fixed less tightly. Air can circulate freely, providing a micro-ventilation effect. As a result, comfortable conditions are created in the apartment during the hot season.
Why do you need to adjust the modes of plastic windows?
By alternating summer and winter modes of plastic windows, you can extend the service life of the structure. In winter, the material contracts, and as the air warms up, it expands. Adjusting the window system changes the degree of pressing of the sash. As a result, the wear rate of the seal and fasteners is reduced.
You should change the plastic window mode if:
- It's blowing from the side of the window. An incorrectly selected position will result in cold air coming in from the window system in winter;
- The sash does not open or close well. An incorrectly selected position may cause it to jam in ventilation mode;
- the sash sagged. The reason may be critical wear of the hinges. By replacing the fittings or switching the structure to winter mode, you can...
Advice! Find out from the specialist how to switch double-glazed windows to winter mode immediately after installing the system.

Advantages and disadvantages of switching windows to winter mode
Timely change of window design mode has a beneficial effect on the microclimate inside the house. When in the winter position, the system will prevent the cold from entering from outside. The summer position will ensure active air circulation.

It should be remembered that constantly changing the order of operation of the window system has certain disadvantages. Adjusting screws allow you to increase the degree of sealing of the window system. However, constant changes in the position of the fastener can cause the loss of the basic characteristics of the sealing element. Strong compression, exposure to low temperatures and high humidity can lead to the fact that after 2-3 seasons the seal will become less able to fulfill its main purpose. In some cases, it may even need to be replaced.
Attention! By refusing to change the order of operation of the window system, you can increase the service life of the seal by at least twice.

Which fittings have the function of switching to summer or winter mode?
Before you figure out how to set plastic windows to winter mode, it’s worth finding out whether all designs have this function. Answer: no. It all depends on what class the fittings used belong to. Available accessories:
- budgetary. Such fittings have limited functionality, as they are intended for cheap plastic products. With its help the sash can be opened/closed. Some models allow you to choose ventilation. Budget fittings are most often used during large-scale construction, when it is necessary to reduce the costs of constructing a standard new building;
- standard. The price corresponds to the quality. The products have wider functionality compared to budget option. Most models allow you to set winter mode on plastic windows. Standard fittings are widely used in most window systems installed in buildings for various purposes;
- specialized. Such products are intended for windows that are installed in premises operated in special conditions. They have special abilities. Can be burglar-proof. With their help, you can change the operating conditions of the window system.
An eccentric or trunnion is one of the hardware elements that is used to transfer a window system from one operating mode to another. Trunnions can have different shapes. As a rule, round or oval with a special hole for the tool. Having purchased housing in a standard house, not every user knows whether there is a winter/summer mode on the plastic windows in his apartment. This can be checked by visually inspecting the fittings that come with the window system. The trunnion located on the side of the sash deserves special attention. If the trunnion has key holes or is oval-shaped, then such a system allows operation in various positions. Before you begin adjusting the window system, you should perform a number of preparatory measures. To do this you will need: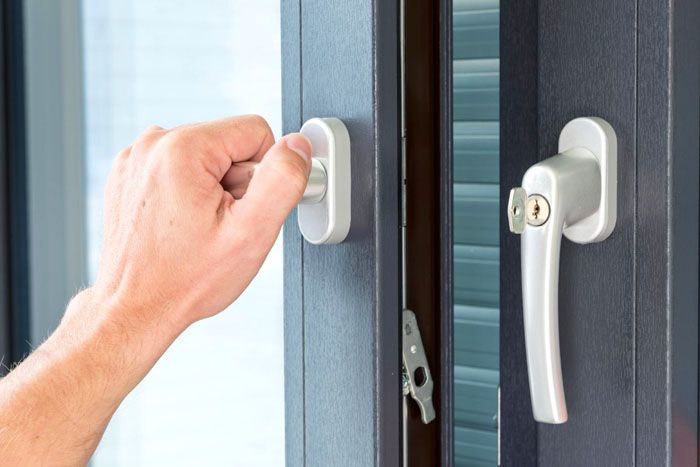
What types of eccentrics (trunnions) are there for switching windows to different modes?
How can you tell by looking at your windows whether they have winter mode?
Preparing windows for switching to winter mode
Advice! Timely maintenance of double-glazed windows will significantly simplify the process of transition from one operating mode to another.
Preparatory work is carried out in the following sequence:
- glasses are washed;
- the frame is cleaned of accumulated dirt. Special attention removed from joints and joints;
- the fittings are cleaned. To do this, you should use a hard brush;
- all elements of the window system are thoroughly wiped;
- the fittings are lubricated with silicone grease;
- the trunnion is given the required spatial position;
- lubricant is reapplied.

When and how to switch windows to winter or summer mode
When to switch windows from one mode to another, everyone decides individually. If there is a “cold feeling” coming from under the closed sash, it’s worth it. There is no need to rush, so as not to worsen the condition of the rubber seal ahead of time. It is also important not to overdo it, since over-tightening the eccentric sometimes leads to. As soon as it gets warmer outside, you should immediately switch from “winter” to “summer”. Let’s look at how to switch Euro-windows to winter mode below in more detail.

How to properly adjust windows
Before setting the mode, you should adjust the window system to avoid damage to the sealing element when the sash sags or is skewed. Armed with a pencil with a soft core, you should circle the closed door around the perimeter. This should be done carefully, without much effort.

After opening the sash, you should measure the distance between the frame opening and the drawn line. The obtained values should be in the range of 6 – 8 mm. Ideally, equal around the entire perimeter.

If the values do not match in height, you should remove the decorative plastic insert from the hinges and tighten the screws using a hexagon. If the distance from below is smaller, then unscrew the top screw a little, adjust the position of the sash and screw the fasteners back. This action is repeated with the second loop. If the distance is smaller at the top, perform similar actions with the bottom screw. The adjustment is carried out until the desired result is achieved. As a result, all screws should take approximately the same position.
Attention! A correctly adjusted structure should open without the characteristic sound of friction.
If horizontal movement of the sash is required, tighten the adjusting screw in one of the hinges. The displacement can reach 3 mm. If you want to move away from the hinge, rotate counterclockwise. Otherwise - clockwise.

Related article:
Photo and video instructions
A fairly detailed verbal description does not always allow you to figure out how to switch windows to winter mode. Pictures with detailed descriptions or a master class recorded on video allow you to understand this much faster and better. We suggest choosing the most convenient way perception of information to make it easier to adjust window design at home.

How to switch plastic windows to winter mode?
For those who do not know how to switch windows to winter mode, instructions with a detailed description will help you complete the necessary steps quite accurately. You should prepare the necessary tools and follow the recommendations of a specialist.
First, let's take a closer look at how to switch windows to winter mode using a hexagon. You can follow the following instructions:
| Photo | Description of work |
|---|---|
 | We open the door. |
 | Prepare a 4 mm square wrench. |
 | We adjust the position of the first eccentric. |
 | We adjust the position of the second eccentric. If there are more, their position should also be adjusted. |
 | The required position is determined by the notch. In winter mode, it should be located closer to the rubber seal. The photo shows winter mode on plastic windows. |
 | Rotating the eccentric 180 degrees will allow you to switch the windows to “summer”. |
 | We check whether all eccentrics are moved to the desired position. Their number can be determined by the counter strips. |
Evgeniy Sedov
When your hands grow from the right place, life is more fun :)
Content
Plastic window designs from different companies have similar adjustments. When installing them, the average pressure density values are set. Over time, due to wear or other factors, the sash may sag and begin to catch on the frame or impost. As the temperature drops, cold air from outside can begin to enter the room. In all these cases, it is necessary to adjust the windows, which you can do yourself if you know how to adjust plastic windows for the winter by switching the pressure settings from summer to winter.
What tools are needed to adjust a plastic window?
Plastic window systems have become the most popular product that is installed during the construction or renovation of both a simple apartment and a luxurious multi-story mansion. With all the diversity window fittings, used in their creation, all systems use similar mechanisms. Preparing plastic windows for winter begins with the first cold snap. The main tools you may need to adjust windows are:
- hexagonal L-shaped key 4 mm wide;
- flat screwdriver 4 mm;
- Phillips screwdriver;
- pliers.
How to set windows to winter mode
In order to prepare Euro-windows for the winter period, seasonal adjustment of the pressure of plastic windows is necessary, in which the following actions must be carried out:
- Adjust the opening sash vertically and horizontally - it should not cling to the frame and clamping strips.
- Adjust the clamping force to the frame. The pressure is adjusted using adjustable trunnions or eccentrics, the number of which on euro-windows is 4-5 pcs., on doors - 6-8 pcs.
- If there is traction at maximum pressure to the frame, it is necessary to replace the seal. Then check the traction at the middle position of the trunnions or eccentrics.

The clamping to the frame is based on the engagement of the rounded elements of the sash by the clamping strips when the handle is turned down. These round elements, made in the form of an oval, are called trunnions, and those made in the form of a round element with a displaced axis of rotation are called eccentrics. The trunnions are rotated using pliers. Installing them vertically creates minimal pressure, which means summer pressure mode, and horizontally creates the strongest possible pressure. By rotating the eccentric with an adjusting hexagon, you can adjust the pressure from weak to stronger and back.

You can determine the need to replace the rubber seal by inspecting and checking the traction. You can change it in parts - at the same time you save cash. When you go shopping for a sealant, you should take a sample with you and buy a longer piece. It is better to trim off the excess when sticking than to leave a gap. Buy a seal made of high-quality rubber. You will need to buy special glue for it. Before inserting the seal into the groove, apply glue over the entire area of contact with the seal, glue it, close the euro window while the glue dries.

Window adjustments and adjustments are made in case of large gaps or when it clings to the frame. It is necessary to adjust the opening sash vertically and horizontally in the following cases:
- if she catches top part frames - open the sash and use the short side of the L-shaped key to slightly push it out on the upper canopy;
- if due to sagging the sash catches bottom part frames, you need to do the same with the lower canopy;
- if it clings to the vertical part of the frame or impost (the middle vertical part of the frame), you need to use the short side of the L-shaped key to slightly push it on both canopies in the direction opposite to the place of such contact.

How to adjust plastic windows yourself
You can adjust the windows yourself if you have the necessary tools. The only parts that can break and require replacement are the handle and rubber seal. By adjusting the window pressure, the switch is switched to winter mode. In this case, the handle turns with force, the sash is strongly pressed against the frame, and the seal is strongly compressed. In the spring, it will be necessary to loosen the clamp, since opening for ventilation occurs frequently, which can lead to severe wear of the closing mechanism and seal.

To switch to winter mode, you must take the following steps:
- Check for inward or outward draft around the perimeter with a lit match - even a slight breeze will deflect the flame.
- If there is draft, it is necessary to open the sash and adjust the locking pins (eccentrics).
- Trunnions come in 3 types - oval, round with a slot for a screwdriver or a hexagon.
- If the oval trunnions are located vertically and the eccentrics are shifted towards the frame, it is necessary to turn them to the middle position with an appropriate tool to increase the clamping force.
- Then you need to check the traction again; if it remains, switch the trunnions (eccentrics) to winter mode. To do this, you need to rotate the oval trunnions to a horizontal position, and move the eccentrics completely away from the street.
- If after checking the draft remains, you need to replace the seal.
- After replacing the seal, check the traction when adjusting the trunnions or eccentrics in the middle position.

How to tighten hinges on plastic windows
The top hinge is adjusted using an L-shaped hexagon. On the top hinge there is one adjustment for the horizontal displacement of the top bar. The displacement control process is carried out at open window the short side of the hexagon in the adjustment hole, which is located at the end of the sash. The range of displacement of the upper part is from -2 to +3 mm. Use a wrench to turn the screw part turn and check for ease of closing.
The lower hinge is adjusted using the same tool. The difference is that on the lower hinge, in addition to shifting the bottom bar horizontally, there is a screw for shifting the entire sash vertically. Horizontal displacement is carried out in a manner similar to that for the top hinge. Vertical displacement is carried out with the window half-open, for which you need to insert the long side of the hexagon vertically from top to bottom into the canopy hole with the decorative casing removed. Such a change is possible within the range from -2 to +2 mm.

Setting up plastic windows when shrinking a house
A strong displacement of load-bearing building elements as a result of shrinkage of a new building can cause the sash to move away from the frame, requiring reinstallation of the plastic window. If the opening is severely skewed, you will have to straighten it or order a new Euro-window. By internal adjustments of the opening and clamping mechanisms, you can correct the horizontal or vertical displacement within 2-3 mm. To do this you will need a standard set of tools:
- special hex key 4 mm wide;
- screwdriver 4 mm;
- pliers.

How to set the horizontal and vertical axes
To align the sash horizontally or vertically, it is necessary to adjust the plastic window in the awnings. Alignment in the horizontal plane is made by end adjustments on the upper and lower canopy with the window fully open. The hex key is inserted with the short side into the hole. When the key is rotated clockwise, the sash is attracted to the canopy, counterclockwise - to the impost. The maximum adjustment range is -2 to +2 mm.
You can adjust the displacement in the vertical position on the lower canopy in cases where the sash touches the frame or to change the size of the gaps. To do this you will need a hex wrench. You need to open the cap on the canopy, insert the hex key with the long end down into the top hole. By rotating the bolt clockwise, the sash can be raised, and counterclockwise, it can be lowered. The maximum height adjustment range is -2 to +2 mm.

What to do if the plastic window does not close
A sash adjusted to fit the gaps at the top, bottom and sides may not close in two cases. The first is associated with a broken handle, the second with the incorrect operation of one of the pin-clamp pairs. To check, you need to open the window and, pressing the double opening latch with your left hand, turn the handle down. If it has turned to the extreme position, then there is a closing problem in one of the trunnion-clamp pairs. You can determine which pair is not working one by one by unscrewing the clamping bars with a Phillips screwdriver.
? 
How to adjust the handle on a plastic window
The design, diagrams and photos of the location of fittings, adjusting bolts, moving parts of the Euro-window, troubleshooting methods and prices can be found on the Internet on sites on this topic. Adjusting the handle involves installing it correctly in accordance with the list below. The opening handle has four positions:
- down – closed;
- to the side - open;
- up – ventilation mode;
- in the middle position between the top and side – partial ventilation.

Replacing a faulty one
If your handle is broken, you must:
- Use a screwdriver to unscrew the upper and lower fastening screws (or screws) located perpendicular to the plane of the sash;
- insert a new handle in the same position in which the faulty one was removed;
- fasten it with two screws (or screws);
- return the protective plate to its original position.

If the handle on a window or balcony becomes loose, you must:
- slightly pull the top and bottom of the protective plate on the handle and turn it to a horizontal position;
- Using a screwdriver, screw the handle tightly;
- return the protective plate to its original position.

All elements of the canopy and closing of the sash are located outside the structure. The main actions when the elements of this mechanism become dirty are cleaning and lubrication. If the window has not been opened for a long time, dried dirt or rust can be removed using a can of universal penetrating lubricant VD-40. After cleaning and washing, you need to lubricate the fittings and adjust them.

The eccentrics are round elements that engage the clamping bars. The axis of their fastening is shifted relative to the center of the circle, so when rotating, the distance from the axis to the point of contact with the pressure bar changes. As this distance increases, the pressure of the sash against the frame increases. The eccentrics are rotated using a hex key or screwdriver. The amount of pressure change varies from 2 to 5 mm, depending on the design of the eccentric. It is necessary to adjust the clamping force twice a year when switching from summer to winter mode and back.

What to do if the window handle is jammed
Among possible breakdowns the locking mechanism may jam the handle. There is no need to apply great force to the handle to open it - the fittings should be taken care of to extend their service life. Jamming is possible in three situations - the window is open for ventilation, wide open or closed. If the handle jams in the first two cases, a distortion during opening or a special lock may be triggered. If the sash hangs on one bottom hinge, the following operations must be performed:
- turn the handle up;
- pressing the top hinge to the frame, set the handle to the right;
- close the window and turn the handle down;
- Pressing the sash against the frame, carefully turn the handle up and open for ventilation.
The rotation lock can be activated as a result of a sharp turn of the handle at a large angle when opening. The lock is released by pressing the unlocking button or turning the corresponding lever. Its location can be found on the website of the company that developed your hardware. If you have difficulty opening, try pressing the sash firmly against the frame and turning the handle.
Stiffness in turning or jamming of the handle when closed window possible with shrinkage and strong (more than 2-3 mm) subsidence of a window or doorway. This is extremely rare and difficult case, which can lead to frame bevel or mechanism failure. Without specialists construction company or installers will not be able to solve this problem with simple adjustments. Jamming is possible due to lack of lubrication of the bolt mechanism. To prevent this and increase service life Maintenance It is advisable to do it once or twice a year.

How much does it cost to adjust Euro windows in Moscow?
Repair and adjustment of plastic windows is carried out by many companies in Moscow, St. Petersburg, and other cities of Russia, which know how to adjust PVC windows and can supply new spare parts. Prices for such services vary by region of the country; they depend on the brand of the hardware manufacturer. A visit by a specialist for a technical inspection and drawing up an estimate in Moscow will cost from 500 to 1000 rubles. The minimum order cost in Moscow is from 2000 to 3000 rubles. The cost of main work is indicated in the table:
|
Name |
Unit |
Cost, rubles |
|---|---|---|
|
Setting up fittings (without removing) |
||
|
Door adjustment (without removal) |
||
|
Adjustment, repair, partial overhaul of the mechanism (without replacing fittings) |
||
|
Adjustment, repair, partial overhaul of door hardware (without replacement) |
||
|
Reinstalling the glass unit during adjustment |
||
|
Reinstallation of the double-glazed door (the price of the double-glazed window is not included) |
||
|
Cleaning and lubrication of accessories |
||
|
Replacing the seal (the price of the seal is not included) |
||
|
Replacing a complete set of rotary fittings |
||
|
Handle white/colored |
||
|
Main lock rotary/tilt-and-turn |
||
|
Push set |
||
|
Door closer |
||
|
Installation of impost |

Video
Found an error in the text? Select it, press Ctrl + Enter and we will fix everything!Discuss
Adjusting windows for the winter with your own hands
The instructions contained in this article will help you find out what position the trunnion is in and figure out how to switch the windows to winter mode without calling a technician to your home. The text contains an overview of the features and characteristics of window fittings, tips on its use and proper adjustment, as well as visual video material and photos with a clear description of this procedure.
Metal-plastic double-glazed windows are widely used for glazing apartments and private houses. Such designs have the ability to make adjustments and set the degree of pressing of the sash. Thanks to this adjustment of PVC windows, the system can be switched to winter or summer seasonal mode. This function is very convenient, although not all owners know about it.

The availability of the adjustment function depends on the type of fittings used. This feature is not inherent in every type of window, but only in modern modifications. There are several modes. Each of them has its own characteristics.
Standard, summer and winter modes of plastic windows
The standard mode assumes the middle position of pressing the sash. This means that the eccentric will be located in the middle. A window structure installed in this mode is, in most cases, capable of operating effectively both in winter and in winter. summer time. This ensures optimal level pressing the sealing material.
In winter mode, windows are characterized by a tighter fit of the sash to the frame. Thanks to this, during the cold season, metal-plastic structures effectively retain heat, keeping it indoors.

Summer mode is characterized by less tight fixation of the sash. In this position, air flows circulate freely between environment and the room. In other words, a micro-ventilation effect is ensured, due to which optimal microclimatic conditions are maintained in hot weather.
Note! Using the summer mode allows you to weaken the sashes as much as possible, which has a positive effect on the condition of metal-plastic windows that have survived a long winter. At the same time, it remains possible to protect the room from dirt, dust and heat.
Why is it necessary to adjust plastic windows for summer and winter modes?
Switching from one mode to another allows you to keep the window structure in a functional state and extend its service life. Adjustment involves changing the degree of fit of the sash to the window frame. IN winter time of the year insulation material It contracts, and in the summer it expands. It, like all fasteners, can be protected from wear with the help of adjustment, video and photographic materials with instructions describing how this can be done are available on the Internet.

Sometimes during operation the sash shifts. When it is warm outside, this does not cause any inconvenience, but in winter this can cause the room temperature to drop significantly. If this happens, you should check the condition of the frame. When installing metal-plastic windows, craftsmen check the position of the sashes in each mode, as well as the absence of gaps between the parts. However, a perfectly executed installation does not guarantee that the sashes will not come apart over time.
If window installation is carried out in early spring or winter, the structures are exposed to external influences:
- The temperature outside is rising.
- Under the influence of climate change, plastic begins to expand.
- The temperature outside is dropping.
- Under the influence of temperature changes, plastic decreases in volume, but it is not always able to take its original shape.

Similar processes occur if windows are installed in the summer. But first the material contracts as temperatures drop, and then expands. However, it is impossible to avoid changes in technical specifications products, so gaps often appear in the windows.
The need to switch plastic windows to winter or summer mode may be due not only to the seasonal transition, but also to a number of other reasons:
- Drafts from the window, carrying frosty air in winter and dust in summer.
- Sagging of the sashes due to wear on the hinges.
- Sash jamming in ventilation mode.
Note! During operation of windows, the sealing material is subject to severe wear. Therefore, it is very important to promptly adjust plastic windows with your own hands when switching to winter/summer modes.

How to check the possibility of adjusting plastic windows for the winter
The ability to switch between summer and winter modes is provided by special fittings. The availability of this function depends on the class of these parts.
There are several types of components:
- Budget fittings are parts that have the lowest cost and are solely responsible for opening and closing the window structure.
- Standard fittings – the kit contains standard and burglary-proof parts that allow you to prepare the window structure for summer or winter.
- Specialized fittings - includes anti-burglary and specialized parts that allow you to switch plastic windows to winter or summer mode.

Majority modern manufacturers produces standard and specialized fittings with the function of switching from one mode to another.
The most popular brands:
- Siegenia Aubi;
- Maco;
- Roto.
During installation, the user is not always provided with detailed information about functionality fittings filling. To find out whether the window design provides for a transition between modes, you should study the appearance and markings of the configuration, namely the axle.

An eccentric or trunnion is one of the elements of the fittings that allows you to adjust the degree of pressure of the sash to the frame of a metal-plastic window. This part is placed on the side.
If the trunnion contains special holes intended for a key, then the design has an adjustment function. This can be easily seen even in photos of plastic windows, of which there are many on the Internet. As a rule, the marking is marked with the image of a hexagon, screwdriver or asterisk. In some cases, the control part has an oval shape, which also indicates that the window can be operated in different modes.
How to determine which mode of plastic windows is set: winter or summer
Before adjusting plastic windows for the winter, you should determine in what position the fittings are installed. There are several ways to help you find out how the sash is placed. In each case, the technique depends on the shape of the trunnion.

How to determine the winter mode of plastic windows before adjusting the fittings:
- Take a sheet of paper.
- It is placed between the sash and window frame so that one of the ends remains on the side of the room.
- The window closes.
- Then you should pull the sheet towards you.
If the paper passes easily, it means that the structure is set for operation in summer mode. Otherwise it will tear.
Helpful advice! Manufacturers of metal-plastic structures advise using windows in summer mode all year round. If there is no reason to switch to the winter position of the sash, this procedure is not necessary.

In addition, there is a way to visually determine whether winter mode is installed on plastic windows; photo examples with markings can be easily found on the Internet. According to this method, it is necessary to find a marking in the form of a dash, asterisk or dot on the round pin. Next, you need to determine the direction of this mark. If the marking points towards the room, it means that the windows are set to summer operation. If the mark faces the street, then the design is set to winter mode.
Related article:

Causes of the problem, types of malfunctions, ways to eliminate them. Tips for preventing door damage.
Trunnions are not only round, but also oval. The operating mode in this case is determined by the nature of the eccentric placement. If it is turned vertically, then the windows are set for summer weather. In a horizontal position, the trunnion presses the sash as tightly as possible to the frame, which indicates winter mode.
Having determined the position of the sash, you can move on to solving the question of how to switch the windows to winter mode; video instructions describing this procedure are presented in large quantities on the Internet.

How to adjust plastic windows in winter/summer modes: video review and description
To find out how plastic windows are adjusted, it is advisable to read the manufacturer’s instructions, study descriptions and videos, which can later be used as a visual aid. If the work is carried out without the help of a specialist, it is very important to fully understand the essence of the issue and act as carefully as possible, since there is a risk of damaging the fittings with a careless movement.
How to set windows to winter modeoperation: photoand description of the preparatory stage
Preparing the window for customization begins with cleaning. To perform this procedure, you will need a certain set of tools and devices.
This list includes:
- mop equipped with a telescopic handle;
- a product intended for cleaning window glass;

- paper napkins or towels;
- a product intended for cleaning accessories;
- silicone-based lubricant;
- brush or hard brush.
Helpful advice! If you constantly take care of your double-glazed windows and keep them clean, you won’t have to spend a lot of time preparing them before adjusting your plastic windows for the winter.
The preparation of the window structure is as follows:
- glass is washed;
- the frame is wiped;
- dirt on connections and joints is removed;

- use a brush or hard brush to thoroughly clean the fittings;
- all window elements are wiped (especially areas with grease);
- by applying a few drops of silicone grease, the fittings are treated;
- the position of the trunnion is determined;
- the trunnion is set to the required position;
- lubricant is reapplied;
- All hinges are lubricated.
After all the above manipulations have been completed, the result is checked using a sheet of paper.
How to switch windows to winter mode: photoand recommendations
To adjust the fittings on double-glazed windows you will need special tool. Experts recommend having with you:
- Pliers.
- Screwdriver.
- Hex key.

The necessary tools should be purchased immediately after purchasing the windows, since the need to adjust them may arise suddenly. Sometimes the eccentrics do not protrude outward, and many owners search the Internet for videos on how to adjust plastic windows with similar features. The secret is to pull the pin outward. After this you can already configure it. When the eccentrics are installed in the required position, they should be recessed into the sash again.
Experts do not recommend changing modes during the first year of window operation. In new designs, the sealing material has not yet been subject to wear, so the mechanical loads on the fittings should not be increased or adjusted. If the winter in the region is not too different low temperatures, operation of double-glazed windows in summer mode is allowed. While winter adjustment should not be left in the summer, since this mode will cause accelerated wear of the seal.
Note! Changing the regime is allowed no more than 2 times a year. Moreover, the length of the winter operating period is much shorter than the summer one.

Setting up plastic windows: how to adjust the sashes horizontally and vertically
Regardless of the mode of operation, the doors of the structure are not allowed to be skewed. Sometimes you have to resort to correcting their position in order to correctly configure the fittings. The presence of sagging or misalignment reduces the service life of the seal. To work, you will need a pencil with a soft lead and a ruler. All manipulations with the window must be performed extremely carefully, otherwise the plastic can be damaged.
Preparing the window for adjusting the sashes:
- The structure is closing.
- The sash is traced around the perimeter using a pencil (marks are applied to the frame).
- The window opens.
- The distances between the frame opening and the marked lines along the entire perimeter of the structure are measured.
The indicators should be the same on all sides. A slight deviation is allowed, but not more than 7 mm. If the level of the left edge is too low relative to the right, or vice versa, you need to adjust its position. To do this, you will need to remove the decorative insert and tighten the screws that are installed in the lower part.

In some cases, it becomes necessary to raise the sash. To do this, unscrew the top screw halfway. If the level of the sash is too high, the fasteners are tightened ¼ turn. If it is clearly underestimated, the bolt is unscrewed by ¼ turn. Horizontal adjustment of the sashes is carried out using screws located on the hinges.
How to adjust plastic windows horizontally:
- The window opens.
- There is a hole whose configuration corresponds to a hex key.
- The screw turns smoothly until the sash is aligned to the required position.
- Check in progress.
To check the quality of the setting, close the window structure. If you need to reduce the distance between the hinge and the sash, the hex key must be rotated clockwise. If the distance between these elements is too small, then the tool is rotated counterclockwise.

Important! A strong horizontal movement of the window is not allowed. Maximum acceptable indicator is 3 mm (in either direction).
Possible problems with metal-plastic windows and ways to solve them
You can check the quality of the work performed not only with a sheet of paper, but also by ear.
A well adjusted window behaves like this:
- nothing interferes with the free opening of the doors; they close without hindrance;
- there is no creaking, grinding or other extraneous sounds;
- all the screws holding the sash in the desired position are screwed in approximately the same way;
- along the entire perimeter of the window, the sealing material has the same thickness and shape;
- after opening/closing the sash, the sealing material returns to its original shape.

Changing the operating mode of a structure is sometimes accompanied by problems. If the roller does not turn, it may need to be pulled out of the groove on the latch by turning it 90°. If this does not help, the part needs to be lubricated with WD-40. This lubricant comes in the form of an aerosol mixture in a can. It is designed for processing joints and threads.
If, when switching to winter mode, drafts from the window do not disappear, it means that the service life of the seal has expired. It is very easy to replace this material. It is enough to remove the old seal from the frame and grooves of the sash and insert a new one in its place (by hand or using a dull spatula). Since the material is welded to the profile in the corners, you will have to trim it to remove it.
The information contained in this article clearly explains how to set windows to winter mode. Videos, photographs and detailed descriptions of the procedure allow you to fully understand the features of adjusting double-glazed windows. Using this data, you can quickly and easily provide warmth and comfort in own home when it's cold outside the windows.

On the one hand, such manipulations promise benefits by reducing heat loss through the window structure, but on the other hand, as a result of adjustment, the seal quickly wears out.
How to switch plastic windows to winter mode: video-instructions
A plastic window, even the highest quality and correctly installed, requires periodic maintenance. It can last for several years without any problems, but over time it may feel friction when opening or closing. The second problem is that there is air blowing from under the seal, and the third is that the handle turns with force. All these breakdowns are not complicated and can be easily fixed, and it is not at all necessary to call a specialist: adjusting plastic windows yourself is a matter of minutes. All you need to do is tighten or loosen a few screws. The main thing is to know where and how. More on this in photo and video format.
Winter and summer mode
Most often, adjustment of plastic windows is required for the new season: in winter, complete tightness is desirable, and in summer, a little fresh air let in. This is achieved by adjusting the sash pressure density. It's easy to do it yourself. Once you figure it out, you’ll be surprised how simple everything is...
The window sash is pressed to the frame using pins. These are movable metal protrusions on the side surface of the sash. When the handle is turned, they move behind the mating metal plates mounted on the frame. In order to be able to adjust the tightness of the fit of the sash and frame, they have an eccentric - either they themselves are made of an oval shape, or in the center of the round protrusion there is an adjustment with an offset center. By changing the position of the trunnions (see photo), you change the degree of pressure, that is, eliminate the draft from under the sash.

As you can see, the shapes of the locking protrusions can be different. To adjust them can be used different instruments. If your window has eccentrics like those in the picture on the left - oval-shaped protrusions - change their position using pliers: clamp it and turn it in the desired direction.
If the locking tab is round, as in the picture on the left, it can be slotted for a screwdriver or hex key. After examining them, you will easily understand which tool you need: a regular screwdriver or a No. 4 hexagon. Insert a key or screwdriver into the slot and also turn it to the desired position.
Place all the protrusions in the same position. Please note that they are not only on one side of the sash - the outer one, but also on the inner side (at least one, but there is one), and can also be at the top and bottom. Set all the existing locking lugs in the same position, otherwise the frame will warp and there will be blowing from under it.

When adjusting the fittings of plastic windows, remember that weak pressure corresponds to the summer mode of closing plastic windows, standard or strong pressure corresponds to the winter mode. If preventative work carry out in winter, first set it to the standard position and check if there is airflow. Immediately pinch the rubber bands on new ones PVC windows not recommended. In this position, the rubber seal installed around the perimeter is strongly pressed. Because of this, over time it loses elasticity. A normal seal has a 15-year warranty, but still... If the pressure is immediately set to maximum, the rubber will deteriorate faster. As a result, once again setting the winter position on the plastic windows, you will find that it is still blowing from under the sash, and the rubber is all cracked. This means it's time to change the seal. This is also not very difficult, but it takes more time, and you still need to buy tires.
So: the winter and summer positions of plastic windows are set by changing the position of the locking lugs - trunnions. Everything is explained in detail in the video below. After viewing, adjusting plastic windows yourself will finally cease to be a problem.
How to adjust a window so it doesn't blow
Sometimes, plastic windows, even after moving the trunnions to the position of strong pressure, are not airtight - there is a blow from under the sash and replacing the rubber does not help. This usually happens when the house shrinks. In this case, they say that the window sags. When this happens, contact between the locking lug and the strike plate is lost. When you turn the handle, the protrusion-trunnion should go behind the plate, pressing the sash. If this does not happen and drafts occur, the heat is blown out of the room.

Where are the trunnions (pressing lugs) usually located?
When a plastic window sag, the adjustment is different: you need to move the sash so that those protrusions that do not reach the plates catch on them.
First you need to decide which of the trunnions do not reach the locking plates. This is done mechanically. First, inspect the sash, remember where the protrusions are. Close the window. Grasp the sash frame where the trunnions are installed and pull it towards you.

If there is contact, the frame remains motionless, if not, it moves. So you check in which places there is no contact and determine in which direction the sash needs to be moved. This is done by adjusting the lower and upper loops.
Bottom Hinge Adjustment
If the PVC window somewhere below does not close, we will move the sash using the lower hinge. There are two adjustments: one in the horizontal plane - moves closer to the hinge or further from it, and the second - in the vertical - raises or lowers the sash a couple of millimeters.
To move the lower part of the sash closer or further to the hinge, it is opened. At the bottom of the sang there is an adjustment hole for a hex key (sometimes for an asterisk).

A hexagon is inserted into it, turning it clockwise brings the lower corner closer to the loop, and turning it counterclockwise moves it away. Move the sash a little and try to close/open it. Once the result is achieved, stop. If the resource is turned all the way, but there is no result, return everything to its original position: this is the wrong adjustment.
This screw can be used to correct the situation if, when closing the window, the sash touches the frame at the bottom. By bringing it a little closer to the loop, you will eliminate this problem.
There is a second adjustment screw on the bottom hinge. To get to it, you need to place the sash for ventilation and remove the decorative trim. It can be easily removed, you just need to pull the bottom edge towards you a little (1-2 mm) and pull it up. After removing the protective cap, you will see a recess in the upper part. A 4 mm hexagon is inserted into it. Turning it clockwise raises the sash slightly, turning it counterclockwise lowers it.

We talk in detail about how to remove the decorative cover on the hinge, how and how to adjust the bottom hinge on a PVC window in the following video.
Adjusting the top hinge
If the top corner of a plastic window does not close, you need to move it. To do this, open the window at least 90°. You can do less, but it will be inconvenient to work. There is a hinge at the top of the sash. It differs in design from the bottom one, but it also has a hole for a hexagon.

The adjustment screw is on the side. By rotating it, we move the sash further from the hinge (if the trunnions farthest from the hinge do not close) or closer to the hinge. One thing - there must be a gap of several millimeters between the sash and the hinge: it is necessary for the tilt and turn mechanism to fit there. Therefore, turn the key half a turn and check how the window opens/closes.
Sometimes this adjustment does not help. Then it is required press the top corner against the frame. There is another screw for this - on the tilt and turn mechanism. To have access to this screw, you will have to open the window in two positions at once. To do this, open the sash and press the lock. It usually comes in two designs - in the form of a locking loop or a tongue (see photo below).

The blocker is retracted all the way, holding it, the handle is turned for ventilation, the upper edge of the sash is pulled slightly towards you, and the rotating mechanism is opened. A device that holds the sash open. On one of the plates there is a protrusion for the same hex key. By turning it, you can adjust the tightness of the upper corner of the sash. It is necessary if the upper corner of the plastic window does not close.

You can watch the video again to see how to adjust plastic windows yourself. Explanations to the point, accessible and without unnecessary words.
The plastic window does not close
Sometimes the geometry of the window opening changes so much that even moving the sash to the maximum, we do not get the desired result: the plastic window does not close. What to do in this case? If there is an adjustment on the mating part, as in options a and b in the photo, try to get by with a little damage - tighten it further here. The principle is the same: insert the hex key and rotate it clockwise, pushing it to the maximum.
If a few millimeters are missing not in depth, but sideways, then will have to be installed under the mating part of the lining. They are cut from a piece of white plastic. The maximum thickness is 3-4 mm. First, unscrew the screws and remove the stops. Two gaskets are cut out: one is installed from below, the second from the side. As a result, the stop moves 3 mm deeper into the sash.

Installed first on Right place linings, on them there is a stop, which is screwed with a self-tapping screw. Protruding pieces of plastic are cut off sharp knife. Check whether the window closes or not.
If this does not help, there is another way: move the sash frame. It is quite flexible and can be moved about 5mm. The procedure is as follows:

If you look closely, you can see that the frame is slightly curved. The main thing is that the window now closes. In 99% of cases this is enough. If you are unlucky and all these tricks do not produce results, you need to remove the slopes and also bend the frame.
You can watch all the steps described above in the video.
Adjusting and replacing handles
A fairly common problem: the handle is difficult to turn. If the problem is not eliminated in time, due to excessive efforts, it breaks, leaving a short stump with which you definitely can’t do anything.
First, how to make the handle close again easily. The locking mechanisms must first be cleaned and lubricated. First, accumulated dust and dirt are removed, wiped dry, then all moving parts are lubricated. Must be used pure oils, without alkalis and acids. The best option— engine oil, you can use any analogue or modern remedy from a can.

Having lubricated all the rubbing and moving parts, open/close the sash several times and turn it on its hinges. Everything should move smoothly, without jerking.
If there are still problems, most likely during the process of adjustments or changes in the geometry of the window, the blocker has shifted. It should fit easily into the mating part and press tightly against the frame. Then the handle turns easily. Move the sash and try again.
Now about how to change the handle. The fastener on which it is held is hidden under a decorative overlay. If you look closely, you will see that there is a thin lid. You grab it with your fingers or pry it with your nails, pull it slightly toward you and turn it to one side. Two bolts open. They are unscrewed, the handle is removed, and a new one is put in its place.

We looked at the most common problems and how to fix them. Now not only is adjusting plastic windows not a problem for you, you can also do minor repairs yourself. You can also do it yourself service maintenance(greasing once a year).