Liquid wallpaper for the ceiling is a great option ceiling decoration, which in last years is becoming more and more popular. Such ceilings look not just stylish, but luxurious. The environmental friendliness of the material captivates the consumer who is at least a little concerned about his health. A long service life of the coating is also important for a person who does not want to turn his life into endless repairs. In a word, this material has plenty of advantages, and as for the difficulties of the production process, within half an hour after the start of work, you will already be confidently working with a trowel, improving appearance Your home.
In our difficult times, inexpensive repairs have become relevant. You can, of course, save on material. But such savings are doubtful, because cheap material, most likely, will not last long.
As for hired work force, then there is no guarantee that this repair will be done for you better than you can do it yourself. The fact is that in our age of total unemployment, many “teams” have appeared that are not specialists at all, but pass themselves off as such.
After watching 2-3 videos about applying liquid wallpaper to the ceiling, you will not only have a complete understanding of this work, but you will also be able to do this work perfectly yourself. You will also understand that this is much better and easier than gluing traditional paper, vinyl or non-woven wallpaper to the ceiling. In order to apply liquid wallpaper to the ceiling, you will need the wallpaper itself and a very simple tool.
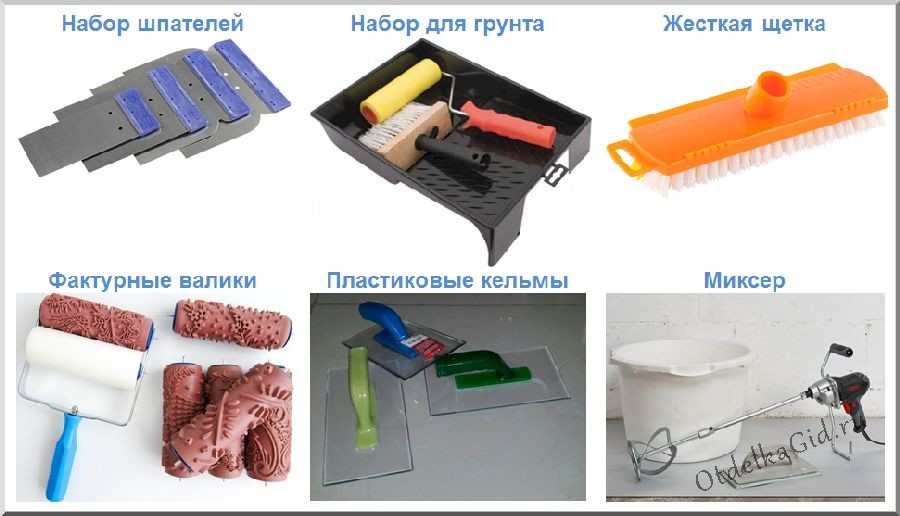
Tool:
- A container where you need to pour liquid wallpaper for swelling;
- Trowel, trowel or spatula;
- Plastic grater;
- Spray.

Of course, the spray gun will provide some savings in material, but... as a rule, this tool is successfully replaced with the same trowel.
Surface preparation involves removing old wallpaper or whitewash.
Liquid wallpaper can be applied to old surfaces painted with any paint, as well as to glass wallpaper. Before applying liquid wallpaper, the surface is primed.
Advantages and disadvantages of liquid wallpaper (video)
How to apply liquid wallpaper to the ceiling: do it right
The technology for applying liquid wallpaper to the ceiling is not fundamentally different from applying it to the walls.
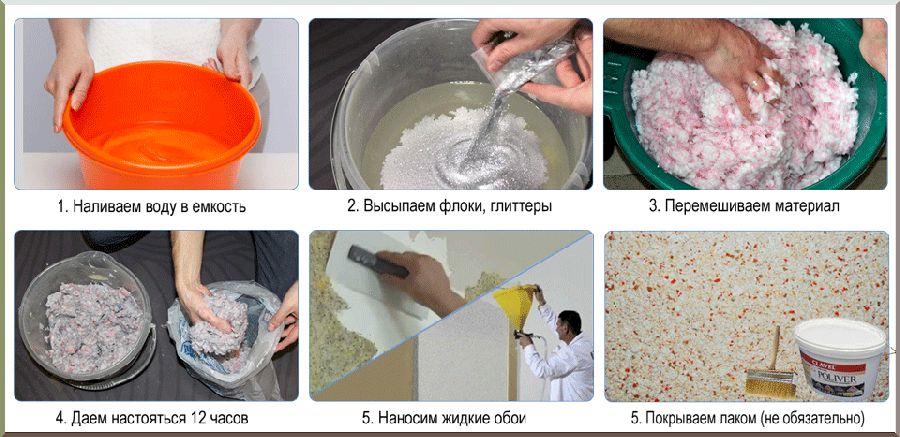
Preparing liquid wallpaper for work is as follows:
- Soak the material from the bag in water at a temperature of 25-30 degrees 12 hours before starting work;
- Each package is prepared separately. Glitter is usually poured in first. Then, after preliminary shaking the contents of the package, in order to thoroughly mix the components, pouring the mixture into water, we achieve a homogeneous mass. It is best to do this with your hands, without fear for your own skin - wallpaper is made on the basis of natural substances. Glitter, by the way, is often not used at all.
- The resulting mixture is again placed in the bag and left to swell for 12 hours.
- After 12 hours, the material can be mixed, divided into required portions and stored, if necessary, for two weeks.
- The walls are primed shortly before wallpaper is applied. The primer is applied in two layers, ensuring the necessary drying. It is not necessary to level the walls perfectly. As for the primer, it is first applied along the ceiling area, and the second layer is applied transversely.
- The finished material should stick well to the wall, without slipping or peeling. If the mixture is not wet enough, you can add water per liter per package. The material is applied with a trowel (spatula) from of stainless steel, in a layer of 1-2mm.

If you need to renew part of the coating or re-glue it completely, a layer of new coating is applied directly to old layer. This quality of the material allows you to apply patterns, as well as designs of a different color, and in general, use all sorts of techniques for applying liquid wallpaper of a different color, boldly changing the familiar interior. Anything is possible, as long as everything is done correctly!
During work, the trowel (trowel) should be held at an angle of about 15 degrees, and not with its entire plane.
The next new portion of material must be mixed with the previous one in order to avoid different colors of the coating.
When the ceiling is ready, you need to lightly smooth the material applied to the ceiling with a trowel soaked in water.
Liquid wallpaper for the ceiling: consumer reviews
A relatively “young” material called liquid wallpaper has been successfully “conquering” more and more living spaces in apartments and houses for several years now.
Thanks to the great many positive qualities liquid wallpaper, there are a lot of reviews, and all of them are practically positive.

Liquid wallpaper for the ceiling is very good material, which allows you to significantly change the interior of your home.
So, reviews:
- Easy to apply to the surface, although this has not been done before;
- It is very easy to repair damage caused by children or when rearranging pieces of furniture that have a large height;
- It is easy to repair cracks that appear in the ceiling;
- Not only sound insulation has improved, but also the acoustics in the room;
- They dry quickly, are not afraid of drafts, and this quality speeds up drying;
- The ceiling surface has no joints; it seems that one huge sheet is glued to the ceiling;
- No cracks or small unevenness in the ceiling are visible;
- Dust does not settle on the ceiling;
- If necessary, it is easy to remove a layer of liquid wallpaper;
- There is no need to remove the old layer before applying a new one. A new layer can be applied on top of the old one.
To all the reviews, we can also add that this wallpaper is an environmentally friendly material, as it contains only natural ingredients.
Liquid wallpaper perfectly withstands temperature changes and shrinkage of the house, which is important for dachas and country houses.
Liquid wallpaper is not subject to fading or peeling for a long time - up to 15 years.
Liquid white wallpaper for the ceiling: reasons for popularity
The vast majority of consumers are accustomed to seeing white ceilings, and this stereotype is firmly entrenched in the subcortex, especially among conservative people.
However, everything depends not only on conservatism or stereotypes that have developed over almost centuries. It also comes down to such an aspect as design.

Fortunately, in construction and online stores there is an ample selection of wallpaper of any color. White color is no exception.
So, the main reasons for choosing:
- White liquid wallpaper on the ceiling visually expands the rooms.
- Not everyone likes colored ceilings.
However, as an intermediate (between color and white), there is a variant of light colors: light gray, or pale beige, etc. It's all a matter of personal perception, basically. And one more thing: before choosing wallpaper, it’s not a sin to look at photos with different color options, as well as videos.
You will find even more information about the benefits of liquid wallpaper in next material: .
Technology of applying liquid wallpaper to the ceiling (video)
In conclusion, I would like to note that even a completely inexperienced repairman can work with liquid wallpaper. In addition, during renovation there will be no odors that irritate the sense of smell in the rooms, which allows you to carry out renovations without causing any inconvenience to your household. The process of applying liquid wallpaper is clean, that is, there will be no usual debris during work. You can ventilate the room immediately after finishing work, without waiting for the wallpaper to dry completely - this will not have a negative effect on them. In a word, such a renovation has a lot of advantages! Liquid wallpaper is used in the living room, hallway, and bedroom. It is not advisable to glue in rooms with high humidity! Go for it, and everything will work out great for you!
Examples of liquid wallpaper on the ceiling (interior photo)


Currently there are many finishing materials, which significantly contribute to bringing the premises into the desired state. Previously, it was believed that minimal attention could be paid to the ceiling, but now the situation has changed radically, so various options for finishing it.
Liquid wallpaper is considered one of the most original design methods. Of course, their application will require some effort, because the work is carried out in an unconventional way for such a product.
Liquid wallpaper on the ceiling is a relatively new solution that allows you to achieve an impressive effect. The material has many different advantages:

On a note! All of these properties contribute to the fact that the decorative coating is very durable: the service life is up to 10 - 15 years, after which all characteristics begin to decline.
 High quality and durability of the coating is guaranteed only if you use a product from a trusted manufacturer
Existing types of liquid wallpaper
Sometimes it mistakenly seems that there are many types of this kind of material. This is due to the fact that construction stores offer various decorative variations. It should be borne in mind that the technology for applying liquid wallpaper does not depend on the base from which it is made.
In reality, there are only three types of material:
- Based on cellulose. You can even make this option yourself. This coating is considered not the most durable. If there is a lot of space in the room window openings which actively transmit the sun's rays, the material quickly loses its decorative properties. But the main advantage of ready-made compounds is that they are cheap enough not to greatly affect the repair budget.
- Based on silk inclusions. They are very resistant to fading, which makes this wallpaper the optimal solution for bright rooms. We must not forget that the surface turns out beautiful, somewhat elegant. But the cost of such products makes you think about its use.
- A combined option that includes the basics described above. This is the most popular option, offering a balance between price and quality. This mixture is very resistant to ultraviolet radiation, which preserves the coating for a long time.
 Each type of material is of high quality, but they reveal their best aesthetic characteristics only in combined decor
 To decide which option is most preferable, they compare together all the characteristics of the material, financial capabilities and the place where such a ceiling will be created.
The nuances of working with the material
It is necessary to prepare a tool that is suitable for working with putty or plaster.
You will need tools from the following list:
- spatula - it is better to prepare three main ones: wide, medium and small (much depends on the ceiling itself);
- primer composition, roller and brush;
- a brush with stiff bristles;
- a set of rollers for working with the decorative layer;
- trowel;
- drill with mixer attachment.
 The main and most important tool For working with liquid wallpaper, a plastic transparent trowel is considered
 Advice! Many craftsmen advise using an electrical appliance only at the first stage. If you overdo it, the mixture will not turn out as desired. It is better to knead by hand.
Application technology
The general technology of work is divided into three main stages, which are inherent in all finishing activities. So, the complex is initially performed preparatory work, which should provide the required quality of coating. Next, the presence is checked necessary tools, the solution is diluted. The final stage is the cladding process itself, which must be approached with all responsibility.
Preparation
This event includes the following actions:
- It all starts with assessing the surface of the ceiling. It is wrong to think that liquid wallpaper can correct unevenness and defects. Indeed, the composition is capable of hiding some shortcomings, but not correcting sins. If there is an old decorative layer, it must be completely removed, especially when it was used on the ceiling. Oil paint, enamel or whitewash. It is important to check that no peeling areas remain.
- It often happens that floor slabs have joints that need to be properly sealed with putty. You need to give everything time to dry thoroughly.
- Next, they begin to apply the primer. The composition is selected depending on what type of material will be used. It is better to lay two layers - this will help to complete the wallpapering with the highest quality.
 For any type of ceiling contact finishing, the preparation steps are identical
 It happens that the surface has significant unevenness, then it is necessary to use a large amount of plaster. But there is optimal solution- the use of drywall sheets, which will help complete the work much faster.
Preparation of the solution
There are different material options on the market:
- Ready to use. They are mixtures that are in special plastic containers. They just need to be moved first.
- Dry formulations. Often packaged in bags. They already contain all the necessary components. The preparation process consists of mixing the substance in the required amount of water, which is indicated in the instructions.
- There is another type of dry material. The composition, in addition to dilution in water, requires the addition of various additives, which are presented in the form of textural inclusions and mineral-based additives.
Of course, the price of each option is different. Any composition has its advantages and disadvantages, which must be taken into account in each specific situation.
 Preparation of the dry composition takes at least 8 – 12 hours
 The material is diluted as follows:
- The required amount of water is poured into a container that should be convenient for work, and dry matter is added. The exact proportions must be specified by the manufacturer. Mixing is done thoroughly - you need to ensure that all components are well mixed. Next, the solution is left for some time, from 6 to 12 hours. This is necessary for complete swelling of all components.
- When the time is up, the material is mixed. If necessary, water is added to obtain a paste-like mixture.
The kneading itself is carried out using a mixer, but the tool can damage the components. It is better to use it for initial mixing.
Advice! To prevent the composition from losing its properties, the container is tightly covered with plastic wrap.
 It is advisable to knead liquid wallpaper by hand; the machine method is used only for initial stage, and very dosed
 Working with the ceiling
It should be taken into account that applying liquid wallpaper to the ceiling is carried out in two ways: manual and mechanical.
The general technology is as follows:
- Manual application technology assumes that a spatula, trowel and roller with a textured cloth will be used. The layer should be laid with a thickness of no more than 5 mm. Initially, the composition is applied and smoothed with a spatula - it is better to do this work on convenient adaptation to cover a larger area. The coating is even and smooth. The texture is obtained if after some time you use a special roller, which is moistened in water during operation. A trowel is also used.
- The mechanized method can cause a lot of trouble. The fact is that the process is carried out using a spray gun. Indeed, the operating time may be significantly reduced, but there is a high probability that the device’s nozzles will often become clogged.
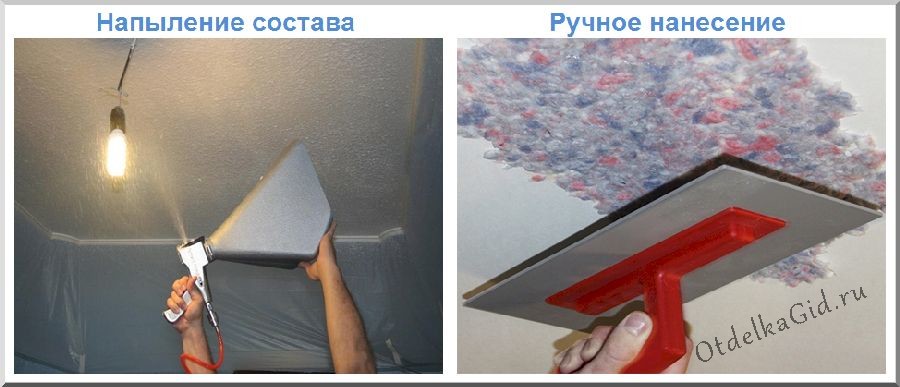 It makes sense to use machine application when arranging large, monochromatic areas; decorative work is carried out only by hand
 Drying of the coating takes several days, during which the decorative layer should not be exposed to any influence. It would be a mistake to decide to use a thermal gun.
Thus, the work is not so difficult, but quite labor-intensive.
Drawing technology
The ceiling covering is significantly transformed when various patterns or textures are applied to it. Liquid wallpaper provides this opportunity.
So, a magnificent panel can be created if you follow the following rules:

It is important to consider that all layers must match. You can use sparkles and beads as decoration.
VIDEO: how to apply liquid wallpaper to the ceiling
Do you want to make your ceiling unique, have you looked through many options, but don’t know what to choose? We recommend liquid wallpaper for the ceiling, which can also be used for wall decoration. From the point of view of construction terminology, this type of finishing coating refers to decorative plaster. By giving it your preference, you will receive an elegant and unique ceiling design, from which it will be difficult to take your eyes off.
Liquid wallpaper is a packaged dry mixture, which includes textiles or cellulose, and some special additives are added. This decorative plaster is a universal material that can be easily used not only on smooth surfaces of ceilings, but also on its shaped parts. At the same time, you get a beautiful, uniform texture and a seamless coating that can hide small defects in the ceiling.

As a rule, this finishing material is packaged in sealed plastic packaging, which some manufacturers vacuum seal for ease of transportation.
Liquid wallpaper for the ceiling differs in:
- texture (smooth or embossed);
- color (white or colored);
- bases (cellulose, silk, cotton or combination).
The roughness of the texture is greatly influenced by the size of the fibers that make up the base of the mixture. The larger they are, the more pronounced the texture of the coating.
Advice! Using a special relief roller, you can make beautiful patterns on the damp surface of the finishing coating, which will also add exclusivity to your ceiling.
The color range of liquid wallpaper is very wide, so you can easily choose any tone for your interior. If difficulties arise with the desired shade, just take white mixture and mix it with the required water-soluble tint color.

Thanks to the inclusion of special additives in the mixture, the ceiling surface acquires its unique appearance. The inclusion of additional components occurs at the stage of mixing the mixture.
Decorative additives for liquid wallpaper:
- stone chips;
- metallic glitter;
- glaze.

The main element of the composition is its base. Durability and performance characteristics depend on it finishing. Also, the main material of the mixture greatly influences the pricing of products.
Types of liquid wallpaper
Depending on decorative and technical properties There are 4 types of wallpaper, each of which has its own cost, advantages, disadvantages and optimal place in design.
Cotton compositions

The main element of the substance is 98% cotton. This environmentally friendly material has good thermal insulation and sound insulation characteristics. It is resistant to sun rays, does not burn out. Cotton liquid wallpaper for the ceiling can be confidently used to decorate a children's room or bedroom.
Cellulose formulations

This type is the cheapest among liquid wallpapers, as it uses inexpensive material - shredded pieces of paper. The composition also includes plasticizers, adhesive components and various colors. Wallpaper containing cellulose does not react well to solar ultraviolet radiation, which leads to fading of the finishing surface. This material is best used in places protected from the sun's rays, for example, in the corridor.
Silk compositions

Silk decorative plaster contains natural fibers silk, which gives the ceiling finish durability and resistance to fading. This type of finishing coating can be easily used in rooms with large windows. sunny side. Because of its advantages, silk liquid wallpaper is the most expensive among the options presented.
Mixed formulations
Combining individual types will help you obtain a textured finish with good properties for relatively little money. The final price of the product will be determined depending on which material there will be more of - cellulose, cotton, silk or additives.
Advantages and disadvantages
In order to give your preference to liquid wallpaper, you first need to familiarize yourself with all the pros and cons of this finish.
The main advantages of liquid wallpaper:
- the materials and glue used are environmentally friendly and do not cause allergies;
- good air and moisture exchange is maintained;
- defects and irregularities on the ceiling surface are hidden;
- provides a uniform coating without seams;
- no labor-intensive surface preparation is required;
- Decorative designs available different shades and textures (from embossed to smooth);
- used on curved and uneven surfaces;
- Damage to the finishing coating can be easily restored.

Main disadvantages:
- poor moisture resistance (if wet, they may lag behind the surface);
- the cost is an order of magnitude more expensive than that of rolled wallpaper;
- budget cellulose options fade over time and lose their original appearance;
- When finishing, basic plasterer skills are required.
Table 1. Comparative analysis of finishing materials
“+” Yes “-” No “+-” Possibly
| Liquid wallpaper | Simple roll wallpaper | Wallpaper for painting | Dye | Decorative plaster | |
| Natural and environmentally friendly | + | + | + | +- | +- |
| Masking cracks and irregularities | + | - | - | - | +- |
| No seams | + | - | - | + | + |
| Complex surfaces and structures | + | +- | +- | + | + |
| Restoration | + | - | +- | +- | - |
| Do not crack | + | - | - | - | - |
| Moisture absorption | + | + | +- | - | - |
| Sound and thermal insulation | + | - | - | - | - |
| Fire safety | + | - | +- | + | + |
| Insect breeding under material | - | + | +- | - | - |
| Antistatic | + | +- | + | + | +- |
| Color fastness to fading | + | - | - | - | + |
| Ease of material removal | + | + | +- | - | - |
| Frost resistance | + | - | +- | + | + |
| "Do it yourself" | + | + | +- | + | +- |
To compensate for all the disadvantages of this decorative finishing, you must initially choose the right material, which in its properties is suitable for renovating a certain room. It is desirable to contain at least 40-50% cotton or silk in the mixture, which will increase durability and performance characteristics. To improve moisture resistance, it is recommended to use a transparent and water-repellent varnish.
Advice! Before you start applying the substance to the ceiling, you should carefully read the manufacturer's instructions on the packaging.
Features of applying liquid wallpaper to the ceiling
The process of finishing the ceiling with decorative plaster is divided into several stages:
- Preparatory.
- Applying the mixture composition.
It is worth noting the importance of preparatory work, on which the quality of adhesion of the prepared substance depends.
What tool to prepare
Today there are a large number special tools for applying liquid wallpaper.
Tool range:
- putty knife;
- grater;
- trowel;
- roller;
- container for preparing the mixture (basin, bucket).
A spatula for finishing the mixture is no different from a plaster one. It could be from:
- of stainless steel;
- hard plastic.

In our situation, the material does not play a big role, the main thing is that it is elastic. When purchasing a spatula, pay attention to the following points:
- ergonomics;
- absence of defects on the surface of the material;
- shape and size of the working surface;
- rigidity, rigid edges;
- elasticity, quick recovery after pressing.
The width of the working spatula should be 25-30 cm. A narrow tool 8-10 cm is more convenient to use in order to apply the mixture to the main one. But the substance is also easy to apply with your hands.
The trowel is used to evenly rub a layer of wallpaper over the surface of the ceiling. The tool is very convenient to control the thickness of the finishing material applied. The main requirement is that the working surface must be smooth. Trowels are made from the following materials:
- stainless steel;
- plexiglass.

Craftsmen give their preference to the second option, since it is easier for them to control the uniformity and thickness of the layer.
Depending on the surface on which you have to work, the trowel has several forms:
- rectangular for smooth and level places;
- trapezoidal for individual zones with increased precision (arches, sockets, switches);
- oval for hard-to-reach surfaces (rounded areas, niches).
Some professionals prefer a trowel over a spatula, since it costs less and is easier and more convenient to work with.
A special feature of the technology for applying liquid wallpaper is that the coating needs to be leveled after a couple of hours. The mixture material dries slowly and the dried areas must be rubbed and trimmed, removing possible flaws and defects.
It is very convenient to do this using a grater. It is similar in shape to a trowel, the material working area made of plastic, has a solid handle. The transparency of the grater makes it possible to see flaws in time and quickly eliminate them.

Using a roller, you can level the coating or apply the mixture to the surface of the ceiling. Each of these options uses different types tool. In the first case, this is a standard roller with short pile, and for the second, an option with sparse bristles is suitable. There are also texture rollers that create beautiful patterns on the finishing surface.
Ceiling preparation

No matter what kind of old ceiling finish you have, the first step is to prepare the room for renovation. If possible, remove all furnishings, and if not, move them to the center of the room and cover them to gain access to the corners of the room. Remove chandeliers, switches and sockets, after insulating the wires. It is advisable to turn off the electricity in the room to avoid accidents. Having done the basic preparation of the room, proceed directly to the ceiling.
Plasterboard ceilings

Such ceilings are initially flat, as this is required by their installation technology. The seams between the sheets should be sealed with putty and, after drying, rubbed with fine sandpaper. For good adhesion, you need to use a primer, which is applied to the finishing surface with a roller or wide brush. In this case, the priming tool should not be heavily wetted, as this can lead to softening and peeling of the drywall. The primer is applied in 2-3 stages with breaks of 3-4 hours for complete drying of the composition. Each subsequent layer is coated perpendicular to the direction of the previous one.
Ceilings with old wallpaper

First of all, old wallpaper is removed. Wet the surface of the ceiling with water using a roller or brush, leave for 30 minutes, then repeat the procedure if necessary. Next, use a spatula to easily remove the old coating. After the work has been done, be sure to prime the ceiling surface. To do this, apply at least 2 layers of primer with a break of 3-4 hours, remembering to change the direction of application to improve surface adhesion.
Ceilings with decorative paint or whitewash

Whitewashing from the ceiling can be removed in much the same way as old wallpaper. Wet the surface with water and remove excess finishing material with a spatula, then rinse again with water using a roller or brush. With acrylic-based paint, things are different - dry paint is scraped off with a spatula. Afterwards the ceiling is washed with water to remove dust. Apply the primer as described above.
Rough finishing on a concrete slab

As with the previous preparation options, be sure to apply 2-3 primer coats at intervals of 3-4 hours, using a roller or brush for convenience. Remember to alternate the direction of application of the primer in each coat.
Plaster all flaws and cracks on the ceiling, then apply a moisture-resistant putty composition with a fine-grained structure. Next, start priming.
Calculation of the amount of material
In order to find out how much finishing material is needed to repair the ceiling, you need to measure the area of the surface to be covered. Consumption decorative plaster also depends on the composition and size of the fibers. The thickness of the coating and the experience of the craftsman are also taken into account. It is recommended to apply a finishing layer of 1-3 mm of liquid wallpaper, but this figure may increase if the surface has significant unevenness, which entails excessive consumption of material.
Average mixture consumption: 1 kg per 3-4 m 2 surface. For example, the ceiling area is 25 m2, then divide 25 by 3, getting 8.3 packs. Always increase this amount up to a whole number. In our case, you will need 9 packets of the mixture.
Based on the above nuances, you need to take into account the reserve:
- 7-13% for a ceiling with an uneven surface;
- up to 15% for coating by an inexperienced person;
- 0.5 kg for subsequent repairs.
If you decide to purchase the missing amount of substance, you should be prepared for the fact that the shade of the finishing material may differ slightly. This will entail certain inconveniences, so it is better to purchase decorative mixture with a reserve.
Application of liquid wallpaper on the ceiling
After you have done all the preparatory work and decided on the amount of the mixture, proceed directly to applying the finishing material to the ceiling surface. This process can be divided into several separate stages.

Preparing the mixture
Pour the dry substance into a container with water at room temperature (20-25 0 C). The proportions are strictly observed according to the instructions on the manufacturer's packaging. To obtain a colorful coating, a water-soluble color of the appropriate shade is added to the water. The color scheme can be selected based on the label on the color can.
Add decorative additives to the dry mixture, then add water, constantly stirring with your hands. For a small area, kneading by hand does not cause any inconvenience, but working with large areas, it is more convenient to do this with a construction mixer. Use it at medium speeds to avoid air bubbles getting into the composition, which is possible at high speeds.
After mixing, the substance swells for 20-60 minutes, after which it becomes ready for application to the ceiling surface.
First application and determination of structure
How you direct your movements finishing tool, the decorative covering of the wallpaper will depend. With circular, transverse and longitudinal movements, the texture of the fibers lies differently. Select in advance on a small straight area the best way, experimenting with the direction of work with the trowel.
Attaching the ceiling plinth
The technology for gluing ceiling plinths in combination with liquid wallpaper differs from their standard installation. Since the surface of decorative plaster has a characteristic porosity, gluing the baseboard to the wallpaper is prohibited due to poor contact between the elements. Ceiling plinth Installed only before applying liquid wallpaper.
Application of finishing material
The finished mixture is applied in a thin layer of 1-3 mm using a trowel or wide spatula. After this, using a float or a special roller, the coating is leveled and certain texture patterns are imparted. It is recommended to apply the composition in one go, before the coating dries. To avoid joints, finishing material is applied in small areas, each next one begins to be covered with the border of the previous one, leveling it.
Final processing and drying
After the ceiling is completely finished, liquid wallpaper on the ceiling dries from 12 to 72 hours. The room must not be ventilated, otherwise the coating will dry unevenly. For renewal performance characteristics dried wallpaper is covered with transparent water-repellent varnish.
Video of the process of covering a ceiling with liquid wallpaper
Examples of interiors with liquid wallpaper


Pasting the ceiling with ordinary roll wallpaper can be a very difficult and time-consuming process, especially if its surface is far from ideal. A good alternative in this case could be liquid wallpaper for the ceiling, which imitates traditional finishing materials and plaster. It is noteworthy that liquid wallpaper allows you to quickly finish the ceiling and disguise small defects in the ceiling. How to glue liquid wallpaper to the ceiling, as well as the types and advantages of such finishing, will be discussed later in the article.
Types of liquid wallpaper
One of the main features of liquid wallpaper is that it harmoniously combines with many finishing options, and can also be used to decorate walls, ceilings and any other surfaces, even quite complex ones. geometric shape. At the same time, the exterior of the coating looks beautiful, smooth, without seams or joints.
Liquid wallpaper should be understood as a composition of textile fibers or cellulose with various additives. On sale, liquid wallpaper is found both in dry form, that is, it requires dilution with water before use, and in ready-made, liquid form. Applying liquid ceiling wallpaper is very simple; this process is very similar to using ordinary plaster and putties. For this property, some people call liquid wallpaper silk plaster.

The classification of liquid wallpaper involves their division according to the following characteristics:
- according to the size of the fibers – smooth or with a relief pattern;
- according to color scheme - colored or white, with the possibility of tinting in any color;
- in composition - a homogeneous mass or with additives that give a certain texture;
- by type of base - silk, cotton, cellulose, mixed.
Depending on the fraction of additives, the texture of the coating changes, that is, the larger the particles of the base material, the rougher the surface will be as a result. If the apartment owners intentionally want to get a textured coating, you can walk over the still wet layer of liquid wallpaper on the ceiling with a special roller, giving it relief.

Liquid wallpaper is available in a wide range of colors, so you can recreate any shade you like. However, it is worth remembering that after applying the material to the wall, the final color will be slightly darker than the wallpaper in its original dry form. If you don’t like or suit any of the presented shades, you can tint the mixture yourself by adding the desired color to the white base.
Originality and presentability liquid ceiling add all kinds of additives. You can find mixtures with stone chips, glitter, textile threads made of cotton or silk, and cellulose inclusions. In each case, the finished coating will have different effects. Thus, based on the desired interior, you can choose the type of liquid wallpaper.
It is worth noting that the composition of the silk plaster on the ceiling will also determine the durability of the coating, as well as its wear resistance and ease of use. The cost of the finishing material also largely depends on the type of base.
Wallpaper with cellulose base
This finishing material is the most affordable for the consumer, since it uses cheap components. In addition to the cellulose fibers themselves, such liquid wallpaper contains plasticizers, glue, coloring pigments, and sometimes some decorative additives.

This type of wallpaper adheres well to any type of surface, since cellulose itself has adhesive properties. However, cellulose liquid wallpaper is sensitive to direct sunlight, so it is advisable to use it in shaded, cool rooms, such as corridors or hallways.
Blends with cotton fibers
Shredded cotton fibers are used as the basis for this type of wallpaper, which provides a soft texture and matte finish. Cotton itself is an environmentally friendly material, so this wallpaper is safe to use for decorating children's rooms and bedrooms. In addition, cotton liquid wallpaper provides good heat and sound insulation.
Silk-based liquid wallpaper
This type of liquid wallpaper is the most expensive, although it is durable, wear-resistant, presentable in appearance with a pleasant shine. The wallpaper obtains all these qualities thanks to the inclusion of natural silk fibers.

Such wallpaper retains its original color for a long time, so it can be used to decorate rooms with good lighting and panoramic windows. The texture of wallpaper can be varied - from imitation of a fabric surface to marble.
Mixed materials
In this case, one mixture may contain additives of several types - cellulose and fabric in different quantities. This way a beautiful decorative effect is achieved affordable price. The cost of the material will depend on the proportions of the materials included in the mixture, as well as their type.

Some components, such as metallic glitter or mineral additives, can be purchased separately. If desired, they are added to the mixture of liquid wallpaper to give the coating one or another decorative effect.
Points for and against"
Before applying liquid wallpaper to the ceiling, it is worth considering all the positive and negative sides this solution, so as not to experience inconvenience and irritation later.
The undoubted advantages of liquid wallpaper include:
- environmental friendliness, that is, exclusively natural composition which does not retain moisture and does not interfere with air circulation;
- smooth surface without seams or joints, even not quite perfect ceiling;
- ease of preparing the ceiling for processing;
- any creases or folds are excluded;
- Various texture options are possible - the surface can be smooth or with a relief pattern;
- diversity color range and additives that give a decorative effect.

In case of any defects, individual sections of the ceiling with liquid wallpaper can be repaired.
Among the disadvantages of this material are:
- high price of the material - it costs more traditional wallpaper approximately 2-2.5 times;
- if the material gets wet, it will peel off, as it is not moisture resistant;
- the cheapest type of wallpaper (cellulose) is sensitive to ultraviolet radiation and fades quickly;
- Working with the material requires a certain amount of skill.

Although the list of shortcomings is not so short, most of them are leveled out by a competent choice of material, its correct use and further maintenance of the ceiling. Wallpaper with content will be more durable textile fibers from 30-40%. And if you coat the material with water-repellent acrylic varnish, you can increase its moisture resistance. How to apply liquid wallpaper for the ceiling is usually written on the packaging.
How to properly apply liquid wallpaper to the ceiling
In general, the process of applying liquid wallpaper to the ceiling includes two stages:
- preparatory work;
- directly covering the ceiling with finishing material.
Preliminary preparation of the ceiling for liquid wallpaper must be carried out very carefully, since it will affect the process of subsequent application of the material and its adhesion to the surface.

The scale of preparatory work depends largely on the type of rough surface. In new homes, the ceilings are usually plastered, so only priming is required. And if there are any finishing materials, such as old wallpaper or whitewash, they will have to be completely removed.
If starter plaster is applied to the walls or ceiling of the apartment and it does not need leveling, then you will need to apply at least 2 layers of deep-penetrating primer. Each layer should dry for 3-4 hours. You can use a brush or roller to apply the primer. In this case, the direction of strokes in each approach should be perpendicular to the previous one. When the base is dry, you can apply liquid wallpaper to the kitchen ceiling.
To cover with liquid wallpaper suspended ceiling from plasterboard or fibreboards, the surface can only be primed and the primer allowed to dry completely. All possible gaps between the plates will be filled with liquid wallpaper. When applying primer to drywall, make sure that the roller is not too wet, otherwise the material will begin to delaminate.

If there are old paper or liquid wallpaper left on the ceiling, they must be completely removed. The paper needs to be wetted and then removed with a spatula. You also need to wash off any old glue that has stuck to it. Liquid wallpaper also needs to be soaked. It is worth spraying water on them, and then using a wide spatula to scrape the material from the ceiling. After removing the old coating, the ceiling needs priming, as in other cases.
Must be removed old paint or whitewash from the ceiling. If the surface was covered with chalk or lime, it is soaked with water or a special remover, and then scraped off with spatulas and washed. For enamels and acrylics paint coatings You will need a spatula or sander to remove any loose areas. Upon completion of grinding, the surface is cleaned of dust and a primer is applied.
Especially actual problem with old ceilings there are all kinds of greasy stains, traces of flooding from precipitation or neighbors from above, as well as rust stains from old metal elements.
Rust on the ceiling can be removed with weak solutions of phosphoric or hydrochloric acid. Apply acid to the stain with a brush and wait until the stain disappears. The remaining substance is washed off with water. When the treatment area is completely dry, metal parts apply moisture-resistant putty, and then cover it with a layer of white enamel.

Grease on the ceiling can be removed with alkaline substances or with the addition of surfactants. For example, the composition can be prepared from soda ash, laundry soap and warm water. This solution should be applied to the stain, and after a few minutes, washed off. The procedure is repeated several times until the stain completely disappears.
If stains from leaking water appear on the ceiling, they can be removed with a regular brush. Especially stubborn stains can be treated with bleach or vinegar. When the ceiling is cleaned, it is primed again, and you can begin finishing.
If the cracks in the ceiling are too large, before gluing liquid wallpaper to the ceiling, you should plaster them and then apply a layer of fine-grained putty. It is advisable to use moisture-resistant putty based on polymers or cement. When the material has dried, the surface is treated with a primer in 2 or 3 layers, drying each separately. After this, you can apply liquid wallpaper.
Since the removal of old finishing materials is always accompanied by a large amount of dust and dirt, it is advisable to remove the furniture from the room, or at least carefully cover it with film.
How to calculate how much material you will need
Before making the ceiling with liquid wallpaper, you need to correctly calculate the amount of material that will be needed to cover the entire surface. This is especially important if you initially use white liquid wallpaper on the ceiling, which is tinted to the desired color immediately before application. To make the color uniform, mix the entire amount of wallpaper at once.
The approximate consumption of material is indicated on the packaging with the mixture. If you cover the ceilings with a 1-1.5 cm layer of liquid wallpaper, then a standard 1 kg package will be enough for 3-6 m2 of surface, based on its texture. If there is minor damage to the rough surface, material consumption may increase. It is worth remembering this when purchasing a mixture for liquid wallpaper.

So, the calculation of the material is carried out based on the size of the room and the minimum area that can be covered. For example, for a room of 20 m2, a mixture is purchased, the consumption of which is 3-4 m2 per 1 kg. Therefore, you will need 20÷3 = 6.6 ≈7 packages of dry mixture.
Please note that it is not worth buying a mixture for liquid wallpaper practically end-to-end, because if there is not enough material for the job, a joint may remain on the ceiling, and it will be quite difficult to choose a shade.
If the color of the mixture is different in several packages, it is necessary to combine the contents of all packages, mix thoroughly, and then dilute with water. Mixing the composition gradually or immediately is everyone’s personal choice.
Covering the ceiling
To avoid mistakes and imperfections, let’s take a closer look at how to properly apply liquid wallpaper to the ceiling.
First we start preparing the working mixture. To dilute the dry mixture, use ordinary water at room temperature (20-25 ℃, not warm). It is added according to the instructions, and then the solution is left for the required time to swell. Different formulations require from 15 minutes to several hours to fully swell. This information is indicated on the packaging of the dry mixture.
If you need to tint white wallpaper, add the dye to the water, then pour it into the dry mixture and mix thoroughly. Depending on how much dye is added, the intensity of the shade of the liquid wallpaper will change.

If decorative components are used, such as shavings or granite chips, they must be added to the dry mixture and mixed. Then the dry mixture is carefully added to the water and mixed. If there is not much material, then you can prepare the solution manually. However, a more uniform composition will be obtained if you use a construction mixer at medium speed. You should not turn on too high speeds, so as not to saturate the solution with oxygen. After the mixture has stood for the required time, it is re-mixed and can be applied.
It is very important to understand how to properly apply liquid wallpaper to the ceiling, that is, what technique to use. The final texture of the wallpaper depends on the direction in which the trowel moves. So, when applying liquid wallpaper in circular, transverse or longitudinal strokes, the fibers of the material will lie differently. This is especially noticeable if the liquid wallpaper has a coarse-grained structure. In this case, the strokes should lie in the same direction across the entire ceiling so that the appearance is not spoiled. To get the hang of it, you can try applying the material to a flat surface.
The next stage is equally relevant for suspended ceilings and liquid wallpaper. It includes the installation of decorative elements, moldings, borders and baseboards. However, unlike paper materials, when working with liquid wallpaper, the entire decor must be fixed before the ceiling begins to be covered. Since liquid wallpaper has a porous surface, decorative stucco and the moldings simply won’t hold up.

To apply liquid wallpaper to the ceiling, you can use a trowel or spatula. Having applied a thin layer of material, they pass over it with a roller or plastic grater and add texture. Cover the ceiling in sections. In this case, each subsequent segment slightly captures the edges of the previous one. The edges are carefully leveled. To ensure that the joints are not visible, the entire volume of material must be applied in one go, until they are dry. Alternatively, you can use a spray gun with a wide nozzle to apply liquid wallpaper. They pass over the applied layer with a hard (a smooth surface is obtained) or a figured roller (the desired relief is achieved).
It takes about 12-72 hours for the wallpaper to dry completely, depending on the characteristics of the surface and the mixture used. There is no need to ventilate the room or turn on the heater to allow the wallpaper to dry more evenly. You can extend the durability of liquid wallpaper by applying moisture-resistant varnish.
DIY liquid wallpaper
If desired, liquid wallpaper can be made with your own hands. To do this you will need 40 sheets of paper. They, whole or crushed, are placed in a container and 1.25 liters of water are poured. An hour later, when the paper gets wet, the mixture is crushed with a drill and mixer. Then add 2 caps of dye to the mixture and mix again. Now you need to add 40 small spoons of gypsum. The better quality it is, the faster the wallpaper will begin to harden. Next, pour 200 ml of PVA glue into the mixture and mix again. The composition is ready. It can be applied to the ceiling.
It is noteworthy that this composition can be applied over the old ceiling covering. The exception is whitewash - it should be washed off and the surface should be puttied a couple of times.
Thus, liquid wallpaper is not only a way to provide a reliable and durable ceiling covering, but also an opportunity to make it more decorative. That is why this type of finishing is becoming more and more popular among interior designers and professional craftsmen repair. You will also be able to deal with liquid materials. Follow our recommendations and you will succeed.