They are afraid of one thing - damage to the enamel. How to paint cast iron bath and what is the best way to do this if you damaged it inner covering? In this article you will find 3 possible options with step by step instructions and all their pros and cons, as well as a description of the “bath to bath” method.
When is it necessary to paint a cast iron bathtub?
Painting cast iron bath needed in two cases:
- The enamel is mechanically damaged and cracks appear along it.
- The enamel has turned yellow over time or due to improper use (exposure to toxic household chemicals or other reagents), too active cleaning during washing.

Restoration options for a cast iron bathtub
A cast iron bathtub can be restored in 4 ways:
- Paint it.
- Coat with epoxy enamel.
- Cover with acrylic.
- Bath to bath.
We will consider all these methods in more detail below.
Painting a cast iron bathtub
The most logical method of restoration seems to the average person to be painting the bathroom.
The advantages of this method:
- the cheapest;
- quite simple;
- can be painted any color.
- smell;
- dents and chips on the surface of the bathtub will still be noticeable;
- will last from 10 months to a couple of years if you use quality paint and apply it correctly.
Paint selection
Not just any paint is suitable for restoring a bathroom by painting, since there will be constant contact with water, temperature changes and mechanical friction of the surface. You will need special paint and you can find it among the following manufacturers:
- Dulux (UK) is a leader among manufacturers paint coatings. To paint the bathtub, you should stop at “DuluxRealifeKitchen&Bathroom”;
- Tikkurila (Finland) is a paint manufacturer known for its quality. For the bathroom, take the Luja painting system (primer + paint);
- Jobi (Germany) – good quality By affordable price. For bathroom painting, stop by JobiWaschFest. This paint is moisture resistant and is intended for rooms with special conditions, which definitely includes the bathroom.

You can, of course, paint it with regular paint, but such a coating will only last one or two weeks. It’s unlikely that you expect such a short-term effect from the restoration, so it’s better not to skimp on paint and buy high-quality paint right away.
Required Tools
To paint the bath you will need:
- roller or brush made of natural bristles 70-90 mm wide. If you prepare two, it will be even more convenient, since if during the painting process the brush gets dirty (especially with something greasy), then you cannot continue working with it;
- drill with grinding attachment;
- a paint knife and tweezers - for caring for the brush when bristles come out of it (this is quite normal for a new one);
- acetone or solvent No. 646. Do not use others!;
- rags made of cotton, calico, flannel or microfiber cloths. The main thing is that there is no lint.

Dyeing process
The dyeing process can be divided into 3 stages:
- Preparatory work.
- Direct coloring.
- Paint drying.
Preparing for coloring
Preparatory work for the restoration of the bathtub consists of removing contaminants from the surface. This is best done using alkaline household chemicals. After using it, the bath should be rinsed well and wiped dry.
Alkaline household chemicals It burns the skin, so you should wear rubber gloves when handling it.

Next, degreasing is carried out with a special chemical composition. You can take a car. Alternatively, you can use regular Fairy dishwashing liquid, but you will need to leave it on the surface of the bath for a while (20-30 minutes) before rinsing. The procedure will need to be repeated 2-3 times.
You can check whether you have degreased it well using a stream of water. If, when watering the walls from the shower, you do not see any drops or streaks, then the fight against grease on the surface can be considered complete.
The preparatory work does not end there. You need to remove the layer of enamel or paint that currently covers your bathtub. This is done using an electric drill with a special grinding attachment. You can remove all the enamel or just the top layer - your choice.

Before applying paint to the surface, it must be cleaned of dust and dried. Drying can be done with a hair dryer or by waiting - the bath will dry itself in a few hours. After this, a primer is applied. It can be applied using a brush, roller or flexible spatula.
Painting a cast iron bathtub
The process of painting the bathtub should begin after the primer has completely dried. First you should paint the sides. The paint is applied in a thick layer and gradually flows down the sides. The sides of the bathtub are painted in the same way, but taking into account the paint already on its surface. Try to keep the layer as even as possible after dripping. Painting the bottom of the bathtub involves distributing the paint that has drained from the top.
The entire coloring process will take you quite a lot of time and effort, so start it at a time when you are most productive.

You can paint the bathroom using a roller - it will be faster and more convenient.
After painting, the bathroom must be closed for 10-12 hours, or better yet, for a day. This is necessary to avoid dust getting on the painted and still wet surface. The final drying process of the paint takes 2-5 days. It is highly undesirable to use the bathroom until this moment.
Restoring a bathtub using epoxy enamel
The oldest way to restore cast iron bathtubs is to apply new enamel. It has been widely used for more than 20 years. The process of applying enamel is somewhat reminiscent of the painting we discussed, but the composition is completely different. There are only 2 categories of compositions: professional and for self-restoration.

Professional epoxy enamel compositions are more liquid. They are applied in several layers, so the process is quite long and labor-intensive. Self-applied formulations are thicker and easier to work with.
Bath enamel sold in aerosol cans, easy to apply, but will last a maximum of a year.
Advantages of restoring bathtubs using epoxy enamel:
- quite a cheap way;
- no need to dismantle the bathroom;
- Suitable not only for cast iron, but also for steel bathtubs.
Disadvantages of this method:
- takes a long time to dry (up to a week);
- long and labor-intensive process;
- unpleasant odor;
- the coating is very sensitive to shock;
- the service life of new enamel rarely exceeds 5 years;
- does not cover dents and chips;
- Even if everything is fine with the enamel and you haven’t damaged it in any way, in a few years it will turn yellow.
Tools for restoring a bathtub with enamel
To restore a bathtub using epoxy enamel you will need:
- a spray gun or roller if professional enamel is used, or a flute brush if the enamel is for self-application;
- a paint knife and tweezers will be needed to carefully remove stray brush hairs;
Enameling process
The process of applying enamel to the surface of the bathroom can be divided into the following stages:
- Preparatory work.
- Direct application of enamel.
- Drying.
Preparatory work
The preparatory work is the same as when painting a bathroom, so we will not repeat it. You can read above.
Applying enamel
Before application, the enamel should be prepared according to the instructions on the package. There is no need to mix the entire composition at once, do it in portions, as it begins to set quite quickly (40-45 minutes), and application in 2 layers takes quite a long time.
If you apply a professional composition, then you can use a spray gun. But for home application, it is better to choose special mixtures that are thicker and suitable for application with a regular flute brush.

To apply enamel to the surface of the bathtub, wet the brush generously and draw a vertical stripe from the bottom to the edge. Then you should rub the enamel on the sides as hard as you can. The next strip should be drawn side by side so that its “rubbing” is enough to reach the already treated area and by repeated rubbing you will cover about half of the previous strip. So, overlapping, the first layer is applied. Wait 15-20 minutes and apply the next one.

The second layer is applied from the same place as the first. The direction of application must correspond exactly to the first layer. This is the only way the coating will turn out beautiful and uniform.
How to remove streaks and sagging enamel during application?
When applying enamel to the walls of the bathroom, drips and sagging of the material often form. Their occurrence should be controlled. They usually become noticeable within 10-15 minutes after application, so keep an eye on the areas covered as you work.
To remove streaks, you need to make a brush stroke without material up to the place of smearing. Sagging that forms on the edges of the drain holes must be removed after the enamel has hardened. To do this, use a painting or mounting knife.
When is the bathtub ready for use?
After applying the enamel, it is necessary to close the bathroom for 3-7 days until the new coating dries completely. The longer you pause before first use, the less chance that the enamel will peel off.
Restoring a bathtub using acrylic
One of the most modern methods for restoring bathtub enamel is restoration with acrylic. You can find it on sale under the name “Stakryl”.
Advantages of the method:
- with proper application and careful use, such a coating can last you 10 years or more;
- a professional does this work in 2-3 hours. You will need more time, but the process itself is simpler than applying enamel;
- attractive appearance– after application and drying you will see a smooth glossy finish;
- no unpleasant odor.
Disadvantages of the method:
- if you scratch the acrylic layer to the bottom in some place, it will very quickly begin to collapse and lag behind the surface;
- the cost is higher than with enamel coating;
- Drying takes 2-3 days.
Tools for bathtub restoration with acrylic
To restore a bathtub using acrylic you will need:
- flute brush or roller;
- flexible spatula;
- a paint knife and tweezers for carefully removing stray brush hairs;
- drill with grinding attachment.
Acrylic application process
The process of applying acrylic can be divided into 3 stages:
- Preparatory work.
- Direct application of acrylic.
- Drying acrylic.
Preparatory work
Preparatory work is similar to the methods described above. Read more about this in the section on painting with paint.
Applying enamel
Acrylic is more liquid than enamel for home application, so it is most convenient to apply it using the pouring method in a tapering spiral from the edges of the bathtub to the drain. Be very careful! Unfilled fragments can be filled with material using a flexible spatula. With its help, the edges of the bathtub and its bottom are leveled.


If bubbles appear during the application process and do not burst on their own, then they must be carefully broken through with a brush.
The second method of applying acrylic is similar to painting. For application, use a brush or roller.
When is the bathtub ready for use?
After applying acrylic, it is necessary to close the bathroom for 2-3 days so that dust and other dirt do not get on the surface before drying.
Restoration “bath within a bath”
The “bathtub-to-bathtub” restoration method involves installing a new acrylic liner inside an old cast-iron bathtub, which completely matches its shape.

Advantages of the method:
- perfectly smooth coating;
- durable acrylic;
- service life – about 15 years;
- no unpleasant odor;
- can be used already on the first day after installation;
- the surface will not turn yellow.
Disadvantages of the method:
- high price. Especially if your bath non-standard sizes and it will be required custom production liner;
- impossible to do on your own;
- the mounting foam with which the insert is attached may move and then cracks will appear;
- the liner may peel off and cause unpleasant musty smell due to the constant formation of condensation between the liner and the bath;
- it will not be possible to do repeated restoration or repair;
- When installing, you will have to remove part of the wall covering at the edges of the bathtub.
- To clean the bathtub during the preparation stage, do not use chlorine compounds.
- It is better to paint and enamel the bathtub in the warm season, so that the apartment or house can be ventilated.
- Before applying paint, primer, enamel or acrylic, you must remove the cuffs and seal the hole with masking tape.
- During the painting process, do not touch the bristles of the brush with your hands. The paint will come off faster from any fat in the future. Better stock up on several brushes for work.
- Never touch the bathtub with your hands while applying paint, enamel or acrylic!
- After restoring a bathtub using enamel or acrylic, it is necessary to replace the cuffs and gaskets, as the drain holes will become narrower and the walls of the bathtub will become thicker.
- To make your bathtub with acrylic coating last longer, apply 2 layers of the material. Then it will be more difficult to scratch it through.
- The acrylic liner can only be installed in high-quality cast iron bathtubs. It is not suitable for bathtubs made of “light cast iron” with thin walls.
Whether it is worth restoring the bathtub and how exactly to do it is decided by the owner of the bathroom and the plumbing item. Of course, no restoration lasts forever, but if you don’t have the money to buy a new one, but you want to take hygiene procedures in comfort, then you should definitely do it!
Cast iron bathroom paint is intended for restoration of old products. It saves it from disposal, because the bathroom is required premises in a house or apartment. Many residents of apartment buildings have cast iron products, as they are convenient and practical to use. Cast iron bathtubs are a design in which you can bathe and wash clothes. They have a long service life.
But after mechanical and chemical influences (chips, scratches, detergents), the coating inside becomes unusable over time. It acquires a gray tint, cracks, and yellowness. You can correct deficiencies without calling a specialist, if self-painting products. Painting a cast iron bathtub at home with your own hands is the ideal solution.
For painting, you need to choose only a dye for metal structures.
This method has a number of advantages:
- Large selection of paint and varnish tones;
- The price of the dye saves a lot of money;
- Possibility to paint a cast iron bathtub without calling specialists;
- Saving time and effort, fast execution;
- No unpleasant odor after the dye dries;
- Beautiful glossy finish.
However, this method of surface renewal has disadvantages:
- The outer coating must be treated before applying the composition. grinder, and then with a soil mixture;
- It is necessary to apply dye to an old cast iron product.
only after treating the coating with an antifungal compound; - There are acrylic solutions that take a long time to dry - three days.
How can you paint a cast iron bathtub? First you need to find the appropriate paint, only then begin work on treating the surface of the cast iron.
Types of paints
The dye is divided into four types:
- Epoxy resin (two-component);
- Acrylic (liquid base);
- Epoxy;
- Aerosol – good for long products.
Resin
For painting cast iron bathtubs with severe surface corrosion (chips, deep cracks). Epoxy enamel is applied in a thick layer, even without preliminary primer treatment of the surface.

The resin is diluted with solvents to a thick consistency, applied to chips, and then to the entire surface.
Acrylic dye (enamel)
How to paint or treat the inside of a cast iron bathtub at home? Acrylic. Resurfacing cast iron yourself is a simple, easy method of resurfacing.

Acrylic has a liquid consistency, which simplifies the work with its distribution over the coating. After drying, the acrylic composition becomes glossy, which is why this paint coating is popular today. The service life of acrylic film is from 7 to 20 years at proper care, so painting the product with this composition will be beneficial.
Epoxy dye
Epoxy new paint resistant to mechanical influences. It is a synthetic oligomer produced from a resin. Long-lasting, durable coating for metal and industrial equipment. Paint with a glossy effect, hydrophobic in property. Can be painted with anything convenient tool: roller, brush, spray gun.
Spray
Cast iron bath paint is an aerosol, namely a dye for cast iron products.

It is applied after treating the surface with grinding equipment and a primer. This is a finishing coating with a large assortment - from a bright, varied palette to the manufacturer. The paint dries quickly and can be processed hard to reach places.
Manufacturers
How to paint a cast iron bathtub at home without knowing what paint to choose? Among dyes and enamels, we can highlight compositions that are in great demand for painting a cast-iron bathtub:
- "Epoksin 51". Enamel.
According to the manufacturer (Russia), products with enamel will last about 9-10 years;
- Liquid acrylic Luxury "Ekovanna". (Manufacturer – Russia).
This is a kit that includes the hardener and the enamel itself. The service life of a product treated with acrylic is 15 years with proper care;
- Lako Colorful Materials from the Finnish company Tikkurila. "Realex 50". Price 1000 -1300 Russian rubles;
- Rust Oleum paint (USA). "Specialty Tub & Tile Refinishing Kit." Price 1700-2000 Russian rubles per liter. Painting a cast iron bathtub with this composition will not be difficult;
- Dulux (country – UK). Dulux Realife Kitchen & Bathroom. Dye. Its price is from 1000 to 2,500 Russian rubles per 1.20 l;
- “Svetlana” (produced in Russia). The set includes clearing pastes (white and other colors). The price of such a kit is about 800 rubles;
- "Renaissance" (manufacturer - Russia). Paint for cast iron. The kit includes all the products needed to paint the surface. Price up to 900 rubles per jar, volume 0.8 liters;
- "Kudo" ( domestic manufacturer). Spray (enamel). The price of one can differs (from 200 rubles to 500 rubles) depending on the composition and color. This paint can be used to paint the outside of a cast iron bathtub.
You can look at all the variety of things you can use to paint or update a cast-iron bathtub at home or in the country on the Internet or in a hardware store.
What to look for when choosing bath paint? It is better to restore the surface of the bathtub quality materials and paint and varnish coatings.
When choosing a paint coating (this is what can be painted), the characteristics of each product are taken into account. How to choose paint:
- The purpose of the composition is indicated on the paint can - for
metal works; - Bath paint has a shelf life of one year. The paint kit includes tinting pastes and special hardeners.
Painting a cast iron bathtub with an aerosol spray (with your own hands) will not work, since the coating will not form a dense layer.
Coverage Requirements
There are many types of paint and varnish coatings on the market and there is something you can use to paint your bathtub. There are restrictions that prohibit painting the bathtub:
- The paintwork materials should not contain toxic substances that can interact with water, detergents and oxygen;
- The texture of the paint should be dense and hard, with a glossy effect. This paint fits perfectly on the surface of old cast iron.
A paint coating is what you can use to paint a bathtub. But you need to test it in advance for color. To do this, it is worth applying one coat of paint, before painting the cast iron bowl, on clear glass and let dry. You can evaluate the tone quality like this: look at the back of the glass.
Bath enamel
How to paint the inside of the bathtub? In addition to paint and acrylic, the construction market where bathtubs are sold should be consulted on enamel.
There are two types of composition:
- For professional processing DIY baths. This composition is liquid and is applied in several layers;
- For manual processing at home. The mixture is thick, which will allow it to be distributed over the surface of the bath without problems.
Enamel is divided into three main categories:
- One-component composition. Effectively smooths out unevenness and fills cracks due to its paste-like consistency;
- How to paint a cast iron bathtub? Two-component composition. The coating applies well, but becomes dense after 6-7 days. The second component is the hardener, so the mixture must be thoroughly mixed before painting the bathtub with enamel;
- Three-component composition, which includes: hardener, base and catalyst. Supplied to stores complete with tools and instructions. Drying time up to 5 days. After applying it to cast iron, contact should not be allowed and drafts should not be allowed.
You can paint the bathtub with enamel after keeping the acrylic for at least a day at room temperature, and then mix it with a hardener.
Restoring the surface of a cast-iron bathtub with your own hands using enamel has some advantages:
- You can inexpensively restore a bathtub;
- The composition is suitable for cast iron and metal.

The disadvantages of painting a cast iron bathtub with acrylic include the following:
- The service life of such a surface is no more than
five years; - The wear resistance of this composition is minimized;
- Enamel does not hide visible defects on the surface
cast iron; - After several years, such enamel turns yellow and
cracks.
The inside of a cast iron bathtub can be cleaned at home only with mild detergents without the use of abrasives. Too much hot water can also destroy the surface of such a bath.
The inside of the bathtub at home needs to be restored:
- The temperature of the room where the work will be carried out should not exceed twenty degrees Celsius;
- It is necessary to lay cellophane film around and under the bathtub, since the enamel is applied by pouring;
- Place under the drain hole tin can or an unnecessary container so that the enamel does not flow onto the floor.
Apply the enamel composition to the surface of the bath preferably with a roller or brush.
Bath liner
How can you paint a bathtub? This question need not be asked, because this method restoration is called “bath in bath”. In an old cast-iron bathtub, a liner is placed on glue, which completely follows the shape of the bathtub.

This method has advantages:
- The new coating consists of acrylic, which is able to withstand impacts and is resistant to the chemical effects of detergents;
- The surface does not change color over time;
- The bathtub is like new – smooth and shiny.
However, there are a couple of nuances when installing the liner in the bathroom. If the bathtub is made of thin cast iron, then in the future it is impossible to avoid deflection of the structure, as a result of which the liner is deformed. Also, before laying the acrylic surface, the siphon is dismantled.
From the above, we can conclude what and how to properly paint a cast-iron bathtub inside and out.
Required Tools
Painting an old cast-iron bathtub in an apartment by a specialist or with your own hands will not be effective without the following tools:
- Sandpaper with various grits;
- Paint thinner (No. 646) or alcohol (White);
- The putty is waterproof;
- A rubber spatula to carefully distribute the composition over the surface with your own hands;
- Roller for applying emulsion;
- Painting a cast iron bathtub with a spray gun;
- Grinding machine for processing outside
baths; - A paint brush to paint the bath yourself;
- Drill;
- DIY nozzle for stirring enamel;
- Separate container for cast iron paint (bucket or basin);
- Container for diluting the primer;
- Bathroom paint.
Purchase separately protective gloves, eye glasses and a respirator.
Preparing the bathtub for painting
After the question of what paint to paint the bathtub has been sorted out and the final conclusion has been made, it is necessary to begin work on preparing the surface of the cast iron for applying the painting composition:
- First of all, the drain and pipes are removed from the cast iron bathtub;
- All fat and fat are removed from the inner surface limescale using special detergents that contain alkali (oxalic acid or baking soda). The cast iron bathtub is polished from the outside;
- Peeling paint and enamel are removed with a grinding wheel or electric drill with abrasive attachments to smooth the surface;
- Cracks and logs are sanded separately sandpaper;
- The primer is distributed throughout the bathtub, a thick layer is applied to chips and to the edges of the sides of the bathtub;
- We prepare the mixture and dilute it. You need to know that the diluted composition should not sit for more than half an hour - this is the time to paint the bathtub, as it begins to harden.
- Next, a coloring composition is applied to the dried surface and evenly distributed over the surface of the cast-iron bath by hand;
- The second layer of paint for a cast iron or metal bathroom (quick-drying option) is applied only after the first layer has dried;
- After application, allow to dry for at least a day with doors and windows closed.
The grinding attachment is selected in accordance with the material being processed - metal; you can also use sandpaper or a steel brush.
A cast iron bathtub is a symbol of the bygone Soviet era, when every apartment was equipped with this unpretentious, simple, but high-quality plumbing fixture. Some owners of “Stalinka” or “Khrushchev” buildings still use old-style washing containers, as they are of high quality, strength, and durability.
The service life of a cast iron bathtub is at least 50 years, however, time, as well as active use, leave their mark on its surface. Yellowing, chips, and abrasions on the enamel spoil the appearance of the bowl, but it is irrational to replace it because of these small defects, because to restore the whiteness of the product, you can simply paint it yourself. In this article we will tell you what bath paint is used at home, as well as how the coloring is done.
Defects in old cast iron bathtubs
A cast iron bathtub has excellent performance characteristics, it retains heat for a long time and has sufficient strength. A special feature of plumbing products made from this alloy is their heavy weight, which can reach 150 kg. This bowl can be used for more than 50 years, it will not lose its qualities, unlike modern acrylic and steel models. However, the service life of the enamel coating is much shorter; even with careful care, traces of intensive use remain on it:

Note! Even with analogues made of acrylic and steel, cast iron bathtubs are very popular because they have a long service life and durability. Replacing an old washing container with new model made from the same material will cost the homeowner 15-20 thousand rubles. Paint for a cast-iron bathtub can restore the whiteness and smoothness of the product for 3-5 times less if you work with your own hands.
Types of paints
It is logical to assume that painting at home is done with special paints. Strict requirements are imposed on coloring compositions: they must withstand constant contact with water, exposure to high and low temperatures, as well as strong detergents. To restore and restore the original appearance of an old bowl with your own hands, you need to select high-quality moisture-resistant paint that can be used to paint cast iron. Bath paint of this type comes in 2 varieties:

Important! The quality of coloring directly depends on the correct preparation of the compound. The base of the mixture has a viscous, thick consistency, and the hardener, on the contrary, is liquid. Therefore, in order to combine the components, it is necessary to mix them for a long time and thoroughly until a homogeneous fluid substance is formed.
Dyeing technology
The process at home with your own hands cannot be called simple. The technology consists of the following stages: preparing the room, preparing the surface, preparing the compound, applying paint and drying. Preparatory work is considered the most labor-intensive operation, as it takes a lot of time and effort. The quality and durability of the new coating depends on the correct preparation of the surface. Painting is performed in the following sequence:

Experienced craftsmen say that the most important part of the technology for painting old cast iron bathtubs is drying. When painting is completed, the bathroom area is closed to prevent dust from entering. Polymerization of acrylic or epoxy enamel takes 3-7 days, during which it is not recommended to use the bathtub. For the first day it is better not to even enter the room. The more time passes from painting to the first wash, the more durable the coating will be.
Video instruction
Today the choice of heating radiators is very diverse. There are aluminum, steel, bimetallic models. However, cast iron batteries are still in great demand due to their affordable price, high strength and classic design. Modern radiators made of steel and aluminum are sold already painted. Durable powder paints are used to coat them. Expensive cast iron radiators also come from the manufacturer in painted form. Inexpensive products usually go on sale unpainted. However, with modern assortment paint and varnish materials It's not a problem. Good paint plus diligence - and the cast iron battery will have a quite presentable appearance. Even if it is not new, but has worked faithfully for decades.
How to paint a cast iron battery?
Nowadays, in any paint and varnish store you will definitely find special paint for radiators. The container with it usually shows a battery. The main difference from wall paints is elevated level heat resistance.
The most suitable for cast iron batteries are two types of paints:
- acrylic (or acrylate) enamel;
- alkyd enamel.
The advantage of acrylic and acrylate enamels is that they never turn yellow. After all, acrylic is essentially plastic. In addition, such enamels dry quickly and do not have a strong odor.
If the battery in the apartment rarely warms up to temperatures above 80 degrees, you can use any acrylic enamel (not heat-resistant). For example, the one that was used to paint the walls. However, in this case the radiator will have to be handled with care. You should not dry wet things on it.
If the radiators are very hot in winter, you need to purchase a heat-resistant one. acrylic paint. This will guarantee that the painted surface will not change color or crack.
Alkyd enamel, unlike acrylic, turns yellow over time, but does not crack or peel, even if wet things are dried on the radiator. Alkyd enamel is also good because it can be applied over old layers of oil paint.
If you plan to paint a new radiator or old battery, cleaned of previous layers of paint, you will need not only enamel, but also an anti-corrosion primer for metal.
How to paint a cast iron battery?
If the battery is not new and has been painted more than once, it is advisable to remove the old paint. After all, the more layers, the less heat. If the radiator has been painted more than two or three times, this is already critical. To remove old paint, you need to use a special remover ( chemical agent to remove old paint), carefully following the included instructions.
The wash softens the paint film and reduces its adhesion to the surface. As a result, the paint can be easily removed with a scraper, spatula or rag.
After clearing the radiator of paint, you should wash it thoroughly. Next, the surface can be sanded in order to at least partially smooth out the numerous roughnesses typical of domestic cast iron radiators. To do this, you can use sandpaper or a brush. The key here is not to overdo it, because excessive sanding can make the battery more fragile. On perfect result It’s still not worth calculating - absolute smoothness will not be achieved.
After sanding - primer. As already mentioned, you will need an anti-corrosion primer for metal. The primer must be completely dry before painting can be done.
If the battery is very old, first painted in the 50-60s, it is advisable to purchase a new radiator. Firstly, peeling off numerous layers of paint will not be easy. Secondly, cast iron radiators also have an expiration date. The longer the battery lasts, the worse it heats, because plaque accumulates inside, preventing water circulation. In addition, old radiators begin to rust and sometimes leak. If there are a lot of layers of paint, the remover will have to be used several times, and a good remover is not cheap. New battery, will probably cost the same amount.
Now let's talk about the next stage - coloring. It is recommended to paint only cold radiators, as the paint dries too quickly on hot ones. There is not enough time to properly distribute the paint over the surface. This causes various flaws: bald spots, smudges, brush marks, etc. Moreover, some paints, if applied to hot battery, may wrinkle.
It is convenient to paint the radiator with a brush. If the battery is cold and the paint is sufficiently liquid, the film will apply evenly and smoothly. If conditions permit, you can use a spray gun or spray paint.


Most often, one layer is not enough. You need to wait until the first layer dries and only then apply the second.
What color should I paint the battery?
White radiator- classic. In our country, batteries are usually placed under the windows, and they are almost always white. A radiator in the color of the window sill and frames is the most common and absolutely organic solution. However, it is far from the only one.

Very relevant today black batteries. There is an opinion that a radiator painted black heats a little better than a white one. However, experts say that the difference, if any, does not exceed 1-2%. The black color of the battery is more of a design tribute than a concern for heat. Such radiators can often be found in modern interiors, especially those decorated.


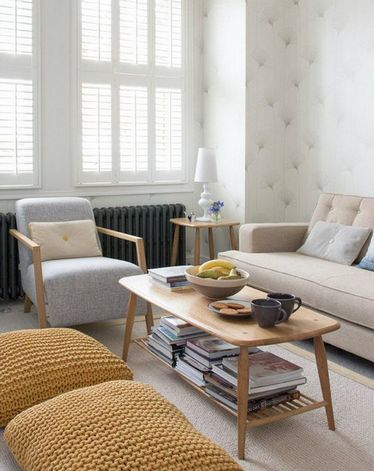
Battery to match the wall color- a less common solution, but certainly successful. Of course, this does not disguise the battery or make it invisible. However, thanks to this technique, the radiator does not stand out from the general space and does not look like something alien.

Photo from the project of designer Galina Yurieva


Not many people dare to paint the radiator in bright color, contrasting with the walls. Making the battery an accent is a bold move. And very effective. This design option is suitable for a modern minimalist interior.

An interesting idea is to paint the battery using the ombre (or gradient) technique. The outer section is painted, for example, white. The second has a subtle color, and each subsequent section becomes more saturated.

Photo source: the-village.ru

Colored batteries are especially appropriate in children's rooms. Here you can safely get creative. For example, decorate the radiator with patterns, drawings, and thematic painting. Or paint the battery in the form of colored pencils, rainbows, etc.

Surface preparation before painting
Selecting paint for radiators - which one is best to paint?
Matte and glossy paints
Paint for cast iron radiators
Types of paints for batteries
Alkyd enamel
Acrylic paints
Oil based paint
Hammer enamel
Powder dyes
Radiator paints without odor
Radiator paint thinner
Paint for radiators must meet special requirements, withstand temperatures up to 80-90 ° C, protect the metal from rust, and at the same time maintain color. Special paints for metal radiators fully meet these requirements. Other universal paints and enamels have similar properties, but they can withstand temperatures only up to 60˚C. It is worth noting that in many heating systems Batteries practically do not warm up to this temperature. In this article we will talk about what is the best paint to choose for radiators so that it meets all the requirements.
Please note that simple paints and enamels, although used for painting radiators, quite often turn yellow and begin to crack due to high temperatures.
If old paint remains intact, has no unevenness, and is laid in no more than three layers; it will be enough to go over the entire surface with fine-grained sandpaper. This will improve the adhesion of the new coat of paint to the surface. After this, the surface is degreased with gasoline or acetone. Everything is thoroughly cleaned again, and they move on to painting.
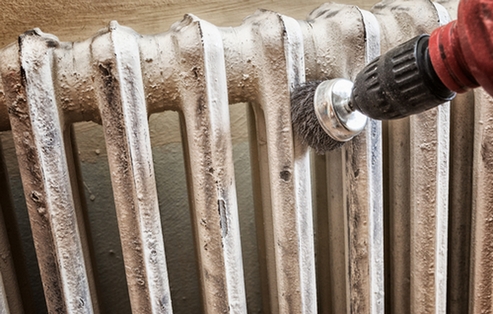
If the paint layer is old enough and has begun to deteriorate, you first need to clean the heating battery. It is necessary to remove all its layers until only metal remains. This can be done with sandpaper, a drill with special nozzle or a special remover for fired paint.
After all the old coating has been removed, the remains are cleaned up. A drill with a cord brush is suitable for this. Next, thoroughly degrease the surfaces and cover them with a primer mixture. As a primer for heating systems, it is best to take the GF-021 brand. For best protection It is best to use mixtures intended for cars. But, by and large, you can use any metal product that has anti-corrosion properties. The batteries begin to be painted after the primer has completely dried.
Selecting paint for radiators - which one is best to paint?
When deciding on paint for radiators, study the label: it should contain the phrase “paint for heating radiators.” The font in some cases may differ; sometimes it can be seen in small letters in the “scope of application” section. If you don’t find such a phrase, then it’s better this product do not purchase.
Among other things, the manufacturer's name must be on the label. There are often cases when special craftsmen copy the design almost 100% famous brands, while they seem to “forget” to indicate the name of the manufacturer. It is better not to pay attention to such enamel for radiators, since, most likely, you will receive a low-quality product, and odorless paint for radiators is out of the question. Batteries painted with this composition will stink for more than one week. There have been cases when it was necessary to remove a layer of such paint using a remover and start all over again, only this time using a quality product.
Matte and glossy paints
Some may wonder what paint to paint radiators with, matte or glossy. In this case, there is no clear answer. All imperfections are visible on the glossy surface, and when falling on it bright light you will see them all clearly. With a matte finish, everything doesn't look so sad.
However, matte enamel loses color over time. This happens because due to the porosity of the layer, dust gets clogged into it. In this regard, experts recommend using white paint for radiators in glossy or semi-gloss tones.
Paint for cast iron radiators
If you decide to cover MS-140 cast iron radiators with glossy paint, then on their surface you will be able to see all the roughness, which, due to the shine, will become even more pronounced. Matte paint will make the batteries look more grey. It may seem like there is no way out, but the problem can be solved.
There are several options for solving this issue:
- Choose multi-colored acrylic enamel for radiators. The fact is that white color looks organic only on light or completely white surfaces. But in all other cases, designers advise painting radiators in a shade close to the color of the walls. Therefore, for cast iron radiators you can freely use matte enamel without fear that it will turn gray and lose color. Hammer paint with a textured pattern performed well - after painting, defects on the surface are invisible.
- Of course, there are times when the only solution is white paint for heating radiators. However, be prepared for the fact that radiators will require repainting after about 2-3 years.
- Alternatively, defects in the surface of radiators can be pre-leveled with putty - polyester for cars or epoxy. Before puttying, the surface is degreased and primed. Then the radiator is sanded, dust removed with a dry cloth and painted. With this approach, both glossy and semi-gloss shades of paint will look equally beautiful. However, be prepared for a lot of hard work. Although the end result will please you.
Thanks to the options presented, you can make your choice more freely suitable paint for heating batteries.
Types of paints for batteries
Painting compositions for heating radiators can be acrylic, alkyd, as well as their variants on various bases.
Alkyd enamel
Alkyd enamel for heating radiators is available in a wide range of colors. Although it has a slight odor, it dissipates quickly. In addition, such dyes are characterized by color fastness.
Depending on the basis there are:
- Solvent based alkyd enamel for radiators. This enamel has a very strong pungent odor, although the surface is beautiful and glossy. The most commonly purchased enamel is PF-115. Sometimes they choose Pesto enamel - its disadvantage is that it requires tinting with blue pigment to avoid yellowing.
- Silicone enamel turns matte. As a rule, this group contains heat-resistant paints with a temperature threshold of up to 600 ℃. Sometimes they release aerosol paints for heating radiators from this category - they are much easier to apply.
- Water-based paint for radiators. These paints vary in their area of application. In particular, heat-resistant types of enamel are used for radiators so that they do not darken over time. In white enamel, titanium pigment is desirable. The main guideline when choosing quality paint is its price.
Acrylic paints
The surface texture of dried acrylic enamel is similar to plastic, both in visual and tactile sensations. The advantages of acrylic paint for heating radiators are that it adheres well to the surface and is easy to clean. Some varieties of such enamel are practically odorless because they are water-based. However, you need to choose acrylic paint for batteries that is resistant to heat.
For these purposes, you can purchase VD-AK-1179 paint. True, it requires preliminary priming of the surface to be painted. This enamel dries for 2 hours between layers and 24 hours completely.
Another type of acrylic enamel for heating radiators is “Thermakrill” from the company ALP ENAMEL. This paint has a specific smell, however, it contains anti-corrosion additives. Can withstand temperatures up to 120℃, can be used for any metal surfaces, particularly low carbon and of stainless steel, titanium and aluminum alloys, protects them from oxidation. Has a wide palette of shades. Partial drying for repainting occurs after 20-30 minutes at 20 ℃, and the paint will dry completely after 2 days.
There are a lot of options for acrylic enamels, so everyone can choose a paint to suit their taste.
Oil based paint
Since such compositions quickly lose their original appearance - the color changes, the shine disappears, cracks appear - for painting heating devices they are almost never used.
Hammer enamel
Hammer paint for painting radiators is a type of alkyd enamel that allows you to create a textured surface and mask defects only with paint. Various pigments can create a hammered texture, the effect of hammer blows and other interesting solutions.
Before painting, the surface is prepared in the usual way - cleaned, sanded, primed, degreased. If the working surface is smooth, it is sanded to obtain small irregularities.
Powder dyes
With the help of such dyes, steel, bimetallic and aluminum batteries in production conditions. For home coloring, it is used very rarely due to the need special tool– spray gun. Although some services rent out such equipment.
According to the technology, a negative charge is transferred to the cleaned part, and powder paint– positive. To do this, you need a diesel generator that produces current at a voltage of 25-30 kV with a power of a fraction of an ampere.
The potential difference allows the powder to be evenly sprayed over the entire surface to be painted. The next step is to polymerize the dye so that it becomes rigid. It is performed by heating the product to a certain temperature. Its range is from 170-200℃ to 350℃.
The lower temperature threshold can be created with a heat gun, but to pump up high temperatures you will need a furnace that will gradually warm up the product. Alternatively, you can use paint that polymerizes under the influence of ultraviolet light. Then in a closed room it is enough to turn on a special lamp for a specified time.
Be that as it may, such technology is difficult to implement at home. You may be able to have your radiator painted in an equipped auto repair shop.
Thus, from all the options for paints for radiators, everyone can choose the most suitable and most affordable one. Even if it is Oil paint– this is not a relevant choice, but it has a right to exist.
Radiator paints without odor
There is a separate category of paints and varnishes - odorless dispersion acrylic paint for radiators. And although it cannot be said that it has no smell at all, it is not sharp and is almost invisible. Please note that you need to purchase paint specially designed for radiators, designed for use at high temperatures - the manufacturer indicates these indicators on the label.
It is worth noting that the odorless paint for batteries is quick-drying, easy to apply and lays down in an even layer, does not lose color or crack. You can choose from semi-gloss and gloss shades.
Before painting the surface with water-based paints, it must be primed so that rust does not seep through the pigment.
In addition, you can purchase Element paints from Eskaro, Aqua-Heizkorperlack from Dufa, as well as odorless materials from Triora, Thermo, Dufa Retail and others.
Radiator paint thinner
Of course, the new paint will lie tightly and evenly only if the old coating from the radiators is completely removed. In order not to waste time scraping the metal by hand or stripping it with a drill and brush, you can use special gel removers. This composition is applied to the surface of the radiator and left for a certain time. When the paint softens, simply scrape it off with a spatula.
You can apply paint remover with an old brush with natural bristles or a metal or wooden spatula. Among various options There are aerosol types of washes. In order not to damage neighboring surfaces, before spraying the composition, cover all nearby objects with film.
Manufacturers indicate the exposure time for various compositions on the packaging. After a specified period, the old coating becomes soft enough that it can be removed without difficulty.
Although the remover contains chemically active components, they do not damage metal and wooden items, as well as skin. But it is still better to use gloves when working. Residues from the radiator can be washed off with plain water.
Such brands of remover as B-52 or SP-6 performed well. Domestic and foreign manufacturers produce many analogues of such substances, varying in price and depth of penetration.
conclusions
As it became clear, the range of types and colors of dyes for radiators is very extensive. When purchasing, you will need to choose the color and type of paint - matte, semi-gloss or gloss. In addition, it is important to decide what kind of paint you want to buy - alkyd enamel or acrylic. The last step will be the manufacturer's choice.
How to paint cast iron batteries
You have cast iron radiators in your apartment, which are famous for their thermal conductivity. True, the only thing that is depressing is their appearance (especially if they were installed several decades ago). Replacing such radiators is very labor-intensive and costly, and there is no particular need for replacement. The batteries work quite well and heat well. To give them a new and beautiful appearance, their appearance can be improved, for example, by simply repainting them. You may ask: how to paint cast iron batteries?
To ensure that the appearance of the batteries does not resemble Soviet times, painting of the batteries must be carried out according to certain rules. Special paint is also needed for cast iron radiators. Do not forget that during the heating season the surface of the batteries becomes very hot. (See also: Which heating radiators are better)
It is worth noting that the cost of paint will also differ significantly from the price of conventional enamels. Therefore, in order not to overpay for painting products, you just need to calculate required amount. Let's take a closer look at all the subtleties and nuances of painting work for cast iron radiators.
Preparatory work
Beautiful cast iron batteries may not look perfect in a niche that needs repairs. Therefore, the first step is to determine the amount of work that will need to be done. First of all, carefully inspect the area under the window sill where the batteries are installed. Minor repairs not prevent? Then we will definitely include it in the list of works, and of course the direct painting of the radiators themselves.
Calculation necessary materials We perform based on the amount of work required. These include:
- high-quality repair of the niche in which the batteries are installed.
- painting cast iron radiators.

You can choose any option for how your niche will look after renovation. It can be covered with wallpaper, trimmed decorative plaster, tiles or tiles. Often, the place where the radiators are located acquires a cracked and yellowed surface over time, which does not add neatness and beauty to the room. On the contrary, a room that has been renovated according to the latest standards looks completely unaesthetic with such radiators and a niche. (See also: Repair of heating boilers)
Very important: painting of cast iron batteries should be done at a time when the heating season has already ended. You cannot paint hot radiators. The point is also that when repairing a niche and the batteries themselves, it is advisable to remove them from the wall, and this requires mandatory disconnection from the central heating system.
If this is not possible, and for some reason you cannot wait until the heating season ends, then you will have to spend a little more effort on repair and painting work. In particular, the paint you purchase for cast iron heating radiators must have high temperature characteristics.
Preparing the battery for painting
It is quite clear that it is not enough just to buy high-quality paint in order to paint cast iron heating radiators. Before painting work, it is necessary to thoroughly prepare the surface of the radiator for painting. (See also: What bimetallic radiators better)
- The first step is to thoroughly remove the old paint, which is probably already cracked and yellowed. To remove the old layer of paint, you can use a brush with metal bristles, coarse sandpaper or a spatula.
- When choosing paint, pay attention to the fact that it must withstand elevated temperatures. If you ignore this requirement, you risk getting a very undesirable effect. Some enamels or paints lose their color when exposed to high temperatures.
Thus, there is a possibility of getting an unsightly yellow battery at the very beginning instead of an ideal crystal white radiator heating season.
- Carefully choose the brushes with which you are going to paint cast iron radiators. Don't buy brushes that are too cheap. Very often they begin to “shed” during painting work, leaving unsightly fluff on the surface being painted. Be sure to purchase a special curved brush. It will help you paint hard-to-reach places in the battery.
(See also: Paint for heating radiators)
Painting
Cast iron radiators are painted in two layers. There is no need to do more, because then it is very difficult to make sure that the paint lays down in an even layer, without streaks. Be sure to thin the paint material if it is too thick. But if you buy special paint, its consistency is normal and does not require additional dilution.
If you are unsure whether you have diluted the paint material correctly, try painting small area batteries. This way you can determine the consistency you need. What you can use to dilute the paint is usually indicated on the paint can itself.
The paint color can be any color, the most important thing is that it matches the interior of your room.
Radiator paint: selection and use
You can play very beautifully with shades, emphasizing the color of the walls or, conversely, muting it, focusing on the radiator. If we talk about color, it does not have to be white. Currently, you can use a service such as coloring and purchase paint in the most delicate and unusual colors. (See also: Cast iron heating radiators)
After the first layer of paint has dried, it is recommended to lightly sand it with fine sandpaper. This allows the second coat to be applied more evenly and improves adhesion between coats.
Repair of window sill niche
Painting a window sill niche also needs to start with preparatory work. The first step is to completely remove old layer plaster. Sometimes it happens that there are significant cracks in the niche. They will need to be sealed carefully.
To do this, you need to remove poorly adhering plaster in places of cracks. If the cracks are deep and go into the wall, they are sealed with ordinary cement mortar. The remaining work can be continued only after the cement has completely dried.
Small cracks can be easily repaired using a special primer. It allows you to strengthen the base and avoid cracks and chips in the future. After the primer has dried, it is advisable to apply a layer of finishing plaster. Its fine consistency spreads easily, making the surface smooth. Now you can proceed directly to painting.
Painting cast iron radiators begins with painting the place where they will be further installed, that is, the window sill niche. So, the base of the wall is prepared, you can start painting. When choosing paint, also remember to choose materials that can withstand high temperatures without losing their color. The fact is that being near heating radiators, the wall can get very hot, so we choose resistant painting materials.
If you decide to decorate a wall with tiles or tiles, try to imagine in advance how it will look together with radiators. This type of finishing is very demanding when it comes to matching colors and surfaces. The most the best option is finishing the wall with paint or decorative plaster. Be sure to consider the color of the batteries. In order to avoid color mistakes, it is not advisable to make the niche colored. Neutral white color is perhaps the most optimal choice, especially if you paint the battery in a color that highlights the interior of your room.
Finishing touch
The last stage is the direct decoration of the heating radiator. Many people wonder how to decorate cast iron battery. All you need to do is use a little imagination. Painting it an unusual color will help make the battery unusual.
For example, on radiators in a children's room you can draw funny cartoon characters using templates. You can come up with a relief pattern and paint it with a different color. Let's look at some options in more detail.
To create a relief pattern on the battery you will need paper flagella. They can be rolled out of napkins; the paper should be thin. Make as many paper blanks as you need for the pattern. It is advisable to first lay out the entire drawing on the windowsill.
Currently, the design of objects with an “antique” effect is very popular. If your interior allows it, you can, for example, paint the radiator with black paint and use a sponge with gold or bronze paint to apply light touches. The effect is amazing.
If you don’t want to suffer and draw different patterns, you can use decorative screens. Eat standard options protective screens, there are unique models with beautiful openwork inserts. The colors are very varied. In any case, you can choose the option that suits you. This way you can easily make beautiful cast iron radiators.
Wooden screens look very nice. If your battery is not located under the window, then the top of the screen can be used by placing beautiful frames with photographs and figurines on it. Just don’t put flowers, it will be too hot for them there. Such screens can in addition be equipped with small drawers on one or each side of the screen.
Ideal solution for small rooms: a beautiful screen that effectively hides the battery, plus a convenient shelf and bedside table in which you can store any things. It is worth noting that the use of protective screens has virtually no effect on thermal effect from batteries.
HomeSitemap
- hand brush for metal;
- battery primer;
Before applying paint to the radiator, degrease the surface with any solvent, if necessary. This is especially important to do if the battery is rusty.
Paint for heating radiators - types and application features
After the solvent has completely dried (a couple of hours), a primer material that is heat-resistant is applied with a special narrow brush.
How to paint cast iron batteries?
Painting cast iron radiators at home
The end of the heating season is the time to solve heating problems. In a private house, heating system repairs can be carried out at almost any time of the year, but when it comes to apartments, difficulties arise. Getting started repair work, you need to wait until the end of the heating season and make sure that the water is drained from the system.
Replacing radiators is a relatively short, but very expensive process, which, unfortunately, not everyone can afford. Don’t get upset ahead of time, old cast iron batteries are in no way inferior in heat transfer modern radiators heating.
The catch is that it takes a lot of time and effort to paint heating radiators to give them maximum attractiveness. But don’t despair, you can do everything yourself.
Painting a cast iron battery will require the following tools:
- a small grinder with an attachment in the form of an iron brush;
- hand brush for metal;
- battery primer;
- heat-insulating paint for metal;
- brush for painting radiators.
Preparing the radiator for painting
At the first stage, all old paint is removed from cast iron batteries using a grinder and an iron brush; hard-to-reach places are treated with a hand-held metal brush.
After this, all dust is removed from the batteries, and if necessary, everything is thoroughly wiped with a damp cloth.
Before applying paint to the radiator, degrease the surface with any solvent, if necessary. This is especially important to do if the battery is rusty. After the solvent has completely dried (a couple of hours), a primer material that is heat-resistant is applied with a special narrow brush.
After this, the batteries can be painted. If you skip the primer coat, rust will show through the water-based paint in places, even if you apply 2-3 coats.
Painting a cast iron radiator
Today, manufacturers offer two types of heat-resistant paints for metal: water-based and oil-based. It is recommended to apply a minimum of 2 coats of paint at intervals of 5-6 hours depending on the type of paint.
Paint for heating radiators.
Before applying the paint, it must be thoroughly mixed so that there are no lumps. This is an important aspect.
It is not advisable to purchase just paint for metal, as it turns yellow over time.
As you can see, painting old cast iron heating radiators is a labor-intensive process, but in the end the result is worth it.