Today you can see slatted ceilings not only in the interior of shopping and entertainment centers, but also in many city apartments and country cottages. The reason for such popularity lies in the fact that the technology for constructing such structures is not so complicated. It is quite possible for a novice builder to install a slatted ceiling with his own hands. Before starting to consider the installation technology, we suggest that you familiarize yourself with existing species of this ceiling.
External features

Ceilings may differ in various ways. Let's list them.
Material of manufacture
This ceiling is a type of suspended structure. We can say that it consists of slats made of different materials(plastic, steel, aluminum) and special system for their fastening.
Dimensions

Existing standards for ceiling slats:
- the width of the slats should be from 50 mm to 30 cm;
- thickness - from 0.4 mm to 0.7 mm;
- length - up to 6 m.

A slatted ceiling can be:
- matte;
- smooth;
- glossy;
- perforated;
- or special decorative texture.
Color
The existing variety of colors and shades of ceiling slats allows designers to use them when decorating any interior.
Form
Most often forms ceiling panels They are rectangular, but sometimes they also have a rounded shape.
Joints

According to the types of joints, the flows are:
- Open. A small gap (about 15 mm) appears between the slats, which is closed with a special profile for decorative purposes.
- Closed. The slats are attached with an overlap. Installation is carried out without the use of decorative profiles.
- Gapless. This type of ceiling also does not require a layout. The slats are installed closely.

The main advantages of slatted ceilings are:
- Versatility. They have proven themselves to be excellent in rooms with significant requirements for moisture resistance: they are installed in swimming pools and bathhouses, on verandas, terraces and gazebos.
- Environmental friendliness. Usage safe materials in the manufacture and coating of panels.
- Durability. The slats do not rust, the color of their coating does not fade or fade over time. These ceilings last over 25 years.
- Diversity. There is a huge range of panels (in style and design).
- Fire resistance. The slats are usually made from non-combustible materials, moreover, when heated, they do not emit any harmful substances.
- Hygiene. Dust does not accumulate on the panels and they can be easily washed with warm water.
- Simplicity and ease of installation. Slatted ceilings are installed quite simply, quickly, and without dirt and dust. They are equipped with an excellent suspension system, which provides an excellent opportunity convenient device communications (air ducts, electrical lighting distribution, etc.). Also, at any time, any rail can be quickly dismantled and replaced with a new one or installed back.
Installation instructions for slatted ceilings

The suspended ceiling system consists of the following elements:
- Corner profile. Necessary for closing the gap that forms between the wall and the slatted ceiling.
- Suspension (adjustable). It consists of a rod attached to the base and a special bracket, which is needed to attach the stringer (support rail).

- Support rail (stringer, traverse, comb). The strip is made of galvanized steel, on which there are locking grooves intended for installing slats.

So, we invite you to read our installation instructions:
- First you need to decide how high the ceiling is supposed to be lowered.
- Using a string and a level, you need to mark out a horizontal line around the perimeter of the room.
- Next, measure the horizontal length and cut off the corner profile pieces required length(for the first wall).
- If the profile does not have holes for fasteners, then you should take a drill with a metal drill and drill the holes yourself. The first hole is drilled at a distance of five centimeters from the beginning of the corner, and all subsequent ones - after about fifty centimeters.
- Along the marked line, attach the profile with holes to the wall, and then through drilled holes Use a marker to put dots on the wall.
- Drill holes in the wall and insert the prepared dowels into them.

- Using self-tapping screws, install corner profile(screwing screws into dowels) - the basis of the rack structure.
- Repeat the above profile installation process for other walls.
- The wall corner is fastened in the outer corners at an angle of 45°, and in the inner corners - end-to-end.
- Attach the support rail to the ceiling, and then use a marker to make two marks for drilling holes at a distance of about 30 cm from the ends of the rail. Make the remaining holes at a distance of 1.2 m or slightly less.
- Repeat the same steps with the remaining stringers (supporting tires).
- Drill holes with a hammer drill at pre-marked points on the base ceiling and install dowels.
- Attach support rails to the ceiling using hangers with special brackets. Fix the bars parallel to each other in 1.2 m increments.
- If the distance is small, the support rails can be secured directly to the base with self-tapping screws. Maintain a distance of 1 cm between the support rail and the installed corner profile.

- Measure the required panel length. The length of the slats, as a rule, is equal to the distance between the walls minus 0.5 cm.
- Place the slatted panel on the corner profile and secure it with the rail clamps. The remaining slats are installed in the same way. Periodically check the level of the ceiling.
- At the end, install a special layout profile to close the gap formed between the panels.
The technology for installing slatted ceilings involves placing slats under different angles to the walls and in different directions. When carrying out work in a narrow, long room, it is recommended to place the slats across - this way the room visually expands.
How to mount the ceiling is up to you, the main thing is that it fits harmoniously into the overall design of the room.
Video
To make it easier for you to understand the progress of the work, we suggest you watch the video instructions for installing a slatted ceiling.
Here is another instruction that will definitely help you in your work.
The technology for installing a slatted ceiling is quite simple, and any home owner can master it. Slatted ceilings are an element of apartment and office decoration. Similarly, they are created unusual interior in shopping and entertainment centers.
Slatted ceilings and their types
Before telling you how to install a suspended slatted ceiling, let’s look at their types. Slatted ceilings are a type suspended ceiling. The design has aluminum, steel or plastic slats. In addition, there is a system for attaching them.
The slatted panel can be made from:
- aluminum;
- plastic;
- become.
Ceiling slats standards (dimensions):
- thickness – from 0.4 to 0.7 mm;
- width – from 50 to 300 mm;
- length can reach 6 m.
Rack surfaces:
- smooth;
- perforated;
- matte;
- glossy;
- textured.
According to form slatted panels– rectangular, and sometimes rounded. In terms of color, elements can have a variety of shades.
The installation instructions for the slatted ceiling provide for different locations of the slats: in directions and at different angles to the walls. In narrow and long rooms, the slats are usually located transversely. Thus it happens visual extension rooms. Be sure to check out the photos of such premises to have an idea of future installation.

Depending on the joints between the slats, ceilings are divided into:
- open;
- closed;
- having no gaps.
At the ceilings open type– 15mm gap between slats. It is closed with a special profile. The closed type of installation of slatted aluminum ceilings does not imply the use of profiles (read: ""). The same principle applies to installation without a slotted ceiling. At closed type ceiling slats overlap each other, and with gapless ones they are mounted as tightly as possible to each other.
Slatted ceilings and their advantages
Slatted ceilings have advantages, which we will discuss below:

Installation of slatted ceiling - instructions
Having talked about what types of slatted ceilings there are, let's move on to the process itself. Of course, we will need instructions.
Elements and components
So, suspension system consists of the following elements:
- support rail;
- Automatically adjustable suspension;
- corner profile.

The support rail (galvanized strip) is, in other words, a traverse, comb or stringer. There are locking grooves on the bus intended for installing slats.
Important: When repairing a slatted ceiling, close all communications located on the ceiling. As a rule, such a ceiling should be located slightly lower than the base one - by 50-120 mm.
Tools
Installation of slatted ceilings requires the use of the following auxiliary tools.
Keep them handy to avoid stagnation in your work:

Slatted ceiling - how to install?
Step by step process working with slatted ceilings is not special labor. The only thing you need is to follow the technology. Decide at what height the ceiling will be placed (lowered). Using a level and a string, mark a horizontal line around the perimeter of the room.
- Measure the length of the horizontal line using the cord made. Next, cut the pieces of the corner profile to the required length. This will be the first wall.
- If there are no holes for fastening in the profile, drill them with a drill (use a metal drill). The first hole should be at a distance of 5 cm from the beginning of the corner, and all subsequent holes should be every 60 cm.
- Attach the profile with the drilled holes to the wall, following the knock line. Then, using a marker, mark points on the wall through the drilled holes (read also: " ").
- Make holes in the wall, then insert butterfly dowels into them.
- Install the corner profile onto the screws, wrapping them into the fixed dowels. For the remaining walls, installation of the profile will be similar.

- Attach the support rail to the ceiling and fix the two holes with a marker. Their distance should be 30-40 cm from the beginning to the end of the tire. All subsequent ones are drilled every 1.2 m. Similar operations will require the remaining support rails.
- Using a hammer drill, drill holes at the marked points on the base ceiling. Next, the dowels themselves are installed.
- The next step is to fix the support rails to the ceiling. To do this, you will need hangers that have a special bracket for securing the tire.
- The tires must be fixed parallel to each other, and the distance between them must be 1200 mm.
- As an option, attach the support rails directly to the base ceiling. But this is only if the distance is small. In this case, you will need the self-tapping screws we are already familiar with. The distance between the corner profile and the support rail is 1 cm.
- Measure the length of the panel. In this case, the length of the slats will coincide with the segment between the walls - from 0.3 to 0.5 cm.
- Next, place the slatted panel on the corner profile. The latter is inserted diagonally, and then straightened and latched using tire clamps. The second rail is installed using the same principle.
- The third batten should be installed at the other end of the batten ceiling. As a rule, this is approximately the second row of clamps.
- Check the plane using a level. If necessary, adjust the height of the tires using self-tapping screws or adjustable hangers.
- If the outermost rail does not fit in width, cut it off. To do this, mark the required distance along the entire length of the panel. Then, using sharp knife and a metal ruler, draw a deep line. After this, you can begin to bend and unbend the rail. Ultimately, it will break off.
Advice : If you have a long strip, make cuts across and break it off in parts.
- Place the trimmed panel in its rightful place and clamp it. The elements will act as a vice wooden block or corner profile (read also: " ").
- Remember that the last stage of installation of open-type aluminum slatted ceilings is the installation of a folding profile. He, in turn, will close the gap remaining between the panels.
Rack ceiling: do-it-yourself installation - dismantling
First of all, disassemble one of the edges - pry up the wall corner profile with a screwdriver or knife. Next, bend it so that you can pull out the end of the outermost strip. Having released the outermost module from all stringer locks, carefully remove it. The remaining ceiling slats require the reverse operation - unlock all locks, then move the freed panel to the edge. After this, you can slowly pull it out of general design. Of course, you should have a diagram of the installation of the slatted ceiling in front of you.
Installation of slatted ceiling, detailed video:
Ceilings rack type quite popular. And this is no coincidence, because they have important characteristics:
- for a long time services;
- moisture resistance;
- ease frame structure;
- ease of installation;
- simplicity dismantling works;
- ease of care;
- low cost.
Choosing a method ceiling decoration is not an easy task. Especially for rooms with a high humidity threshold. The most practical option in this case, an aluminum slatted ceiling can become. Its features are attractive appearance make this ceiling perhaps the most popular option.
Practicality and reliability of aluminum slatted ceilings
These coatings have a number of advantages:
- Easy to install.
- Possibility to dismantle the entire structure or individual sections.
- High quality coatings.
- Moisture resistance, which allows the use of this type of ceiling finishing in rooms with high humidity.
- Long-term operation, wear resistance.
- Environmental friendliness.
- Good reflective function.
Types of aluminum rack systems

Design elements
Aluminum slatted ceilings are a structure consisting of:
- Stringers (another name is traverses or combs) are load-bearing elements that are used to fix the lamellas.
- Adjustable hangers that ensure reliable fastening of the dies to the roughing material ceiling surface.
- Aluminum slats.
- Decorative elements – plugs and profiles. The latter are represented by corner strips that mask the space between the ceiling surface and the walls.

The most common are the following three types of coatings for aluminum ceilings:
- Cassette. The ceiling surface is decorated with aluminum sheets in the shape of squares or rectangles.
- Rack and pinion received this name because they are used in interior decoration.
- Designer – separate species , more expensive, but distinguished by originality and sophistication.
The type of device assumes two types:
- Open– with gaps between adjacent slats.
- Closed. They are presented with a smooth surface with tightly fitting panels.
Main characteristics of aluminum slatted ceiling
Technical features
Despite the variety of manufacturers, the parameters of the slats are similar to each other:
- Lamellas and decorative plugs are made from aluminum sheets. They differ from each other in thickness.
- The appearance of slatted panels is represented by long three- or four-meter slats. If slats are required bigger size, they can be made according to individual order. Maximum length one panel is 6 meters. Such slats are usually installed in spacious, high rooms, since standard rooms are smaller in size.

- The edges of the slats are curved in a special way, which makes it possible to securely fix them to the stringers.
- The slats are either solid or micro-perforated. The front surface is decorated with various color shades and textured coatings.
- The stringers are made in the form of U-shaped profiles with cut-out tongues on the edges that securely hold the lamellas. There are through holes made in the upper part of the tires for attaching them to hangers. The standard length is 4 m.
- Depending on the material of manufacture, stringers are made of aluminum or galvanized steel.
- The thickness of the slats is 0.3-0.6 mm.
Openslatted ceilings suggest the formation of small gaps (up to 16 mm) between the panels. The traverses are visible through them.

Decorative appearance this system acquired through the use of special layouts that are installed between adjacent slats. They are produced in the same colors as the main coating, or in different shades from the panels. The layouts are smaller in size than the main slats, then they are “recessed” into the resulting gap. Or match the size of the panels. In this case, they are fastened flush with the slats, resulting in a flat surface.
Closed slatted aluminum ceilings are mounted with the panels tightly adjacent to each other. The installation principle is similar to laying lining. This installation is also carried out using traverses, but without the use of decorative overlays.

The installation and installation process of slatted suspended structures is not difficult, so it can be done independently.
On a note! Experts advise great attention pay attention to the correct fixation of the slats to the frame.
Installation of the suspended structure takes place in several stages:
- Marking.
- Frame installation.
- Fastening panels.
- Installation of decorative plugs.
Before starting work, carefully read the instructions so as not to damage the material. Professionals suggest first producing correct calculations, on the accuracy of which the success of the work depends. It is also a good idea if you are trained in using power tools. But even without such skills, you will be able to install a rack aluminum ceiling with your own hands.
What materials will be needed for installation

You need to buy in advance:
- Combs.
- The slats are of the required length.
- Starting aluminum or galvanized profile.
- Decorative plugs.
- Fasteners – dowels and self-tapping screws.
Material calculation
- For the frame. The profile is sold in standard sizes of 2.5 or 3 meters. To calculate its quantity you need to know the perimeter of the room. Divide this figure by the length of one profile strip and get the number of elements. If the final number is not a whole number, round it up to the nearest whole number.
The guides are installed in a parallel direction every 100 cm, the first one is installed 40 cm from the wall surface. Calculate the required number of meters of traverses by addition. And divide it by the length of one stringer.

Suspensions are calculated in the same way. To attach one profile to the wall surface, you only need four self-tapping screws; the suspension is attached to the base ceiling with one self-tapping screw. Count the number of hangers based on the number of guide bars. One guide profile must be mounted on four suspensions.
- For slats. In this case, you need to take into account the type of aluminum slatted suspended ceiling - open or closed.

We have provided a calculation of the minimum amount of materials you will need to install the ceiling. To ensure the work goes smoothly, it wouldn’t hurt to add 10%.

To install an aluminum slatted ceiling, prepare the following tools:
- level or level;
- roulette;
- perforator;
- a simple pencil;
- screwdriver;
- scissors or a hacksaw for metal.
Ceiling markings
Before you do it yourself, you will need to mark the rough surface. The procedure will be as follows:
- If you plan to install chandeliers or lamps on the ceilings, then mark their locations in advance.
- Step back 15-20 cm from any corner and mark the required distance from the ceiling on the wall. In this case, the height of the lamp must be taken into account.
- Using a level or level, place another mark from the previous one at a distance of 50 cm.
- Mark points at the same interval along all the walls of the room.
- Using painter's upholstery thread, connect all the marks to each other.

First you need to make a frame for the new ceiling:
- Measure the wall and cut the profile to size using a grinder or hacksaw for cutting metal materials. Prepare it for all walls in this way.
- Attach the profile to the wall surface with self-tapping screws every 50 cm and install wall corners.
Important! The wall corner is pre-attached by cutting its edges at an angle of 45 degrees. Holes are drilled in the corner and the element is fixed to the wall.
- Install hangers. They must be on the same level.
- Measure the length of the stringers, cut the material, and fix the tires flush with the profile in a perpendicular direction to the slats at intervals of 100-120 cm from each other.
- If the stringer is not long enough, add material to the existing strip.
Installation of aluminum slats

After you have installed the tires, you can proceed to installing the main covering:
- Remove from slats protective film, cut the products to the desired length. They should be 3 cm shorter than the distance from wall to wall.
- Tuck the lamella into the comb and fix it along the entire ceiling. Do this with all the slats except the last one.
Important! Immediately pay attention to the evenness of the ceiling, adjust it using hangers.
- If the finishing ceiling strip is wider than the remaining uncovered section of the ceiling, trim it lengthwise in a straight line construction knife. Bend the rail in different directions until it breaks.
- Close the cracks with decorative inserts.
Slatted aluminum ceilings in the interior (photo)
Such structures may differ in design. Thanks to this, they are increasingly used to decorate ceilings not only in public spaces, but also residential buildings and apartments.

Regardless of the type of installation (open or closed), you will be able to create original interior with the inclusion of these structures.
Can be picked up decorative elements, which will match the color of the main coating, or differ from it in shades, creating trendy design solutions.

Currently, slatted ceilings are available in different color variations. Silver, gold and white tones continue to be the most common. You can find lamellas on sale with images, glossy or matte textures printed on their surface.
Choose an Italian or German design for your ceiling and your room will sparkle with new colors.
How to make a slatted aluminum ceiling in the bathroom with your own hands video
Renovations have begun in your house, and you have decided that for the bathroom you will make a functional and modern slatted ceiling with your own hands. This a good choice for rooms with high humidity and high hygiene requirements. Such ceilings are not susceptible to fungi and harmful microflora, are not destroyed by dampness and rust, are securely fastened and are easily treated with detergents and disinfectants. In addition, the slatted ceiling is easy on your budget and can be installed independently, without the involvement of outsiders. Like any suspended structure, such a solution ceiling design does not require preliminary preparation of the surface it forms.
It should be noted that such a ceiling can be done not only in bathrooms. Today, manufacturers create products so decorative that with the help of a slatted ceiling you can create unique interior in a room of any direction of use.

classic slatted ceiling
We make calculations and buy materials
Having decided on the type and color of the future ceiling, you will need to calculate the amount of materials needed.
- You measure the perimeter of the room - this is the total length of the U-shaped profile, which will be fixed to the walls and will allow you to make a neat connection of the ceiling surface to the walls of the room.
- Calculate the total length of the supporting combs - stringers. To do this, mark the ceiling perpendicular to the intended direction of location. decorative panels, in increments of up to 1 meter.
- Determine the area of ceiling covering you need by calculating total area premises.
Now you can purchase ready set materials for your area or assemble it yourself, based on the calculations you made.
What will the master need?
In order to independently install a slatted ceiling, you will need a set of tools and materials consisting of:
- ceiling kit, which includes profiles, stringers and panels;
- suspension elements;
- hammer drill, drill and screwdriver;
- marker, building level, ruler and tape measure;
- knife, metal scissors, pliers;
- dowel-nails and self-tapping screws.

The work begins with marking
The slatted ceiling in the bathroom or toilet, as in other rooms, is installed upon completion of all finishing works and is the final chord in the renovation.
The most crucial moment when installing a ceiling is applying markings. The first is to outline the perimeter along which the U-shaped profile will be attached. If the ceiling is strictly horizontal, you simply draw a line at the desired height in the horizontal projection. A multi-level ceiling will require more complex calculations. The distance from the top edge of the wall will depend on the filling between ceiling space. If you don't plan to place anything above your decorative ceiling, then you can raise it as much as possible, leaving a gap of about 5cm. Placing lamps or other communications will require more space between the real and false ceiling.
The next step is to apply markings for the stringers. Check that the lines are parallel to each other and relative to the side wall, and perpendicular to the direction of the finishing panels and the end wall.
Video: slatted ceiling assembly, part 1
Fixing load-bearing elements
First of all, the U-shaped profile is secured using dowels. Step back 5 cm from the edges and drill holes; in the space between the edge fastening points, in increments of about half a meter, make the remaining holes for fasteners. You need to drill from the outside of the profile to avoid the formation of burrs, which could prevent it from fitting tightly to the wall.
After the profile is fixed, prepare according to the markings of the space for hangers, which can be made in various options– from plates to wire. The most convenient are adjustable hangers; they allow you to level the ceiling surface as accurately as possible. The edge points are located 30-40cm from end walls, and intermediate ones are done in increments of 1.2-1.5 meters.
Now you can fix the stringers - tires with grooves on which the ceiling slatted panels are fixed. Their length should be such that there is a gap between them and the wall profile of about 1 cm, in order to compensate for the deformation of the material due to temperature changes.
Final assembly
Before installing a slatted ceiling, you must cut the panels to the required length. To do this, they need to be made 3-5mm shorter than the distance between the profiles into which the ends of the panels will be inserted. After this, you can begin assembling the ceiling surface. The panels are inserted into the grooves of the stringers until they click, which indicates that the edges of the rails are tightly fixed to the tongues of the tire.

If last panel does not fit in the remaining space, it will have to be cut. To do this, a deep marking of the cutting location is applied with a knife along the entire length, perpendicular cuts are made on the part to be removed, and the pieces of the panel formed by them are separated by breaking off by bending and unbending the metal. After this, the edge panel is tucked with the cut side into the wall profile, and the other edge is fixed on the stringer tongues. For ease of work, the panel to be cut is installed next to last, and the last one is made 14mm shorter than all the others.
When installing all the panels, you inserted them into the wall profiles diagonally. And the latter will first have to be shifted to one side, bringing the first edge into the profile as much as possible, then insert the second edge into the profile and return the panel to the desired position, in which both of its ends are evenly positioned relative to the walls. After this, secure it to the support rail.
Video: installation of slatted ceiling, part 2
Additional points in installation
When planning a slatted ceiling, take into account the direction of the lines formed by the joints of the panels. Usually they are located from the window to the opposite wall. Narrow room will visually change the proportions when the panels are arranged transversely. In a square room, diagonal stripes on the ceiling are well perceived.
If the room is large, you will have to splice the panels, for which the kit should include intermediate liners that allow you to give a neat look to the joint.
The slatted ceiling allows you to carry out... To do this you need to make holes for them. You must draw in in the right place panel of the required diameter, and from its center to the outer line, using metal scissors, make radial cuts, bending the resulting petals into the ceiling space. The narrower the petals are, the better the installation of the lamp will be.

Slatted ceilings can be varied complex shape, and you can illuminate the room with spots built into it.
One of the types of suspended ceilings is its slatted version. It is characterized by good strength, has a long service life, and has a wide range of color range and is suitable for premises for various purposes. Most often, the installation of slatted ceilings is carried out in bathrooms, kitchens, swimming pools, as well as in garages and office spaces.
Installation diagram of a rack ceiling.
The slatted ceiling is also used in one more direction, which concerns open structures, such as terraces, verandas and gas stations. This is due to the fact that this type of ceiling finish has high degree resistance to influence humid environment. What is the design of a suspended slatted ceiling and what is the best way to install it? We'll talk about this further.
Design features of the slatted ceiling
As for the design of the slatted ceiling, first of all we draw your attention to the fact that it consists of individual slats, or, in other words, panels, the length of which can reach 6 meters. In addition to the slats, its design includes a special suspension system.
Now a few words about the materials from which the slatted ceiling is made. Most often, its slats are made of aluminum or steel with a thickness varying from 0.3 to 0.6 mm. Their outer side has a varnish coating. The width of the slats can also be different: the minimum is from 50 mm, the maximum is up to 200 mm.

Typical shape and size of a batten for a closed ceiling.
If you follow the instructions, then at the first stage of work you need to prepare the ceiling surface for finishing. Make sure that both the walls and the ceiling itself are in pure form and were fairly even. And don’t forget to think about what exactly will be placed in the inter-ceiling space. This is important, since the gap between the main ceiling and the suspended ceiling will depend on this. Lighting will also affect this indicator, depending on whether they are built-in or suspended.
I would like to note that if you are the owner of a room with low ceilings, the height of which does not exceed 2.6 m, then in this case you need to make every effort to make the gap between the base ceiling and the slatted ceiling as small as possible. To do this, the stringers are attached directly to the surface of the ceiling, and the leveling procedure is carried out using so-called linings. The most suitable lamps in this case will be devices hanging type. For this type of premises, it is most advisable to use closed ceilings.
A short list of tools that may be needed:
- roulette;
- drill or hammer drill;
- screwdriver (it’s better if there’s a whole set of them);
- pliers;
- to cut elements of a metal suspended ceiling you will need metal scissors;
- self-tapping screws and dowels;
- shoe knife.

Scheme for installing a suspended slatted ceiling on self-tapping screws.
Marking always begins from the wall that is the smoothest of all.
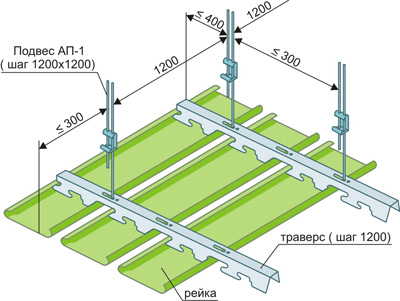
To do this, a parallel line is drawn at a distance of approximately 300 mm from the above wall. It will be needed when installing the stringer.
Exactly the same markings are made from the opposite wall. The line marking pitch for stringers is no more than 1.2 m.
The next step will be marking the future hanger mounts. The first point from the wall should be located at a distance of no more than 400 mm.
If you plan to equip the slatted ceiling with lamps, do not forget to mark them too. And on the surface of the walls you need to indicate the desired height of the suspended ceiling.
Installation of slatted ceiling

Scheme for installing a lamp in a slatted ceiling.
At the first stage of installation, install combs or, as mentioned above, stringers.
The hangers can be attached using one of the methods listed below. This is either using self-tapping screws and dowels, or using anchors driven into pre-prepared holes.
Don't forget that if your ceilings are not very high, then using pendants is not practical.
Installation of a slatted ceiling, or rather stringers, ends with the horizontal alignment procedure. The position of the hangers can be adjusted by simply twisting and unscrewing.
The next stage involves the installation of skirting boards. As noted above, they are designed to cover joints.
Fastening is carried out using self-tapping screws, the distance between them is about 60 cm.
Next, you can proceed to the installation of panels. But before that, make sure that all preliminary work on placing communications and lighting behind the ceiling is completely completed. The place to install the first panel is the wall along which the rail will be located, which will not be cut to width. If you also use inserts, they are also mounted at this stage.