Arrangement country house requires solving many engineering and construction issues. In addition to creating convenient and comfortable conditions for living inside the house, you will also have to equip your garden plot. One of the important buildings on suburban area is a storm drain at the dacha.
Protecting yourself from precipitation
There are practically no areas in our country where there is no precipitation. IN middle lane In Russia, the volume of rain and water from melting snow throughout the year can be measured in cubic meters. In addition, not a single dacha is immune from heavy rain, which in a limited time can oversaturate the soil on your site with moisture and turn it into a natural swamp.
After your dacha is covered by heavy rain, the fallen water will roll off the roofs and from areas with a hard, non-water-absorbing coating into the ground, excessively saturating it with moisture. Not only can this moisture cause problems for your crops, but it can also cause the foundation of your home to collapse. If there is a cellar, ground floor or basement in your country houses - water can penetrate into these rooms and partially flood them. The same situation with an excessive amount of moisture in the area can also develop during intense spring melting of the snow cover.

To protect yourself from the adverse effects of moisture - on personal plots they install a storm drain that drains excess moisture outside your dacha, to a place where it cannot damage anything.
Main characteristics of storm drainage
The storm sewer system is a rather specific structure. Unlike conventional water supply, rain and melt water contain a large number of both large debris and small suspended particles. This composition of the drain implies primary treatment and the creation of a channel for the uninterrupted movement of littered water.

Composition of a storm drainage system at the dacha
The composition of the storm drainage system is not limited solely to drains that collect rain moisture from the ceilings of structures. Rain pipes are just one of the components storm drains.
In the storm country sewerage The following main components can be distinguished:
- Elements that remove rainwater and melting moisture from various areas of floors or terrain.
- Elements that collect diverted melt water away from garden beds or houses.
- Elements that allow you to accumulate or reuse accumulated moisture.
It is also worth noting that storm drainage can be created using two design methods: linear and point, or a combination of both.

Point storm drainage system at the dacha
When using this method of collecting rain or melt water, runoff is collected from hard, non-absorbent surfaces, such as roofing or paved areas. Next, the wastewater is sent to receiving funnels. After collection, the wastewater is transported to the drainage system.
Linear storm drainage system at the dacha
When using a linear drainage system, all runoff from non-absorbent surfaces is drained into gutters located along such areas. After collection, rain and melt runoff is sent to the drainage system. If there is a border with a ravine or reservoir on your site, it is advisable to direct the drains towards the natural flow. As an option, rain and melt runoff can flow into a purification plant, where it undergoes primary treatment.

Recycling rain and melt water seems to be a very profitable activity. With its use, you can achieve significant savings on water bills for irrigation or cleaning. Rain and melt runoff carry relatively few pollutants and their treatment in a standard septic tank should not pose any particular problem.
We install storm drains in our country house ourselves
Even though it's raining sewer is quite complex engineering system– you can easily install it yourself. The situation is made easier by the fact that in the storm water sewer systems There are no pressure pumps, and the water in it moves by gravity. Therefore, installing a storm drain in a country house or in country house is just a more technically advanced children's igloo with spring streams. In order to competently design and install rain or melt water drainage at your dacha, you need to have only minimal technological skills.

Storm sewer installation technology
- On initial stage the storm sewer system is being calculated. Minimum necessary elements is a system for draining water from buildings, since rainwater if there is an excess of it, it can seriously complicate your life. Next, if necessary, drainage from paths and hard-surfaced areas, for example from an asphalt parking lot, is calculated.
- Having determined the areas from which water should be drained, it is necessary to ensure that rain moisture does not linger on such surfaces. Everything is clear with the roof - water is collected from it by a standard drainage system. But in order to ensure that your paths or parking lot at the dacha are not covered with water after every rain, during their construction it is necessary to provide a slope along which water, under the influence of gravitational forces, will roll into water intake funnels or gutters. Similar devices - funnels or gutters - are also installed under the ends of drainpipes that collect moisture from the roof.
- After calculating and constructing all funnels or drainage gutters - collected water should be discharged away from the site or into the wastewater treatment system.
- Water drainage from water intakes can be carried out closed or open method. When using the open method, water flows into gutters closed at the top with grates. When using closed system water enters the collection and disposal site through a system of underground pipes.
- Both when laying gutters and when placing pipes, building drainage structures should be placed with a slope towards the drainage area. The angle of inclination of drainage pipes and gutters is calculated in the same way as when laying an external sewer system.
- When laying pipes and gutters, after digging trenches in the selected location, a sand cushion at least 10 centimeters thick is laid on their bottom.
- The drainage system pipes in the ground do not need to be buried to a significant extent. Storm drain It works exclusively in the warm season and is not threatened by freezing problems.
- To ensure that the system does not become clogged, it is necessary to install filter grids to collect large debris and sand traps to collect suspended small particles such as sand. At the locations of filters and sand traps for underground closed pipe laying, it is necessary to provide inspection wells and hatches for routine maintenance and unscheduled wastewater treatment.

Features of storm sewer installation
To lay storm drain gutters in an open manner, you can use ready-made solutions - concrete and plastic gutters for storm drains.
Also, storm sewer can be combined with a drainage system. In soils with a lot of moisture, constant drainage of excess water is required. To do this, pipes with holes are laid in the ground, which collect moisture from the soil and divert it away from the site. These same pipes can also be used to move rain or melt water outside the area. However, as a rule, drainage pipes are laid at a depth greater than the storm sewer system.
Carefully calculate the slope of the drainage pipes. Use a building level or a special theodolite.
Please note that water is quite aggressive environment, therefore, make the storm sewer system exclusively from materials that are not subject to corrosion, such as plastic or reinforced concrete. Do not use pipes with corrugated surfaces as they are extremely susceptible to clogging.
Water can find its way out everywhere, so when connecting storm drain pipes, use sealing technologies similar to conventional outdoor drains.
To prevent the water in the storm drain from freezing winter time– at the beginning of frost, the system must be completely cleaned and freed from water.
All entrances to drainage basins and storm gutters must be covered with gratings. It is easier to rake leaves from such grates than to later remove them from the depths of the sewer system.
At each turn of the drainage pipe there must be an inspection hatch or well.
To learn more about the technology for constructing storm drains in a dacha, watch the video tutorial.
Storm drainage at the dacha: video
Water that accumulates during rain or from melting snow near the house can lead to flooding and destruction of the foundation. To prevent this from happening, storm sewerage is required in a private house.
In addition, it is required for the accumulation of water resources in regions with arid climates. And also for diversion excess moisture from vegetation on local area. It can be installed quite easily by yourself.
Storm sewerage in a private house: device
 Drainage is a system that collects and filters melt and rainwater that accumulates in a special reservoir. They are then used as process water.
Trays or storm water inlets for storm drainage are divided into:
- closed type;
- open;
- combined type.
Open and closed storm drains in a private house are considered part of the path. In the first case (simple point sewerage), water flows from the roof through a drainpipe into the tray. In the second (closed) option, water enters a buried pipe, then into a collector to collect water. Closed trays are directly mounted in them, leaving only gratings on the surface. Through them, moisture goes into the underground pipeline. This type is used for large building perimeters.
 For open storm drainage in a private house, external water intakes are used. They are open and installed on the surface.
 They are no different in design from closed ones, but they are flooded more often, so more maintenance is required. Use this or a small cottage. There is a third type of storm drainage system - mixed or combined. The features of internal and external drainage are combined here. In it, one part of the storm drainage is carried out with closed drains, the other with open drains.
Drainage elements

Drainage drains and water pipes come from:
- plastic;
- concrete;
- cast iron;
- alloy steel;
- aluminum
To install storm drains in a private house with your own hands, use plastic and steel materials, since they are reliable in operation and easy to install.
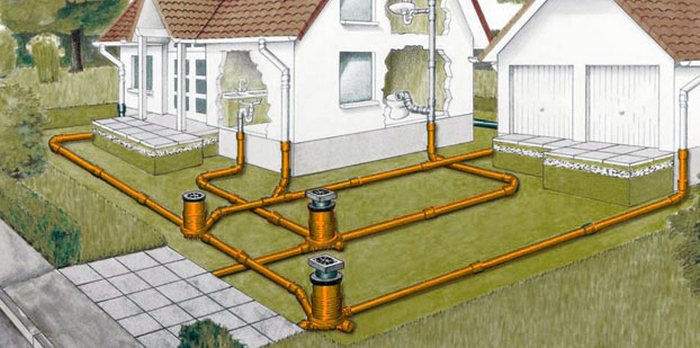
The storm drainage system consists of:
- gutters and storm water inlets;
- collectors for collecting water.
Gutters and storm water inlets
 This is the initial link of the system, with the help of which wastewater enter the drain and pipeline. When choosing a material, preference should be given to concrete or plastic, since metal ones are very noisy under the impacts of rain and gusts of wind, if they are not buried in the ground. In addition, they are susceptible to corrosion. Concrete is more reliable and has a long service life. However, such gutters have strictly regulated dimensions and it is not always possible to install them on site. Plastic is easy to cut and combine, and the rainwater inlet can have different well depths. With an existing blind area, they can be easily installed without dismantling it.
Filters
 Designed to retain stones, leaves, sand, branches and other debris that can clog pipes. The grates allow you to clean storm drains less frequently and eliminate the risk of tripping. Cast iron is reliable as a grate material, but requires painting every 2 years. Steel rusts quickly.
  Aluminum can be considered the best option because it has a long service life and looks stylish. However, it is somewhat more expensive.
The size of the holes should not be very small, as they should allow a lot of water to pass through at once, but not large either, otherwise debris will penetrate into the system and lead to its clogging.
Pipe networks
 Pipes carry the flow to a water collection point. If they are made of PVC, then this perfect solution for storm sewer installation. Their smooth surface eliminates the risk of silting. Their diameter is 100-150 mm.
Collector for collecting water
 The collector is part of a closed and mixed storm drainage system and is a reservoir for receiving the main flow of water. Such a well can be constructed from a sand and gravel cushion and concrete rings or a concrete ring with a bottom for later use of liquid. A plastic well is assembled from PVC molds. It is perfect for those areas where groundwater lies superficially. Water disposal occurs using a pipeline system, and moisture can also be used for economic purposes on the site.
Instead of a collector, it is permissible to make drainage from a special perforated plastic container with the discharge of water into the ground, placing it horizontally and burying it in the sand. Through the holes, moisture will gradually seep into the sand and go deeper.
 In addition, the storm drainage device can be supplemented with an under-door tray installed near the porch when front door, pipes for soil drainage, a hatch for access to the system.
Operating principle
The main principle of sewerage operation is compliance with gravity, which requires taking into account the following factors:
- The location of the building to determine the length of the stormwater pipes around the house.
- Relief features of the area.
- Climate and precipitation to determine the volume and number of wells and pipes.
With an average annual precipitation of 60-90 cubic meters. m pipe diameter should be 11-12 cm.
 The installation scheme for storm gutters in the courtyard of a house depends on the type of precipitation collection. It can be linear or point.
The layout of the system should be considered when designing the house so that wastewater is discharged in a straight line and there are fewer problems with cleaning.
The diagram indicates the location of communications, storage, equipment and drainage circuits. When combining drainage and storm water into the sewer system, a more serious approach will be required and a geodetic survey of the area will be required to determine the groundwater level. This will make it possible to determine the most comfortable spot for storage and drainage laying.
Installation
Before installation, the area is marked in order to determine the location of the trenches. If turns are necessary, they must be made at right angles and inspection hatches must be made in these places.
The installation of ground channels, trays and gutters must be carried out on open places plot. When installing a tray, the soil around it should be compacted to prevent soil subsidence.
Pipes are laid with a slope of 1 cm per 1 m length.
It is better to use them from PVC, since the material is not subject to corrosion. The pipes are laid in a trench, into which crushed stone and sand are first poured, and geotextiles are spread. 
The pipe is then completely wrapped in geomaterial and the trench is backfilled with excavated soil. 
Connections are made with couplings of suitable size and type. 
Finally the receiver is installed. 
Installation is carried out with a bias towards the drive.
If system elements pass under functional areas(entrance, parking), then additional reinforcement will be required in the form of a floor with further backfilling with soil.
Cleaning function
 Storm system drainage, unlike a septic tank does not require deep cleaning. In this case, water can be discharged into the ground, the nearest stream, ravine, or used for irrigation.
At the same time, without violating sanitary and hygienic standards and soil ecology. But basic filtration is necessary, for which sand traps are used to trap various debris, stones, leaves, etc. The pipes are also periodically washed with jet pressure using a pump. The flow can eliminate contaminants in hard to reach places. The drive is cleaned separately using disinfectants.
The construction market offers all kinds of storm drainage options, so any configuration can be used. The most reliable is considered to be a trench system using trays, wells, a collector, and filter membranes. But it is intended for a large area, for small area An open storm drain around the perimeter of the house is suitable. The drainage can be connected to a sewer septic tank with multi-stage biological wastewater treatment.
Only rain and melt water do not require fine filtration. For them, it is enough to equip the system with grilles and filters, but they need to be cleaned mechanically, otherwise the channels may become clogged, causing flooding of the area.
Unusual do-it-yourself storm drain - video
To ensure that the area does not turn into a swamp after each rain, and the foundation is not washed away by seasonal flows of melt water, it is necessary to ensure the removal of excess moisture. Equipped with your own hands will cope with this perfectly. It’s not difficult to make one on your plot or dacha, it’s just important to correctly calculate the quantity necessary materials, view and select the appropriate storm drain design.
Few people doubt that the installation of a storm drain is a necessary process, because melt and rain flows destroy not only the foundation and paths, but also significantly impoverish the soil. In terms of its design, the storm drain represents the following set of elements:
- Roof drainage system. It looks like gutters fixed along the slopes of the roof, serving to collect drainage and diverting flows down through vertical pipes.
- Receivers of precipitation on the ground. Such a storm drain around the house can have many of its own elements: funnels, storm inlets, linear drainage systems, sand traps. Structures are installed for the purpose maximum efficiency receiving precipitation, spot placement under drains is possible. Linear receivers, as shown in the photo, are placed along paths located with a slight slope for gravity flow of rainwater.
- Design of redistribution and discharge of sediments.
The latter is worth talking about separately, precisely because the issue of discharging excess water arises very often and in all its “completeness.” There are three possible solutions:
- Use streams to water gardens. To do this, all pipes and trays are brought into one large tank, and from there they are sent to the irrigation system using a pump.
- Install a flow drainage system, as shown in the video, into a centralized sewer system, drainage ditch or natural reservoir, if there is one nearby.
- In the absence of the need for water for irrigation and a natural reservoir, excess moisture is discharged into the ground. But to do this, you will have to install a certain number of pipes on the site, digging them to a depth below ground level.
Types of storm drains for a private home
There are three types of system:
- Underground. Structurally, all parts are below ground level. This is an ideal choice aesthetically, but it will require a lot of labor, as well as financial investments. Arrange similar system possible with complete refurbishment allotment of land. In this case, you will have to choose a freezing or non-freezing type. The first storm drains do not work during the period of frost, but they are easier to lay; the laying depth does not exceed 1 meter - maximum, but should not be lower than 30 cm minimum. But non-freezing storm drains are laid deeper, about 1.5-1.7 m. Ground work is large, pipeline systems will be required, but the structure will not interfere with garden work.
- Do-it-yourself above-ground storm drainage is much easier to install. These are drainage and drainage gutters/troughs, from where streams of water flow into a reservoir or directly into the garden.
- Combined storm drain- a design where part of the system is located on top, for example, trays for collecting and diverting flows into a specific reservoir, and part is under the ground (water is sent from the reservoir through a pipeline to be discharged or under the roots of trees). Professionals believe that combined storm drainage is the most best option both in terms of costs and in terms of its aesthetic and practical characteristics.
Important! Before choosing a specific type of storm drain, it is necessary to carefully study the area: the level of water saturation of the soil, the amount of precipitation, the possibility of laying a pipe system, the terrain, the building plan, etc.
But what needs to be done is to divert the water from the house as far as possible. Let this be the simplest option: installing trays on the roof and gutters to drain streams onto the lawns, as shown in the photo, but the foundation will not be washed away in the event of prolonged rains. If there is a large area paved with tiles (a parking lot), you will have to install a storm drain here too, since puddles accumulate in such spaces, which are difficult to deal with. Several water collection points, equipped with point rainwater inlets, will relieve all worries.
Combine or separate?

In a private house or country house, sometimes it is necessary to install several drainage systems: sewer, drainage, storm water. Sometimes all systems run in parallel without touching each other, so the desire to combine a storm drain with any structure, while saving on materials, is quite great. For example, use an existing well. But this is not necessary for the following reasons:
- with a good, prolonged rainfall, water arrives quickly (from 10 m3/hour), so the well will overflow instantly;
- when discharging water into the sewer, such flows will raise the liquid level, which means that it will not be possible to lower the sewer discharges down, all the garbage and masses will remain on the surface;
- after the water level drops, there will definitely be garbage left in the sewer that will have to be cleaned - not the most pleasant pastime;
- during discharges into drainage wells, storm streams with good pressure will flow into the system, quickly overwhelm it and begin to pour out under the foundation;
- siltation of drainage pipes cannot be avoided. Moreover, it is impossible to clean the entire structure; it will have to be replaced, and this will involve new financial costs.
As a result: storm drainage in a private house or country house must be a separate system, have its own well/reservoir or natural reservoir for discharge.
Components and types of storm sewer system

All structural elements must be connected into one system, which can consist of a storm drain:
- Large well or tank to collect water from the entire site, including water on the roof of buildings. Most often, the well is equipped concrete rings, like water, but only with a bottom. An alternative is plastic wells, which are dug to the required depth, anchored, and trays and gutters are placed there to collect flows.
Advice! If there is little rain in your region, then a regular tank is ideal as a reservoir. plastic barrel, buried in the lowest place on the site. It’s convenient to draw water from it, and the tank costs a penny
- Luke. Sold separately, can be rubber, plastic, metal. Serves to prevent debris from entering the tank. In order for the hatch to sit firmly, the rings of the well must protrude above the ground by at least 15 cm.
- Point storm water inlets– small containers installed in places of greatest accumulation of precipitation, for example, under trays on the roof, under drainpipes or at the lowest point of the ground.
- Linear storm inlets/drainage channels. These are plastic gutters installed in places where precipitation accumulates (along the roof eaves, pedestrian paths). This option is suitable if, during the construction of the blind area around the house, they forgot to lay a pipeline for water drainage.
Important! The receivers are taken outside the blind area, the second end of the trays is connected to the receiver - this The best way remove the water and not disturb the blind area
- A sand trap is a structure where sand settles. As a rule, plastic casings are used, installed in a row on sections of the pipeline. Sand traps require cleaning, but this is easier than cleaning the entire system.
- Lattices. To ensure gravity flow of water, the holes in the grates must be large. There are cast iron, steel, aluminum models.
- Pipes for storm drains It is better to choose polyethylene ones. Smooth walls will not accumulate sediment, do not allow microorganisms to get caught, and have good throughput and quite durable.
Important! The diameter of stormwater pipes depends on the power and saturation of precipitation and the branching of the network. The minimum diameter is considered to be 150 mm, the slope should not be less than 3% (3 cm for each meter of pipeline)
- Inspection wells – plastic structures, mounted throughout the system and intended for cleaning the pipeline.
A storm drain in a country house or country plot may not contain all the elements, but they can be used to build a sewer system to drain flows of any complexity and configuration.
Construction order and stages

First you need to think through the project. If you don’t want to turn to the services of professionals, you can do all the constructive and schematic work yourself in one of the programs or even on a piece of paper. This makes it possible to more accurately understand and correctly position all elements. Afterwards you will have to purchase materials and then begin work.
How to make a storm drain with your own hands correctly:
- Install roof trays and drainage system.
Important! Installation of a storm drain requires lifting the ground, so it is best to carry out the work process simultaneously with the arrangement of drainage and sewer systems, which are also then completed by laying paths and blind areas
- Dig trenches for the pipeline as shown in the video. The depth of the trenches must exceed the size required for pipes by at least 15 cm. Lay a crushed stone cushion at the bottom of the pits, and only then the pipes. Crushed stone will help neutralize the forces of heaving, always remaining motionless. This quality helps all devices installed in crushed stone to feel almost no stress.
- Install rainwater inlets, concrete the structures and lay the finishing coating.
- Connect the pipeline to a reservoir or lead the end into a river or lake to discharge water.
These are the main steps, but as shown in the video, you will need to install trays along the paths and linear sewers to remove flows.
You can do without complex structures, even if rain in your region is not the best a rare event. If the soil absorbency is good, it is enough to equip under-roof trays and bring them to the end vertical pipe. At the bottom of the pipe, install a reservoir (barrel) where the water will accumulate. And then use the liquid for irrigation and other technical needs. If the soil absorbency is low, add a point rain inlet at the lowest point of the site and dig a barrel there; gutters for runoff from paths and roofs also go into the barrel. And that’s it, the storm drain is ready. Options for arranging structures are in the video, and you can do it yourself the simplest system It will not be difficult even for a novice home craftsman.
Experienced builders and country residents know well that “excess” water on the site is bad. Excess water leads to flooding of the foundation and basement floor, washout of the foundation, flooding of beds, swamping of the area, etc. As a result, in spring, autumn and even summer, summer cottage You can't walk without rubber boots.
In this article we will look at:
- How to arrange water drainage on the site.
- How to make a budget storm drain with your own hands.
- Drainage device. How to make inexpensive drainage and drain a wetland.
What kind of water interferes with the life of a developer and a country homeowner?
About the types of surface and groundwater, as well as drainage and storm sewer systems, you can write a separate book. Therefore, we will leave beyond the scope of this article a detailed listing of the types and causes of groundwater occurrence, and will concentrate on practice. But without minimal theoretical knowledge, taking on the independent arrangement of drainage and storm sewer systems is throwing money away.
The point is that even done wrong drainage system the first few years of operation. Then, due to clogging (silting) of a pipe wrapped in geotextile, which was placed in clayey, loamy, etc. soil, drainage stops working. But money has already been spent on drainage construction and, most importantly, drainage construction involves a large volume of earthworks with the use of technology.

Therefore, simply digging up and relaying a drainage pipe 3-5 years after it was laid is difficult and costly. The site is already inhabited, done landscape design, a blind area has been equipped, a gazebo, a bathhouse, etc. have been installed.

You will have to rack your brains on how to redo the drainage so as not to ruin the entire area.

From here - drainage construction should always be based on geological soil survey data(which will help you find a waterproof layer in the form of clay at a depth of 1.5-2 m), hydrogeological surveys and clear knowledge of what kind of water leads to flooding of a house or waterlogging of an area.

Surface waters are seasonal in nature, associated with the period of snowmelt and abundance of rain. The groundwater are divided into three main groups:
- Capillary water.
- Ground water.
- Verkhovodka.
Moreover, if surface water is not drained in time, when infiltrated (absorbed) into the ground it turns into underground water.
Volume surface waters usually exceeds the volume of groundwater.
Conclusion: surface runoff must be drained by storm drainage system, and don’t try to do surface drainage!

Storm drainage is a system consisting of trays, pipes or ditches dug into the ground that carry water from drains outside the site + competent organization relief on the personal territory. This will allow you to avoid stagnant zones on the site (lenses, pools), where water will accumulate, which simply has nowhere to go, and further waterlogging.
The main mistakes that are made when independent device drainage:
- Failure to maintain the correct slope of laid drainage pipes. If we take an average, then the slope is maintained in the range from 0.005 to 0.007, i.e. 5-7 mm per 1 running meter drainage pipe.

- Using a drainage pipe in a geotextile wrap on “wrong” soil. To avoid siltation, pipes in geotextiles are used on soils consisting of clean medium- and coarse-grained sands.

- Using cheaper crushed limestone instead of granite, which is washed away by water over time.
- Saving on high-quality geotextiles, which must have certain hydraulic properties that affect the quality of drainage. This is an effective pore size of 175 microns, i.e. 0.175 mm, as well as transverse Kf, which should be at least 300 m/day (with a single pressure gradient).

Inexpensive do-it-yourself storm drain
The first thing that comes to mind in order to equip a budget option for storm drainage on a site is to lay special trays.

Trays can be made of concrete or plastic, but they are expensive. This forces users of our portal to look for cheaper options for installing storm drainage and drainage systems from the site.

Denis1235 FORUMHOUSE Member
I need to make an inexpensive storm drain, about 48 m long, along the edge of the fence, to drain the melt water that comes from the neighbor. The water must be drained into a ditch. I was wondering how to drain the water. At first it occurred to me to buy and install special trays, but then they would be left with “extra” grates, and I don’t need any special aesthetics for the storm drain. I decided to buy asbestos-cement pipes and saw them lengthwise with a grinder, thereby getting a homemade tray.

Despite the budgetary nature of this idea, the user was not attracted to the need to cut asbestos-cement pipes on his own. The second option is the opportunity to buy gutters (plastic or metal) and lay them on a prepared base in a concrete layer of about 100 mm.
Portal users dissuaded Denis1235 from this idea in favor of the first option, which is more durable.
Hooked on the idea of an inexpensive storm drain, but not wanting to deal with cutting pipes on my own, Denis1235 found a factory that produces asbestos cement pipes, where they will immediately be cut into pieces 2 m long (so that the 4-meter one does not crack during transportation) and ready-made trays will be brought to the site. All that remains is to develop a scheme for laying the trays.
The result is the following “pie”:
- Soil base in the form of a bed.
- A layer of sand or ASG about 5 cm thick.
- Concrete about 7 cm.
- Tray made of asbestos-cement pipe.

When installing such a storm drain, do not forget to lay metal mesh(for reinforcement) at the joints and leave a deformation gap (3-5 mm) between the trays.

Denis1235
As a result, I made a budget rain shower at the dacha. It took 2 days to dig the trench, another two days to pour concreting and install the route. I spent 10 thousand rubles on trays.

Practice has shown that the route “overwintered” well, did not crack and intercepts water from its neighbor, leaving the area dry. Also interesting is the option of rain (storm) sewerage for the portal user with the nickname yury_by.

yury_by FORUMHOUSE Member
Because The crisis doesn’t seem to be ending, then I started thinking about how to install a storm drain to drain rainwater away from the house. I want to solve the problem, save money, and do everything efficiently.
After some thought, the user decided to make a storm drain for water drainage based on flexible double-walled corrugated pipes (they cost 2 times less than “red” sewer pipes), which are used for laying power cables underground. But, because the depth of the drainage route is planned to be only 200-300 mm with a pipe diameter of 110 mm, yury_by I was afraid that the corrugated pipe might break in the winter if water got between the two layers.

Eventually yury_by I decided to take a budget “gray” pipe, which is used when arranging internal sewerage. Although he had concerns that the pipes, which were not as rigid as the “red” ones, would break in the ground, practice has shown that nothing happened to them.

yury_by
If you step on the “gray” pipe, it turns into an oval, but there are no significant loads in the place where I buried it. The lawn has just been laid and there is foot traffic. Having laid the pipe in the trench and sprinkled it with soil, I made sure that they kept their shape and the storm drain was working.

The user liked the option of installing an inexpensive storm drain based on “gray” sewer pipes so much that he decided to repeat it. All the nuances of the process are clearly demonstrated by the following photographs.
We dig a hole to collect water.

Level the base.
We install a concrete ring.

The next stage is to fill the bottom of the well with gravel of fraction 5-20.

We cast a homemade well cover from concrete.


We paint the manhole cover.


We make an insert into the well with drainage plastic “gray” sewer pipe, maintaining a slope of the route of 1 cm per 1 linear meter.

We spill the pipe with a mixture of sand and water so that there are no voids left between the walls of the trench and the pipe.

To prevent the pipe from floating, it can be pressed down with a brick or board.
We put the lid on, install the hatch and fill everything with soil.

This completes the production of the budget rain shower.
Construction of low-cost drainage and drainage of wetlands
Not everyone gets the “right” plots. In SNT or in new cuts, the land may be very swampy, or the developer may have a peat bog. Build a normal house for permanent residence on such land, not an easy one summer cottage- both difficult and expensive. There are two ways out of this situation - sell/exchange the plot or start draining and putting the plot in order.
In order not to deal with various expensive alterations in the future, users of our portal offer budget options drainage and drainage of the territory at the base car tires. This option allows you to save your family budget.

Yuri Podymakhin Member of FORUMHOUSE
Peat soil is characterized high level groundwater. On my site, the water is almost level with the surface, and after rain it does not go into the ground. To drain the top water, it must be thrown outside the site. I didn’t spend money on buying special pipes for drainage, but made drainage from car tires.

The system is installed as follows: a ditch is dug, tires are placed in it, and the tires are covered with polyethylene on top so that the earth from above does not fall inside. Polyethylene can also be additionally pressed with pieces of slate that are “unnecessary” in the household. This will increase the overall rigidity of the structure. Water enters the “tire” pipeline and is then discharged outside the site.


But there are also “harder” places where much more needs to be done.


Seryoga567 FORUMHOUSE Member
I have a plot in SNT, with total area 8 acres. There is a building on the site that I plan to complete and expand. The place is very low. Because drainage grooves for drainage in SNT they are in a deplorable state, where they are buried, littered or clogged, then the water does not go anywhere. The water level is so high that you can draw water from the well with a bucket, holding it by the handle. In the spring, the water in the dacha sits for a long time, the area actually turns into a swamp and, if it dries out, it is only in the summer when it is very hot. Nobody wants to put the drainage ditches in order, so everyone floats. Therefore, I decided that it was useless to fight with my neighbors. You need to raise your site and find a way to dispose of all the “unnecessary” water from the site.