Very easy to make or bed. To do this, you will need a box or several boxes, scissors, a sharp stationery knife, foam rubber, cotton wool or padding polyester (or other padding material), thread, and glue. Cut out a blank from the box where necessary - glue, for example, the back and legs of the bed or armrests for. Then cover the blank with foam rubber, roll up the bolsters for the armrests and headboards of the bed and sew them in advance. Cover the undersides of the furniture with fabric. Make sure there are no air bubbles between the fabric and the cardboard. Sew the right sides together, pulling the fabric tightly and catching it on the fabric glued on the back. Sew the pillows and bedspread, stuff the pillows with synthetic padding. The furniture is ready.
Furniture made from tin cans. It is better to make such furniture together with adults. This will help avoid injury. Take a tin can, it is better if it is from thin metal, for example, a soda or beer can will do. Cut the sides of the jar into thin strips and bend them away from the bottom. Using tongs, connect several strips at a time, twist them into patterns and model the legs of a future table or chair. When the workpiece is ready, sew the pad and glue it into the bottom of the jar.

Wicker furniture from newspapers. You can make country doll furniture like this: take newspapers, cut them into thin strips, and use a long knitting needle to twist them into tubes. Glue the tubes with PVA glue. Roll a thick ball from newspaper; it will be needed for the volume of the chair. Place eight tubes in a star pattern and begin weaving them in a circle with other tubes. Fix the ends with glue. When you think the round seat is ready, fold the edges of the figure eight up and weave the back. For convenience, place a ball rolled out of newspaper inside. The tighter your tubes fit together, the stronger the chair will be.
Furniture made of plastic. Sufficiently durable and in no way inferior to store furniture can be made from plastic. You can buy plastic at an art store - self-hardening or for baking. Make the frame of future furniture from thick foil and cover it with rolled plastic. To ensure that the product is neat, use a toothpick to roll one layer of plastic onto another. Draw small details and patterns and leave until completely dry, if it is a self-polymerizing material, or bake in the oven at a temperature of 135-150 C for 30 minutes. After hardening, paint with acrylic paints and varnish the furniture. It is also very convenient to make dishes, accessories and food for Barbie from plastic.
Parents who have already been able to make a dollhouse on their own or bought it in a store, spending a significant amount, are thinking about how to make furniture for dolls with their own hands. Toy furniture isn't cheap, so why not save money? family budget. You can easily make it with your own hands from available materials.
For arrangement dollhouse For your daughter, you may need these materials that we most often throw away:
- cuttings of plywood sheets;
- matchboxes:
- plastic jars and boxes for cosmetics;
- shoe boxes;
- colored dish sponges;
- viscose napkins;
- plastic bottles;
- egg tablets;
- textile;
- foil
- wire and many more various little things, the place of which we often determine in the trash can.

When choosing materials, everything will depend only on your imagination.
Plywood and wood are the most popular and durable materials for manufacturing. doll furniture. However, the process of creating interior items from them is labor-intensive; skills in working with them will be required. But if you still make such furniture, it will serve the dolls for a very long time and will delight your daughter for just as long.

In order to make miniature plywood furniture you will need:
- plywood sheets;
- jigsaw;
- sandpaper;
- small nails or screws;
- glue;
- sheets of cardboard;
- pencil;
- ruler;
- varnish or acrylic paint;
- scissors;
- attributes that you will use to decorate each type of furniture: fabric, beads, pieces of leather, and much more.

Common stages of work for all types of furniture:
- Think through or find printable furniture design diagrams on the Internet.
- Draw on cardboard or use ready-made prints of furniture parts and cut them out.
- Attach the resulting templates to sheets of plywood and trace.
- Use a jigsaw to cut out parts from plywood.
- Sand all parts with sandpaper until the surfaces become smooth.
- We assemble the structure. We glue the parts or fasten them with self-tapping screws.
- We coat the finished item with paint or varnish and let it dry.
- If necessary, we cover it with textile elements and decorate it.
So one piece of doll furniture has been made.

Cardboard furniture for a dollhouse is very easy to make. You can also involve a child in the manufacturing process. Cardboard is the most available material for work. You can use either sheets of cardboard or take small cardboard boxes as a base.

- cardboard or cardboard boxes;
- white sheets of paper;
- pencil;
- ruler;
- scissors;
- glue (if necessary);
- details for decorations.

- We think through the details of the future piece of furniture and make templates on paper.
- Transfer the templates to cardboard.
- Cut out the details.
- We make the necessary cuts at the joints of the parts.
- Assembling a piece of furniture. Glue where necessary.
- We give a finished look by decorating the structure.
You can decorate the dollhouse with a new piece of furniture.

You can construct almost any interior item from matchboxes. The advantage of such furniture will be drawers. It is enough to show your imagination and think through in detail the image of future furniture.

- matchboxes, the quantity depends on what piece of furniture you will make;
- glue;
- decorations for future furniture.

- Let's prepare required amount matchboxes.
- We glue them together in the sequence required for the interior detail.
- We decorate the resulting piece of furniture. Acrylic paint and varnish are suitable for painting.
Your daughter's dolls will be happy with the new thing.

You can make a rack for dolls from matchboxes yourself by watching the following video.
Plastic jars can perfectly serve as furniture in your dollhouse. Sometimes you don’t even need to do anything with them. IN finished form they can be used, for example, as a bath. The child will be able to truly bathe his dolls; water will not spill out of them anywhere. You can construct more complex interior items from plastic jars, caps from toothpaste tubes, and other small items. They can simply be glued together in the required sequence.

For a master class on making a toilet for dolls from a shampoo container, watch the following video.
Using wire that bends easily, you can decorate your interior in Provence style. Beds whose frame will resemble a forged product will look very elegant. You can add a forged candlestick or an unusual forged chandelier. Almost any interior detail can be made using a wire frame. Your imagination will tell you the right direction.

Using egg tablets you can perfectly decorate the rooms of a dollhouse. Both plastic and cardboard tablets are useful in your work. All that will be necessary is to carefully think through the composition and cut out the necessary parts of the tablets.

The work may require:
- egg tablets;
- scissors;
- glue;
- acrylic paint;
- double sided tape;
- gel pen refills
and much more. Everything will depend on how your imagination plays out.

This section offers you some ideas for creating furniture for dolls with your own hands.
Bed with drawers for matchbox dolls
- matchboxes;
- glue;
- pencil;
- scissors;
- a sheet of white cardboard;
- sheets of white paper;
- paints;
- beads;
- thin wire;
- decorative elements to suit your taste.

- Measure the height of the doll for which the bed is intended. The number of matchboxes that will be required depends on this.
- Glue the required number of boxes with the side walls facing each other. This will be the base of our bed.
- If you want to make the bed higher, you can glue peculiar legs in the form of additional boxes to the outer boxes at the bottom.
- We cover the base of the bed with white paper so that the pull-out elements remain open.
- Draw the desired shape of the headboards on cardboard and cut them out.
- Glue the backs to the sides of the base.
- Paint the bed in the desired color.
- We attach beads to the sliding elements of the boxes at the base using wire. These are the arms of our bed.
- We decorate, cover with bedding and you can put the doll to sleep.

In the next video you will see a master class on making a bed for a doll from cardboard.
You can decorate your bedside table in the same style.
- 2-3 matchboxes;
- glue;
- White list;
- the same paint and decorative elements that decorated the bed;

- We glue the boxes together, placing them on top of each other with their bases.
- We cover it with white paper, leaving the retractable elements open.
- We paint in the style of the already made bed.
- We attach the beads to the boxes.
- We decorate.

Watch the following video for a master class on making a bedside table from matchboxes.
- plywood;
- jigsaw;
- glue or small nails;
- sandpaper;
- cardboard;
- pencil;
- ruler;
- varnish or acrylic paint;
- pieces of fabric;
- cotton wool

- We decide on the design and dimensions of the future sofa. We make drawings for the back, seat, side backs on cardboard. We take into account that with the help of the back and side backs the sofa will gain stability.
- Cut it out.
- We apply the resulting templates to a sheet of plywood and trace them.
- Using a jigsaw, we cut out the parts of the sofa.
- If you want to do upholstered furniture, then at this stage we wrap each part of the sofa with a thin layer of cotton wool and cover it with fabric. If the sofa is not covered, it is necessary to sand the parts.
- We attach the sofa parts to each other using glue. If you have soft sofa, then you need to fasten it with small nails.
- We cover the parts not covered with fabric with varnish or paint.
- We sew small pillows for the sofa.
- We decorate it to your liking and give it to the doll for use.
Chairs can be made in the same way.

You can see how to make a sofa for a doll with your own hands in the following video - master class.
To make it you will need:
- thick cardboard;
- glue;
- pencil;
- strips of lace;
- empty helium pen refill;
- thin wire;
- a small diameter cap (lids from jars of medicine or ketchup are suitable)

Draw a cone blank on cardboard. Cut it out and glue it together. Cut off the top of the cone. The result is the base of a floor lamp lampshade. We cover it with lace. We bend the wire in half and pass it through the rod. We attach the lampshade to the wire from above, and to the lid from below to give stability to the floor lamp. The lid can be decorated with a lace skirt. Instead of a rod, you can use beads as a stand by passing wire through them. In this case, we also decorate the lampshade with beads.

Watch the master class on making a floor lamp in the following video.
To make a chandelier we need a small container. You can use medicine measuring cups, disposable plastic shot glasses, or the simplest candles in a metal case.

To decorate the chandelier you will need strips of lace and thin strips of satin ribbon. They need to be pasted over the plastic base of the chandelier. The metal case doesn’t even need to be decorated, it will work original chandelier. We attach an LED to the base of the container that we used if you were planning a house with real lighting. We hang it from the ceiling. The method of attachment to the ceiling will depend on the materials from which the house is made.
This way you can make lamps for any room in your dollhouse.

It will be convenient to use small boxes to make a kitchen. If there are no such boxes, then you will need to make them from cardboard. This is not difficult to do. It will be easier to use if the boxes are glued together to form a single structure.

If the kitchen has plans wall cabinets, then we glue a sheet of cardboard to the back wall of the cabinets, onto which we glue these cabinets. You can strengthen the structure by gluing long flat sticks to a sheet of cardboard on the back side. The boxes must have cabinet doors cut through.
To decorate our kitchen we will use self-adhesive paper, or any other beautiful paper. We glue the cabinets and use wire and beads to make handles for them. The faucet can be made from wire, the mixer handle from small beads. A deep lid is suitable for a sink. We attach it to the tabletop. The stove burners can be made from buttons. You can decorate the space between the cabinets in the form of a tiled apron. To do this, find a suitable picture on the Internet and print it. Stick it on the sheet of cardboard on which the cabinets are attached.

We arrange dishes and food. The kitchen is ready, you can send the hostess to cook!
You can see a master class on making a kitchen in the following video.
- cardboard box;
- sheet of cardboard;
- foil;
- a small piece of ceiling plinth;
- glue;
- pencil;
- colored, packaging or self-adhesive paper.

- We measure the required height of the table on the box so that the doll can sit comfortably at it.
- Cut off the excess.
- The base of the table is the bottom of the box. From the part located below, we cut out the legs.
- We cover the resulting table with self-adhesive paper
- Draw the desired shape of the mirror on cardboard and cut it out. We glue the foil as a mirror surface.
- We decorate the mirror frame using thin strips of ceiling plinth.
- Glue the mirror to the table.
We make the chair for the dressing table in the same way. We change only the required height. Instead of a mirror surface, we make the back of a chair.

Almost any piece of furniture can be made from available materials. This requires free time, your imagination and desire. Your girl will be very happy with the new dollhouse!
The child's desire to play with dolls must be encouraged and supported. Do-it-yourself doll furniture will be an excellent means of bringing together the older and younger generations. A variety of furnishings that replicate an adult interior contribute to the development of a child’s imagination and logical thinking. Dare, create, and the dollhouse will turn into a small masterpiece.
Variety of doll furniture
Sets of doll furniture amaze with their variety and elegance. Buy ready set The easiest way, but much more interesting, is to make miniature furniture for dolls with your own hands. In addition to standard interior elements such as a bed, chair and table, almost any item can be made from scrap materials. The main thing is to be smart and set aside some free time. Kitchen and bedroom sets are most often found in sets for playing with dolls. But the child will be delighted with the desk, floor lamp and bathtub.
The complexity of making doll furniture is determined by the material chosen as the basis. The dimensions must correspond to the height of the doll. For little dolls it is very easy to make furniture based on matchboxes. The owner of the dolls herself is often involved in the process. For larger specimens, choose cardboard and plywood.

The materials at hand, which are often used when making doll furniture with your own hands, are presented in the following list:
- Plywood sheets. Most durable option design of doll furniture. Processing plywood sheets is not for everyone and often requires the use of a jigsaw. But the doll furniture that came from the hands of the master amazes with its sophistication.
- Thick cardboard. Much easier to handle, a child can work with it school age can do it independently without the help of adults. Often, ready-made cardboard boxes are selected as the basis for doll furniture.
- Matchboxes. Ideally suited for a miniature dollhouse where the main occupant is small.
- Plastic containers for cosmetics. Don’t rush to throw away your elegant after-cream jar and shampoo container. Perhaps they will be transformed into an elegant ottoman or a comfortable doll chair. Even small plastic bottle can become the basis for a chair. The following video demonstrates how to make a comfortable toilet.
- Viscose napkins and dish sponges. Used to decorate the upholstered part of doll furniture.
- Containers for eggs, wire, beads, skewers. This list can be continued endlessly. Choice additional elements depends on complexity puppet design and desired decor.
Exclusive sets of furniture for dolls, designed by wood craftsmen, are presented in the photo:


Chair manufacturing options
There are several ways to make a comfortable doll chair. The choice of material depends on the size of the doll, whether you want to involve the child or whether you will decorate everything yourself. The presented options differ in complexity, so everyone can choose the most suitable piece of furniture for themselves.
Model 1
To work you will need:
- cardboard 1.0-1.5 mm thick;
- foam board about 5 mm thick, it can be replaced by 3 mm corrugated cardboard;
- thick white paper;
- tube Ø 15-25 mm, for dolls furniture will fit thread tube or marker body;
- thin foam rubber or fleece;
- upholstery fabric;
- glue, scissors, pencil, ruler.
Algorithm for making a doll chair with your own hands:


Comment! The external aesthetics of a doll chair and any other furniture depends on the finish. Therefore, take care of beautiful upholstery material.
The upholstery elements are cut out according to the previously prepared drawing, only allowances of 15 mm are made. Before decorating the back, it is initially covered on one side with foam rubber. This element can be made removable or stationary. Making a pillow for doll furniture with your own hands is even easier; the steps repeat the algorithm with the backrest.


The work is, of course, painstaking, but the result deserves admiration.

Model 2
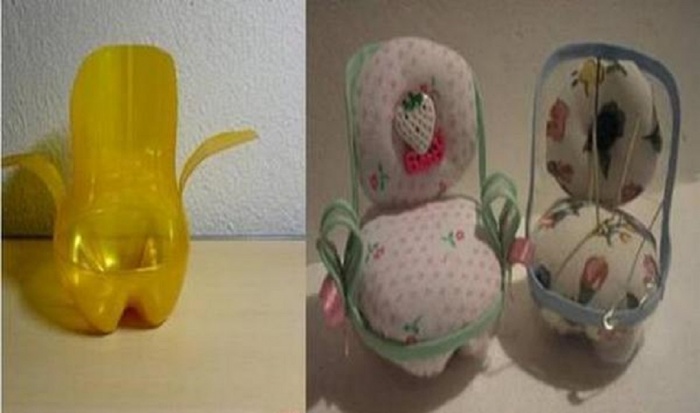
You can make a chair for a doll even simpler. The base is a small cardboard box. Based on the size of the base, a piece of foam rubber is cut out, which will simultaneously serve as the back and armrests. Tape will help secure it to the seat. The chair is decorated with upholstery fabric and complemented with a miniature pillow. If you take the box not square, but oblong, you will get a chic doll sofa.

Model 3
A plastic bottle can become a furniture frame. Having cut out the blank, it is sheathed with fabric. For stability, the inside is filled with something heavy. To ensure that the furniture matches the idea of a chair, prepare a cushion and a soft seat. You can make a small chair from a 0.5 liter bottle or take a larger container, then it will be something like a throne.
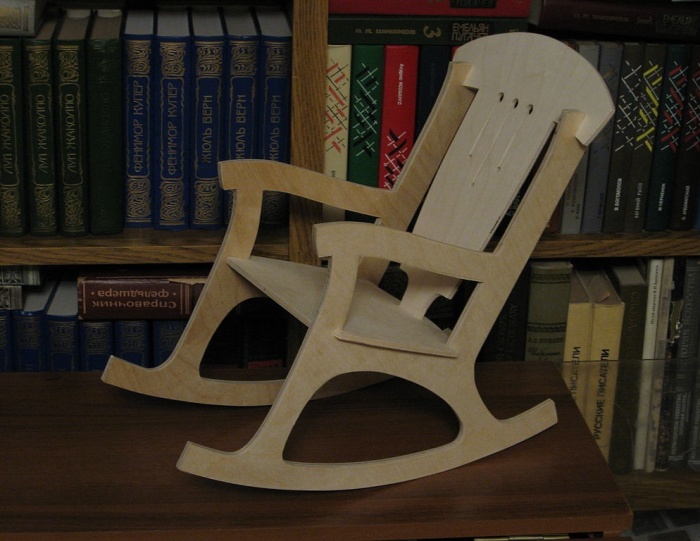
If you want to make a doll rocking chair, we offer you a diagram of an interesting design for study. Experience with a jigsaw will be required; reliable and durable furniture is made of plywood.

Ways to decorate a bed
Playing with dolls often turns into a real performance, when your beloved Barbie is already a mother herself, and her small child A crib is required. Matchboxes with cardboard are an affordable and free material to make a doll bed. The whole process consists of three steps:
- glue 2 boxes;
- backs are cut out of cardboard;
- For beauty, doll furniture is covered with colored paper.
Instead of cardboard, the legs can be made from popsicle sticks.

It's not much more difficult to make a bed with drawers. To do this, matchboxes are glued in 2 layers. On the side that will be used as a box, beads are glued or secured with wire. After connecting with the backs, the furniture is decorated with paper. Additionally, it is advisable to sew bedding.


A small bed can be made from cardboard sheets:
- Initially, print out the proposed drawing or draw it yourself.
- The parts are cut out of paper, then transferred to cardboard or plywood.
- Collect interesting design doll furniture.
Comment! If plywood is used in the work, the edges of the workpieces are carefully sanded so that the child does not get hurt during play.
Sofa, chest of drawers and desk
Plywood is the most suitable material to make doll furniture. Similar to a bed, you can make an exclusive doll sofa from plywood.
Making master class:
- We draw up a drawing of the future sofa, the diagram includes the seat, armrests, and backrest. It is important to consider that the side elements and the back determine the stability of the furniture.
- The drawing on paper is transferred to plywood.
- The parts are cut out using a jigsaw.
- A doll sofa is a soft piece of furniture, so the blanks are wrapped in thin foam rubber and decorated with upholstery fabric.
- Connect individual elements doll furniture using nails.
The procedure can be slightly changed. First, the elements of the plywood doll sofa are fixed together using Moment glue. The finished sofa is varnished and small soft pillows are sewn onto it.

You can make a sofa according to the principle of a chair, model 1. If you try very hard, you will get a masterpiece close to the example in the photo:

It is somewhat easier to make a chest of drawers from matchboxes. Main stages of the creative process:
- Matchboxes are coated outside and inside with paint.
- When the pieces have dried, they are glued together in a vertical order.
- The outline of the doll furniture is trimmed with braid. It will look beautiful and give the chest of drawers durability.
- Beads attached to the bottom act as legs.
- It is also advisable to equip each drawer with beads for ease of use of doll furniture.
The photo collage demonstrates the process of making doll furniture with your own hands and the result.

Matchboxes are a kind of construction set, extremely affordable and with an unlimited resource of crafts. A desk or desk is another example of doll furniture that is easy for a child to make on their own.
Key points of creativity:
- three matchboxes are fixed together vertically;
- future boxes are previously equipped with beads on wire;
- the function of the second table leg can be performed by a matchbox without insides;
- both elements of doll furniture (fastened drawers and legs) are connected with cardboard using glue;
- the workpiece is painted or covered with colored paper.
An approximate result of the work is shown in the photo:

An easy way to make kitchen furniture
First, let's look at a simple option on how to make kitchen cabinets from matchboxes. Bottom part formed from 9 elements according to the principle of a chest of drawers. The function of handles can be performed by staples from a stapler. For wall cabinets 3, the box is fixed to a cardboard wall and cut in the middle to make doors. Of course, it is better to cover the boxes with paper or paint them in advance. Naturally, the surroundings play a big role:
- Complete the doll kitchen with mini lamps.
- Decorate the window with a lace curtain.
- You can make a sink out of foil.
Doll furniture will sparkle with new colors. Add kitchen set You can use a table and chairs made of cardboard.


We will not describe complex options for making doll furniture for the kitchen out of plywood. Let’s just imagine the result of the master’s painstaking work:


Floor lamp and chandelier
To make a cute doll floor lamp, you will need very little:
- The basis of the lampshade can be thick cardboard or suitable perfume caps.
- pen rod;
- lace;
- wire.
If there is no lid, we prepare a base for the lampshade from thick cardboard. We cover the blank with lace. The wire is passed through the rod. A lampshade is fixed on the upper edge of the rod, and a stand on the lower edge.

Comment! In order for the floor lamp to gain stability, the stand must be wider than the lampshade and heavy.
An interesting and simple way to make a floor lamp in addition to doll furniture is presented in the video:
You can make a chandelier for a dollhouse in a similar way. The basis of the lampshade is a small container. Decorative candle molds fit perfectly. The chandelier will be attached to a wire. The lampshade is decorated with lace. If you involve your dad in creativity, you can make a glowing chandelier. To do this, an LED is fixed inside the lampshade.


DIY furniture for dolls can be of simple or intricate designs. When choosing materials for crafts, they are guided by own experience and availability of free time. Crafts can be done by adults or in tandem with children, it will be much more interesting. A school-age child is able to cope with the task of making doll furniture from matchboxes or cardboard on his own.
There are a lot of varieties of houses for Barbie dolls in the store, but, unfortunately, there are very few options for furniture; if there are any, they only have a crib or a table. We decided to make the furniture ourselves, using cardboard furniture plans (for dolls). If you love creativity and are practically on friendly terms with it, then you can try your hand at making the house itself, which will save your budget significantly. Let's try to use this article to answer the question of how to make cardboard furniture for dolls.
Making from cardboard
As in any home, the living room comes first, let’s start furnishing it. The first thing we'll start with is the sofa. We need a pattern of cardboard furniture for dolls; it can be prepared from plain white paper. Next, cut out 1 piece from thick corrugated cardboard. the bottom of the sofa measures 10 x 20 cm. Back wall also in quantity 1 pc. size 13 x 20 cm. Side backs in the amount of 2 pcs. size of 1 piece is 8.5 x 10 cm. The blanks are ready, now you need to make the sofa soft and bring it closer to reality. To do this, we use foam rubber, the thickness is at your discretion, but remember, if it is thin, then several pieces need to be cut out and glued together. In the case of foam rubber 1cm thick, it will be enough to cut out 1 piece of the back and sides, and 2-3 pieces for the bottom are better. We trace the finished blanks on the foam rubber and cut them out, then we glue the foam rubber and blanks with any available PVA glue.
The sofa can be upholstered in any way (leather, suede, fabric), that is, you can simply use what you have available. We cover it with regular fabric. The foam sides face inward, so they receive special attention.
After all the parts are ready, they need to be glued into one structure; to do this, use Moment glue, or something else with strong fixation.
Decorate the sofa soft pillows and an additional seat. To do this, cut out parts equal to the bottom from foam rubber in the amount of 2 pieces. and sew the cover in the same dimensions, insert the foam rubber through the hole and sew it up. Use the same principle to make the backrest and pillows. From a piece of woolen fabric, make an additional warm blanket for your doll. The sofa is ready, you can safely bring it into your doll house.
Cardboard chair
We create a chair from cardboard in the same way as a sofa. Quantity from 2 pieces. Take the dimensions of the patterns from the sofa, the only thing you need is to reduce the length of the back and bottom of the sofa.

Making a cardboard bed for the bedroom
No bedroom is complete without a bed. And in children's house Need a crib for a doll. Let's make it from thick cardboard. To do this, we will prepare patterns: bottom 26 x 18 cm, side back 9 x 8 x 18 cm. Cut out 1 piece from cardboard. We use a side panel in the form of a trapezoid; you can use your own imagination or use a regular rectangle measuring 18 x 8 cm.

From foam rubber we cut out 3 pieces of the same size for the bottom and 2 pieces for the side. We glue the foam rubber to the cardboard base and cover it with fabric. We also make the legs for the bed from cardboard. To do this, we cut out 4 squares measuring 5 x 5 cm and make cuts approximately 1 cm on either side at a distance of 0.5 cm from each other. We twist the square into a tube and bend the cut strips to the side, using them to glue the leg to the bed. We do this with all the legs. We make pillows for the bed; instead of a blanket, you can use a piece of fabric. The bed for the doll is ready, we put it in the bedroom, and you can put the doll to rest.
Making a chair from cardboard for the kitchen
We continue the topic of how to make furniture from cardboard for dolls, and further furnish the dollhouse. In order to make a chair, you will need thick A4 cardboard.

First, prepare a diagram and transfer it to cardboard. Mark the folds. Proceed to pasting the chair blank with material or leather and remember that on the back the seams are hidden on the front side, and on the seat - on the back. The doll's chair is folded along the dotted lines; these places can be slightly bent before pasting. We attach the seat with strong adhesive. If desired, decorate with ribbons or additional decorative materials.

Dollhouse kitchen table
What's a kitchen without a table? We continue to make crafts from cardboard. We make furniture for dolls only from dense material.

You can use a cardboard sleeve for the table leg. Or you can take regular cardboard and roll it tightly into a tube. We cover the workpiece with colored or white paper. We cut out the tabletop in the shape of a circle and also cover it with colored paper. We connect the tabletop and the leg using a glue gun. We decorate the table with a tablecloth from pieces of material and, if desired, make napkins. The kitchen table is ready.
Cardboard cabinet for a doll house
Developing the topic of how to make cardboard furniture for dolls, we solve the problem of scattered dresses and other things.

For work we will use a ready-made cardboard box. Using a utility knife, remove the top and bottom flaps, leaving only the side flaps; in the future they will serve as cabinet doors.

Covering the inside of the box suitable color, you can use self-adhesive wood-look wallpaper.
We prepare templates for the shelves and cut them out of cardboard. Consider the dimensions based on your box, measuring the height and width along the inside. They must be pasted over in the same color as the inside of the cabinet. We connect the shelves with a glue gun.

In the next section of the closet, glue a cocktail tube and make hangers from paper clips. The outside of the box can also be covered with paper or painted. On one door, as an option with a mirror, you can glue a piece of foil. Fill the closet with things and install it in your house.
TV made of cardboard
What's a home without a TV? To create it we will need, as with all products, thick cardboard. We prepare two identical parts measuring 15 x 12 cm. Glue them together. For a plasma effect, you can cover a cardboard TV with black tape. If you don’t have this on hand, plain black paper will do. We begin by gluing all the side parts first, and then only the flat panels. The leg can be made from a regular felt-tip pen cap, and we also decorate it with tape.
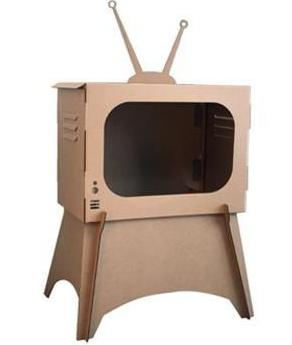
As a stand, you can take two matchboxes and glue them together, additionally cover them with plain paper and only then decorate them to match the color of the TV. Using hot glue, we attach the leg to the TV and to the matchbox base. Cut from any children's magazine beautiful picture, slightly smaller than a TV screen and glue it to the plasma. We place it in the house and make your doll happy.
With the help of the article, we examined the main options for arranging a cardboard house and answered the question of how to make cardboard furniture for dolls.

Based on this, fantasize, come up with your own options and delight your children with new ideas.
When a child gets a doll, pretty soon every child begins to think about arranging a home for it. At modern development Toy production in the store for your favorite doll you can buy almost any furniture or a whole house at once. However, it will be much more fun to decorate everything with handmade items. This does not require any special skills or expensive materials, such as plywood, wood, metal or plastic. You can simply arm yourself with glue, scissors and paper. We will look at how to make paper furniture for dolls in this article.
How to make doll furniture from paper
Today there are many ways to make paper furniture. Each of them has its own advantages and disadvantages. Here are the most famous of them.
- Origami technique.
- Manufacturing of furniture according to drawings.
- Gluing according to color schemes.
- Weaving from paper strips or tubes.
- Using matchboxes as a “building” material.
- Manufacturing furniture from corrugated cardboard.
- Painted furniture.
- Making paper furniture from combined materials.
- Papier-mâché furniture.
Although all these techniques are different, they use the same material - paper and its derivative cardboard. No matter which of them is chosen, one rule remains the same for all: making doll furniture requires special care and attention, because it is almost jewelry work.
Requirements for paper for toy furniture
When considering the question of how to make paper furniture for dolls with your own hands, it is worth remembering that each manufacturing method has certain requirements for paper.
Almost all of the above methods require thick paper from 90 g/m2. It should bend well and not delaminate at the bend. However, for origami, paper is needed that is less dense, capable of withstanding repeated folding and maintaining a beautiful appearance.
The same requirements apply to cardboard. By the way, to make furniture from it, you can use both regular stationery cardboard and corrugated packaging cardboard.
If doll furniture is made using papier-mâché or weaving, the quality consumables Old newspapers or magazines work great.
How to make paper furniture with your own hands: origami
The simplest method of making furniture, which does not require special skills, materials, and most importantly time, is origami (the art of folding paper figures).
All you need is a square paper sheet and a diagram of how to fold it correctly. No glue or scissors are needed for origami (unless, of course, it is a modular subtype).
When making doll furniture in this way, you should first practice on paper from a math notebook (it will be easier to fold because of the squares). And, having mastered this technique, make a table, chair or something else from special paper.
Schemes on how to make a chair, table and sofa using the origami technique
As an example of how to make paper furniture with your own hands (step by step), below are three diagrams for origami. The size of the finished product folded along each of them depends on the size of the sheet. After practicing several times, it will not be difficult to calculate it relative to the doll’s height.
The first diagram shows the paper technique.

It would be nice to add a chair to the made paper table. How to do this is shown in this diagram.

Instead of paper chair, in addition to the table, it’s a good idea to use a sofa assembled according to the diagram shown below.

for paper dolls without glue
Besides origami, there is another way to make paper furniture without glue. However, in this case you cannot do without scissors. You will need them to cut out doll furniture according to the pattern. Then you need to fold it.

A chair or slab made in this way looks more elegant than origami products. But when creating furniture this way, you need to cut and fold it very carefully so as not to spoil it.

To print such diagrams, it is best to use paper with a density of about 100 g/m2.
The finished product can be painted to your liking.
Making doll furniture from color schemes
In the old days, paper cutting houses could be purchased at almost any bookstore. Follow the instructions and use scissors and glue to create a charming dollhouse or palace with furniture.

Knowing the basics of working with any graphic editors and the principles of constructing such diagrams, you can easily make similar blanks. If making a whole palace for a doll is not part of your plans, it wouldn’t be a bad idea to create a wardrobe, chair or bed and, after printing them, make vintage furniture for your favorite. Needless to say, for this method Only laser printing is suitable, since inkjet printing, although more colorful, can float or simply fade over time when it comes into contact with water.
As for the choice of glue for this furniture, it is best to use double-sided tape or glue gun, but very carefully.
Weaving paper tubes as one of the ways to make doll furniture
Weaving is quite ancient and popular look handicrafts. Today it is experiencing a new revival. However, modern craftsmen increasingly use paper tubes or ribbons for weaving rather than wicker. The finished product is painted and then varnished and in this form can serve for many years.
When choosing a way to make paper furniture for Barbie with your own hands, it would be nice to take advantage of this: today the tendency to use wicker paper furniture in your homes is becoming more and more fashionable.

Among the advantages of this technique are the elegance and strength of the finished furniture, as well as its realism. In addition, the materials will cost nothing, because these are unnecessary old newspaper or magazine sheets.
But among the disadvantages - to make doll furniture using this method, you must first master the weaving technique, and also have a certain pattern.

But, having learned how to create toy tables, cabinets or chairs for Barbie, it would be nice to try your hand at making human-sized furniture.
Matchbox furniture
Among the most used materials for making doll furniture are matchboxes. In fact, they act as bricks for creating tables, chests of drawers, beds, etc. Moreover, if some craftsmen simply paste over ready product colored paper or fabric, while others decorate matchbox furniture using decoupage, giving the product realism.
To make sure that from matchbox can be done very beautiful furniture for a doll, below is a master class on making a toy chest of drawers from two boxes of matches. To complete it you will also need stationery cardboard, black and White paint, double-sided tape, sandpaper and two beads.

In this way you can also successfully make wardrobes, desks And kitchen furniture. The main thing is to have a lot of matchboxes in stock.
Furniture for dolls made of cardboard
Quite popular today is a technique that tells how to make furniture for dolls with your own hands from cardboard and paper. This method is used to make not only furniture, but also entire dollhouses.

For this method, it is most rational to use corrugated cardboard, the source of which can be any box from a parcel or some kind of household appliance.
Most often, furniture made from this material is covered with paper or fabric, and sometimes painted. However, in last years Eco-style has become especially popular. Following it, furniture made of corrugated cardboard is not painted, but is left as is. At the same time, do not forget: if there was something printed or written on the front side of the box, it needs to be re-faced so that the picture remains hidden inside the product.
It is worth noting that the production of real modular furniture Corrugated cardboard is becoming quite a popular trend in the modern world.

True, it is not very durable, but it is affordable and environmentally friendly, unlike plastic, and can be easily disposed of or transported when moving.
Painted furniture
When choosing how to make paper furniture, do not underestimate the most simple ways. One of them is to simply draw furniture on paper or cardboard and place it in the dollhouse.
Of course, the painted home decoration cannot be compared with voluminous furniture made using one of the above methods, but as an option it is quite suitable for novice dollhouse designers.

By the way, in addition to paper, you can also draw on corrugated cardboard. It is noteworthy that some modern designers are beginning to use the method of partially hand-drawn furniture to decorate real houses.

Furniture made from combined materials: master class on creating openwork chairs from paper and a coffee cup
When imagining how to make furniture out of paper, you should not neglect combining it with various improvised means, for example, with paper chip boxes or coffee cups.
For example, a small cylinder-shaped box will make an excellent cradle for a baby doll.

And a paper coffee cup combined with paper quilling strips will make a very elegant doll chair.

The seat and legs of the future chair are cut out from the bottom of the cup. Two cotton swabs are glued between the legs to add stability. The remaining paper from the cup is suitable as material for the back of the chair. Suitable for decorating a seat with weaving, as well as for making elegant curls on the legs and back of the product.
Papier mache
Among the many ways to make furniture out of paper, the papier-mâché method (using paper mass and glue for modeling) stands out.
Most often, this method is used to make masks or some kind of figures, but it is also quite suitable for doll furniture. Like weaving from paper tubes, the papier-mâché technique is very economical, but at the same time it is simpler.
Furniture made in this way must have a frame and dry well before it is coated with paint or varnish. By the way, if you add a little gypsum to the paper mixture, the product will become much stronger.

Each of the above methods for making paper furniture is unique in its own way. Some are complex, others are simpler to implement. But no matter which one is chosen, the main thing is to put your soul into your work. Then the result will definitely please you, and your favorite children's doll will have the best home in the world.