Home experiments for 4-year-old children require imagination and knowledge of the simple laws of chemistry and physics. “If these sciences were not taught very well at school, you will have to make up for lost time,” many parents will think. This is not so, experiments can be very simple, not requiring special knowledge, skills and reagents, but at the same time explaining the fundamental laws of nature.
Experiments for children at home will help to practical example explain the properties of substances and the laws of their interaction, will awaken interest in independent exploration of the world around us. Interesting physical experiments They will teach children to be observant, help them think logically, establishing patterns between ongoing events and their consequences. Perhaps the kids will not become great chemists, physicists or mathematicians, but they will forever retain warm memories of parental attention in their souls.
From this article you will learn
Unfamiliar paper
Kids like to make appliqués out of paper and draw pictures. Some 4-year-old children learn the art of origami with their parents. Everyone knows that paper is soft or thick, white or colored. What can a regular white sheet of paper do if you experiment with it?
An animated paper flower

Cut out a star from a sheet of paper. Its rays bend inward in the form of a flower. Fill a cup with water and lower the star onto the surface of the water. After some time, the paper flower, as if alive, will begin to open. The water will wet the cellulose fibers that make up the paper and spread them out.
Strong bridge
This paper experiment will be interesting for children 3 years old. Ask the kids how to place an apple in the middle of a thin sheet of paper between two glasses so that it does not fall. How can you make a paper bridge strong enough to support the weight of an apple? We fold a sheet of paper into an accordion shape and place it on the supports. Now it can support the weight of the apple. This can be explained by the fact that the shape of the structure has changed, which made the paper strong enough. The properties of materials that become stronger depending on their shape are the basis for the designs of many architectural creations, for example, the Eiffel Tower.
An animated snake
Scientific evidence of movement warm air can be brought up using simple experience. A snake is cut out of paper by cutting a circle in a spiral. You can revive a paper snake very simply. A small hole is made in her head and suspended by a thread above a heat source (battery, heater, burning candle). The snake will begin to rotate quickly. The reason for this phenomenon is the upward warm flow of air, which unwinds the paper snake. This is exactly how you can make paper birds or butterflies, beautiful and colorful, by hanging them under the ceiling in your apartment. They will rotate from the movement of air, as if flying.
Who is stronger
This fun experiment will help you determine which paper shape is stronger. For the experiment you will need three sheets of office paper, glue and several thin books. A cylindrical column is glued from one sheet of paper, a triangular column from another, and a rectangular column from the third. They place the “columns” vertically and test them for strength, carefully placing books on top. As a result of the experiment, it turns out that the triangular column is the weakest, and the cylindrical column is the strongest - it will withstand the greatest weight. It is not for nothing that columns in churches and buildings are made in a cylindrical shape; the load on them is distributed evenly over the entire area.
Amazing salt
Regular salt is found in every home today; no meal can be prepared without it. You can try making beautiful children's crafts from this affordable product. All you need is salt, water, wire and a little patience.
Salt has interesting properties. It can attract water to itself, dissolving in it, thereby increasing the density of the solution. But in a supersaturated solution, the salt again turns into crystals.

To conduct an experiment with salt, bend a beautiful symmetrical snowflake or other figure from a wire. Dissolve salt in a jar of warm water until it stops dissolving. Dip a bent wire into a jar and place it in the shade for several days. As a result, the wire will become overgrown with salt crystals, and will look like a beautiful ice snowflake that will not melt.
Water and ice
Water exists in three states of aggregation: steam, liquid and ice. The purpose of this experiment is to introduce children to the properties of water and ice and compare them.

Pour water into 4 ice trays and place them in the freezer. To make it more interesting, you can tint the water with different dyes before freezing. Poured into a cup cold water, and throw two ice cubes there. Simple ice boats or icebergs will float on the surface of the water. This experiment will prove that ice is lighter than water.
While the boats are floating, the remaining ice cubes are sprinkled with salt. They'll see what happens. Through a short time, before the indoor float in the cup has time to sink (if the water is quite cold), the cubes sprinkled with salt will begin to crumble. This is explained by the fact that the freezing point of salt water is lower than normal water.
Fire that doesn't burn
In ancient times, when Egypt was a powerful country, Moses fled from the wrath of Pharaoh and tended flocks in the desert. One day he saw a strange bush that was burning and did not burn. It was a special fire. Can objects that are engulfed in ordinary flame remain safe and sound? Yes, this is possible, this can be proven through experience.

For the experiment you will need a sheet of paper or a banknote. A tablespoon of alcohol and two tablespoons of water. The paper is moistened with water so that the water is absorbed into it, alcohol is poured on top and set on fire. Fire appears. This is burning alcohol. When the fire goes out, the paper will remain intact. The experimental result can be explained very simply - the combustion temperature of alcohol, as a rule, is not enough to evaporate the moisture with which the paper is impregnated.
Natural indicators
If your child wants to feel like a real chemist, you can make special paper for him that will change color depending on the acidity of the environment.

The natural indicator is prepared from the juice of red cabbage, which contains anthocyanin. This substance changes color depending on what liquid it comes into contact with. In an acidic solution, paper soaked in anthocyanin will turn red. yellow, in a neutral solution it will turn green, and in an alkaline solution it will turn blue.
To prepare a natural indicator, take filter paper, a head of red cabbage, cheesecloth and scissors. Chop the cabbage thinly and squeeze the juice through cheesecloth, squeezing it with your hands. Soak a sheet of paper in juice and dry. Then cut the made indicator into strips. The child can dip the paper into four different liquids: milk, juice, tea or soap solution, and watch how the color of the indicator changes.
Electrification by friction
In ancient times, people noticed the special ability of amber to attract light objects if rubbed with a woolen cloth. They did not yet have knowledge about electricity, so they explained this property by the spirit living in the stone. It is from the Greek name for amber - electron - that the word electricity comes.

It is not only amber that has such amazing properties. You can conduct a simple experiment to see how a glass rod or plastic comb attracts small pieces of paper. To do this, rub the glass with silk and the plastic with wool. They will begin to attract small pieces of paper that will stick to them. Over time, this ability of items will disappear.
You can discuss with children that this phenomenon occurs due to electrification by friction. If fabric rubs quickly against an object, sparks may appear. Lightning in the sky and thunder are also a consequence of friction air flow and the occurrence of electrical discharges in the atmosphere.
Solutions of different densities - interesting details
Get a colorful rainbow in a glass of liquids different colors You can prepare the jelly and pour it layer by layer. But there is a simpler way, although not as tasty.
To carry out the experiment you will need sugar, vegetable oil plain water and dyes. Concentrated sweet syrup is prepared from sugar, and clean water painted with dye. Sugar syrup is poured into a glass, then clean water is poured carefully along the wall of the glass so that the liquids do not mix, and vegetable oil is added at the end. The sugar syrup should be cold and the colored water should be warm. All liquids will remain in the glass like a small rainbow, without mixing with each other. The thickest sugar syrup will be at the bottom, the water will be at the top, and the lightest oil will be on top of the water.
Color explosion
Another interesting experiment can be carried out using different densities of vegetable oil and water, creating a color explosion in a jar. For the experiment you will need a jar of water, a few tablespoons of vegetable oil, and food coloring. In a small container, mix several dry food colors with two tablespoons of vegetable oil. Dry grains of dyes do not dissolve in oil. Now the oil is poured into a jar of water. Heavy grains of dye will settle to the bottom, gradually freeing themselves from the oil, which will remain on the surface of the water, forming colored swirls, as if from an explosion.
Home volcano
Useful geographical knowledge might not be so boring for a four-year-old if you put on a visual demonstration of a volcano erupting on an island. To carry out the experiment you will need baking soda, vinegar, 50 ml of water and the same amount of detergent.

Small a plastic cup or the bottle is placed in the mouth of a volcano, sculpted from colored plasticine. But first, baking soda is poured into a glass, water tinted red and detergent are poured. When the improvised volcano is ready, a little vinegar is poured into its mouth. A rapid foaming process begins due to the fact that soda and vinegar react. “Lava” formed by red foam begins to pour out of the volcano’s mouth.
Experiments for 4-year-old children, as you have seen, do not require complex reagents. But they are no less fascinating, especially with an interesting story about the reason for what is happening.
Household chemist-scientists believe that the most useful property detergents - this is the content of surfactants (surfactants). Surfactants significantly reduce the electrostatic voltage between particles of substances and break down conglomerates. This property makes clothes easier to clean. In this article there are chemical reactions that you can repeat with household chemicals, because with the help of surfactants you can not only remove dirt, but also conduct spectacular experiments.
Experience one: foam volcano in a jar
It is very easy to carry out this interesting experiment at home. For it you will need:
hydroperite, or (the higher the concentration of the solution, the more intense the reaction will be and the more spectacular the eruption of the “volcano”; therefore, it is better to buy tablets at the pharmacy and immediately before use, dilute them in a small volume in a ratio of 1/1 (you will get a 50% solution - this is an excellent concentration);
gel dishwashing detergent (prepare approximately 50 ml of aqueous solution);
dye.
Now we need to obtain an effective catalyst - ammonia. Carefully add ammonia liquid drop by drop until completely dissolved.
 Copper sulfate crystals
Consider the formula:
CuSO₄ + 6NH₃ + 2H₂O = (OH)₂ (copper ammonia) + (NH₄)₂SO₄
Peroxide decomposition reaction:
2H₂O₂ → 2H₂O + O₂
We make a volcano: mix ammonia with a washing solution in a jar or wide-necked flask. Then quickly pour in the hydroperite solution. The “eruption” can be very strong - to be on the safe side, it is better to place some kind of container under the volcano flask.
Experiment two: reaction of acid and sodium salts
Perhaps this is the most common compound that is found in every home - baking soda. It reacts with acid, and the result is new salt, water and carbon dioxide. The latter can be detected by hissing and bubbles at the site of the reaction.

Experiment three: “floating” soap bubbles
This is a very simple baking soda experiment. You will need:
- aquarium with a wide bottom;
- baking soda (150-200 grams);
- (6-9% solution);
- soap bubbles (to make your own, mix water, dish soap and glycerin);
Spread baking soda evenly along the bottom of the aquarium and pour it in. acetic acid. The result is carbon dioxide. It is heavier than air and therefore settles at the bottom of the glass box. To determine whether there is CO₂ there, lower a lit match to the bottom - it will instantly go out in carbon dioxide.
NaHCO₃ + CH₃COOH → CH₃COONa + H₂O + CO₂
Now you need to blow bubbles into the container. They will slowly move along a horizontal line (the boundary between carbon dioxide and air, invisible to the eye, as if floating in an aquarium).
Experiment four: reaction of soda and acid 2.0
For the experience you will need:
- different types of non-hygroscopic food products(for example, chewing marmalade).
- a glass of diluted baking soda (one tablespoon);
- a glass with a solution of acetic or any other available acid (malic,).
Cut marmalade pieces sharp knife into strips 1-3 cm long and place for processing in a glass with soda solution. Wait 10 minutes and then transfer the pieces to another glass (with an acid solution).
The ribbons will become overgrown with bubbles of carbon dioxide formed and float to the top. The bubbles on the surface will evaporate, the lifting force of the gas will disappear, and the marmalade ribbons will sink and again become overgrown with bubbles, and so on until the reagents in the container run out.
Experience five: properties of alkali and litmus paper
Most detergents contain caustic soda, the most common alkali. Its presence in a detergent solution can be detected in this elementary experiment. At home, a young enthusiast can easily carry it out on his own:
- take a strip of litmus paper;
- dissolve a little liquid soap in water;
- dip litmus in soapy liquid;
- wait for the indicator to color Blue colour, which will indicate an alkaline reaction of the solution.
Click to find out what other experiments to determine the acidity of the medium can be carried out using available substances.
Experience six: colored explosions in milk
The experience is based on the properties of interaction between fats and surfactants. Fat molecules have a special, dual structure: hydrophilic (interacting, dissociating with water) and hydrophobic (water-insoluble “tail” polyatomic compound) end of the molecule.
- Pour milk into a wide container of shallow depth (“canvas” on which a color explosion will be visible). Milk is a suspension, a suspension of fat molecules in water.
- Using a pipette, add a few drops of water-soluble liquid dye to the milk container. Can be added to different places containers of different dyes and make a multi-color explosion.
- Then you need to moisten a cotton swab in liquid detergent and touch the surface of the milk. The white “canvas” of milk turns into a moving palette with colors that move in the liquid like spirals and twist into bizarre curves.
This phenomenon is based on the ability of a surfactant to fragment (divide into sections) a film of fat molecules on the surface of a liquid. Fat molecules, repelled by their hydrophobic “tails,” migrate in the milk suspension, and with them the partially undissolved paint.
Who didn't believe in miracles as a child? To have a fun and educational time with your baby, you can try experiments in entertaining chemistry. They are safe, interesting and educational. These experiments will answer many children's “whys” and awaken interest in science and knowledge of the world around us. And today I want to tell you what experiments parents can organize for children at home.
Pharaoh's snake

This experience is based on increasing the volume of mixed reagents. During the burning process, they transform and, wriggling, resemble a snake. The experiment got its name from a biblical miracle when Moses, who came to Pharaoh with a request, turned his rod into a snake.
For the experiment you will need the following ingredients:
- ordinary sand;
- ethanol;
- crushed sugar;
- baking soda.
We soak the sand in alcohol, then form a small hill out of it and make a depression at the top. After this, mix a small spoon of powdered sugar and a pinch of soda, then pour everything into an improvised “crater”. We set fire to our volcano, the alcohol in the sand begins to burn out, and black balls form. They are a product of the decomposition of soda and caramelized sugar.
After all the alcohol has burned out, the pile of sand will turn black and a wriggling “black pharaoh’s snake” will form. This experiment looks more impressive with the use of real reagents and strong acids, which can only be used in a chemical laboratory.
You can do it a little easier and buy a calcium gluconate tablet at the pharmacy. Set it on fire at home, the effect will be almost the same, only the “snake” will quickly collapse.
Magic lamp

In stores you can often see lamps, inside of which a beautiful illuminated liquid moves and shimmers. Such lamps were invented in the early 60s. They work on the basis of paraffin and oil. At the bottom of the device there is a built-in conventional incandescent lamp, which heats the descending molten wax. Part of it reaches the top and falls, the other part heats up and rises, so we see a kind of “dance” of paraffin inside the container.
In order to carry out a similar experience at home with a child, we will need:
- any juice;
- vegetable oil;
- effervescent tablets;
- beautiful container.
Take a container and fill it more than halfway with juice. Add vegetable oil on top and throw in an effervescent tablet. It begins to “work”, the bubbles rising from the bottom of the glass capture the juice and form a beautiful bubbling in the oil layer. Then the bubbles reaching the edge of the glass burst and the juice falls down. It turns out to be a kind of “circulation” of juice in a glass. Such magic lamps are absolutely harmless, unlike paraffin lamps, which a child can accidentally break and get burned.
Ball and orange: experience for kids

What will happen to a balloon if you drop orange or lemon juice on it? It will burst as soon as the citrus droplets touch it. And you can then eat the orange with your baby. It's very entertaining and fun. For the experiment we will need a couple of balloons and citrus. We inflate them and let the baby drip some fruit juice onto each one and see what happens.
Why does the balloon burst? It's all about the special chemical substance– limonene. It is found in citrus fruits and is often used in the cosmetics industry. When the juice comes into contact with the rubber of the balloon, a reaction occurs, limonene dissolves the rubber and the balloon bursts.
Sweet glass
You can make amazing things from caramelized sugar. In the early days of cinema, edible sweet glass was used in most fight scenes. This is because it is less traumatic for actors during filming and is inexpensive. Its fragments can then be collected, melted and made into film props.
Many people made sugar cockerels or fudge in childhood; glass should be made according to the same principle. Pour water into the pan, heat it up a little, the water should not be cold. After this, add granulated sugar and bring to a boil. When the liquid boils, cook until the mixture gradually begins to thicken and bubbles strongly. The melted sugar in the container should turn into viscous caramel, which, if lowered into cold water, will turn into glass.
Pour the prepared liquid onto a previously prepared baking sheet greased with vegetable oil, cool and the sweet glass is ready.
During the cooking process, you can add dye to it and cast it into some interesting shape, and then treat and surprise everyone around you.
Philosophical nail

This entertaining experience based on the principle of copper plating of iron. Named by analogy with a substance that, according to legend, could turn everything into gold, and was called the philosopher's stone. To conduct the experiment we will need:
- iron nail;
- a quarter of a glass of acetic acid;
- table salt;
- soda;
- a piece of copper wire;
- glass container.
Take a glass jar and pour acid and salt into it and stir well. Be careful, vinegar is harsh bad smell. It can burn the baby's delicate airways. Then we put copper wire into the resulting solution for 10-15 minutes, after some time we lower an iron nail, previously cleaned with soda, into the solution. After some time, we can see what has appeared on it copper plating, and the wire became shiny like new. How could this happen?
Copper reacts with acetic acid to form a copper salt, then the copper ions on the surface of the nail exchange places with iron ions and form a coating on the surface of the nail. And the concentration of iron salts in the solution increases.
Copper coins are not suitable for the experiment because this metal itself is very soft, and to make the money stronger, its alloys with brass and aluminum are used.
Copper products do not rust over time; they are covered with a special green coating - patina, which prevents it from further corrosion.
DIY soap bubbles
Who didn't love blowing soap bubbles as a child? How beautifully they shimmer and burst merrily. You can simply buy them in the store, but it will be much more interesting to create your own solution with your child and then blow bubbles.
It should be said right away that regular mixture from laundry soap and water won't do. It produces bubbles that quickly disappear and are difficult to blow out. Most affordable way To prepare such a substance, mix two glasses of water with a glass of dishwashing detergent. If you add sugar to the solution, the bubbles become stronger. They will for a long time fly and won't burst. And the huge bubbles that can be seen on stage by professional artists are created by mixing glycerin, water and detergent.
For beauty and mood, you can mix food coloring into the solution. Then the bubbles will glow beautifully in the sun. You can create several different solutions and use them in turns with your child. It's interesting to experiment with color and create your own new shade of soap bubbles.
You can also try mixing the soap solution with other substances and see how they affect the bubbles. Maybe you will invent and patent some new type of yours.
Spy ink

These are legendary invisible ink. What are they made of? Now there are so many films about spies and interesting intellectual investigations. You can invite your child to play secret agents a little.
The point of such ink is that it cannot be seen on paper with the naked eye. Only by applying a special influence, for example, heating or chemical reagents you can see the secret message. Unfortunately, most recipes for making them are ineffective and such ink leaves marks.
We will make special ones that are difficult to see without special identification. For this you will need:
- water;
- spoon;
- baking soda;
- any heat source;
- stick with cotton on the end.
Pour warm liquid into any container, then, stirring, pour baking soda into it until it stops dissolving, i.e. the mixture will reach a high concentration. We put a stick with cotton wool at the end there and write something on paper with it. Let's wait until it dries, then hold the leaf to a lit candle or gas stove. After a while, you can see how the yellow letters of the written word appear on the paper. Make sure that the leaf does not catch fire while developing the letters.
Fireproof money
This is a famous and old experiment. For it you will need:
- water;
- alcohol;
- salt.
Take a deep glass container and pour water into it, then add alcohol and salt, stir well until all ingredients dissolve. To set it on fire, you can take ordinary pieces of paper, or if you don’t mind, you can take a banknote. Just take a small denomination, otherwise something may go wrong in the experiment and the money will be spoiled.
Place strips of paper or money in a water-salt solution; after a while they can be removed from the liquid and set on fire. You can see that the flame covers the entire bill, but it does not light up. This effect is explained by the fact that the alcohol in the solution evaporates, and the wet paper itself does not catch fire.
Wish-fulfilling stone

The process of growing crystals is very exciting, but labor-intensive. However, what you get as a result will be worth your time. The most popular is the creation of crystals from table salt or sugar.
Let's consider growing a “wishing stone” from refined sugar. For this you will need:
- drinking water;
- granulated sugar;
- piece of paper;
- thin wooden stick;
- small container and glass.
First, let's make the preparation. To do this we need to prepare a sugar mixture. Pour some water and sugar into a small container. Let the mixture boil and cook until it becomes syrupy. Then we lower the wooden stick there and sprinkle it with sugar, this must be done evenly, in this case the resulting crystal will become more beautiful and even. Leave the base for the crystal overnight to dry and harden.
Let's start preparing the syrup solution. Pour water into a large container and add sugar, stirring slowly. Then, when the mixture boils, cook it until it becomes a viscous syrup. Remove from heat and let cool.
Cut out circles from paper and attach them to the end wooden stick. It will become the lid on which the wand with crystals is attached. Fill the glass with the solution and lower the workpiece into it. We wait for a week, and the “wishing stone” is ready. If you add dye to the syrup during cooking, it will turn out even more beautiful.
The process of creating crystals from salt is somewhat simpler. Here you just need to monitor the mixture and change it periodically in order to increase the concentration.
First of all, we create a blank. Pour warm water into a glass container and gradually stir, add salt until it stops dissolving. Leave the container for a day. After this time, you can find many small crystals in the glass; choose the largest one and tie it to a thread. Make a new one brine and put the crystal there; it must not touch the bottom or edges of the glass. This may lead to unwanted deformations.
After a couple of days you can notice that he has grown. The more often you change the mixture, increasing the concentration of salt, the faster you can grow your wishing stone.
Glowing tomato

This experiment must be carried out strictly under the supervision of adults, since it is carried out using harmful substances. The glowing tomato that will be created during this experiment should absolutely not be eaten, as it can lead to death or severe poisoning. We will need:
- regular tomato;
- syringe;
- sulfuric matter from matches;
- bleach;
- hydrogen peroxide.
We take a small container, put pre-prepared match sulfur there and pour in bleach. We leave all this for a while, after which we take the mixture into a syringe and inject it inside the tomato from different sides, so that it glows evenly. For start chemical process Hydrogen peroxide is needed, which we introduce through the trace from the petiole on top. We turn off the lights in the room and we can enjoy the process.
Egg in vinegar: a very simple experiment
This is a simple and interesting ordinary acetic acid. To implement it you will need boiled egg and vinegar. Take a transparent glass container and place an egg in its shell in it, then fill it to the top with acetic acid. You can see bubbles rising from its surface, this is happening chemical reaction. After three days, we can observe that the shell has become soft and the egg is elastic, like a ball. If you shine a flashlight on it, you can see that it glows. Conduct an experiment with raw egg not recommended, as the soft shell may rupture when squeezed.
DIY slime made from PVA

This is a fairly common strange toy from our childhood. Currently it is quite difficult to find it. Let's try to make slime at home. Its classic color is green, but you can use the one you like. Try mixing several shades and creating your own unique color.
To conduct the experiment we will need:
- glass jar;
- several small glasses;
- dye;
- PVA glue;
- regular starch.
Let's prepare three identical glasses with solutions that we will mix. Pour PVA glue into the first, water into the second, and dilute starch into the third. First, pour water into the jar, then add glue and dye, stir everything thoroughly and then add starch. The mixture needs to be stirred quickly so that it does not thicken, and you can play with the finished slime.
How to quickly inflate a balloon
Is there a holiday coming up and you need to inflate a lot of balloons? What to do? This unusual experience will help make the task easier. For it we need a rubber ball, acetic acid and regular soda. It must be carried out carefully in the presence of adults.
Pour a pinch of soda into balloon and put it on the neck of a bottle of acetic acid so that the soda does not spill out, straighten the ball and let its contents fall into the vinegar. You will see a chemical reaction take place and it will begin to foam, releasing carbon dioxide and inflating the balloon.
That's all for today. Don’t forget, it’s better to conduct experiments for children at home under supervision, it will be safer and more interesting. See you again!
Guys, we put our soul into the site. Thank you for that
that you are discovering this beauty. Thanks for the inspiration and goosebumps.
Join us on Facebook And In contact with
We have a lot of things stored in our kitchen that can be used for interesting experiments for children. Well, for myself, to be honest, make a couple of discoveries from the “how did I not notice this before” category.
website I chose 9 experiments that will delight children and raise many new questions in them.
1. Lava lamp
Needed: Salt, water, a glass of vegetable oil, some food coloring, a large transparent glass or glass jar.
Experience: Fill the glass 2/3 with water, pour vegetable oil into the water. Oil will float on the surface. Add food coloring to water and oil. Then slowly add 1 teaspoon of salt.
Explanation: Oil is lighter than water, so it floats on the surface, but salt is heavier than oil, so when you add salt to a glass, the oil and salt begin to sink to the bottom. As the salt breaks down, it releases oil particles and they rise to the surface. Food coloring will help make the experience more visual and spectacular.
2. Personal rainbow
Needed: A container filled with water (bathtub, basin), a flashlight, a mirror, a sheet of white paper.
Experience: Pour water into a container and place a mirror on the bottom. We direct the light of the flashlight onto the mirror. The reflected light must be caught on the paper on which a rainbow should appear.
Explanation: A ray of light consists of several colors; when it passes through the water, it breaks down into its component parts - in the form of a rainbow.
3. Vulcan
Needed: Tray, sand, plastic bottle, food coloring, soda, vinegar.
Experience: A small volcano should be molded around a small plastic bottle from clay or sand - for the surroundings. To cause an eruption, you should pour two tablespoons of soda into the bottle, pour in a quarter cup of warm water, add a little food coloring, and finally pour in a quarter cup of vinegar.
Explanation: When baking soda and vinegar come into contact, a violent reaction begins, releasing water, salt and carbon dioxide. Gas bubbles push the contents out.
4. Growing crystals
Needed: Salt, water, wire.
Experience: To obtain crystals, you need to prepare a supersaturated salt solution - one in which the salt does not dissolve when adding a new portion. In this case, you need to keep the solution warm. To make the process go better, it is desirable that the water be distilled. When the solution is ready, it must be poured into a new container to get rid of the debris that is always in the salt. Next, you can lower a wire with a small loop at the end into the solution. Place the jar in a warm place so that the liquid cools more slowly. In a few days, beautiful salt crystals will grow on the wire. If you get the hang of it, you can grow fairly large crystals or patterned crafts on twisted wire.
Explanation: As the water cools, the solubility of the salt decreases, and it begins to precipitate and settle on the walls of the vessel and on your wire.
5. Dancing coin
Needed: Bottle, coin to cover the neck of the bottle, water.
Experience: The empty, unclosed bottle should be placed in the freezer for a few minutes. Moisten a coin with water and cover the bottle removed from the freezer with it. After a few seconds, the coin will begin to jump and, hitting the neck of the bottle, make sounds similar to clicks.
Explanation: The coin is lifted by air, which compressed in the freezer and occupied a smaller volume, but has now heated up and begun to expand.
6. Colored milk
Needed: Whole milk, food coloring, liquid detergent, cotton swabs, plate.
Experience: Pour milk into a plate, add a few drops of coloring. Then you need to take a cotton swab, dip it in the detergent and touch the swab to the very center of the plate with milk. The milk will begin to move and the colors will begin to mix.
Explanation: Detergent reacts with fat molecules in milk and sets them in motion. This is why skim milk is not suitable for the experiment.
7. Fireproof bill
Needed: Ten-ruble bill, tongs, matches or lighter, salt, 50% alcohol solution (1/2 part alcohol to 1/2 part water).
Experience: Add a pinch of salt to the alcohol solution, immerse the bill in the solution until it is completely saturated. Remove the bill from the solution with tongs and let it drain excess liquid. Set the bill on fire and watch it burn without getting burned.
Explanation: The combustion of ethyl alcohol produces water, carbon dioxide and heat (energy). When you set fire to a bill, the alcohol burns. The temperature at which it burns is not sufficient to evaporate the water with which the paper bill is soaked. As a result, all the alcohol burns out, the flame goes out, and the slightly damp ten remains intact.
9. Camera obscura
You will need:
A camera that supports long shutter speeds (up to 30 s);
Large sheet of thick cardboard;
Masking tape (for gluing cardboard);
A room with a view of anything;
Sunny day.
1. Cover the window with cardboard so that light does not come from the street.
2. We make a smooth hole in the center (for a room 3 meters deep, the hole should be about 7-8 mm).
3. When your eyes get used to the darkness, you will see an inverted street on the walls of the room! The most visible effect will be achieved on a bright sunny day.
4. Now the result can be shot with a camera at a long shutter speed. A shutter speed of 10-30 seconds is fine.
IN high school They don’t start chemistry until 8th grade; children find this science too difficult. But you can prepare a student for the subject in a very simple and non-boring way - by organizing a chemistry experiment at home. Such mini-experiments will help you look at science from a different perspective, and showing “chemical tricks” will help children's party will significantly increase the degree of fun.
Fireproof banknote
To perform an incredibly impressive but simple trick, you will need:
- bill;
- aqueous-alcohol solution with an alcohol content of about 50%;
- salt;
- tweezers or tweezers.
A pinch of salt must be added to the solution. Next, a bill is placed into the solution using tweezers. For those who are conducting such an experiment in chemistry for the first time, it is better to take a banknote of a lower denomination!
After the money is thoroughly wet, you should pick it up again with tweezers and lightly shake off the excess liquid from the paper. Now you can set it on fire! The fire will pass through the entire bill, but not a single edge will even turn brown. This happens because the alcohol contained in the solution burns. In turn, the water with which the paper is saturated does not have time to evaporate.
Crystal eggs

Growing crystals is one of the popular hobbies that entertaining chemistry offers. Experiments with crystallization are most often carried out on sugar, but sugar crystals no longer surprise anyone. We offer a new and unusual sight - crystals grown on eggs!
Crystal eggs can be obtained using:
- alum (sold in pharmacies);
- PVA glue;
- dyes.
The crystals on the eggs will grow very quickly, in just a day. It is necessary to first wash the shell and dry it thoroughly. After which the eggs are smeared with glue and sprinkled with alum. Now they need to lie down for several hours to dry again.
Next, the dye must be dissolved in two glasses of plain water. You can choose the amount of dye yourself; in this case, only the intensity of the color of the crystals depends on it. The eggs are placed in the dye for a day or a day. The longer the egg sits in the solution, the larger the crystals grow. It is worth taking out the finished crystal eggs carefully - they are quite fragile.
Balloon on a bottle
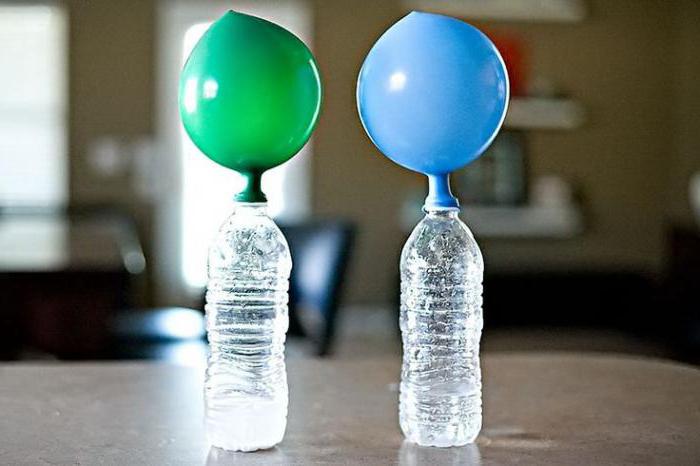
How can you inflate a balloon without helium without any physical effort? To do this, you can use regular baking soda and vinegar, which are in every mother’s kitchen cupboard. To conduct this experiment in chemistry, you will need:
- balloon;
- bottle;
- 3-4 teaspoons of soda;
- table vinegar.
The soda is poured directly into the ball using a funnel or spoon. After which it is put on a bottle with a small amount of vinegar. As soon as the soda from the balloon begins to spill into the bottle, it begins to swell, as if from helium. This happens because vinegar reacts with baking soda, releasing carbon dioxide. The ball is inflated thanks to the gas in a few seconds, just catch it!
Multi-colored layers in a bottle
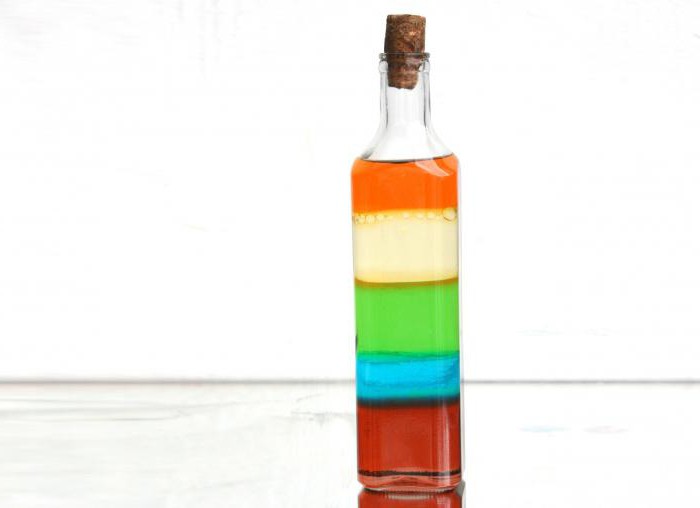
The following chemistry experiment will clearly explain to your child the concept of liquid density. For this you will need:
- a quarter cup of sunflower oil;
- a quarter glass of water, tinted in any bright color;
- a quarter glass sugar syrup(to make the focus more effective, you should also add dye to it).
The child can predict in advance what will happen when all these liquids are mixed. He will like the result - the syrup will settle down as the densest one, the water will be located in the middle, and the oil will remain on top. You can experiment with colors and liquids, creating unimaginable compositions. For example, adding different quantities sugar into syrup, you will be able to get several liquids of different densities.
Laboratory experiments in chemistry can be anything but boring. These eye-catching yet simple tricks will help encourage your child to study science and will simply provide some entertainment on a rainy day.