Even the brightest ones need a frame - “outfits” that will further emphasize their beauty. Street flower pots are rightfully considered the most spectacular and at the same time simple “outfits”. Making them with your own hands will not be difficult. Do you want hanging planters made from bottles, wicker from wicker, or ground-mounted from a tree stump? No problem! Read the instructions on how to make flowerpots from these and other materials, and also watch educational photos and videos - they will help you transform your garden beyond recognition.
Making flower pots from rags and cement
To make such a flowerpot, you will need:
- cement;
- old tablecloth;
- vase, pot or other vessel for form;
- water;
- bucket;
- “mixer” – attachment for a drill;
- dye.
The procedure for creating a flowerpot is very simple. First you need to prepare cement mixture. To accurately determine its volume, take a tablecloth, place it in a bucket and mark on the walls how much space it takes up - according to this mark, pour water for the solution. Add cement to the water and mix them with a “mixer”. The result should be cement laitance, reminiscent of slightly runny sour cream in consistency.
Then, when the mixture is ready, place the tablecloth in it and leave for a couple of minutes until it is completely soaked. After this, remove the material and make sure that there are no dry areas left on it.
Next, take the prepared container for the mold and hang a wet tablecloth on it. Gently straighten the material and leave to dry. When the cement mortar has completely hardened, remove the product from the mold container and paint. Use special paints for concrete - they are stronger and more durable. Once the paint has dried, you can use the pots for their intended purpose.
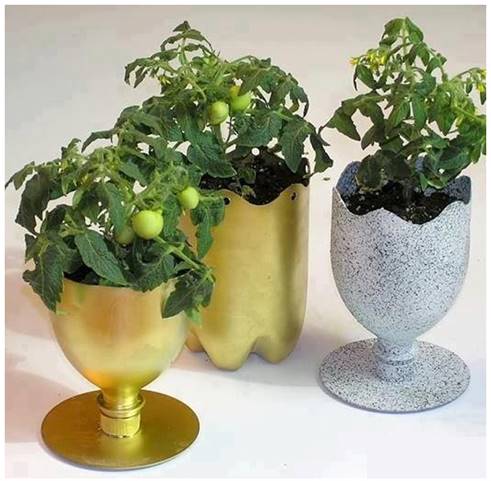
Making flower pots from plastic bottles with your own hands
Plastic containers are a universal material for flower pots, since several models of “outfits” can be built from them at once.
The first option is a classic flowerpot. Take a plastic bottle, two CDs, sandpaper, scissors, glue and paint. Cut the bottle into two equal parts using a wavy line. Sand both discs with sandpaper. Take the bottom of the bottle and glue it to the stripped first disc. Then take top part: First unscrew the cap and glue it onto the second disk, and once the glue has dried, screw the plastic part of the bottle back onto the cap. When finished, coat the pieces with paint.
The second option is a hanging planter. Here you will need: bottle, rope, paints, scissors. First, cut off the neck of the bottle - only a straight line will be used in this work. Bottom part containers. Then cut small holes on the sides for the rope. Then decorate the structure: paint, cut out patterns, draw an animal, trim the top edge - whatever you can do carefully. And then thread a rope through the holes, place a flower pot in the flowerpot and hang the structure on strong nails.
We make wooden flower pots
The easiest way to make a flower pot is from a stump or log. Take:
- wood;
- drill: drill length – at least 25 cm, diameter – at least 20 cm;
- chisel;
- protective impregnation for wood.
- Select a log or stump of the required diameter. Measure a piece to the height of the flower pot or flowerpot and cut it off - this is again a flowerpot.
- Drill a series of holes into the top plane of the wood to destroy the core.
- Use a chisel to remove the wood - you should be left with an empty container. The edges need to be aligned.
- Treat the inner walls of the pots protective composition and place a flower pot in it.
Advice. The wooden planter itself can also serve as a pot, but to do this, you need to put durable polyethylene in the container and cover it with drainage on top. And only after that you can place the soil mixture with the flower.
A more complex option is a flowerpot made of boards and timber. You will need:
- beams with a section of 25x25 mm;
- boards 15 m thick;
- self-tapping screws;
- wood glue;
- drill;
- protective impregnation for wood.
The algorithm for making pots is as follows:
- Assemble a cube-shaped frame from the beams.
- Cut out parts for the bottom and walls from the boards. Sand the panels on all sides.
- Drill several holes in the bottom for drainage.
- Assemble the design of the flowerpots together: attach the side and bottom panels to the cubic frame using self-tapping screws. In order to give the product even greater reliability, carefully glue all joints.
- Cover the surface of the finished structure with a protective compound.
We weave flower pots from wicker
Another simple one, but interesting option flower “outfit” - a flowerpot made of vines. Prepare for work:
- flexible vine - it can be either fresh or dried;
- plywood sheet;
- moisture-proof impregnation;
- drill;
- awl;
First, soak the vine in water - this will give it the extra flexibility needed for easy weaving. Cut a blank for the oval or bottom from a plywood sheet. round shape. Along the edge of the resulting bottom, drill identical holes with a diameter slightly smaller than the diameter of the vine. All holes should be at the same distance from the edge of the bottom. Then insert a strong twig into each hole - this will be a blank for the frame of the flowerpot.
The next step is direct weaving: lay the vine between the rods, carefully pressing each new row with an awl. Wrap the twigs until the product reaches the height you require. Laying methods can and even need to be changed after a row - this way you will achieve a different textured surface of the pots.
At the end of the weaving, either cut the rods or weave them into the main rows of the vine. Then let the structure dry a little and get stronger. The last stage is treating the pots with moisture-proof impregnation and varnishing.
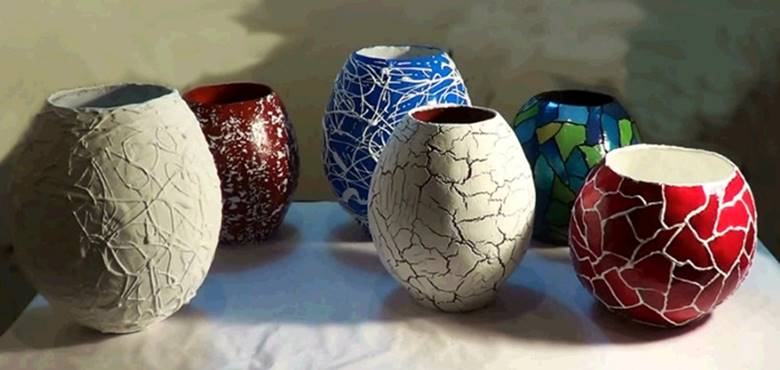
We make plant pots from plaster
To make such a pot, prepare:
- gypsum;
- wire;
- textile strips no more than 10 cm wide;
- paint;
- bucket;
- protective varnish.
The first step is preparing the frame. Turn the bucket upside down and braid its surface with wire. Tuck the edges and hide. Carefully remove the finished frame from the bucket.
The second step is diluting the gypsum solution. Take gypsum and mix it with water until the mixture begins to resemble sour cream.
The third step is the construction of the “body” of the flowerpot. Dip all textile strips into the plaster solution and soak for 3 minutes. Then take out the tapes one by one and place them on the frame layer by layer. The thickness of the walls should be at least 2 cm. Then carefully treat the walls of the structure with the remaining gypsum mortar. After this, the pot should dry completely - set it aside for 10-12 hours.
The fourth step is design design. Flowerpots can not only be painted, but also decorated with various pieces of glass, beads, pebbles - any small details that you like.
Advice. After drying, the walls of the pots will not be completely smooth, so the paint will not apply well. To avoid this, carefully clean the surface with sandpaper and treat the structure with white water-based composition, and then apply paint of the required color to the flower pots in the second layer.
Now you know that you can make a beautiful flower pot from almost any material without spending a lot of time or a lot of money. The main thing is to turn on your imagination and be smart. So if you want to effectively decorate your garden, don’t rush to buy store-bought pots – take the initiative into your own hands and don’t be afraid to experiment.
How to make a flowerpot: video
Planters for the garden: photo


Pots or not regular pot can highlight the unique charm of the plant in it, add zest to a mini-garden on the windowsill, or become an interior decoration both inside the house and in the garden. However, the question of material that should be preferred when choosing a container for flowers often arises. The article will discuss how to choose or make flower pots with your own hands.
Material selection
Depending on your needs and budget, you can choose from a wide range of pots. Before you decide to buy, it's worth comparing different variants, and weigh the pros and cons.
A few points to consider:
- finance. There are a lot of options on the market - from inexpensive flowerpots to exclusive handmade ones;
- purpose. Will the flower pot be part of a temporary project? In this case, there is no point in spending a lot of money on it. If it will be an element of interior decor, then it is worth investing in the long term;
- self-production. Often, to save time, a ready-made flowerpot is purchased, however, nothing compares to your own unique creation;
- advantages and disadvantages. Before purchasing, it will be useful to consider the advantages and disadvantages different types pots.
Types of materials for pots
Plastic flower pots

A cheap, universal material from which both small pots and large flower pots are made.
- The color of the pot is preferably light; it will not heat up quickly in the sun, and the plants in it will be less susceptible to the spread of microorganisms.
- If necessary, you can always make additional drainage holes for the root system in such a pot.
- Among the disadvantages of the material, it is worth noting its fragility, especially if it is used outdoors; over time, the material becomes thinner and becomes brittle.
Clay pot

Traditionally popular material for flowerpots.
- In terms of design, clay pots offer many attractive options.
- However, for plants clay pot is not always the best place to live because it is almost impossible to provide adequate drainage.
Pots made of natural stone

Most often used in the manufacture of outdoor flower pots, as an element of landscape design.
- They are very beautiful, monumental and, of course, durable.
- In addition, stone can be called perhaps the most environmentally friendly material.
- Its main drawback is its heavy weight.
Wooden flower pot

Wooden pots are very attractive and distinctive.
- They provide excellent thermal insulation for the soil. Where necessary, they help insulate plant roots from excessive solar heat.
- However, due to the fact that wood is a natural material, pests can grow in it, and wooden bottoms rot over time. To avoid this, it is recommended to combine wood with other types of pots, for example, placing several plastic pots in a wooden pallet.
Metal planter

Metal containers will add a touch of austerity to the design.
- They are strong and durable, but have a very high thermal conductivity, so they, like wooden pots, are recommended to be used in tandem with an insulating pot, for example, made of clay.
Nylon threads

They are used to weave flower pots in the macrame style. These are inexpensive, but at the same time exclusive flowerpots that will fit perfectly into the interior of not only a country house in rustic style, but also suitable for a modern city apartment.
Six ideas on how to make flower pots with your own hands
In spring and autumn, gardeners traditionally put things in order in their gardens, both regular and mini-gardens on the windowsill: they replant plants and get rid of unnecessary things. Why buy a new expensive flowerpot if you can make it yourself from scrap materials? Surprisingly, such simple things as baskets, shoes, dishes, furniture make amazing, unique flowerpots that will undoubtedly decorate any garden.
Old drawers cabinet or chest of drawers will look very interesting as a flowerpot. To prolong their life, it is better not to pour soil directly into the box, but to place smaller pots with plants in it.

Helpful Tips:
- It is better to remove the pots from the box during watering, so its life will be noticeably extended;
- To camouflage pots in a box, they are covered with coconut fiber or moss.
Sackcloth. This material, rough at first glance, in skillful hands becomes an excellent design tool. The fabric can be dyed and simply wrapped around the pot. Thus, even pots of different shapes and quality will turn into a single ensemble.

Helpful Tips:
- in order to securely fix the fabric on the pot and simplify the process of creating a flowerpot, it is recommended to use a glue gun;
- Alternatively, you can create a removable cover for the pot, in which case it is sewn together with thread.
Multi-level design made of baskets. This technique will not only help optimize space for plants, but will also make watering easier. In addition, this is an excellent option for pots for hanging flowers.

Helpful Tips:
- to extend the life of the baskets, a layer of coconut fiber (peat) is first laid on the bottom, and then soil is poured;
- Before planting, it is necessary to calculate the height of the baskets and the height of future plants in them.
Bright plastic sand buckets. Only for children to play in the sandbox? Not at all! It is enough to make drainage holes in the bottom, and bright plastic buckets will lift the mood in your summer cottage.

Helpful Tips:
- With the help of such flowerpots, you can create a kindergarten by planting your baby’s favorite plants in them so that he learns to care for them independently.
Looks unusually stylish old shoes as flowerpots. It can be rubber boots or leather boots. The undoubted advantage of this type of pots is the ability to replace them regularly. And old bags can also be used as hanging flower pots.

Wooden box. You can leave the tree untouched, adding brutality to its appearance, or paint it to match the overall landscape.

Helpful Tips:
- Using boxes you can create themed corners, for example: medicinal or culinary herbs, spring and summer flowers, etc.
DIY flower pots with self-watering system
A flower pot with a self-watering system consists of the following elements:
- the actual pot. Any old plastic one will do, just make sure it has the necessary drainage holes;
- a moisture-absorbing area; any plastic bottle is suitable for these purposes;
- The tube for filling the tank with water is wide enough to make it convenient and easy to fill the water. You can use a plastic tube or hose;
- barrier ( mosquito net, plastic bag, etc.);
- stones (for example, large river pebbles);
- land (in which the plant will be planted);

Step one: preparation
- In a self-watering pot system, the heart is the area that is responsible for transferring moisture to the roots of the plant. Therefore, the manufacture of the pot begins with this element.
- To make it, take any plastic bottle, the bottom of which must be cut off and many small holes made in it (through which the soil will be saturated with moisture).
- The height of this plastic part depends on the height of the pot, and should be at least a quarter of it.
Step 2: Prepare the tube and drain hole
- The tube must be installed in a flowerpot and cut to height. It can be 2-4 cm above the ground surface.
- Then the level at which the hole will be made to drain the water is measured. It should be flush with the top of the plastic part that was made to saturate the soil with moisture.
- The drainage hole is responsible for preventing excess water from reaching the roots of the plant to prevent them from rotting.

Step 3: Filling with Soil and Installing Absorbent Area
- At this stage, you will need a mesh or film, the size is determined by the diameter of the pot, the fabric should be 2-2.5 times larger.
- The middle of the cut is marked, which is inserted into a plastic drainage cup.
- Then the mesh must be straightened and earth must be poured into the cup. It is important to ensure that it lies evenly along the edges and that the earth is thoroughly compacted.
- After which the glass can be placed in the center of the flowerpot.
Step 4: installing the watering tube and filling with stones

- A glass with soil was placed in the center of the pot, a tube (or hose for supplying water) was installed on one side and then stones were poured to the height of the plastic cup.
Important: the protective barrier (mesh) must be held at this moment; then it will be carefully laid on top of the layer of stones. Its function to separate is to separate stones from the soil. There is no need to cover the cup itself with material.
Step 5: filling the soil and planting the plant
- Filling the soil begins from the middle of the pot, from the place where it is placed plastic cup, performing the function of saturation with moisture, moving from the center to the edges.
- When pouring soil, the mesh can be gradually pressed down. When most of it is covered with soil, the plant itself is planted to the required depth. Then the soil is added to the top of the pot.
Step 6: watering and finishing work

- Now that the plant is planted and the soil has been filled, it’s time to water.
- Water for the first time after transplantation upper layer soil, and then water is added through a tube into the bottom layer.
- The plant will now be able to take the necessary moisture with the help of its roots through a moistened area of soil in a plastic cup.
- You can also feed the plant by adding fertilizers to the water, which is poured through a tube.
A flower pot made in this way can be used as a wall-mounted one if it is woven using the macrame technique, or as a floor-mounted one for large-sized plants.
Good housewives strive to make their home comfortable and beautiful. Flowers in interesting flower pots on the windows are one way to make your home feel cozy. Skillful hands can build flowerpots out of practically nothing. A waste container that is just right to throw in the trash can easily turn into a design masterpiece that makes a pleasant impression on the owners and guests.


How to create a masterpiece from nothing?
Every home has old things that are a pity to throw away. They can be given a second life by making. It is enough to wash the container, remove the stickers from it, make a hole in the bottom - and new house For indoor plants ready.
Nowadays it is fashionable to plant flowers in worn shoes. The rubber one is especially convenient. You can’t place such flower pots made with your own hands from scrap materials in an apartment, but they are perfect for the street. 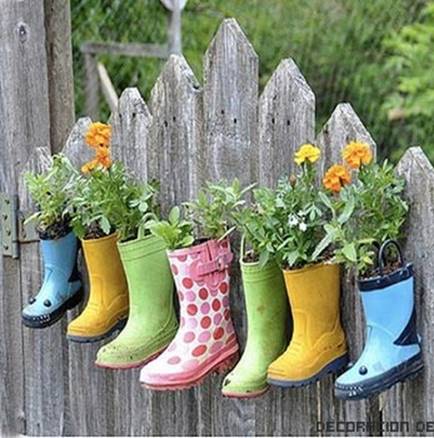
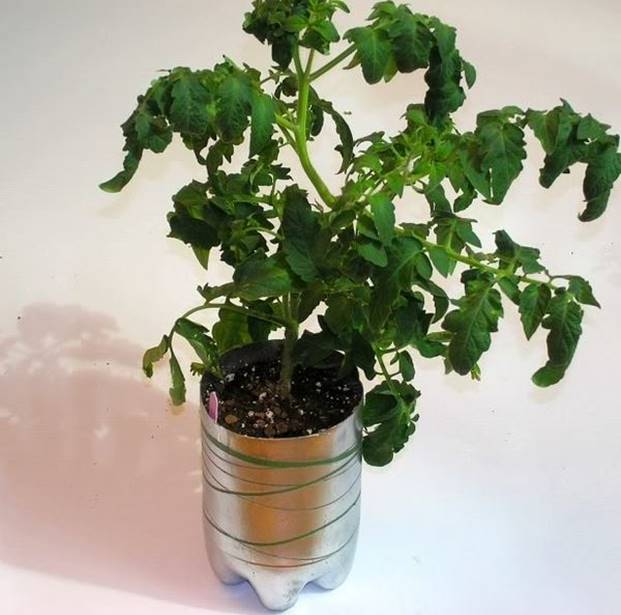
DIY pot made from plastic bottles
They are usually used to make pots for seedlings, but they are also suitable for creating real flower pots.
The simplest option:
- Cut off the top of the bottle.
- Use a thick needle to make a hole in the cork to allow excess water to drain out.
- Insert the top with the screwed cap into the bottom of the bottle, neck down.

The simple pot is ready.
You can also make a flower pot in the shape of a large glass with your own hands. The disadvantage of this product is the absence of a hole for water drainage. To prevent the plants from dying, you need to fill the bottom with a good layer of drainage and place it in homemade flowerpot such representatives of the flora who are not afraid of overflow. This can be a compact indoor plant - any plant except a cactus.
The best drainage in such cases is activated carbon. It effectively absorbs excess water and prevents roots from rotting. Activated carbon can be purchased in large packages at an aquarium supply store.
You will need:
- bottle;
- computer disk;
- glue gun;
- dye.
Manufacturing:
- Cut the bottle in half.
- If desired, make the edges curly in the form of teeth or waves.
- Apply glue to the bottle cap and glue it to the center of the disk.
- Paint with spray paint.
You can also paint the second part of the bottle, then you will get another flower pot.
Now there are paints that imitate stone, wood, and metal. They can be used to decorate a regular plastic flower pot.
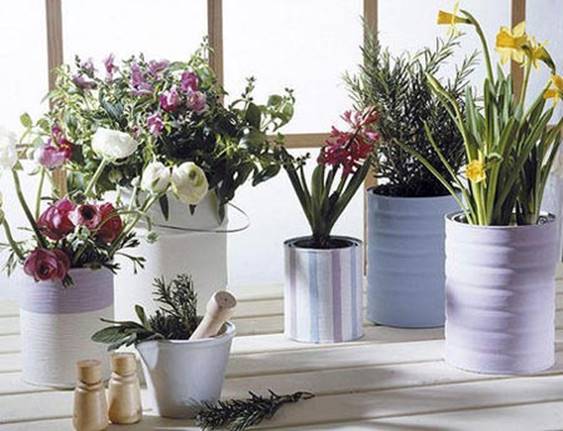
Cans in use
Flower pots made from tin cans are inappropriate in classic interior, but they are suitable for decorating a loft-style home or a country house. Cans from baby food, paints, canned food are durable and lightweight. If you remove the label from them, even without painting they will look decent.
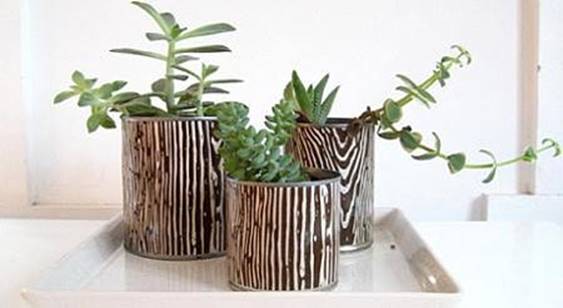
If the vessel is damaged, covered with glue, scratches, rust, it will have to be renewed. The easiest way is to paint. The pattern and color can be any. The main thing is that the owners like the finished product.
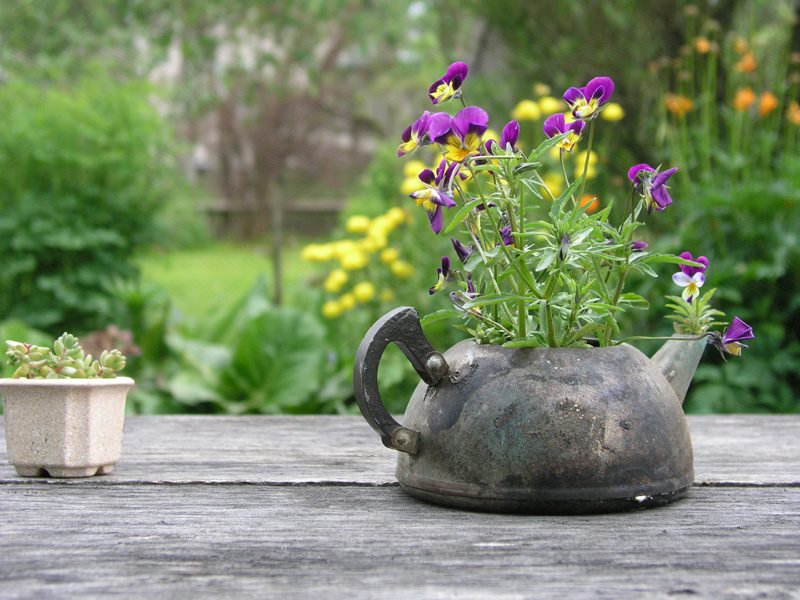
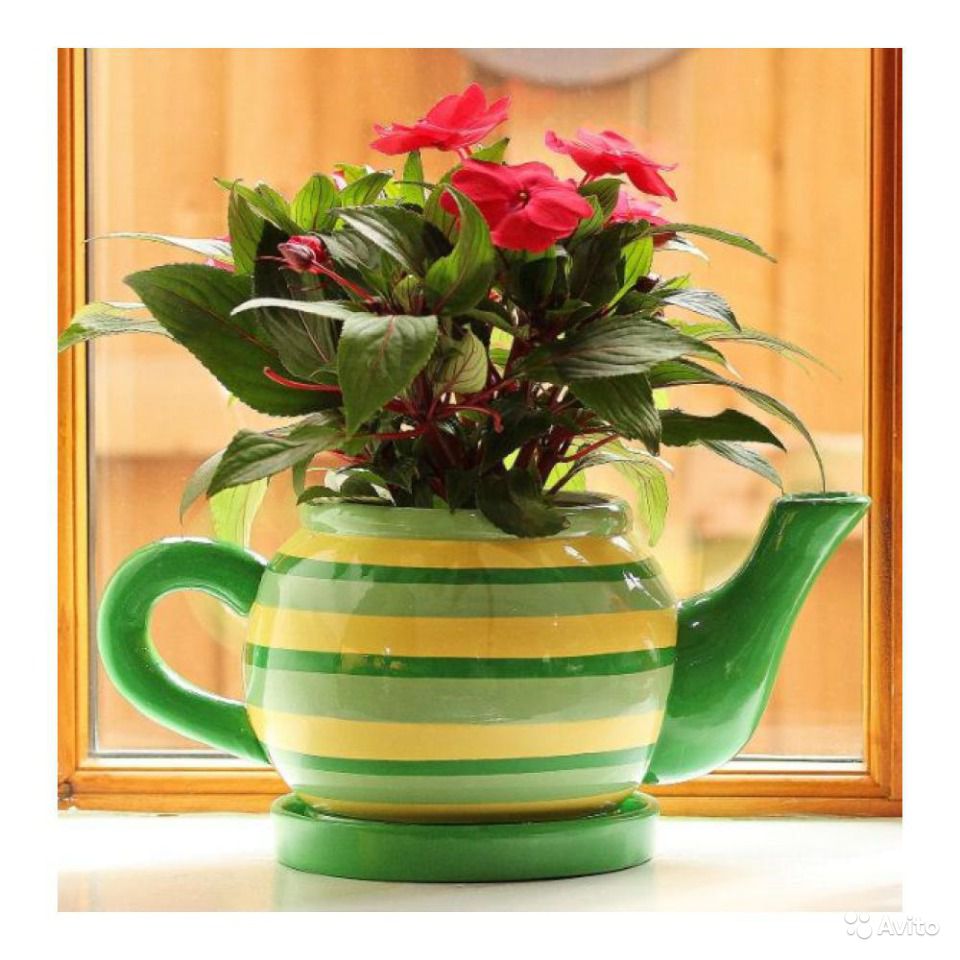
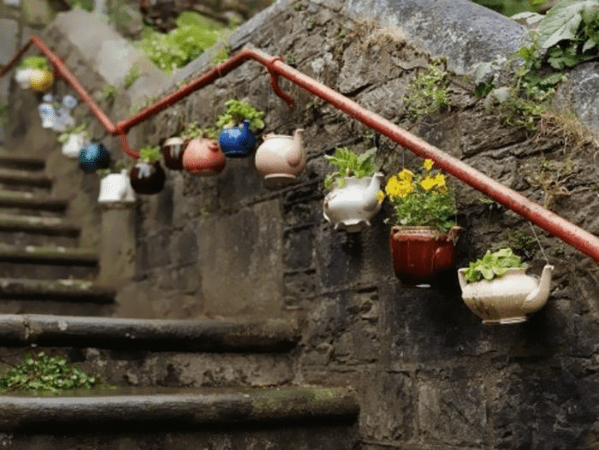
Old dishes
Pots, plates, teapots and any utensils can act as flower pots - they can also be made with your own hands very simply. It is enough to renew the surface with acrylic paint and make holes in the bottom. Make flowers new house is a great way to get the benefit of a topped mug or bowl.
Teapots can be effectively hung by the handle, creating hanging pots with hanging plants.
Flowerpots and pots that you can make with your own hands from old dishes, photo:


There are special drills for ceramic tiles, but they are thick and not suitable for processing mugs.
Holes in a ceramic or porcelain cup make electric or hand drill by inserting a glass drill into it:
- A piece of paper is glued to the bottom of the cup.
- Periodically water the drilling site with water to prevent the tool from overheating.
A large mug with a massive bottom is drilled with a drill with a tile drill in small modes, without pressing the tool. During operation, the container should be upside down.
Grow only in transparent containers. The old ones cope with this role glass vases. You will need a special glass drill. To prevent glass dust from spreading throughout the room, the vase must be placed upside down in a bucket filled with water, so that it is completely hidden in the liquid. Water will protect against dust, dirt and overheating, and will reduce the likelihood of the vase cracking.
The drill is turned on at the lowest speed and allows the tool to enter the glass on its own without any physical effort. The slower the tip moves through the thickness of the glass, the less likely it is that the container will crack.
The easiest way to drill dishes is from metal. Pots are made from steel and aluminum teapots, cans, pans, cups, and mugs. Metal can be drilled even without a drill or drill bit, using a metal screw and a regular screwdriver.
Cement and rags - who would have thought?
It is not known who was the first to come up with the idea of making an outdoor flower vase from old rags and concrete, but honor and praise to the unknown inventor. His technique allows him to make exquisite garden decorations from waste material.
To make outdoor flower pots with your own hands you will need:
- a rag made of fabric that absorbs water,
- any container (for example, an old bucket),
- coloring pigment for adding to concrete,
- mixing container,
- strong polyethylene.
To stir the solution you need a paint spatula. An electric drill with the appropriate attachment will greatly simplify the work.
Making a vase:
- sift sand from debris and large stones;
- put a rag in the container and make a mark at the level to which it reached;
- pour water into the container up to the mark;
- fill with sand and cement 1:1;
- stir;
- wrap the bucket or other container you chose to make the vase with polyethylene;
- dip the rag into the cement mortar until it is completely saturated
- after 10 minutes, remove the rag and let the excess solution drain;
- place the rag on the mold, wrapped in film and turned upside down;
- straighten the fabric so that the bottom is even, and bend the edges with arbitrary folds or sharp creases;
- leave the product for 1-3 days;
- remove the rag from the container.
DIY cement and fabric planters, video:
The technology of making a flowerpot from scrap materials will be more quickly understood by those who made flower pots from vinyl records, melting their edges over a fire, after which they sagged in beautiful folds. Now that records have become a rarity, inventive people have figured out how to make similar products from ordinary fabric.
Ideas for floor vases
Floor vases are used to decorate apartments and country houses. In order not to purchase a vessel in a store, you can use the well-known papier-mâché - a mixture of wet paper with PVA. The substance is spread on a base made of any durable, moisture-proof material.
Papier-mâché allows you to create complex shapes and specific relief. If a smooth surface is needed, the dried product is sanded with an abrasive cloth and a leveling layer is applied.
This retro-style vase is made from an old aluminum can, spray-painted in Brown color. You can decorate a bucket with flowers using the same method.
You can put both artificial and fresh flowers in a metal vessel. If you cut off the neck and drill several small holes in the bottom, the can can be covered with soil and used for growing live ornamental plants. Aluminum is cut with a circular saw, metal scissors, a hacksaw, and a jigsaw.
DIY garden vases
Garden vases are easiest to cast from concrete. The surface of the product is decorated with any natural materials, in this case, pebbles.
Such vessels are durable, take any shape in the hands of the master, have a significant weight, and therefore are not blown away by the wind and do not tip over.
Manufacturing technology:
- choose two containers different sizes, one of which freely fits into the other with a large gap;
- process sunflower oil both containers so that the solution does not stick to their surfaces;
- mix sand and cement 1:1;
- dilute with water to the consistency of thick sour cream;
- pour the solution into the bottom of a large container;
- secure the segment plastic pipe to create a hole for drainage;
- wait until the solution sets;
- place a small container in a large one;
- fill the gap with concrete;
- leave for 24 hours;
- remove the inner container;
- sprinkle the concrete with water;
After a week, the finished pot can be shaken out of the mold, covered with soil and plants can be planted in it.
Decorating pots
When it comes to plant pots, color is often more important than shape and even size. Beautiful drawing makes you pay attention to the design flower pots.
Many people grow indoor flowers in ordinary red clay, believing that such containers “breathe”, so the plants feel more comfortable in them. There is some truth in this. But even such a pot can be given a bright personality, without compromising its beneficial properties.
Decorating a dull flower pot with multi-colored pebbles, as in the photo, will not be difficult to do with your own hands:
 It is not necessary to cover the clay with an airtight layer of varnish or paint. You can take glue gun and cover the walls with beautiful pebbles or small saw cuts.

An interesting option for decorating flower pots - eggshell. Before work, it is very important to remove the film, rinse and dry thoroughly. The shells are glued with the convex side outward using PVA glue.
The final stage is coloring. You can paint both the shell itself and the walls of the pot.
Perhaps the most sophisticated way of decoration is decoupage. This technique involves the use of paper and can be used on any pots, including plastic and corrugated ones.
Pot decor with decoupage:
- Clean the surface of the pot from dirt and degrease with acetone.
- Cover with base paint.
- Cut out the necessary motifs from paper.
- Glue the paper to the surface.
- Cover with varnish.
Master class on decoupage of a flower pot on video:
You can decorate a flower pot with your own hands using lace. It adds sophistication to any product, even a cheap plastic pot. Working with this material is easy. The container is covered with PVA glue and the fabric is glued.

Instead of lace, you can take burlap or combine these two materials, and also additionally decorate the fabric with beads or seed beads. All additional elements They are also glued with PVA glue.


Indoor flowers in flowerpots are a wonderful way to decorate an apartment or house, making the room more lively and cozy.
In this article we offer you interesting ideas how to make beautiful hanging flower pots using a variety of materials, such as wood, leather, twine and other available materials.
Also 5 step-by-step master classes with diagrams and photos on how to weave flower pots quickly and easily with your own hands and create a truly beautiful decor interior

Leather hanging flower pots are easy to make and look very original. Add a little style to your home interior along with this wonderful leather planter. It can definitely become the highlight that makes the interior unique.


Master class: leather hanging planter

Necessary materials:
- Distilled (purified) water
- Tracing paper (21x28 cm) and 4 pieces of strong rope (or leather laces), each approximately 90-120 cm in length
- Leather dye (optional) and gloves
- Leather (square size 30x30 cm)
- Packing tape, a pencil and a utility knife
- Computer and printer (to print the template) and template
- Sponge for wetting and staining
Step 1: Preparation and Placement
Print the factory hanger template on tracing paper. Place the template down on the wrong side of the leather and select perfect place placement (not too close to the sides, and to avoid any defects in the skin).

Step 3: Soften the skin
Dip the sponge into purified water and then apply the moisture evenly to the skin. Repeat this step at least three times until the skin looks like it can't accept more water. This will soften the skin and make it easier for us to weave the flowerpots.

Step 4: Transferring the Template
Now place the template on the previously selected location and tape it to the sides so that it does not move to the sides. Using a simple pencil, draw the lines printed on the tracing paper, pressing the pencil with medium force. Be careful and don't miss any line.

Step 5: Cutting
Now remove the template from the leather to see how the design has been transferred to the surface of the leather. Using a utility knife, make cuts along the lines.
For convenience, you can first cut a circle along the outer contour. The cuts should be clearly along the drawn lines.


Step 6. Coloring
Note: This step is optional and depends on the color you want and the materials you have on hand. In our case, we painted the leather dark brown.
After the skin has dried from moisture (at least one hour), apply the desired dye. Apply the paint using a sponge (wearing gloves) until the desired effect is achieved.

As the leather dries, pull it back a little at a time to create a voluminous shape. You will start to see the skin deforming, continue pulling and stretching it to create the shape of the pot for the pot as it should be when finished.

Step 8: Hanging
- After that, how the skin dries completely, and the shape of the planter is formed, punch four holes in the top to thread the ropes through.
- You should place them evenly, at the same distance from each other, so that the hanging flower pot does not tilt in one direction.
- Take four ropes (regular or leather) and tie a knot on each of them, tightening it tightly at the end.


Step 9: Decoration and installation
Add tassels, beads, rivets- everything you need to achieve the desired style in the end. At the top of the hanging cords, gather all four of them together and tie them into a knot.

You can use this knot to hook onto a ceiling hook and/or ring. See if the length of the pendant suits you; if necessary, tie the knot at a different level.


Hanging planter made from straws
This pot will suit the interior with an innovative touch. Transform and complement your home decor with these neon straws and thread stands. Moreover, even 15 minutes will be enough for you!

Necessary materials:
- Neon threads
- neon straws (8 pieces per pot)
- flower pots for indoor flowers (we used white ones made of melamine)
- house plants (succulents)
- scissors

How to weave - instructions:

Step 1: Cutting the threads
Cut eight pieces of neon cord, each 90-150 cm long, depending on how close to the ceiling you want to place the pots.
Step 2: Making a Knot
Take the newly cut strands together and tie a knot at one end, creating a tassel from the small excess cord at one end.
Step 3: Divide the threads into sections
Lay out the rope into four sections (like a cross shape). That is, two ropes in each section.
Step 4: Cutting the Straws

- Cut off the small part of the straws that is separated by the spring. Then cut it in half. Take eight of these small pieces and thread a thread into each of them.
- Push the straws towards the center(knot) and make a knot on every two threads (in sections). This is what it will look like:
- Arrange the threads again in a cross shape, two threads per section. Only now, to form a section, take one thread at a time from the previously adjacent sections.
- Cut the straws into pieces (16 total needed), each of which should be the size of a part of a straw, which is separated by a spring.
- In each of Thread 8 pieces of straws and make knots on the threads from one section.
- Similarly, arrange 2 threads in a cross shape, one from adjacent sections.
Add the third and final set of straws to the threads and tie adjacent threads (similar to the previous set).
Step 5: Hanging
All that remains is to hang the flowerpot and insert a flowerpot with indoor flowers into it. Make several pieces, then together they will create a beautiful composition.

And neon straws will also glow a little at night, which will look very original.
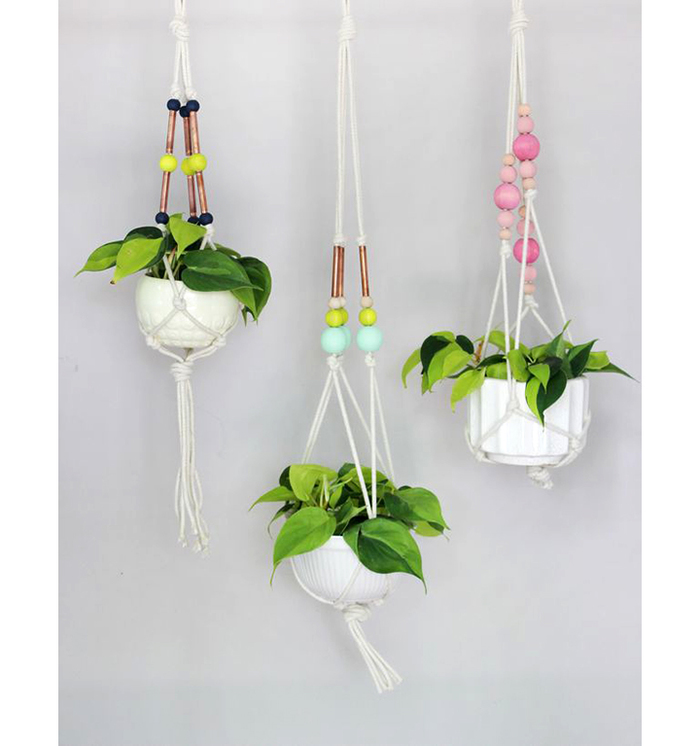
Macrame flower pots
The macrame technique probably has the most variations in making pots. They can be either very simple, which can be done in literally 10-15 minutes with your own hands, or complex with many hours of work. Practice weaving first on easy ones, hone your skills, and then improve.


Master class: Do-it-yourself macrame weaving
Macrame is back in fashion again, as is handicrafts in general. In this master class you will learn how to make a hanging plant pot with your own hands using this technique. There is nothing complicated, just follow the instructions and you will succeed!

Necessary materials:
- 3 cords 2.5 m long and 0.5 cm thick
- Metal ring with a diameter of 2.5-3 cm
- Hook (on the wall, slot) to hold the macrame while working
- Scissors and colored rope
- Glass pot in the shape of a ball with a diameter of 20 cm
- Drainage stones and soil
- Houseplants that climb (eg Stephanotis)
- Decorative moss (optional)
Step-by-step instruction:

Step 1: Thread the ropes into the ring
Pull all three ropes through the metal ring until the ring is in the middle of the ropes. Thus, you now have six ropes to work with, each 1.25 m long.
Step 2: Making a Knot
- Of all tie a knot with six ropes right next to the ring. Make it as tight as possible; to do this, after forming the knot, pull each rope separately.
- Hang the ring on a hook (if there is no hook, then use a separate small rope to tie it to a cabinet handle or something like that, the main thing is to secure it). This will allow you to use both hands while working.
Step 3: Divide the cords into groups
- Separate the cords into three groups, two in each. Tie a knot in each pair 45cm below the ring. You will have three knots at the same level, make sure they are tight.
- Take one rope from two adjacent pairs and tie them together approximately 12 cm below the previous node.
Repeat the previous step with the remaining ropes so that they are all tied together. This will create a zigzag pattern between the cords.
Step 4: End Node
- Approximately 12 -15 cm below the second set of knots, gather all six ropes together to make one large end knot. Pull each cord individually to make the knot as tight as possible.
- Look what you need to leave the length and cut the ropes to the required size.
- Wrap colorful threads around the rope in several places, creating blocks several centimeters long. This stage is decorative and is performed at will. Now the macrame pendant is ready and you can place the pot in it.
Step 5: Planting indoor flowers
Place drainage stones in the bottom of the glass pot to create a layer about 2.5 cm high. Fill the rest of the bowl with soil.

- Remove the plant from the temporary pot and place it in a glass container. Apply water and press down on the soil to compact it. You can place decorative moss on top of the soil., optional.
- Place the glass bowl with the flower over the lowest node and spread the ropes to the sides to secure well.
- Straighten the plant if it gets tangled in the strings. Hang it and admire the beauty of the plant and your own product.

Macrame patterns for flowerpots
Here are a few more patterns for those who want to master macrame weaving. They are very simple - suitable even for beginners. We look at the photo and repeat. Clothesline or thin twine are perfect materials. The minimum consumption for a hanging planter is 10 meters of rope.

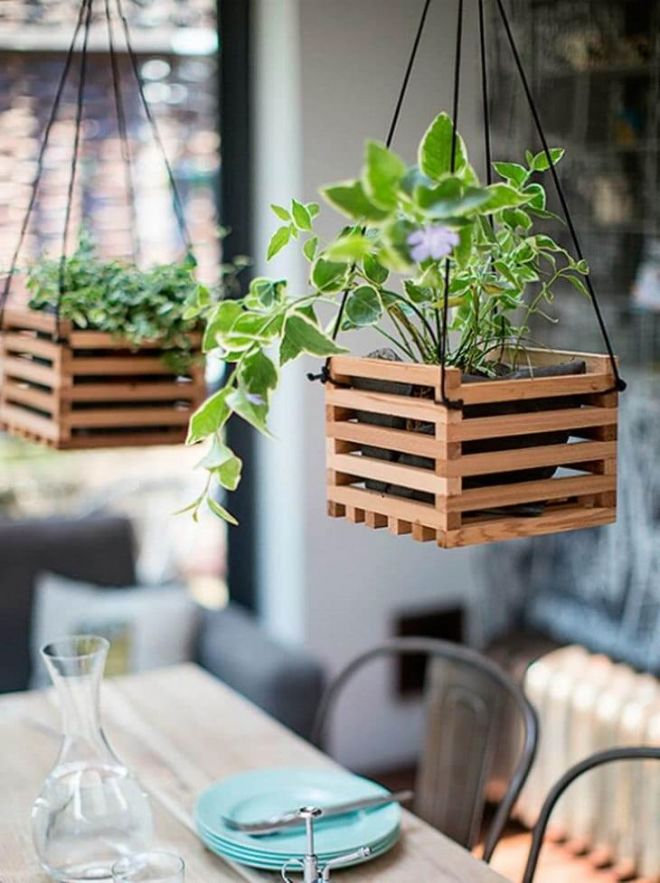
Wooden flower pots
Wood also provides a fairly wide range of actions, various shapes and colors. Choose what you like best and create.


Master class: hanging wooden planter
This hanging planter will wonderfully complement your home interior. It’s quick and easy to do, and it won’t cost you a lot of money on materials either. The optimal solution for an apartment.

Necessary materials:
- Wooden plate and saw
- House plants and flowerpots
- Rope and metal ring
- Drill and sandpaper
- Paint and brush
Step-by-step manufacturing scheme:
Step 1: Making Wooden Squares

Think about how many tiers your flower stand will have ( there are 4 here, but you can do more or less ). Select the houseplants you want to place there.
Based on all this, cut out the required number of squares from the wooden plate.
- To do this, turn the pot upside down and place it on a plate, circle it and leave it on the sides approximately 5 cm each, thus determining the size of the square.
- Using a saw make squares.
Step 2: Making holes for the pots

- You already have a circle drawn on the tree from the top of the pot, now you need to draw another one in the middle so that their centers coincide, but the diameter of the new one is about 1-2 cm smaller.
- This value depends on how quickly the pot you will place in the stand increases towards the top, and also you want so that the wooden square is almost at the very top, or in the center of the pot.
- You can take another pot that is the same size as the stencil and trace it.

- Use a jigsaw to cut out this new circle. For convenience, you can first make a hole with a drill and, starting from there, work with a jigsaw.
- The pots should now fit inside the squares.
Step 3: Hanging Holes

At the corners of the squares you need to make holes for the rope so that they can be hung. To do this use drill with a diameter of up to 1 cm.
Step 4: Paint the tree

By using sandpaper remove roughness and unevenness that formed after sawing and drilling. Now the wood can be painted or simply treated with an antiseptic. In this case, dark brown paint was used.
Step 5: Paint the pots

Pots can also be painted, if desired. Casual strokes of white paint look good on plain clay pots. You can skip this step. 
Step 6: Putting it all together
In order to fasten the wooden squares together, we need a thick rope: cut 4 ropes of 180 cm each (for the given number of tiers). Stretch one rope into each corner hole of one of the squares and tie a knot at the end, this will be the lower part of the structure.

Tie one more on each rope knot at 25-30 cm higher than the previous one and thread the ropes into the holes of the next square. Check that everything is level and the second tier is clearly horizontal above the first, adjust the knots if necessary. The second tier is ready. Repeat these steps with the remaining tiers. 
Step 7: Plant the Plants
A practical advantage of such a hanging stand is that the water that can flow down after watering from top plant, will drip onto the bottom one. So a stand for the pot is needed only on the lowest tier (if you use it outdoors, you can do without stands at all).
You can also place coffee filters or similar water-absorbing materials in the bottom of the pots, this way the water can drain out but the soil won't fall out through the hole.
TIP: To prevent the bottom pot from falling off the stand if someone accidentally snags the string, superglue it to the pot.
Step 8: Transplant the plants into prepared pots.
If you glue the base of the lower pot before inserting it into the wooden square, it will look like the photo below. If you want the bottom pot to be inserted into the tree in the same way as the others, then first replant the plants, insert the pots into the holes in the tree, and only then glue the stand to the bottom one. 
Step 9: Hanging
- To hang this structure, thread the ropes through a metal ring and tie a knot, or bend them over and tie another thin rope around them.
- Adjust the rope so that all tiers are horizontal and level.
This stand is good, just don’t forget that flowers need enough light.
A hanging stand is a wonderful solution for those who love flowers, but do not have enough space to display them.

Pot made of copper pipes
The manufacturing principle is similar to that described in the previous master class, only here copper tubes are used (and they are folded into a slightly different pattern). Of course, these materials will be more expensive than straws, and cutting them is not so fast, but in general there is no difficulty, and it turns out beautifully and with high quality. 
TIP: If desired, copper tubes can be replaced with plastic straws for cocktails
Necessary materials:
- 2 m copper tube approximately 3 mm in diameter
- Mini pipe cutter
- Strong thread or fishing line
- Leather string (length depends on how high you want to hang the pot)
- small pot
- Plant

Step by step weaving:
Step 1: Cutting the tubes
You need to cut the tube into the following pieces: 20 pieces 4 cm long and 5 pieces 24 cm long. Cut the long pieces first, and then the small ones, it will be more convenient. Use a measuring tape for measurements.

Step 2: Start folding the tubes
Tie a knot at one end of the fishing line, and thread the other through 5 small pieces of tube so that you get a pentagon (that is, you need to pass the fishing line through the first piece of tube twice).

Step 3: Continue making pentagons from small tubes

- Thread the line through 4 tubes of the same size, and then through the tube of the previously formed pentagon. Now the fishing line is in the tube connecting the pentagons, and you need to bring it through the upper tubes of the newly obtained pentagon to its left edge.
- Don't worry if they don't look perfect, everything will straighten out when you hang and place the pot.
- Then do the same in the same way 2 more pentagons, there should be 4 pieces in total, and they should be located as in the photo below.
- Now bring the line through the tubes to the bottom of the outer pentagon and put the tube on it. Next, thread the line through one edge of the other outermost pentagon.


This is what you should get:
Pass the line through 2 more tubes, and then through the edge of the pentagon, as in the photo below. It should look like something like a flower, or rather like this:


Step 4: String Long Tubes


- Bring the line to one of the highest points of the structure (between the two upper tubes of one of the pentagons). Now the fishing line needs to be threaded through a long tube.
- Thread the line through another long tube, and then direct it to the next highest point of the pentagon structure (any one, not necessarily the adjacent one).

- Thread the wire through the 2 small tubes to reach the next highest point. Now pass through another long tube, the line will come out to the junction of the long tubes, return the line back down through one of the previous two long tubes. Attach the fourth tube in the same way.
- Now all you have to do is attach the last tube, but first place the pot in the middle of the structure, otherwise later it will not fit between the tubes.
- Now attach the last tube. This is what you should get:


Step 5: Attach the leather lace
Cut about 30cm of leather cord and attach it to the connecting point of the long tubes. You can tie a knot, but here they used it for aesthetics hot glue, securing it to the neatly folded end of the cord. This is what it looks like:


To prevent the gluing area from being visible, cut another small piece of cord, secure it with hot glue, and wrap it around the cord by which we will hang it.
Trim excess fishing line and cord. And the last step: plant your favorite indoor plants!
![]()

Where to hang the pots
Moreover, in the summer, plants can be placed both inside and outside the house, but since it’s cold now, we’ll focus on indoor ones. You can green any room in your apartment, kitchen or hallway, the main thing is to take into account the needs of the plants and the right amount of light. In fact, each version of a hanging planter can be placed in any room of the apartment, so it is only your design decision.
Of course, you can just put a flower pot on the windowsill or bedside table, and it will already look good. But if you try a little more, you can decorate appearance pots, and more optimally use the space of the apartment, at the same time arranging the plants and not taking up extra space with them (if hanging planters).
Above the workplace
Here, a hanging planter will not take up much space, especially since we always try to place the work table closer to the window, which will really appeal to indoor plants.


In the bedroom
Placing plants in the bedroom is not only beautiful, but also very useful. They enrich the room with oxygen. How nice it is to wake up among greenery. Try hanging a pot of plants in your bedroom.


In the kitchen
This perfect option, you will never snag or overturn a flowerpot. The flowerpot looks very homey in the kitchen!


On the balcony or in the chill-out area
If the area of your apartment allows, then with the help of hanging flower pots, you can green up an entire room and make a mini-garden. But spruce does not have enough square footage - you can arrange a comfortable seating area on the balcony.


Pot ideas from scrap materials
If you show your imagination, you can make a hanging plant pot from absolutely any available materials. Starting from old cans, bottles to unnecessary towels and T-shirts.
From beads
If you have old beads lying around and you don’t know what to do with them, then here’s one option to solve the problem - decorate the pots.


From baskets and pots
Such pots can be used for a single pot or for several at once. Such wicker baskets will probably be found in many homes. They often lie idle, and in vain they will make an excellent hanging for flowers.


Flowerpots in high-tech style
Modern pendants made of concrete or brass will fit into modern style apartments.


From bottles
Probably the cheapest of all methods, but it looks no worse than the others. We collect empty plastic and glass bottles and make original flower pots.


From moss and shells
Many people at home have shells brought from the seas, and if you drill a small hole and plant small succulents there, you can create a mini-pots. The main thing is in quantity, 3-8 pieces will create an excellent hanging garden.


It is known that little things made by hand give a home a special charm; many can tell about the tastes, habits and hobbies of the owner. And one of these individual features of your home can be flower pots made by you yourself.
In addition, each of your green pets has its own character, requirements for planting and care conditions, and a pot made according to “ individual project» is able to fully satisfy both your aesthetic tastes and the urgent needs of the plant.
Making your own flower pots
Clay pots
Clay is considered traditional material for making flower pots. And, of course, you can buy a clay pot in a store without any problems.
But it's possible make it yourself, even without a pottery wheel at hand.
To make it you will need:
- clay;
- oven for firing the finished product.
Before starting work, knead the clay thoroughly until smooth.
Separating a small part from the total mass, form a ball and, flattening it, give the shape of a round disk. You have the base of the pot ready.
Form a rope with a diameter of about 0.5 cm and a length equal to the diameter of the bottom. Strengthen the rope on the bottom and start making the next one. This way you will form a clay pot of the size you need.
Leave the finished work to dry for a couple of days, after which the product must be fired.
 Don't know how to do it correctly? We'll tell you!
Basic conditions proper reproduction hyacinths are described, do not neglect them if you want to grow a healthy and beautiful plant.
Cement pot
This product will not only be original, but also durable.
To work you will need:
- several bricks;
- cement;
- sand;
- two plastic containers, different in volume;
- In addition, you will need a hammer drill and an old basin or pan in which you will mix the solution.
 Prepared Grease clean containers with oil(can be plant-based): smaller in volume - on the outside, larger - on the inside. This way you will protect them from excessive sticking of the solution.
Prepare a mixture of sand, cement and water. Place the prepared solution in a container bigger size, and place a smaller piece inside. The greater the difference between the volumes of these vessels, the thicker the walls of your pot will be.
Place bricks or other weights inside a small container. The cement mortar must dry within 2 days. After this, cut the plastic containers and free your product from them.
In this way you can make quite large flowerpots. Small pots made in this way will look rather cumbersome, but, nevertheless, also original.
If desired, such a pot can be painted after drying. acrylic paints or decorate in another way.
Plaster pot

The procedure for making a pot from gypsum is similar to cement technology. Only other ingredients will be needed:
- gypsum;
- water;
- two plastic containers of different sizes.
We take a larger container, lubricate the inside with oil, place a smaller container inside, lubricated with oil on the outside, set the desired level and fill in the plaster, having previously made a solution in a 2:1 ratio.
To have a more complete idea, I recommend watching the video of this process below; in addition, at the end of the video they will show how to decorate such a pot using the decoupage technique.
Wicker pot
 If you are a fan of eco-style, you can try to weave a flower pot from twigs. The process is quite labor-intensive, but the result will undoubtedly please you.
You'll need:
- twigs, preferably even;
- a piece of burlap;
- strong twine;
- glue;
- base container in the form of a cylinder.
Trim the twigs so that their length is slightly longer than the height of the base container.
Use twine to tie the twigs together to create a solid “canvas” that you could use to wrap the cylindrical base. Cover the base with a piece of burlap, and place the resulting structure of twigs on top. Secure with twine. If instead of twine you take a bright jute cord, your product will turn out more elegant.
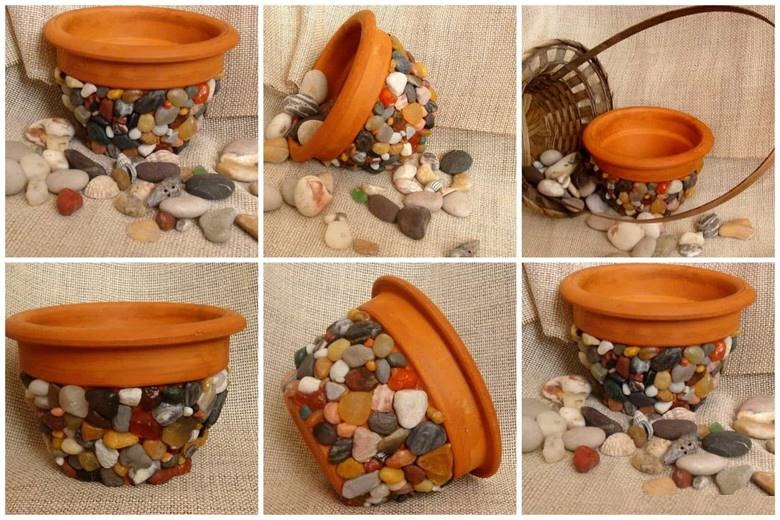
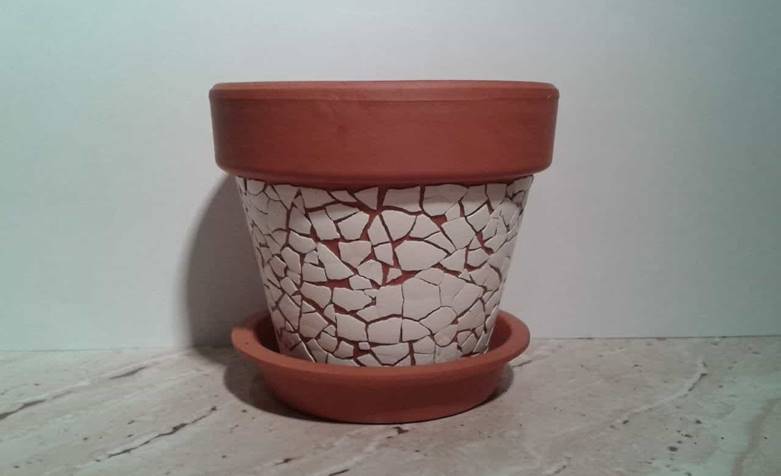
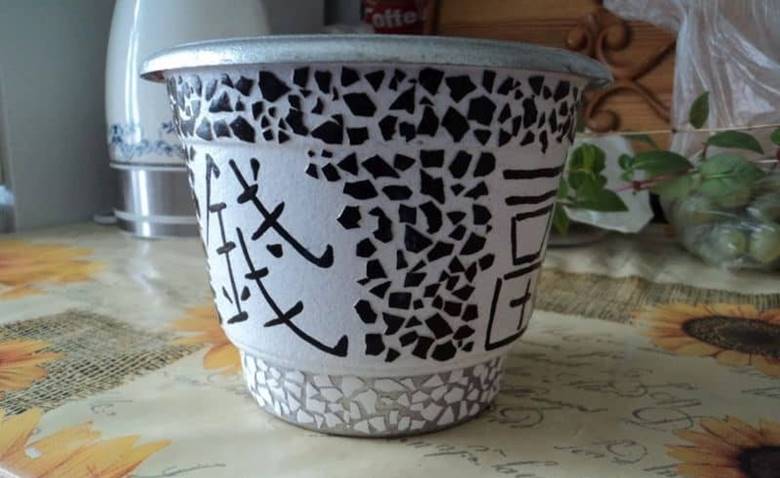
Mosaic pot
 Pots made using the mosaic technique are beautiful and original..
As a “mosaic” you can use small pebbles, shells, fragments of porcelain or dishes, or colored glass.
In this way, you can decorate both small pots and large vases.
To work, in addition to the “mosaic”, you will need:
- tin base (this can be either an empty tin can or a tin bucket);
- plaster;
- mounting mesh;
- grout for tiles.
Cover the tin with plaster, and then wrap it with mounting mesh, “drowning” it into the plaster mixture. Next, lay out the entire surface of the future pot (excluding the bottom) with the prepared “mosaic”. After this, leave your product to dry completely.
Finally, treat the surface with tile grout. to make the pot smooth and eliminate cracks and the gaps between the pieces of the “mosaic”.
Remove any remaining grout from the surface with a soft cloth.
Pot made from a piece of wood
 Original floor flowerpot can come from a small old stump, and from a piece of a rather thick branch you can make a smaller pot.
To make such a “house for flowers,” remove the core from the tree, clean the inside and sand it.
If desired, you can free the stump from the bark or leave it in its “natural” form. In any case, coat the top of the product with several layers of wood varnish.
After complete drying new pot can be used for its intended purpose.
Coconut shell planter
 Coconut shells serve as an excellent container for plants that do not need frequent watering.
Hanging plants will look good in it.
Making such a design is quite simple: cut a coconut in half, extract the flesh, then drill holes in the bottom for drainage, and holes at the edges in order to thread a cord or chain through them.
Place expanded clay on the bottom, and place the substrate on top - the pot is ready!
Felt pot
 Felt products are now at the height of fashion. Why not give your favorite flowers a felt “nest”?
Take pieces of felt, ready-made or felted yourself, cut out the details of the future pot and sew them together! In such an unusual pot, plants will feel very comfortable.
Mini cactus garden
 Unusual containers for planting cacti and other slow-growing types of indoor plants can be made from wine corks.
To do this, the core of natural cork is removed with a knife. The mini-pot is filled with soil.
On one side, using a heat gun, a magnet is attached to it, powerful enough to hold the weight of the “pot” with the plant.
Such mini-containers can be attached to any metal surface, for example, to the refrigerator door, forming entire flower arrangements.
Other ideas for unusual homemade pots
- If you are a fan of high-tech style and you still have unnecessary computer floppy disks, you can build original flower pots from them. By the way, they are perfect for growing violets and other small plants.
- By gluing together 5 square mirrors of the same size or 5 ceramic tiles, you will receive an easy-to-make, but stylish and original flower pot.
- Pots can be made from old vinyl records. If a vinyl disc is heated, it becomes soft and pliable, easily taking on the most unimaginable shapes.
Using old things
Sometimes The most unexpected objects can serve as flower pots. Thus, porcelain, earthenware and earthenware can turn into excellent containers for planting indoor plants. Cups, deep salad bowls, teapots with flowers planted in them will enliven a country or Provence style interior.
Enameled dishes are also suitable for planting flowers. But this is more of an option for a country house.
By the way, if you couldn’t find a suitable pot for bonsai, an elegant salad bowl is perfect for this. You just need to carefully make drainage holes in the bottom using a drill.
Sometimes the most unexpected things can turn into flower pots. For example, an old cosmetic bag can also serve as a container for planting flowers.
Decorating finished flower pots. How to decorate a pot with your own hands?
To create a flower pot with an unusual design, you don’t have to make it from scratch. You can take ordinary standard pots as a basis and decorate it yourself and according to your own taste.
By painting a clay pot with acrylic paints and varnishing it, you will get a real designer item. By the way, such work can be entrusted to a child - and the image on finished product will delight you with its sweet spontaneity.
You can decorate ordinary plastic pots by simply covering them with bright scraps of fabric. Or you can crochet “clothes” for a standard pot - such containers will add special coziness to your home.
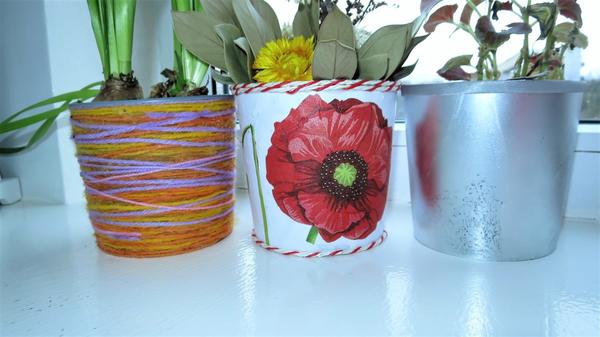
 By covering the pot completely or partially with braid, twine, lace or simply bright threads, by winding them around the container, you will get an original and stylish decoration for your home.
You can decorate an ordinary pot with buttons, shells, coffee beans, cereals or beads.
Even eggshells are used to decorate pots. It must first be treated with a soda solution and dried. The prepared shell is glued to the surface of the pot using PVA glue, gently pressing down in the process so that it cracks. Next, the surface of the pot is covered with ink, which fills the voids between the pieces of shells. After this, the surface of the pot is wiped with a cloth and varnished.
Regular plastic pot can be decorated using decoupage technique using PVA glue and a paper napkin with a design you like. The design is cut out and glued to the surface of the pot, carefully leveling it so that wrinkles do not form. After drying, the finished picture is coated with varnish.
Other photo ideas for flower pot design


Using the tips above, you can create a truly unique pot at home, as well as decorate and decorate it with your own hands.