A bread box made of wood is an environmentally friendly item that allows you to keep bread soft for a long period of time. Moreover, this beautiful item decor that complements the chosen kitchen design. If you creative person and love filling your home with original, handmade items, you should definitely make your own bread bin!

Initial stage of work: Preparation
First you need to prepare the necessary tools and materials, as well as make drawings in accordance with the dimensions, and think over a way to open the door on the bread bin. The first step is to decide what material to make the case from.
It could be: Tree. Bamboo. Birch bark. Plywood.

On a note! All of these materials are capable of regulating humidity inside and allowing air to pass through. Sometimes they are combined to create one product.

To make fastenings, you need to stock up on screws and wood glue. The choice of fittings depends on the method of opening the door.
Bread storage containers are:
- simple;
- carved;
- with curtain-blinds


Important! To make the product, you will need a carpentry kit.
Making a bread box from wood yourself
To make a wood product, choose varieties such as linden, birch or ash. Conifers have a pungent odor that will be transferred to the bread. For manufacturing, you will need to complete the following stages of work:
Cut out all parts from wood in accordance with the drawing. Required condition is the tight connection of all elements with each other.
Product dimensions may vary. The parts can be fastened together with screws, furniture nails, or use wood glue.
If you have experience in carpentry, then you can use a tenon to create a fastener.
To improve the joining, the joints are coated with wood glue.
Don't forget to sand the cut areas with sandpaper.
The door is made separately.
Most often this is a curtain that is made of small slats.
To ensure the movement of the curtain, a groove is made on the body along which the door moves.
The structure is coated with a special varnish or stain.

On a note! You can make a curtain door that opens outward. It is also made from narrow planks, instead of which a bamboo mat is sometimes used.

Natural material ensures environmental friendliness and is combined with different interior design styles.
Bamboo bread bins are another simple option.
This material can be used as a decoration for a wooden product or made from it into small bread bins. The main advantage will be the speed of completion of the work. It only takes you a few hours to create a bread box!
To carry out the work you need: Bamboo napkins. Thick fabric. Durable cardboard. Scissors. Self-adhesive. Pencil. Door fittings.


To get the job done quickly, you should follow some recommendations:
— dimensions are limited by the size of the napkins; the body of the structure is made of cardboard;
- on one side, the side walls are made rounded - this allows the door to fit tightly and move without problems; - all parts are connected using glue;
— the outside and inside of the structure is covered with self-adhesive, which will provide the product with additional strength;
- at the final stage, finishing with bamboo occurs. To do this, cut the napkin in two: the first part is suitable for the door, the second for the bottom.


Decorating options Tip!
You can make a version of the product with several compartments. This production makes it possible to conveniently use and sort flour and bakery products. The separator is made of slats or a thin board.
Handmade bread bins are distinguished by their individuality and original design, and all this thanks to exclusive decorative methods. Several centuries ago, rich decorative elements using veneer, carving, engraving and painting. In aristocratic houses one could find boxes with monograms. In poor houses, items made of birch bark were used. Peasants used wicker options for storing bread.


To create a beautiful and individual decoration, you can choose different methods:
— Wood carving allows you to create relief compositions from ornaments, patterns or images. You can choose natural motifs and create them using milling.
— Decoupage is a technique of pasting napkins with bright, beautiful motifs. This design option is well suited for wooden products. The surface needs to be made smooth, then the napkin will repeat the silhouette of the structure without flaws. Newspaper clippings or postcards also work.
 On a note! To get inspired by ideas for creating a bread box, you can watch a variety of photos or videos with design options. Handmade original design will look attractive in different styles interior and will last for a long time!
Since ancient times, it has been customary to store bread in wooden boxes, which people began to call bread bins. Thanks to this device, the baked goods remained fresh and did not go stale for a long time. Modern bread bins perform the same functions as their predecessors, but now they are more functional and easy to use.
Now you can buy it at any hardware store this device. But a do-it-yourself wooden bread box will become a real decoration for the interior of any kitchen and will retain the warmth of the master’s hands. Where to start and what material will you need?
You need to prepare first before starting the manufacturing process. Stock up on everything necessary tools and materials, prepare drawings of the future product in accordance with the dimensions, as well as the method of operation of the door. You can even make an approximate model if such work is being carried out for the first time. The design is thought out last.
First you need to choose the material from which the case will be made. A homemade bread box can be made from:
- Plywood
- Trees
- Bamboo
- Birch bark

Any of these materials perfectly allows air to pass through and regulates moisture inside the bread box - they are often combined in one product. Thanks to these properties of wood, bread retains its taste and smell for a long time. Small screws and wood glue are used for fastenings and connections. Depending on how the door will open, you may need small hinges and a handle. Bread bins come in several types depending on the door design methods:
- Simple
- carved
- Curtain blinds

For execution suitable for work standard carpenter's kit. The surface finish of a product can be a wound - it is determined by the design, and accordingly Decoration Materials for covering.
Making a wooden bread box with your own hands is quite simple. It is worth considering that ideal option Linden, ash and birch will be used for this. Pine and spruce have too strong a smell that will absorb the bread. The manufacturing process itself can be divided into the following stages:
- According to the drawing, all the elements that should fit tightly together are cut out of wood. The sizes can be arbitrary. An example of parameters is shown in the figure.
- The parts can be connected with screws, furniture nails or wood glue. More skilled craftsmen use tenon joints. Spikes form on some parts, and notches form on others.
- The seams at the joints are coated with glue for better connection. In this case, all connections must be carefully processed. This is done using sandpaper.
- At the end the door is made. A modern wooden bread bin is usually equipped with a curtain door, which is made of thin slats.
- In order for the curtain door to move, you need to make a groove inside the body of the product, along which this element will move.

You can make a simpler version of the door. In this case, the curtain will fold outward. It is also made from thin strips. Often the slats are replaced with a bamboo mat, which is stitched with strong thread.
In any case, such bread bins will be quite spacious and functional. Thanks to the material, the product is completely environmentally friendly and will suit any interior style. The surface can be opened with wood varnish, having previously painted it with a pattern. Those who do carpentry can decorate the body with wood carvings.
Plywood, as an analogue of wood
A cheaper analogue of wood is plywood. A do-it-yourself plywood bread box is made according to the same principle as a wooden one. The main thing is to draw a sketch of the future product and cut everything out efficiently constituent elements. Plywood is difficult to process as the edges can flake, so you need to be very careful. To work you will need the following tools:
- Jigsaw for cutting
- The drill will form holes to connect the parts
- The grinding machine is designed for processing saw cuts

The last step is assembly. The figure shows the simplest example of this procedure.

The body elements can be connected using glue, screws and grooves. The hinges for fastening the door are installed on the outside. At the end, general grinding is done, and then the surface is decorated. The housing must have holes for ventilation.
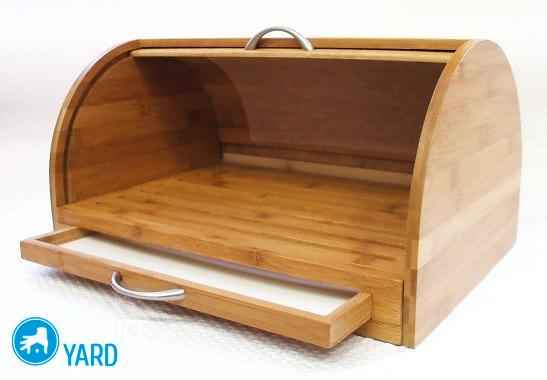
Bamboo bread bins
Bamboo material is not only a decoration for finishing the body finished product. Craftsmen often make small bread bins from bamboo napkins. Such a product will be made over the course of several hours, not days - this is the main advantage.
To work you will need:
- Bamboo napkin
- Cardboard
- Self-adhesive
- Scissors
- Textile
- Pencil for markings
- Decorative wooden handle

The dimensions of the future product are determined by the parameters of the napkin. The body is made of cardboard. The side walls on one side should be rounded. This is done to ensure that the door closes smoothly and fits tightly to the structure.
The parts are glued together using glue. On top, from the inside, the made body is covered with self-adhesive tape. Thanks to this technique, the cardboard will become much stronger. The last stage will be finishing with bamboo. Cut the napkin into two parts. The first one corresponds in size to the bottom, and the second one will be the door. Your own finishing option will make the product unique.
Birch bark bread box

Many craftsmen are interested in: how to make a bread box from birch bark? This material is very soft and pliable for weaving. It is difficult to buy this material, but you can make it yourself by cutting off the top layer of birch bark.

Since the body of the product is formed thanks to weaving, the bread box in its own way appearance resembles a box with a lid. Over time, the birch bark material hardens.
Weaving methods:
- Rug
- Angular

In this case, you need to monitor the formation of the edges of the panels - they should be smooth and tightly woven. To do this, they use several basic tricks, adding stripes for rounding.

The fabric for the lid and bottom is woven of the same size, and the same applies to the side sections. The connection is a strip of birch bark, which is woven into the gaps of the panels. A DIY birch bark bread box will make your kitchen interior more unique and authentic.

All photos from the article
Almost anyone can make a bread box out of plywood with their own hands, since this does not require expensive equipment. You can get by with a simple tool and a few tips, which we will describe in our article. The most important thing is to be careful and use quality material, since the structure will be used for storing food.

What you need for work
If you decide to make a bread box, then first of all you will need to have on hand following materials and accessories:
| Plywood | This is the main material, the quality of which is very demanding; it is best to choose the 1/1 grade, in which both sides are attractive and reliable. You also need to choose the ideal sanded sheets, then you will have to process the surfaces much less, which will significantly simplify and speed up the work process, their price is higher, but the difference is not so great |
| Accessories | Here you can, which are used when the doors are made in the form of latches, or curtains, if the door will be attached to them. Handles are also used, which should be not only comfortable, but also beautiful. As for fasteners, it is best to use 3 mm thick self-tapping screws, and additionally strengthen all connections with wood glue |
| Tool | Either a hand or power tool is used to cut the material. Do not forget about the need to grind the ends; for this, ordinary sandpaper with different grain sizes is used |
| Protective compounds | The wooden surface must be protected from moisture and contamination by applying protective coating. Since we will be making a bread box, it is necessary to use either special oils or food varnishes to exclude Negative influence on human health |
Important!
To make a high-quality product, you need to take very careful measurements and mark out all the elements.
In this work you cannot do without a tape measure, a ruler, a square and a carpenter's pencil.

Process description
We will tell you how to properly prepare the material, how to choose it, and what nuances you should pay close attention to. Every detail is important here, so you should carefully follow all recommendations.
Preparatory stage
This stage includes whole line important actions:
- First you need to choose a high-quality manufacturing material; it is better to use plywood with a thickness of about 10 mm, then the bread box will be durable and can withstand even significant loads. We recommend using options with top layer from birch veneer, since this wood is harder and does not emit resins, unlike conifers;

- You also need to make drawings of the bread box with your own hands from plywood, perfect accuracy is not needed here, the most important thing is to determine all the dimensions so that you can clearly navigate the work process and avoid mistakes. Can be used ready-made options from the Internet or specialized literature, finding them will not be difficult, and we will tell you about one interesting solution;

- Based on the sketch, the dimensions of all elements are determined, and then it is necessary to draw a sheet of plywood. Arrange each element wisely to use material as economically and efficiently as possible.
Cutting and assembly
The main work begins after marking, there is nothing complicated about it, however, the instructions presented in this chapter will help you understand the process even better:
- First of all, you need to cut all the elements, for this you use either a jigsaw or hand saw with small teeth. The material is very easily damaged when sawing, so along all lines it is necessary to apply a mixture of wood glue and water in a ratio of 1:2 and wait until the composition dries;
Important!
Working hand tools, do not press too hard, this will achieve maximum .

- After cutting, you need to carefully process all ends, for this, ordinary sandpaper is enough, the surfaces are leveled and rounded to make the elements more attractive;
- Grooves for doors are cut in the sides, which simultaneously serve as boards for cutting bread. In the middle there is a partition on which there is a block with grooves. You can do it simpler: do not make a partition, but attach a solid door to the curtains; the decision is up to you;
- Next, the elements are fastened together, it is important to drill small-diameter holes before screwing in the screws to avoid cracks in the material. It is better to choose thinner fasteners so that they are unnoticeable on the finished product; the caps are recessed and then sealed with putty to match the color of the surface;
- Then you need to attach the doors if they are installed on curtains. Also, don’t forget about the handles; with their help, using the bread box will be much more convenient. Lastly, a protective composition is applied to the surface.

Since ancient times, bread in our country has had a special place on the table. How many sayings have been made about it, how much work has been put into it? That is why Special attention given to the storage of this product.
Breadbox - then and now
Previously, so-called wooden boxes were in great demand. People said that if it is skillfully made, then bread in it retains its properties for seven days, remains fragrant and soft. The tree has a light, porous structure. Thanks to this, the humidity inside the box is perfectly regulated. Our ancestors decorated it beautifully, decorated it with carvings, and painted it with bright, elegant patterns. Today we call such a box a wooden bread box.
Today, there are craftsmen who independently make boxes from wood for storing bread. Of course, now the artists have developed more convenient designs than existed in the old days. The modern wooden bread box has a more compact shape, as it is designed for an ordinary family. After all, if earlier there were 10-15 people in a family, today it is mostly 3-4 people.
Of course, this product also has a significant disadvantage - it is quite difficult to wash. Wood absorbs moisture very easily and takes a long time to dry. Therefore, consider this issue carefully. When cleaning wooden bread box do not use sponges and rags that are too wet and leave them to dry in a warm place with open lid. Otherwise, you risk getting just a swollen piece of wood instead of a beautiful box for storing bread.
Is it possible to make it yourself?

Anyone who knows how to use it at least a little can make it themselves at home. Below we will describe several ways of how this can be done. General scheme remains unchanged, only the details change. However, before choosing one of them, you need to think about how much bread you plan to store.
A wooden bread box, made with your own hands, will bring you a lot of benefit and joy if you remember the main rule - the bread will remain soft much longer if the percentage inside it slowly changes. This depends on the filling of the wooden box: the more product there is, the slower the change humidity. But it’s also not worth filling it in completely. And the product will be wrinkled, and you won’t be able to close the lid.
If there are few people in the family, then an ordinary small bread bin will do, but if there are many, then it is best to make a bread bin consisting of two compartments. They can be stored different varieties of bread.
General manufacturing scheme

First of all you will need wooden plank. It is best to choose birch, oak, ash or linden. But you shouldn’t use pine, it is saturated with the smell of resin, and bread easily absorbs odors. Its thickness should be about ten millimeters. Also stock up on the slats from which the flexible lid will be made, a handle and fasteners.
We use the board to make two side walls, a top strip and a bottom. Semicircular grooves are made on the inside of the sides. We recommend using a router for this. For example, a finger cutter can be used, which must be installed on a drill. The cover will move along the grooves.
Our wooden bread box will also require a lid. It is made of thin thickness. The slats are either fastened with cord or glued to a fabric base.
Breadbox options

As we already said - general principle making a wooden bread box remains unchanged. What details might there be?
For example, using the same scheme, you can make a two-tier product, for big family. Secondly, the form itself can change. You can create round, rectangular, square, shaped wooden bread bins. The photo above shows you that the “box” shape can be any. Different ways doors can also be attached. It will not necessarily be a movable roof made of thin slats. It can be dense, attached with fasteners on the side walls and opening up or down. You can even do it completely unusual option- and the lid of your bread bin will open to the side, like a microwave oven door.
The inner surface of the product is not covered with anything, but the outside can be opened with varnish or linseed oil. Then it all depends on your imagination - many people decorate homemade bread bins with carvings, paintings, etc.
Afterword
Certainly, modern market offers us great amount bread bin options. They are made from plastic, metal, wood and other materials. It would seem, why bother and do everything yourself, when all this has long been stamped in factories and is freely sold in stores? But something made with your own hands always gives special warmth and comfort to the room.
As for bread boxes made of other materials, I would like to note that none of them have the qualities that a wooden bread box has. Consumer reviews indicate that only wood products retain the natural taste and softness of bread for a long time. And if you decide to make it yourself, you will be able to maintain the style you need, be confident in the quality of the materials used, and simply use your imagination.
Do-it-yourself wooden bread box is not such a popular item kitchen interior like an ordinary bread box. But, unlike its more modern “brothers” made of plastic, it looks solid and very beautiful, it is an environmentally friendly item, and the bread in it stays soft and fresh longer. And if you also like to experiment and are ready for further creativity in order to equip your home with items of your own unique production, we offer you in this article drawings and a master class on how to make a bread bin with your own hands.
Preparatory work
You must prepare the room before starting production. Stock up on everything necessary materials and tools, prepare drawings of the future product that will correspond to the dimensions, and also think about how the door of your bread bin will function. You can even make a rough example if this is the first time such work is being done. Last but not least, the design of the bread box is thought through.
First, you must decide on the material from which the case will be made. The bread box can be made from:
- Plywood;
- Bamboo;
- Trees;
- Birch bark.
Important! Any of the listed materials perfectly allows air to pass through and also regulates the level of moisture inside the bread box. Quite often they are combined in one product. It is thanks to these special properties of wood that bread retains its smell and taste for a long time.
Wooden bread box
Making a wooden bread box with your own hands is quite easy.
Important! You must definitely take into account that ideal material Ash, linden and birch will be used for this product. Spruce and pine have an extremely persistent odor, which will subsequently absorb the bread.
The manufacturing procedure itself can be immediately divided into several stages:
- According to the drawing, all elements that must fit tightly together are cut out of wood. Sizes may vary.
- All cut parts can be connected using screws, furniture nails or wood glue. More skilled craftsmen use a spike for connection. A spike is formed on one part, and a notch is formed on the other.
- The joints are coated with glue for a better connection. In this case, absolutely all connections must be thoroughly processed. This is done using ordinary sandpaper.
- At the end the doors are made. A modern wooden bread bin is usually equipped with a curtain-style door, which is made of thin slats.
- In order for the curtain door to move, make a groove inside the body within which the door will move.
- You can open the surface with varnish, but always with wood varnish, and not with nail or hair varnish, having previously painted it with a pattern.
Important! You can make a simpler version of the door. In this case, the curtain opens outward. It, like the previous version of the door, is made of slats of small height. Often the slats can be replaced with a bamboo mat that is held together with strong thread.
In any case, the bread bins will be incredibly spacious and also functional.
Important! Thanks to the material from which the product is made, the bread box is completely environmentally friendly and will suit all kinds of interior styles.
Bread bins made from bamboo
Bamboo material is not only a decoration for lining the body of the finished product. Quite often, some craftsmen make small bread boxes from bamboo napkins.
Important! Such a product will be manufactured within 2-3 hours, not days, and this is the main advantage.
To make such a bread box with your own hands, prepare the following tools and materials:
- Bamboo napkins;
- Cardboard;
- Self-adhesive;
- Textile;
- Scissors;
- Pencil for marking;
- Decorative handle made of wood.
 Helpful tips for making:
- The dimensions of the future product are limited solely by the parameters of the napkins.
- Make a body out of cardboard.
- On one side, the side walls must be rounded. This is done to ensure that the door closes without interference and adheres carefully to the structure.
- Glue all the parts together with glue.
- From above, from the inside, cover the finished body with self-adhesive tape. Thanks to it, your cardboard case will become much stronger.
- The last stage is finishing with bamboo. Cut the napkin into 2 parts. The first must correspond to the dimensions of the bottom, and the second to the door.
DIY open bread bin
To make a small, beautiful, convenient and original open bread bin that will decorate your table during lunch, stock up on the following materials.
Thick cardboard
You can take a box from a device and cut out a piece of the required size.
Flashy fabric
You should like the fabric and fit perfectly into the interior of your room where the bread bin will be located. The fabric will determine whether the DIY decor will be interesting.
Important! Take better linen and cotton. Linen is especially relevant for the simple reason that it is incredibly durable, natural, and bread crumbs will not get stuck in the middle of its threads. But if you take cotton, then this situation will occur.
Threads
You can also use bright threads if you want to make the seams stand out. In certain cases, the fabric is sewn with thick threads and in a chaotic manner to make it more noticeable.
Important! However, in order to constantly store bread, such a product may not be suitable. Even if you cover the bread with a towel for longer than one night, it will not last - it will simply begin to dry out. That is why it is more profitable to make a small open bread bin.
- To ensure that the interior of your kitchen does not contain extremely flashy and large-scale products, the bread bin must be made small.
- In no case should it resemble a container or a tray with high sides, which is why 20-25 cm in diameter should be enough.
Making a bread box:
- Cut out a square or rectangle from one sheet of cardboard approximately 20x20 cm plus approximately 5 cm for the height of your future bread box.
- Using a pencil, mark on the inside of your future bread box where the sides and bottom bend. Take a ruler or knife and make curves. This must be done extremely carefully so that the cardboard gets a minimum number of cracks during the work.
Cover for bread box
A particularly interesting method of sewing is that even at the stage of forming the cardboard form, you can make cuts along all the side sides right down to the very bottom. And for all the parts, make a separate case, for what.