Beautiful aprons It’s very easy to make one for the kitchen with your own hands. Sew such an apron with your own hands, or kitchen apron, the simplest, but at the same time beautiful style, even a girl - a primary school student - can make it ready high school. That is why in technology lessons in the third to fifth grades, children (girls, and, in the case of joint technology lessons, boys) are often given a simple task: to sew an apron (apron) for the kitchen with their own hands.
In contact with
Sometimes elementary school students take as a basis a ready-made pattern for an apron (apron) model, and sometimes children receive a more difficult task: to make a pattern for an apron (apron) for the kitchen with their own hands, using photos of patterns on the Internet and specialized literature as a basis. Typically, elementary school students do an excellent job with the task of “sewing with your own hands.” the simplest apron model to the kitchen, having previously developed a pattern.” Photos of such children's works can be found in abundance on the Internet.
What you need for work
To sew with your own hands the simplest model of an apron (apron) designed to protect clothes in the kitchen, you need to prepare everything you need with your own hands before starting work. So to successfully sew a protective apron To work in the kitchen, having previously made a pattern, you will need:

General description of the process
Undoubtedly, the most critical stage of the work is making the pattern. It will be quite easy to sew a product using a successful pattern. And, on the contrary, sewing according to a pattern made incorrectly will very difficult. To sew an apron without special costs time and effort, it is necessary to clearly understand its main stages before starting work. And then even a schoolboy can cope with the task of “sewing a protective apron for the kitchen.”
The work of sewing the simplest apron model consists of several stages:

How to decorate the finished product
Exists great amount finished decor options kitchen apron. It all depends on the imagination of the beginning craftswoman. Most often, the following are used to decorate kitchen aprons: decorative elements:

To decorate an apron with applique, you can use ready-made decorative elements for applique, which are sold in specialized handicraft stores. Most often this flower images, vegetables, fruits or animals. But you can make applique elements yourself.
To do this, you need to draw a sketch of the applique, transfer it to the fabric, and cut out one or more applique elements from the fabric. So, for example, a stylized apple can consist of one element (the general silhouette of an apple with a leaf), or it can consist of several elements: the apple itself, a green leaf and, for example, a worm sitting in an apple. A multi-layer applique looks impressive; the main thing is to draw a preliminary sketch so as not to get confused in the sequence of applying decorative elements to the surface of the apron.
For fixing the application on the surface For the apron, you can use special fabric glue, or you can simply sew decorative elements to the surface of the apron. The second method seems more reliable, and if you use beautiful seams, such an applique will look more impressive compared to a “sticker”.
You can also decorate your apron with decorative tassels and hand-made pom-poms. But they should not be too bulky so as not to interfere with cooking, since main function The purpose of a kitchen apron is to protect clothes.
 In order to sew a high-quality apron to protect clothes while cooking, you need to choose the most simple model with one or two pockets. As a rule, kitchen aprons are made from natural fabrics. The apron should be easy to wash. Many people prefer kitchen aprons in dark colors because they don't look so visible dirt, and they for a long time maintain a presentable appearance. In this case, we can recommend the following color options: large or small check fabric, dark fabric with white polka dots, plain dark green or dark blue.
Some housewives, on the contrary, prefer aprons in bright, cheerful colors, because they look elegant in the kitchen interior and add positivity to the cooking process. In addition, other kitchen accessories can be made from the same fabric in cheerful colors: oven mitts, towels, napkins, and then it will already be a single set kitchen utensils, worthy of decorating the interior.
You can sew an apron and accompanying accessories from baby diapers in cheerful, cheerful colors. Also perfect for this purpose is calico with large and small flowers, which is traditionally used for making bed linen. In general, the choice of fabric and color depends on individual tastes and preferences and does not have a decisive influence on the practical function of the kitchen apron.
To make the kitchen apron as convenient to use as possible, it is recommended to pay Special attention his ties. They must be securely sewn to the apron and have an optimal length, sufficient for the apron to hold firmly on the neck and waist. The pockets on the apron should be spacious enough. It is better to sew one large pocket than several small ones, as this seems more convenient And simple solution. In order for the apron to retain its presentable appearance longer, you can also sew it from thick oilcloth or waterproof fabric. As the apron gets dirty, it is necessary to wash it, and it is advisable to do this as often as possible.
To sew a beautiful, elegant and comfortable kitchen apron, a novice needlewoman should choose the simplest model and take a responsible approach to creating the pattern. When following all sewing recommendations, you need to be extremely attentive to detail, and then a kitchen apron in a noble dark or cheerful bright color will delight you with its appearance for a long time.


With this accessory you will surely feel a surge of culinary inspiration! Sew stylish apron for the kitchen with your own hands.
You will need:
- fabric (1m x 1.5m) - light or medium density, cotton, linen. Choose a fabric keeping in mind that you will be washing it regularly.
- matching threads
- optional: decorative braid, buttons, etc.

Step 1

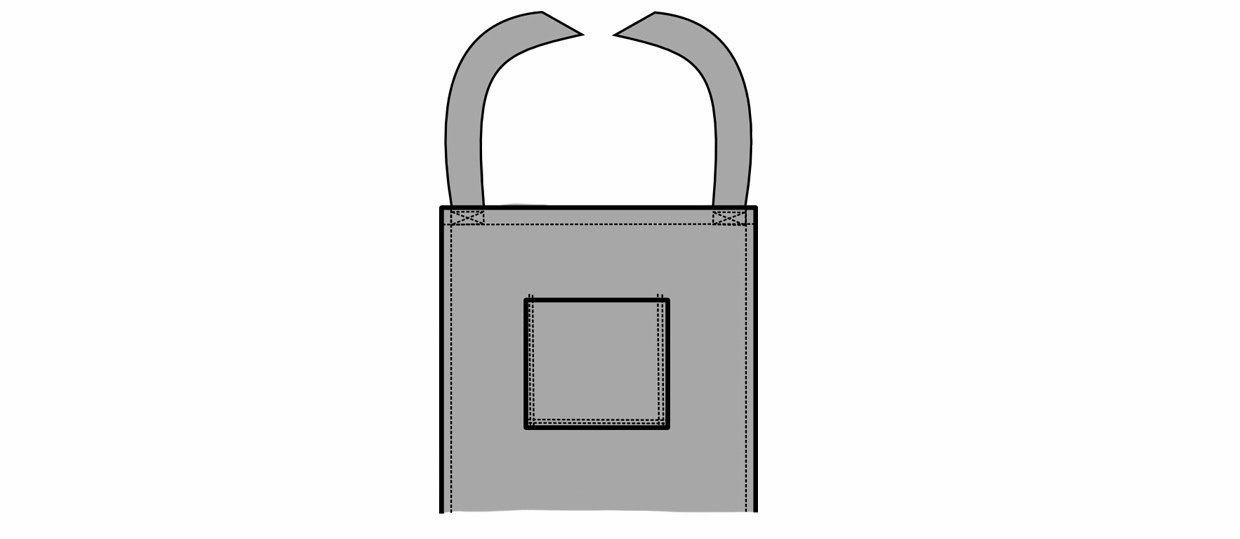
We process the sections of the skirt. Gray The diagram shows the front side. Fold 1 cm along the edges, 2 cm along the bottom, iron and stitch.
Step 2

We process the pocket sections (allowances on the sides are 1 cm, on top 1.5 cm). Iron and topstitch.
Place the pocket in the center of the skirt and sew two stitches along both sides and along the bottom of the pocket, as well as in the middle, to create two separate pockets.
Step 3

Process the small pocket that will be located on the top of the apron in the same way (without stitching in the middle).
Step 4

Gather your skirt in any way in a convenient way. For example, use our master class -.
Step 5

Place the gathered skirt between the two waistband pieces, aligning the centers. Sew all three layers, retreating 1.5 cm from the edge. Start and end the stitching 1 cm from the edge. Press the seams to the waistband.
, step-by-step master class from the site!
Step 6

Sew the top piece of the apron as the top piece of the waistband, aligning the centers. Press the seams down.
Step 7

Iron the seam allowances of the second part of the belt inwards. Sew both parts from the face.
Step 8
Fold the future ties (belt) in half, right side inward. Sew, and from one end - along the bias. Trim the corners and allowances. Turn it inside out and iron it.
Step 9

Place the ties into the unstitched waistband. Sew from the face, gathering the ties slightly.
Step 10
Treat the neck ties in the same way, then stitch them to the top piece. For reliability, you can lay additional lines crosswise.
It's always nice to spend time in the kitchen with friends or family. Cooking meals together nice talking, delicious aromas - all this creates a mood and brings people together. But when the man starts preparing the dishes, the whole family knows - now there will be a holiday! The man in the kitchen is a master, he does everything competently, leisurely, without fuss. Denim aprons are popular - they not only look stylish, but are also very practical. This is not to say that women do not like to cook; we always do it with great enthusiasm and desire. However, deep down, each of us dreams of a man who will cook just for her. So let's give men a little push to cook more often and make them a fashionable denim apron for the kitchen. After all, even if your man does not have professional cooking skills, he is always with great pleasure will cook for you flavored coffee or make delicious sandwiches. And such a gift as an apron will be very useful to him!
Advice! If your man doesn’t like to spend time in the kitchen, this apron is suitable for working in the workshop, garage, country house and many other places.
We have prepared a life-size apron pattern for you, you can download it at pdf format and print. The second option is to build a pattern yourself according to the drawings in Fig. 1 and fig. 2. The pattern is very simple, and you can draw it in literally 5 minutes.
Kitchen apron pattern
Draw an apron pattern according to the diagrams in Fig. 1 and fig. 2 or print it on a printer (the pattern is also given for 2 sizes - M and L) - you will find a link to the pattern at the end of the article.
Rice. 1. Pattern of an apron for the kitchen size M
The apron pattern for size L is shown in Fig. 2.
Rice. 2. Pattern of an apron for the kitchen size L
IMPORTANT! We sewed this apron on a machine that was specially developed by manufacturers for sewing products made from denim and leather. The power of such a machine allows you to sew up to 12 layers of denim simultaneously and easily cope with rough and thick skin.
We tested the car, and we will write a separate article about the test results, which we will publish a little later. Here we will only partially touch on some points that we would like to draw your attention to. When sewing an apron, we installed various threads on the machine and assessed the quality of the stitches:
- To sew pockets while finishing with decorative stitches, the machine was equipped with 100% polyester Mettler top thread No. 30, and the bottom thread was a universal Mettler polyester thread.
- To sew the straps, the machine was equipped with thick bobbin and top threads (Mettler No. 30, 100% polyester).
Summary: In both cases, minor adjustments to the tension of the bobbin and top threads were required. The quality of the stitches was quite stable, the machine showed itself with the best side and she coped with her task.
Advice! If you don't have sewing machine To work with denim fabrics, set up your machine. To do this, install the upper thread - install thread No. 30, lower thread- regular sewing thread. Adjust the stitch quality using the tension regulator upper thread(usually it is installed on maximum value). Run a test stitch and evaluate the result.
How to cut an apron for the kitchen
To sew an apron you will need: about 0.9 m of medium weight denim 140 cm wide, 0.9 m of plaid cotton lining, adjustable top strap 2.5 cm wide, rectangular leather emblem for top pocket measuring 2.5 x 3 cm, thread number 30 for decorative stitches, universal sewing threads.
Rice. 1. Denim and cotton fabric for an apron
Cut out the apron piece from the main fabric with allowances on the sides of 1.5 cm, on the bottom - 4 cm, on the top side - 3 cm. On the piece made of lining fabric, an allowance of 3 cm must be made only on the bottom side (!) On the remaining sides do not make allowances. Cut out the pocket parts with allowances of 1 cm on all sides and 3 cm on the top sides.
Rice. 2. Cut out a denim apron for the kitchen
Additionally, cut out:
- 2 top straps: 7 cm wide (2.5 cm in finished form) and one is 65 cm long and the second is 15 cm long.
- 2 waist straps: 7 cm wide (2.5 cm when finished) and 90 cm long.
Rice. 3. Detail of the apron from the wrong side
Transfer the contours of the pockets to the front side of the part (Fig. 4).
Rice. 4. Marking pockets using marking stitches
Fold the seam allowances along the top side of both pockets and stitch them at a distance of 2 cm from the edge. Sew a leather emblem onto the top pocket (Fig. 5).
Rice. 5. Processing the top allowance of the pocket
Fold and iron the seams on the sides and bottom of the pockets. Baste the pockets according to the markings and sew them with a finishing stitch along the sides and bottom (Fig. 6). At the top corners, secure the pockets with short horizontal stitches (make 2-3 reverse stitches). In the center of the bottom pocket, lay 2 vertical lines - the distance between the lines is 4 cm.
Rice. 6. Sewing patch pockets to the apron
On the main part of the apron, fold the seam allowance along the bottom and stitch at a distance of 3 cm from the bottom fold. On the lining, fold the bottom seam allowance by 3 cm and stitch (Fig. 7).
Rice. 7. Folding the bottom allowance of the lining
IMPORTANT! The lining piece with a folded bottom allowance should be 1 cm shorter than the denim apron piece. The lining remains open at the bottom.
Place the lining piece on the wrong side of the apron, right side up, aligning on all sides. Fold the allowances along the side notches by 0.7 cm, then again by 0.7 cm and baste. Topstitch both sides at a distance of 0.6 cm from the edge (Fig. 8). Then fold the top seam allowance 2 cm, fold the edge of the seam allowance and baste. Topstitch on the right side with a finishing stitch.
Rice. 8. Sewing the apron lining
Fold and baste the vertical allowances on the sides, stitching at a distance of 0.6 cm from the edge.
Fold the parts for the straps in half lengthwise, fold the allowances along one short side and both long sides (with the exception of the short strap, it is necessary to fold the allowances only on both long sides). Install both (lower and upper) threads No. 30 on the machine. Sew the straps along the long and short sides.
Thread the short strap into the clamp to adjust the length, bend it in half and stitch it under the top edge of the apron on the left along the markings (Fig. 9). Sew the long strap for the top to the right.
Rice. 9. Sewing a short strap with a clasp
Fold the straps for tying at the waist along the short open sides, place them on the wrong side of the apron, align along the marks and stitch to the sides of the apron (Fig. 10).
Rice. 10. Sewing the straps to the sides of the apron
The finished apron is shown in Fig. 11. Give men gifts made with love, happy holidays to you!
Rice. 11. Finished apron
Life-size apron pattern for download
IMPORTANT! On the finished pattern, the apron details for size M are shown as outlines with short dotted lines, for size L as a solid line. Additionally, dotted lines indicate the finishing stitches of the pockets. Separately transfer the upper and lower patch pockets onto tracing paper. Pay attention to the direction of the grain thread on the bottom pocket. Since cooks keep a hand towel in their pocket at all times, the top edge of the pocket should not stretch. Therefore, the pocket is cut with the long side along the grain thread.
Even more original ideas and patterns you will find on the website of the Anastasia Korfiati Sewing School. Subscribe to free news and sew fashionable clothes together with us!
An apron is also a beautiful and practical gift, and if it is made by yourself, its value only increases. Aprons have to be washed frequently, so the material must be durable.
The fabric for an apron must be practical
But chintz, satin, and linen will do the job perfectly, although from time to time such an apron will need to be put in the washing machine.
Some craftsmen like to use denim pockets and straps to finish the apron. Also, parts from clothes that are no longer worn can be used to design an apron.

Beginning craftswomen choose simple styles for their first apron - for example, an apron trimmed with ribbon, while more skilled housewives can experiment with styles, decoration, combinations of colors and materials.
By the way, all experienced seamstresses claim that it is the apron that will help you master all the basics of work. And if you don’t know how to sew, but want to learn, then it’s better to start by sewing an apron with your own hands. After all, such a product consists of elementary parts that easily connect to each other - so let’s start sewing!
As for color, variegated fabric is certainly better than plain fabric. On such fabric, stains are not so noticeable.
Apron styles for the kitchen
Having decided on the fabric, you need to choose the same style that you won’t get tired of in a month or two.
The style for the apron can be chosen extremely simple or complicated

The complexity of the chosen style will depend on your cutting and sewing skills

The simplest apron:
Additional elements - ruffles, frills, braid - will decorate the apron
 It’s not difficult to sew an apron of the style you like if you know its tailoring in detail


Pattern for an apron with a pocket in the center:


You can choose the shape of a one-piece apron as you wish:


Ideas for aprons with a cut-off bottom


