A bathhouse is a complex functional structure that has special operating requirements. A well-equipped bathhouse ceiling ensures the maintenance of optimal temperature conditions in the premises and protects against the negative effects of external factors.
To ensure a long service life of the ceiling, it is necessary to take it into account design features, as well as the choice of materials for construction and finishing.
Requirements
To ensure the durability and reliability of the entire structure, the ceiling in the bathhouse must meet a number of important operational requirements:
- High thermal insulation characteristics. To reduce heat loss in bath rooms, the ceiling structure must have good thermal insulation. This will ensure rapid accumulation of thermal energy and reduce consumption fuel material and will prevent the steam room from cooling quickly.
- Moisture resistance. As a rule, wood is used to build baths, which requires additional protection from high humidity and hot steam. For these purposes, special antiseptic impregnations and varnishes are used. However, wood is not an absolutely sealed material, so it is capable of allowing excess moisture to pass through to the heat-insulating layer. To protect the insulating base of the ceiling from moisture, it is necessary to install a vapor barrier.
- Mechanical strength and reliability. The ceiling structure must have increased strength to ensure safe operation of the entire structure. When developing a bathhouse project, you should take into account the weight of the finished structure, the weight of the insulation, finishing materials and, if an attic space is provided, the weight of furniture and equipment located inside.
- Long service life. The bathhouse is built for decades, so the ceiling must not only be practical, but also durable, made from high-quality and safe materials.
Materials
For proper arrangement ceiling structure An important step is the choice of construction, finishing, heat and vapor barrier materials. In this case, what is the best material to make a ceiling from in order to get a reliable and durable structure? Experts recommend giving preference to safe, environmentally friendly, practical and durable materials.
- For ceiling structure. The ceiling in the bathhouse is made of coniferous wood, resistant to rotting and elevated temperatures. Besides, pine board or timber - cheap materials, convenient for processing and installation. Ceiling beams, rough ceiling and attic floor are constructed from softwood.
- For decorative finishing. Deciduous wood is used as finishing materials - alder, linden, aspen, larch, oak. Wood finish The ceiling in the bathhouse is resistant to high temperatures, high humidity, and is easy to process and install.
- For thermal insulation. The thickness of the thermal insulation layer for bath ceiling should be 30 cm, which allows you to retain heat in the steam room for a long time. fire-resistant and safe insulation materials are used - mineral and basalt-based wool. They are resistant to burning, rotting, and the negative effects of moisture and steam. To maintain thermal insulation characteristics, it is recommended to use them together with waterproofing materials. To reduce the cost of construction, more affordable analogues are used - sawdust and natural clay. The finished clay solution is laid in a thin layer on a rough board flooring in the attic, then covered with sawdust, shavings or sand.
- For waterproofing. Provide protection of insulation from high humidity and steam. The best option for waterproofing - double-sided foil membranes.
- For vapor barrier. They provide protection against the penetration of hot steam through the ceiling structure into the insulating layer or into the attic. Foamed polyethylene film, glassine and vapor barrier membranes are used as insulators. The main requirement for the material is the ability to operate at air heating temperatures of up to 125 degrees.
- Fasteners. When arranging the ceiling, it is allowed to use galvanized, copper or brass fasteners.
For the construction and finishing of the ceiling structure, you cannot use:
- plywood, chipboard and OSB;
- expanded polystyrene and foam boards;
- mounting foam for sealing;
- films based on polyethylene;
- damaged or deformed wood.
Installation methods
Floors and ceilings in the bathhouse can be made in one of three ways:
- Hemmed. The ceiling arrangement provides for an attic space for storing bath fixtures and utensils. A distinctive characteristic of the structure is the presence of a log floor, which is mounted on the last crown of the log house. Similar system simple and easy to install.
- Flat. Suitable for small-sized bath buildings that are not equipped with an attic and do not have floor beams. This design is simple and easy to implement. The permissible span length should not be more than 2.5 meters.
- Panel. A technically complex structure, which is built from wooden boxes filled with insulating material. Installation of such a ceiling requires outside help.
false ceiling
Installing a suspended ceiling in a bathhouse with your own hands is technically difficult, but possible. This design is expensive building materials.
Construction false ceiling in a log bathhouse it is performed in the following order:
- Preparing a ceiling frame from timber with a cross-section of 5 × 15 cm. Laying beams at a distance of 55 to 95 cm for strapping. A special hole is made for a square-shaped chimney pipe, taking into account the diameter of the pipe. The wood is treated with antiseptic impregnation.
- Laying vapor barrier material with an aluminum protective layer, with fixation from the inside of the room to the ceiling beams on metal brackets with an overlap of 10 cm. Sealing the joints construction tape.
- Installation of sheathing on a vapor barrier, observing technological gaps for natural ventilation.
- Installation decorative lining from deciduous wood. Thermal insulation and waterproofing of the ceiling in the attic. Work is being carried out on laying insulating and waterproofing materials overlapping and treating the joints with construction tape. Fixation to the ceiling structure using metal brackets. Compliance air gap 3–5 cm.
- Installation flooring– plywood or floorboards. Wooden base thoroughly treated with antiseptics.
Important! To fix the main structural elements, galvanized nails with wide heads are used. They must be longer than thick wooden board twice. If necessary, nails can be replaced with self-tapping screws or clamps of a similar size.
Flat ceiling
This is the fastest and affordable way arrangement of the ceiling structure, since its cost is much lower than that of a false ceiling. It can be used in a bathhouse made of boards, in which there is no attic space.
Step by step guide on how to make a deck ceiling:
- As a basis for the ceiling, rough boards 40 cm thick are used, laid inside the bathhouse on the walls and fixed to each other thin bars at a distance of 40–80 cm from each other. This is how the entire ceiling panel is assembled.
- Lay on the installed ceiling frame vapor barrier material to create a sealed layer. Fixing the material to the boards using metal staples.
- Next, the insulation flooring is performed. It is easier to choose mineral or basalt wool, but if you intend to use bulk materials- expanded clay, clay, sand or earth; additionally, the arrangement of enclosing wooden elements made of boards will be required.
- Waterproofing is laid on the thermal insulation layer to provide additional protection from moisture and steam.
- At the end it is carried out decorative finishing wooden clapboard.
Panel ceiling
The main advantages of such a design are its efficiency and durability, because for its assembly the remains of lumber preserved after the construction of the bathhouse can be used.
To properly sheathe the ceiling panel slabs, all work is performed in the following order:
- Prepare two beams of length equal to the width of the opening, with allowances of 5 cm on each side. The beams are installed on a flat surface parallel to each other in increments of 50 cm. The structure is lined with a board, the length of which exceeds the width of the opening by 10 cm. As a result, the board floor is wider than the base of the box by 5 cm on each side.
- On the inside, the ceiling panel is sheathed with vapor barrier material.
- To prevent possible skewing of the panel, the connection of individual parts is carried out using temporary clamps.
- Ready ceiling panel mounted to the upper rims of the load-bearing frame wall structure taking into account additional installation rafter system for the roof. Jute fiber is placed between the panels for insulation.
- After installing the ceiling base, the inner base of the panel is filled with insulating material and sealed with waterproofing. To make the structure lighter, fiberglass or basalt wool up to 10 cm thick can be used as insulation.
- The upper part of the structure is sheathed with tightly laid boards.
Important! During operation of the bathhouse, condensation may form on the upper part of the ceiling cladding. To prevent this phenomenon, the ceiling cladding is performed at a slope of 6 degrees.
In conclusion, here are some tips for properly arranging a ceiling structure in a bathhouse:
- If the bathhouse design includes an attic space, then when installing the ceiling, it is additionally worth considering an entrance hatch with a retractable ladder.
- Decorative finishing of the ceiling surface is carried out after preparing the floor base. The final stage is wall cladding.
- To reduce or prevent possible heat loss in the room, it is necessary to take care of high-quality and reliable thermal insulation of the ceiling structure.
- To obtain a perfectly flat ceiling surface, the first floor boards must be laid level. Otherwise, this will lead to deformation of the finished structure.
- For the construction and finishing of the ceiling, it is recommended to use environmentally friendly safe materials, which do not emit hazardous substances when exposed to high temperatures.
Build a reliable and durable ceiling in a bathhouse building it is quite easy. To do this, you need to decide suitable option ceiling structure, assortment of building and finishing materials. Due to their increased strength, durability and practicality, suspended and flat ceilings are the most popular.
Who among the owners of a country house has not at least once thought about building their own bathhouse? However, before turning your dreams and ideas into reality, it is worth learning more about the features of building a bathhouse, of which there are many due to the specifics of the construction. They also concern the construction of the ceiling, which must withstand high temperatures and humidity, help maintain the necessary microclimate in the steam room and prevent heat from going to waste. In this article you will find the subtleties and nuances of installing a ceiling in a log bathhouse and receive step-by-step instructions for its manufacture.
What should the ceiling in the bathhouse be like?
First of all, it is worth understanding the conditions in which the ceiling in the bathhouse is located, and based on this, develop the requirements that it must meet. Compared with residential building The conditions in the steam room can be called extreme - the temperature rises to 80-90 degrees Celsius and higher, and this is with extremely high humidity. Both warm air and moisture, obeying the laws of physics, rush upward to the ceiling. Therefore, the latter is required to be resistant to high temperatures. In addition, it needs good thermal insulation, because up to two-thirds of heat loss occurs in the ceiling. And the less energy is lost “to nowhere,” the easier it is to maintain the microclimate in the steam room. High-quality thermal insulation of the ceiling in a bathhouse means saving money in the future.
Now it’s worth paying attention to the problem of humidity. Here its level is very high, and moisture should not penetrate higher, to the ceiling and thermal insulation. Otherwise, the insulation will lose its properties, and dampness will negatively affect the strength and durability of the entire structure. Besides, high humidity creates comfortable environment for the appearance of fungi and mold.
Important! Remember that moisture penetrates not only from below, from the steam room, but also from above, with rain and snow.
Therefore, in addition to good thermal insulation, the ceiling in the bathhouse must have high-quality vapor and waterproofing.

The next question is the strength of the structure. The wooden ceiling itself has a considerable mass, and a mass of insulation is also added to it. Therefore, the ceiling structure must be durable and able to withstand such loads. And if the space under the roof of the bathhouse is used as an attic or attic, then the requirements for strength and safety become even more stringent.
And the last (but not least important) characteristic of the ceiling in the bathhouse is appearance. Agree, it’s more pleasant to be in the steam room when everything around looks beautiful, including the ceiling. In addition, a bathhouse that is attractive both outside and inside will give you a reason to be proud in front of your household and guests, because you did all this yourself, your with my own hands. Therefore, when building a ceiling in a bathhouse, remember not only about thermal insulation and strength, but also about beauty.

Installing a ceiling in a bathhouse: choosing the material
The next question that needs to be considered is what the ceiling in the bathhouse is made of, and first of all this concerns the cladding. Since the steam room, unlike an ordinary living room, heats up to 80-90 degrees, all kinds of plastics disappear: at such temperatures they release substances into the surrounding air that are dangerous to humans, sometimes polymer panels even become deformed in such conditions. And the section of plastic ceiling surrounding the chimney will simply melt or even catch fire.
Various types of plywood and particle boards also cannot be classified as materials suitable for the ceiling in a bathhouse - they are too susceptible to moisture and, under its influence, change their shape and lose strength. Of course, they can be protected with paint or varnish, but such coatings at high temperatures pose the same danger as the above-mentioned plastics.

Therefore, the only optimal material option for covering the ceiling of a bathhouse would be wood, but not just any kind. It is better not to use coniferous wood for these purposes - when heated, it releases resin, drops of which, when contacting the skin, cause discomfort and leave painful burns. Choose wood with low resin content, resistance to decay and the effects of temperature and moisture. Example ideal material for covering the ceiling in the bathhouse - lining made of linden, aspen or alder.
Prices for lining
Advice! Any wooden structures in the bath they must be treated with an antiseptic and fire retardant. This way you will protect them from the main “enemies” of wood - fungus, mold, rot and fire.
In addition to the sheathing, the homeowner must choose the insulation that he will use to install the ceiling in the bathhouse.
The following materials are used for this:
- expanded clay;
- mineral wool;
- ecowool;
- Styrofoam;
- sawdust.
Expanded clay It is clay chips with a porous structure. It is extremely easy to use, has average thermal insulation and relatively high weight, so a ceiling with such insulation should be especially durable. Requires high-quality vapor barrier on both sides.
Mineral wool– the most common type of insulation for the ceiling in a bathhouse. Mineral wool is light, does not burn, does not rot, protects well from heat loss and is inexpensive. It is advisable to purchase basalt wool for a bath, since it contains a minimum (or does not contain at all) additives and binding materials that can be harmful to humans in the form of fumes. Mineral wool tends to absorb moisture, so it requires good waterproofing.

Main advantage ecowool clear from its name - it is a safe and environmentally friendly material made from cellulose with the additive boric acid and impregnations that protect the insulation from rodents, insects, rotting and burning. Ecowool has excellent thermal insulation properties, but to install it you will need special equipment and a specialist who can work with it.
Styrofoam It is unlikely to be a material that is well suited for a bathhouse. Yes, it is cheap and has low thermal conductivity, but at the same time, like any other polymer, at high temperatures it is capable of releasing harmful substances. In addition, polystyrene foam cannot be used near a chimney, as this can cause a fire.
Sawdust as insulation can be called the “old-fashioned” method, which, obviously, is already outdated. They get damp quickly, mice can get in them, sawdust burns well and cakes over time. Their main and only advantage is their low cost: you can get them at the nearest sawmill either for free or for a nominal fee.
Prices for expanded clay
expanded clay

To vapor barrier the ceiling in a bathhouse, some kind of material is needed. The simplest and cheapest option is to use dense polyethylene. But for low price you will have to put up with the shortcomings of the material, among which the main one is the release of condensate that penetrates the thermal insulation layer.

An alternative is various membrane vapor barrier films, which will become a reliable barrier to moisture. Examples of such materials can be NANOIZOL or ISOSPAN. Another option for vapor barrier is foil roll insulation. You can protect the thermal insulation layer using the polyethylene and membrane films already mentioned above, or using roofing felt.
Prices for mineral wool
mineral wool

There are three types of ceiling designs for a bath - floor, hemmed and panel. Below are step-by-step instructions for creating each of the three types.
Video - Ceiling heights in a log bathhouse
How to make a floor ceiling for a bath
With this design, the ceiling cladding is laid directly on the walls of the log house. This option is suitable for baths with a width of no more than 2.5 meters and with low ceilings. There is an opinion that making it is simple and quick, but for a log house the task becomes much more complicated. First you need to prepare the area on which the boards will be laid.

- Two opposite crowns are selected and horizontal lines are drawn along them at a certain distance from the floor. These lines are the level of the future ceiling.
- The logs are removed from the log house and transferred to a previously prepared place. Next you need to measure with lines on upper parts crowns, the width of the platform for flooring - it should be at least 5 centimeters.
- The sections of logs highlighted by lines are sawn through and then gouged out with an ax and chisel. The “shelf” should be as level as possible.
- Both crowns are laid back on the frame, the height of the platforms is also checked - it should be the same on both logs along their entire length.

Now the preparation of the boards and laying begins. For a flat ceiling, it is advisable to use tongue-and-groove boards 2.5-5 centimeters thick: thanks to the tongue-and-groove connection, they fit better together. In addition, the strength of this design is higher.
Step 1. The width of the bath is measured taking into account the areas in the crowns. For accuracy, it is advisable to take as many measurements as the boards are laid, at intervals along their width. Data is being recorded.
Step 2. The boards are cut according to the obtained width values. Next, the boards are marked with a pencil in the order of laying - so each board will be laid in its pre-designated place.
Step 3. The flooring is treated with an antiseptic and fire retardant.
Step 4. A board is taken, laid on platforms on the crowns and nailed. The length of the nails should be 2-2.5 times the thickness of the board. If necessary, in the right places holes are drilled with a drill, but you need to make sure that their diameter is smaller than the diameter of the nails.
Step 5. By adjusting one board to another, the floor ceiling is laid. Most likely, the last board will be wider than necessary, so you need to carefully cut off the excess from it and nail it to the crown areas.

Step 6. Place on top vapor barrier film, making sure that there are no breaks in it and that the joints are overlapped. In addition, the seams are taped with special waterproofing tape.
Step 7 Next is laid thermal insulation material. If it is loose, like expanded clay or sawdust, then a sheathing of timber is made along the perimeter of the ceiling. This way you will achieve even distribution of the material over the flooring.
Prices for roll waterproofing
roll waterproofing

Step 8 The final stage is laying waterproofing. As with the vapor barrier film, this layer should be laid overlapping and the seams sealed with adhesive tape.
If desired, instead of tongue and groove boards, you can use ordinary planed boards, but they must be adjusted to each other especially carefully. Another option - unedged boards, but always in two layers. So upper layer bridges the gaps between the boards of the bottom. The result will be a unique and quite beautiful floor ceiling.
For enough large baths the boards are not laid on the walls, but on the beams. To do this, you must first make grooves in the crowns into which the transverse beams will fit. They are made from timber, which needs to be sanded, treated with an antiseptic and fire retardant. The section of the beam is selected based on the width of the bath, the load on the floor and the distance between the beams. To do this, use the tables below.

Table No. 1. The required beam cross-section for a distance between beams is 50 cm.
| Wall width, m | 150 | 250 | 350 | 450 |
| Beam section, cm | ||||
| 2 | 5x8 | 5x10 | 5x11 | 5x12 |
| 2,5 | 5x10 | 5x12 | 5x13 | 5x15 |
| 3 | 5x12 | 5x14 | 5x16 | 5x18 |
| 3,5 | 10x11 | 10x13 | 10x15 | 10x16 |
| 4 | 10x13 | 10x15 | 15x15 | 15x16 |
Table No. 2. The required beam cross-section for a distance between beams is 100 cm.
| Wall width, m | 150 | 250 | 350 | 450 |
| Beam section, cm | ||||
| 2 | 10x10 | 10x10 | 10x10 | 10x10 |
| 2,5 | 10x10 | 10x12 | 10x13 | 10x15 |
| 3 | 10x12 | 10x14 | 10x15 | 10x16 |
| 3,5 | 10x14 | 10x16 | 10x18 | 15x16 |
| 4 | 10x16 | 10x18 | 10x21 | 10x23 |
How to make a false ceiling for a bath
Most often, a false ceiling is made in a bathhouse - there are no restrictions on the length, width and height of the building, and besides, with such a ceiling design, the space above it can be used as an attic for storing bath equipment or as an attic that can accommodate those who come to you guests.
Ceiling beams are made of thick timber, the cross-section of which is selected based on the size of the room and the load on the ceiling. Before installation, do not forget to treat the beams with antiseptics and fire retardants.

Step 1. In the opposite crowns of the log house, grooves are cut for cross beams. You need to make sure that they are directly opposite each other.
Step 2. The beams are laid in pre-insulated grooves.
Step 3. Mounting rails are nailed to the beams (perpendicular to them) in increments of 50 cm (see diagram above).
Step 4. A layer of vapor barrier is nailed to the bottom of the beam. Its installation should be completed before laying the boards. This way, not only the insulation layer, but also the ceiling beams will be protected from moisture.
Step 5. Sheathing is laid underneath the vapor barrier and beams. For it you can use regular or tongue and groove boards with a thickness of 20-40 mm. You can nail the lining to the sheathing or leave the ceiling as is.
Step 6. Thermal insulation material is laid or poured into the space between the beams. The thickness of the bath layer is at least 10-15 centimeters.
Step 7 A vapor barrier is laid on top. To do this, it is advisable to use membrane films, such as “Izospan FB” (the material is laid with the foil side out with an overlap of 15-20 cm). This way, moisture will not penetrate from above to the insulation and beams, but at the same time, water vapor from them will be able to evaporate freely, and the ceiling will “breathe.”

Step 8 A second layer of boards is laid, which will no longer be the ceiling of the steam room, but the floor of the attic.
Advice! The insulation of the bathhouse ceiling should begin on the side farthest from the entrance to the attic, and the flooring should begin, on the contrary, from the side closest. This is due to the fact that you cannot walk on the insulation itself, and it is inconvenient to move, stepping from beam to beam.
How to make a panel ceiling for a bath
This structure consists of individual panels assembled “on the ground” and then installed on the crowns of the log house. The panels include ceiling beams, sheathing, vapor and thermal insulation. This is the main advantage - most of the work is carried out in safe conditions, and you don’t have to constantly think about how not to fall down from the ladder. However, lifting and installing such panels is a complex task, requiring the participation of several people.
Step 1. In the opposite crowns of the log house, platforms are cut out on which the panels will be installed. It is worth mentioning that labor-intensive and unsafe work with logs can be replaced by installing thick wooden beams, which will serve as “shelves” for future panels.
Step 2.“On the ground” two beams with a cross section of 50 by 100 millimeters are laid. The distance between them is half a meter, the length is selected according to the width of the bath, taking into account the installation sites.
Step 3. On top, a flooring is created from boards 20-30 thick and 600 millimeters long. They are laid so that the edges of the boards protrude 50 millimeters beyond the beam on both sides. Nails are used for fastening, four per board.
Prices for edged boards
edged board

Step 4. The resulting wooden box is turned over and a vapor barrier film is attached to its inner surface. For this you will need a construction stapler. The joints of the film are overlapped by 10-15 centimeters, the cracks are sealed with adhesive tape.
Step 5. Thermal insulation material is laid (or poured) between the beams.
Step 6. Now it rises and installs. On top, the beams are pre-connected with oblique crossbars to give the structure rigidity and prevent it from deforming when lifted.
Step 7 After installing the panel on the platform or “shelf”, the operation is repeated several more times. As a result, you will get an array of panels.
Step 8 Place a vapor barrier film and a layer of insulation in the space between the panels.
Step 9 You need to lay a layer of waterproofing film on top.
Step 10 At one of the walls, the panels are connected to each other: to do this, you need to lay a long and fairly thick board nailed to each beam.
Step 11 Step 10 is repeated, but for the opposite wall and the space between them. The interval between such connecting boards should be approximately one meter.

Step 12 The attic floor is being laid. If desired, the ceiling lining of the bathhouse is finished with clapboard.
Arrangement of the opening for the chimney
The main thing in arranging an opening is compliance with the requirements fire safety. It must be remembered that chimney heats up to very high temperatures, so it cannot come into contact with flammable materials such as wood, polyethylene or foam.


As you can see, with due effort you can build a ceiling in a bathhouse from logs yourself. The main thing is to have not only tools and materials, but also the desire to realize your plans and ideas.
Video - Ceiling installation in a log bathhouse
The ceiling in a steam room must have two qualities:
- High thermal insulation. Since, according to the law of physics, all heat goes up. And with a cold ceiling all the work sauna stove will be aimed at heating the air space around the building. This will be especially noticeable during winter operation.
- Suspended strength. No other building element is located in such an aggressive environment. This is due to the fact that, on the one hand, it is affected by humid heat steam rooms, and on the other, severe winter frost.
However, making a ceiling for a bathhouse with your own hands is quite feasible. And in order to fulfill installation work qualitatively, we will consider its installation and insulation in this article.
Installation
The ceiling structure can be of three types: hemmed, panel and floor. In the case of a bathhouse, the most suitable implementation is hemmed structure. We will analyze it in more detail.
Compound

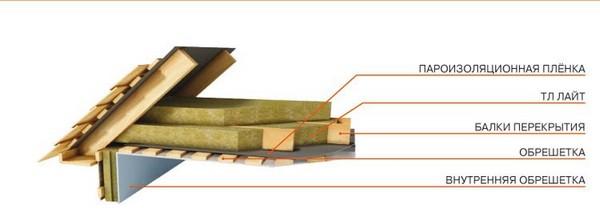
The ceiling design in the bathhouse looks like this:
- Load-bearing beams.

- Flooring from edged boards with a section of 2.5 cm by 15 cm.
- Waterproofing. Polyethylene film is quite suitable for this.
- Insulation. Sections are moisture resistant basalt wool or other acceptable material.
- Vapor barrier and thermal insulation using foil.

- Planks for installation of lining.
- Pine lining with a cross-section of 1.4 cm by 9.6 cm.

Step-by-step work plan
To avoid mistakes and complete the installation correctly, the installation instructions will help you:
- We install the beams using the “paw” method as shown in the figure below. This will allow you to conveniently insert products from below and remove them if restoration work is necessary.

Tip: plan for a beam height of 2344 mm.
Then, after all the work, the net distance from the ceiling to the floor will be exactly 2.3 meters, which is ideal for a steam room.
- We take unedged boards 25 mm thick and nail them to the beams with five-centimeter nails on top.
- We arrange waterproofing. For these purposes, using a construction stapler, we fix the plastic film to the boards from the bottom side, thus closing the beam openings. We leave a few centimeters of overlap on the sides. We glue the joints with mounting tape.
- For the openings between the beams from below, first standing on a stepladder, we insert sheets of basalt wool, trimming it if necessary.

Can also be used for these purposes:
- Styrofoam. Its price is the lowest.
- Felt. Bath caps are also traditionally made from it.

- Extruded polyurethane foam. High water-repellent qualities.
- Penoizol. It is produced by spraying, which allows it to fill the most inaccessible places.
- We install a vapor barrier using foil. To do this, we fix it to the beams using a stapler, covering the insulation material. At the same time, we create overlaps on the walls in order to connect it with the waterproofing layer. This will give some tightness to the walls, protecting them from the harmful effects of excessive humidity.
We seal the joints with aluminum mounting tape so that the aluminum sheets overlap each other by 20 cm to create maximum tightness.

You should know: it not only performs the function of vapor barrier, but also the function of thermal insulation.
Because it has high reflective properties, which causes thermal radiation to return to the room.
- We fix the planks using seven-centimeter steel screws and an electric screwdriver.
- Installing the lining:
- Using a plane, remove the tenon from one side of the tongue and groove board.
- We fix it to the planks with the stripped side facing the wall, maintaining a gap of two centimeters. Such a gap is necessary for high-quality ventilation of the room. For fastening we use seven-centimeter self-tapping screws.
- We insert the clamp into the free side and screw it with self-tapping screws to the upper slats.

- We install the next board into it.
- We install the rest of the products using this method.
- We cut the latter so that after its installation there remains a two-centimeter gap to the wall.

- The do-it-yourself bathhouse ceiling is ready for use.
During finishing work, it is advisable to know some rules that simplify the process:
- The cladding of the steam room should begin with the floor, then the ceiling, and only finally the walls.
- The structure of the suspended ceiling is strong enough to be used as an attic for storing brooms or other bath accessories. To do this, it is necessary to provide for the implementation of a hatch.

- Pay special attention to installing the first board, as it will be a beacon for all subsequent ones.
- If you need to correct the position of the lining, then place it additionally between the groove and the mallet. wooden block. This will keep the tongue intact.
- You can install the lining directly on the beams. But then it will be necessary to specially make holes for ventilation.
- For finishing you should choose deciduous trees. Because conifers contain very a large number of resins, which, when exposed to high temperatures, will begin to release abundantly. And this will have a detrimental effect on the health of vacationers.
- It is especially necessary to carefully insulate the ceiling structure. Because all the heat of the steam room gathers under it. And if it leaks, this will lead to large financial losses in attempts to heat the room to the desired temperature.
- The attic part can also be used for installation bulk insulation, such as expanded clay.

Conclusion
The ceiling in a bathhouse is the most vulnerable place for heat to escape, since it is under it that its greatest accumulation occurs according to physical laws. It also experiences heavy loads due to the large temperature difference between inside and outside the room. Which is especially sensitive in the winter season.
The best ceiling design for a bathhouse is a hemmed one. It best meets everything you need technological requirements. In addition, it allows you to equip an attic for storage auxiliary equipment or for additional insulation.

The best tree species for lining are deciduous. They are quite waterproof, strong and do not produce any discharge when exposed to high temperatures.
Suitable insulation materials include: mineral wool, polystyrene foam, penoizol, felt, extruded polyurethane foam. It is also very important to protect it from the harmful effects of excessive humidity by installing waterproofing and vapor barriers.
Using the instructions given in the article, it is quite possible to install the ceiling in the steam room with your own hands so that it fully meets all requirements.

The video in this article will provide more information on the issue at hand.
Good luck with your finishing work!
One of the most crucial moments in the construction of a bathhouse is the creation of a ceiling. Not only the comfort in a given room, but also the service life of the entire building will depend on how correctly and efficiently you do it.
To create a ceiling, necessary correctly, such an indicator as the height of the room is also important. Despite the fact that to build a ceiling in a bathhouse you need to have certain knowledge and skills, anyone can do this work with their own hands House master.
The peculiarity of the washing room and rest room in the bathhouse is that although in these rooms there are high humidity , But air temperature is low, compared to the steam room, therefore for finishing the ceiling, one of the most optimal options is a plastic lining.
Main advantages plastic lining:
- such panels do not require additional treatment with antiseptics;
- they have the correct geometric shape;
- light weight;
- There are various color solutions;
- after installing such a lining, there is no need to periodically paint it, as is the case with wooden materials;
- do not rot;
- low cost, which allows you to significantly save money.
In case of use plastic panels, their installation is the final stage finishing works.
In the washing room, water gets on both the walls and the ceiling; plastic panels, due to their tight fit to each other, reliably protect against moisture.Installation of plastic lining on the ceiling of a washing room carried out after the device and draft ceiling, in the following sequence:

When using glossy panels, please note that they are very easily damaged, so protective film they must be removed at the very last moment.
To prevent the plastic panels from sagging, the distance between the beams or laths of the sheathing should be no more than 60 cm.
Typically the panels are 6 meters long, which makes their transportation much more difficult. Experts recommend immediately deciding on the required length and cutting the panels in the store.
 For the washing room and for the rest room in the bathhouse, it is better to choose seamless panels, since if available decorative seam, moisture and dirt will accumulate in it, which will spoil the appearance of the ceiling.
Caring for this coating is very simple, but it is best to use gentle detergents. It is recommended to choose a calm color for the panels, this will allow you to better relax and unwind; it is better not to use contrasting solutions in the bathhouse.
Plastic panels have good thermal insulation characteristics, since they have a cellular structure; in addition, a large number of partitions makes them quite durable.
Since plastic does not allow steam to pass through, It is necessary to ensure good ventilation in the room so that the ceiling and walls can dry properly.
Ceiling installation in the steam room
The steam room is the smallest room in the bathhouse, but due to the fact that in it heat and humidity, ceiling requirements will be high. Making mistakes when creating a ceiling in a steam room not only reduces the comfort of visiting the bathhouse, but can also lead to rapid damage to the building and you will have to make repairs.
Selection of cladding material
For covering the ceiling in the steam room wooden paneling is used. Usually the one made from coniferous species is not used, since when heated, resin can be released from it, so they use panels made of alder, aspen, linden, but oak or ash are best suited.

Instead of lining you can use tongue and groove boards, since there is practically no difference between them. But still, it is better to use lining, which has a non-linear surface, and during its drying, cracks will not form on the ceiling, as when using boards.
The width of the lining should be 9-10 cm; if the planks are narrower, it will take longer to install them, and if they are wider, they will warp and crack more.
If there is a subfloor in the attic, then lining can be taken with a thickness of 12 mm or more, if it is not there, then its thickness should be from 18 mm. To create a flat ceiling, you need to take 25 mm thick lining, since it will be subject to a large load. 
The differences between regular lining and euro are that the latter has inside there are longitudinal grooves to improve ventilation, and its surface is smoother, so if funds allow, then It’s better to buy eurolining for the ceiling in the bathhouse.
 Since the cost of eurolining is higher, then the geometry of the slats must be strictly observed, there should be no knots on the panels; you need to pay attention to this when purchasing it.
It’s good when you have the opportunity in the warehouse to check whether the lining has moved; to do this, you need to join two planks; if this happens freely and without gaps, then everything is fine.
Installation
There are three types of ceilings: floor, panel, hemmed. 
Let's look at how to make a hemming method from a log house:
- Floor beams are treated with a protective compound.
- Taking into account the location of the stove-heater, a metal passage box for the chimney is mounted between the beams.
- Attach foil or hydro-vapor barrier membrane to the underside of the beams using a staple gun, leaving 30 cm overlap on walls, the foil is glued together with aluminum tape.
- If the distance between the beams is large, then additional make lathing and then install the clapboard on it, the sheathing is made with 20 by 40 mm timber with a pitch of 400 mm.
- Carry out installation of lining, fastened with self-tapping screws or nails, but clamps can also be used. When using nails, they can be driven into the face, into a tenon or groove. In the first case, the caps will be visible, and in the second and third cases the fastening will be invisible.
- From the attic between the joists(mineral stone wool, expanded clay or clay with straw)
- We cover the insulation with a hydro-barrier(diffuse membrane), it will protect the insulation from moisture from above and freely release water vapor from the bottom.
- We lay the attic floor boards.

When fixing the planks through the front part, the caps are visible, but the fastening is reliable, the fixation through a tenon or groove is invisible, but a small part of the board is captured, so when the lining expands, there is a possibility that it will be turned out or torn off.
When fastened with nails, there is a possibility that the panel may burst, which is especially unpleasant when expensive material is used. To avoid this, it is recommended to first drill a hole and then fix the strip with nails, although this takes longer, the material does not crack.
For fixing into the surface, finishing nails are used, since they have a small head. The fastening points are covered with putty, to which wood dust is added, and after it dries, this place is sanded.
Required Tools
To finish the ceiling in the bathhouse, you will need the following tools and materials:
- lining, which can be plastic or wooden;
- vapor barrier;
- insulation;
- waterproofing;
- stapler;
- electric drill;
- screwdriver;
- hammer;
- doboynik,
- mallet;
- wooden block;
- building level.
How to install a pipe in a bathhouse through the ceiling?
The location of the pipe passing through the ceiling must be determined during design. When marking the hole, it must be taken into account that it corresponds to the vertical axis of the pipe. There should be at least 130 mm from the edge of the pipe and ceiling beams.
 The gap that exists between chimney and ceiling, must be insulated, For this you can use asbestos, basalt wool or fiberglass.
The thickness of this layer should be not less than 50 mm To prevent the insulation from falling, the hole around the pipe from below is hemmed with a sheet of stainless metal.
It is not recommended to hem the hole around the pipe with galvanized iron, since when it is heated, harmful substances will be released.
If you are finishing the ceiling in the steam room, washing department and relaxation room with your own hands and doing it for the first time, then to get good result, The following expert advice should be taken into account:
- All Finishing work in a bathhouse you need to start from the floor, then make the ceiling and only then sheathe the walls;
- when creating a false ceiling, the attic space can be used for storing and drying brooms, but for this, provide a hatch and a retractable ladder;
- when installing the first panel of the lining, you must be very careful, since the installation of all other elements depends on this;
- in order not to damage the panels, you need to use a mallet and a wooden block, which will help to evenly distribute the created shock load;
- if the distance between the beams is up to 60 cm, then you can attach the lining directly to them, in other cases you will have to make lathing.
Conclusion
In a bathhouse, the ceiling is the most vulnerable place, since the maximum amount of heat escapes through it. To prevent this, it is necessary to correctly for the steam room it is wooden, and for the washing room and rest room it is plastic lining.
All installation work is carried out carefully and carefully, then you can independently carry out high-quality thermal insulation of the ceiling and make it beautiful, safe and durable.
Useful video
Installation of lining in a steam room, video:
In contact with
-> Floor and ceiling1. Top cover
2. Ceiling
Very important for any building high-quality installation ceiling. Ceiling- this is the first and important barrier on the way internal heat. Because warm air accumulates at the top, it is obvious that the leaky ceiling is the main source of heat loss. This is especially pronounced at elevated temperature conditions baths
The ceiling height in my bathhouse is 2.2m. However, to organize a steam room “according to all the rules,” I would advise making the ceiling height 2.5 m.
On top of the rough ceiling, exactly under the mats, counter strips are nailed - boards 10 cm wide and 20-25 mm thick, on top of which they are mounted finished ceiling from clapboard or something similar. The finished ceiling boards are laid parallel to the rough ceiling. The lining material is any, including coniferous. Rumors that spruce or pine boards in the bathhouse they bleed resin, greatly exaggerated- a droplet will appear somewhere, so it’s easy to remove it. Do not forget that pine is a strong energy donor and, therefore, this material is the most preferable for a bathhouse.
In the steam room, the ceiling is made in exactly the same way, only the rough ceiling can be made from thicker boards (40-60mm thick).
It is not allowed to use plywood, fiberboard, chipboard for ceiling lining, since these materials are made using adhesives based on formaldehyde and phenol, which are toxic carcinogenic substances.
Please note: in Germany, Finland, and Sweden the use of these materials in residential construction is prohibited.
3. Vapor barrier
The main task vapor barriers prevent the penetration of warm, humid air into the insulation, otherwise moisture from the air will condense inside the insulation, the insulation will get wet and lose its insulating properties.
4. Insulation.
In Belarusian villages the following insulation materials were also used:
1. Backfilling (laying) with dry maple leaves layer of 10 - 15 cm, on top of which a layer of soil 5 cm thick was poured. No vapor barrier was made under this backfill, since the leaves are laid horizontally and cope with this task well on their own.
2. Liquid clay is mixed with sawdust in the following proportions: clay - 1 part, sawdust - 3 parts. Clay is a good natural antiseptic and does not allow sawdust to rot or mold. The disadvantage of this method is that a layer of such insulation 10 - 15 cm thick takes several months to dry.
3. Kostra - a product of flax processing - is a very effective insulation material, but is highly flammable and combustible. To reduce the fire hazard, 3 parts of fires were mixed with 1 part of soil and laid in a layer of 10 - 15 cm.
You shouldn’t stick out your lip contemptuously - these cheap old-fashioned methods can give a head start to many newfangled expensive insulation materials in terms of thermal insulation properties. And in terms of environmental friendliness, it is generally unrivaled!
I would especially like to dwell on the inadmissibility of using insulating materials such as polystyrene foam, polystyrene foam, and polyurethane foam in a bathhouse.
All these substances emit formaldehyde, styrene and other toxic substances. When heated, the rate of release increases, and at temperatures above 60°C, destruction processes begin to develop in them with a change in volume and intense release of toxic substances.
Since in a bathhouse the speed of a person’s metabolic processes increases sharply, all these poisons are successfully absorbed by the body through the skin and respiratory tract, which over time leads to a whole bunch of diseases, including cancer. Styrene is especially dangerous for the female body.
I will quote excerpts from an article by Evgeniy Shirokov, Ph.D. tech. Sciences, Chairman of the Board of the Belarusian Branch of the International Academy of Ecology.
Architect Dmitry Tikhashin (Belarus): “Everything new is a well-forgotten old... In the early 1980s, the Dalstroyproekt Institute (Magadan), of which I was an employee at that time, developed and implemented it in the Severovostokzoloto Department structural system prefabricated buildings and structures in remote areas of the extreme northeast of the USSR (Magadan region, Kamchatka).
The system was based on lightweight aluminum panels with a “filling” - expanded polystyrene with a thickness of 200 - 250 mm. The helicopter transported up to 300 m³ of enclosing structures per flight, the load on the permafrost is minimal - the foundations are lightweight, the heat transfer resistance is sufficient...
For those hard to reach northern regions- perfect option. Many buildings were built: production workshops, gold processing factories, service houses and a series of two-story residential buildings - in the village of Bilibino, in Chukotka, and in other places...
However, 5 years later, the USSR Ministry of Health, after inspections and studies that were closed, decided to ban further construction and living in such houses. The reason for checking and making a decision was numerous facts of unsuccessful pregnancy in the houses of this series. Then it was officially believed that formaldehyde and other emissions from polystyrene foam, their high concentration in residential premises, were probably to blame for this.
The story is similar with the well-known “beams” at BAM - the dream of the newlyweds - the builders of the legendary highway. Many still remember well these metal “barrels”, insulated with polystyrene foam from the inside. Approximately the same design scheme, the same consequences for pregnant women (families were young, and they were settled first), and the same result - a ban on production 5 years after large-scale implementation, despite the presentation of high state awards to the developers. Interestingly, the residents of these houses did not feel any odors or discomfort.”
So, men, if you want to have healthy children and grandchildren, then draw your own conclusions...
Calculation of insulation thickness.
At calculating the thickness of insulation We will be guided by the following SNiP:
SNiP 02/23/2003 “Thermal protection of buildings”.
SNiP 23-01-99 “Building climatology”
SNiP II-3-79 “Construction heating engineering”.
These documents are easy to find in the public domain on the RuNet. Just type their name in the search window. I advise you to download them, as they will be needed for calculations.
Calculation procedure:
1. According to Table 1 “Climatic parameters of the cold period of the year” SNiP 23-01-99 “Building climatology”
We determine Dd - Degree-day of the heating period, °C day using the formula
Dd=Noheat (Internal - External)
Where,
TVinternal - calculated average temperature internal air of the building, equal to 21°C.
Тexternal - average outside air temperature during the heating period (column 12 of Table 1)
Notopit - duration, days, of the heating period, taken for a period with an average daily outside air temperature of no more than 8 °C. (column 11 of Table 1)
Determine Dd - degree-day of the heating period in the village of Babenki, Ivanovo region. RF.
Using Table 1 of SNiP 23-01-99 “Building Climatology” we determine the necessary parameters for the city of Ivanovo.
Noheats = 219 days; Text = -3.9°C;
Then,
Dd=Noheat·(Тinternal - Тexternal) = 219·(21-(-3.9))=219·(21+3.9)= 5453°С day;
Dd = 5453°C day;
2. According to Table 4 “Normalized values of heat transfer resistance of enclosing structures” SNiP 02/23/2003 “Thermal protection of buildings” we determine the normalized value of heat transfer resistance Rreq, m °C/W, substituting the resulting value Dd into the appropriate column and column;
Determine the normalized value of heat transfer resistance Rreq in the village of Babenki, Ivanovo region. RF.
According to Table 4 “Normalized values of heat transfer resistance of enclosing structures” SNiP 02/23/2003 “Thermal protection of buildings”
In column 2 - “Public, except for those indicated above, administrative and domestic, industrial and other buildings and premises with damp or wet conditions”,
in column 5 - “Attic floors, over unheated crawl spaces and basements”,
We find the normalized value of heat transfer resistance Ro for the value Dd closest to the obtained Dd = 5453°C day.
In our case, this is 6000°C day.
For this value, Rreq = 3.4 m °C/W;
Rreq = 3.4 m °C/W;
3. Determine the thickness of the insulation:
Where,
R - heat transfer resistance of the insulation layer, m °C/W;
λ - Thermal conductivity coefficient of the selected insulation, W/(m °C), which is determined according to SNiP II-3-79 “Building Heat Engineering” Appendix 3 “Thermal performance indicators of building materials and structures”
R=Rreq-R1-R2-...-Rn
Where,
Rreq - normalized value of heat transfer resistance, m °C/W
R1,R2,...,Rn - heat transfer resistance of layers of all structures (except for the insulation layer), which are located between the indoor air and the outdoor air, m °C/W. This could be: finished ceiling, rough ceiling, attic floor, roof materials.
Where,
Tn - thickness of the structure, m;
λn is the thermal conductivity coefficient of the material from which this structure is made, W/(m °C).
Determined according to SNiP II-3-79 “Building heating engineering” Appendix 3 “Thermal technical indicators of building materials and structures”
Determine the thickness of basalt wool insulation in the attic of a bathhouse in the village of Babenki, Ivanovo region. RF.
The following structures are located between the indoor air and the outside air (with the exception of the insulation layer):
Finish ceiling made of pine (lining), thickness 1.5 cm;
Rough ceiling made of spruce (board), thickness 3cm;
The attic floor is made of pine (board), thickness 3cm;
Rough roof decking made of spruce (board), thickness 2.5 cm;
Slate, thickness 0.6cm;
λ pine=0.18 W/(m °C)
λ spruce = 0.18 W/(m °C)
λ slate =0.35W/(m °C)
λ bazvata =0.06 W/(m °C).
Then the heat transfer resistance of the insulation layer:
R=Rreq - Rfinished ceiling - Rrough ceiling - Rattic floor - Rrough flooring - Rslate=
3.4 - 0.015/0.18 - 0.03/0.18 - 0.03/0.18 - 0.025/0.18 - 0.006/0.35 = 2.68m °C/W;
The thickness of the insulation is:
T=R·λ=2.68 0.06= 0.16m;
The minimum thickness of basalt wool insulation is 16 centimeters.
5.Attic space
Attic space- a convenient and necessary part of the building. If the roof slope is 35 - 45 degrees, then in the attic you can make a spacious room with a ceiling height of 2.0 - 2.2 m. This room can be used as a rest room, as a room for storing brooms, or as a room for feasts, etc.
If we are going to make a room in the attic (uninsulated attic), then we need to lay a floor in the attic.
We lay a finished floor on the subfloor made of any material that suits your taste and financial capabilities.
For example:
Batten
Moisture-resistant laminate
Parquet
And others...
When laying the floor, ventilation gaps of 2 - 2.5 cm between the walls and the finished floor are also required.
6. Hatch to the attic
This design provides reliable thermal insulation.