Wooden chandeliers can increasingly be seen in the interiors of country mansions. What is the reason for such popularity of such lighting devices? Of course, first of all, it is important to note the environmental safety of natural wood. This one is useful and quality material Ideal for making your own wooden chandelier.
Wooden chandeliers, made of wood, fill the room with a pleasant and soft light, allowing the owner of an apartment or house to completely relax after a busy day at work.
Wooden chandeliers have excellent technical and performance characteristics. Professional interior stylists note their unique wear resistance, as well as the possibility of making such lighting fixtures with their own hands.

Attention! A high-quality wooden chandelier has enough high cost.
It is not necessary to spend money on buying a ready-made lighting device, because you can easily make it yourself, turning your creative ideas and original ideas into reality.
In addition, a DIY wooden chandelier is a guarantee of uniqueness and individuality.
Reasons for choosing wood for making a lamp
In our age of scientific and technological progress and innovative technologies, have become widespread polymer materials, which pushed natural wood into the background. Despite the variety of finishing and decorative materials offered by lighting manufacturers modern market, interior designers continue to use natural wood in their work.
Original wooden chandelier with your own hands, step-by-step instruction, as well as photos can be found in the video:
Natural wood has certain advantages. For example, this natural material is in the process machining retains its original characteristics.
Advice! For relaxation, professionals recommend choosing spruce or pine for making a wooden ceiling chandelier. Doctors recommend choosing such wooden chandeliers for people with chronic respiratory diseases, as well as for asthmatics.
Also among the advantages natural wood Let's highlight the ease of its processing. If desired, you can make antique or modern wooden chandeliers, and of any degree of complexity.
When choosing wood to decorate the interior of a living space, you can make it cozy and harmonious.
Wooden ceiling chandeliers will help to add emphasis to the room, emphasizing the main idea chosen for decoration.
Advice! In order to put into practice creative fantasies, you can experiment with the selection of wood species.

For example, antique wooden chandeliers can be made from oak or larch, and modern options lighting fixtures are made from pine.
Among the advantages of choosing wood to create ceiling chandeliers, professional stylists note the wonderful combination of this decorative material with other decor options: glass, plastic, metal, fabric.

Disadvantages of wooden ceiling lamps
It would seem that with this a huge number positive characteristics, the tree must become ideal option for the manufacture of ceiling lighting fixtures. But unfortunately, even wood has some significant shortcomings, which should be mentioned.
Wooden chandeliers are easily flammable, as wood is not resistant to high temperatures.
Attention! It is strictly forbidden to use light bulbs in such chandeliers that will heat up during operation.
For safety reasons, professionals working with this natural material, prefer to choose fluorescent or LED bulbs that cannot create fire hazards.
Among the disadvantages of ceiling wooden chandeliers used in rooms with high humidity, we highlight the instability of wood to negative influences environment: moisture, temperature fluctuations.
Ceiling lights made from wood are susceptible to insect attack.

Advice! To provide your ceiling light reliable protection against these factors, it is important to coat the finished product with a special protective impregnation.
Also among the disadvantages of choosing lighting fixtures made by hand from wood, we note their high cost. As it dries, in some cases the original may also change. appearance ceiling chandelier.
If we take into account all these disadvantages inherent in wooden products, it is possible to make an original and functional lighting fixture, which will become the pride of the owner of an apartment or house.
Materials for work
To assemble a wooden ceiling chandelier with your own hands, you will need the following tools and materials:
- roulette;
- screwdriver and hammer;
- pencil;
- electric drill;
- hammer and pliers;
- antiseptic for processing wooden products;
- socket, light bulb, electric wire;
- decorative elements
Depending on which particular model of lighting fixture will be created, this list may be supplemented with other materials and tools.
Exist certain rules, which must be observed when starting work related to the creation of wooden ceiling chandeliers.
First of all, it is necessary to take care of the complete treatment of the material with a special antiseptic composition.
In addition, you need to pay due attention to the fastening system finished product to the ceiling surface. For example, you can choose an original metal chain so as not to be afraid that the chandelier will fall from the ceiling.
During connection wooden lamp It is better to use the services of a professional electrician to avoid emergencies.
Wood has been used by people for a long time to make household items.
This is an environmentally friendly material that is easy to process. It is available, its price is not high, and the texture is very beautiful when finished correctly.
It is for this reason that hand-made wooden ceiling chandeliers will never go out of fashion.
We create beauty ourselves
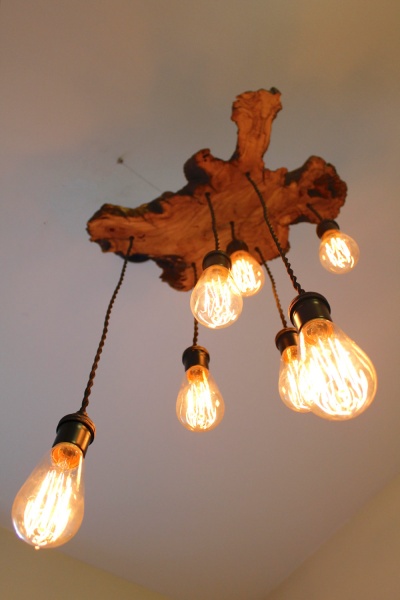
Product made from driftwood
Each snag that you find in the forest has its own individual and unique shape.
It is perfect in every curve, because it was created by nature itself. The main thing is not to spoil it all during processing, to cut off the excess, but not to disturb the natural beauty.
It is necessary to clean the surface of bark and damaged wood and dry it well. Then you need to sand it thoroughly using sandpaper.
The next step is to select the type of lamps and purchase the appropriate components.
Note. Since wood is a highly flammable material, it is better to use energy-saving or LED lamps. They heat up slightly.
In order to lay the wires, you can use a long and thin drill make a series of holes.

Having laid the wire, the holes can be filled with putty by selecting putty of a suitable color. You can use a chisel with a narrow blade to select grooves for the wire on the upper (facing the ceiling) side of the branches.
Lighting sockets are attached to the ends of the branches.

The driftwood can be hung from the ceiling using chains. All wooden parts are varnished in several layers.
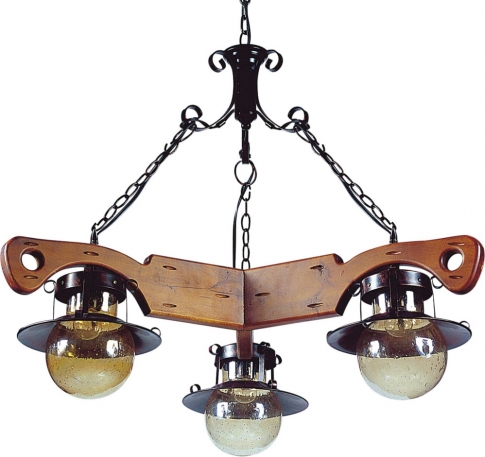
Lamp made of boards and cups and saucers

This design is attached to the wall, but it can also be hung from the ceiling.
Manufacturing instructions:
- A suitable board (oak, ash, but also pine) must be treated with stain and varnish.
- In the bottoms of cups and saucers diamond drill holes are made for glass.
Note. If you use thin, translucent cups, the decorative effect is higher.
- Wires are connected to the electric sockets (see), passed through the holes in the cups and saucers, and everything is attached to the board.
- On the back side, the wires are connected in parallel to each other and the supply wire.
- The board is suspended from the ceiling using chains or a twisted cord.
If you artificially age a board and use it instead of cups and saucers clay pots, the design becomes completely different.
Country style
Several boards irregular shape, processed using the brushing technique, covered with stain and varnish, a coil of hemp rope, several meters of chain and lampshades with sockets - that’s all that is needed to create a designer lamp with your own hands.
Making your own lamp is not difficult
Another design, made independently, in the video:
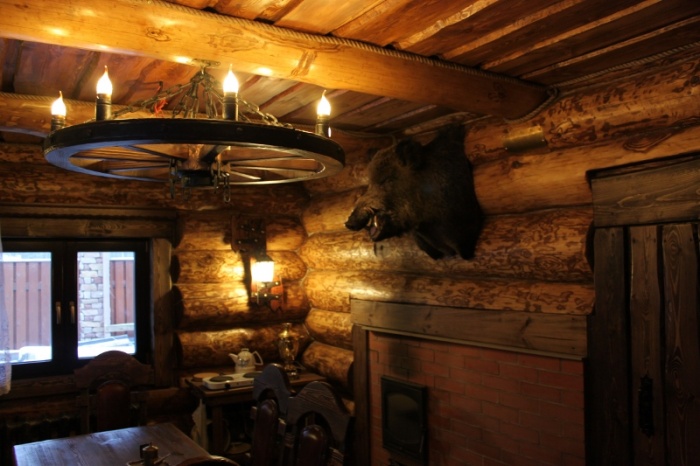
Previously, candles were used to illuminate rooms. They were installed on the rim of a cart wheel suspended from the ceiling.
Wooden ones in the form of a stylized wheel with candle-shaped light bulbs are often found today.

Very often, forged parts are used together with wood to emphasize the style.

Forging and embossing in finishing. This is what lamps are like in the house.
Lampshade made from clothespins
People with imagination and skillful hands don’t make crafts from anything! Ordinary clothespins, varnished or painted and attached to a frame made of wire or metal mesh- here is the lampshade for a completely unusual look.
Lampshade made from clothespins
Plywood lace
From thin high-quality (preferably birch) plywood using hand jigsaw you can create real masterpieces of applied art.
The manufacturing technology is very simple:
- The drawing of the parts is transferred onto a sanded sheet of plywood using carbon paper.
- Parts of the structure are cut along the contour.
- A hole is drilled inside each piece to be removed with a thin drill (1 mm).
- All internal parts are cut out.
- Clean the edges with small files of various shapes.
- The product is assembled using glue.
- Cover with varnish.
Advice. PVA glue turns yellow over time. It is necessary to carefully remove its residues on visible parts of the product (it is better to use special wood glue).
If you use incandescent lamps, their power should not exceed 40 watts. They must be located as far as possible from wooden parts to avoid overheating and fire.
Carved and turned chandeliers
In the Middle Ages, chandeliers were made of metal (copper, bronze or silver) and were very expensive. It was then that wooden carvings with a coating that imitates metal.

Ceiling wooden chandeliers are often made on the basis of turning products.

Parts are made on a lathe, photo
Lamps in oriental style
For a room decorated in Japanese or chinese style, metal is not used in the construction of wooden lamps (see). The shape is usually rectangular, and frosted glass is used instead of rice paper.
Chandeliers can be suspended or fixed to the ceiling.

In oriental style.photo

Ceiling lamp, photo
Design solutions made of veneer or wooden plates
Veneers of valuable species or bars and plates are often used to make wooden products. various forms and sizes.


If you hang it from the ceiling, it will be a chandelier, photo
Wooden chandeliers can be matched to any interior style precisely because wood is a universal material.
All photos from the article
Over the past few decades, there has been virtually no design direction left that does not use wood products to one degree or another. A lamp in general and a chandelier in particular are objectively one of the most noticeable interior items, therefore hanging chandeliers made of wood are deservedly considered perhaps the most popular trend at the moment.

Features of wooden ceiling lamps
Any wooden object in the interior of a room on a subconscious level it is associated with warmth and comfort. Traditionally, homemade wooden chandeliers are used in all areas of oriental themes, where the geometric regularity of the lines and at the same time the warmth of natural wood contribute to a peaceful relaxation.
A trend like country music is generally impossible without using natural materials. The rural style has always been characterized by the use of slightly rough, unusual shapes. Massive look Such lamps create a feeling of reliability.

An antique wood chandelier is associated with medieval romance and knightly tournaments. Interspersed with forged metal elements give this design exquisite lightness and unique flavor.
Advantages of wooden lamps
- The first thing that catches your eye is the naturalness of such a chandelier. It is difficult to find a more environmentally friendly material. Moreover, being constantly near a heat source, wood releases health benefits into the atmosphere. essential oils and microelements.
- The technology for processing this material, as a rule, is not very complicated.. Even children can assemble relatively simple wooden structures.

- Wooden dacha chandeliers are deservedly considered to be perhaps the most the best solution . After all, the dacha itself is intended for countryside holiday closer to nature.
- The price of the structure plays an important role. Even if you use total cost A homemade chandelier will be available for almost any budget. But as a rule, all costs end with the purchase of cartridges, light bulbs and wires, and a few planks or branches can always be found at any dacha.

What are the disadvantages of such lamps
- Opponents will immediately point out to you the fire hazard of such a chandelier. There is, of course, some truth in these statements, but with proper installation and use of LED or other low-heating light sources, you are in virtually no danger. In addition, there are a lot of natural impregnations on sale that prevent fire.
Important: such homemade lamps, no matter what you impregnate them with and no matter how competently you assemble them, it is highly undesirable to place them near sources of open fire. For example, next to the fireplace or in the barbecue area.

- Whatever one may say, wood is a living material and very hygroscopic. Wooden chandeliers for a bathhouse look great, but it is better to install them away from showers and steam rooms. Constant changes in temperature and high humidity are far from conducive to the preservation of the massif. In this case, a wood-look chandelier is more suitable.
- Another serious problem with this material is the high probability of damage to the array by various types of pests. But as mentioned above, no one is stopping you from impregnating your chandelier with natural protective compounds.
A few words about self-assembly
A do-it-yourself antique chandelier made of wood is a very real thing. In essence, all you need is a great desire and a standard set of carpentry tools, which is found in almost every home.
- Usability assessment
- Preparation of material
- What lamps to use
Original wooden interior items bring comfort and coziness to the environment. If you won’t surprise anyone with solid wood furniture or carved figures on the shelves, then a floor lamp, chandelier or sconce made of branches or driftwood will definitely attract the attention of guests.
However, they are worth wooden crafts not cheap, especially the original ones. We suggest saving money and creating a lighting fixture with your own hands. In addition, this is a great way to implement bold ideas while spending very little time. To make lamps and sconces you will need standard carpentry tools.
Usability assessment
To understand how good a wooden lamp is, let’s weigh the pros and cons of it. unusual item decor.
Advantages:
- Ecological purity of wood – important advantage before polymers and other synthetic materials.
- When heated and in its normal state, the tree emits aromatic substances from resin - ether, which relaxes and heals.
- From wood materials any shapes can be created - the raw materials can be easily processed with carpentry tools.
- An unusual option for interior decoration. Wooden chandeliers in residential buildings and offices are rare.
Flaws:
The disadvantages are reduced by using different impregnations and appropriate preparation of the timber. Therefore, a wooden lamp can be called a useful accessory that will emphasize the style of the room and give it charm.
Preparation of material
Lamps and sconces are made from any wood materials. Boards, branches, driftwood, plywood are used - the choice is determined by the idea. Nevertheless, no matter what the design for the lamp is made from, it is important to properly prepare the lumber:
- The wood must be dried.
- The workpieces should be treated with complex impregnations with fire-resistant, insecticidal and antiseptic components.
- It is worth choosing solid lumber without signs of rotting.
In addition to wood, light bulb sockets, carpentry tools and glue (preferably epoxy) are prepared to make lampshades.
What lamps to use
Since wood is a highly flammable material, you need to be careful when choosing a light source. It is better not to use an incandescent lamp for bedside lamps and lampshades - when burned, it strongly heats both the socket and the wood.
LED lamps and strips are suitable for such homemade products - they emit white light and do not heat up surfaces, and are fireproof. LED strips are ideally combined with wood of any color and texture.
Master class: lamps made from boards
There are countless ideas for making home lamps. We'll tell you how to do it homemade chandelier– it can be taken as a basis for creativity.

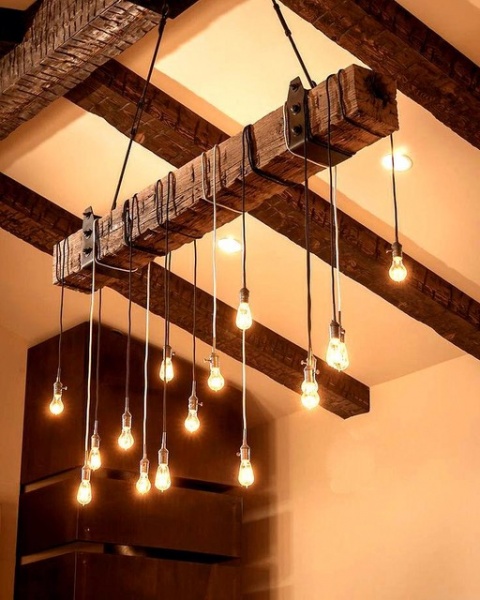
For manufacturing, you will need beams of any cross-section, for example 100×100 mm or less, depending on the desired dimensions of the finished product, as well as a mirror. We recommend making a drawing of the chandelier in advance, which will reflect the lengths of the sides and the area of the mirror part (it should protrude beyond the internal perimeter in order to rest on the beams).
- We make a blank from 4 bars of equal length.
- Next, we form a “lock” - cut out a rectangular cup half the thickness. A cup cutter or jigsaw will help with this.
- We assemble the structure and glue the parts together.
- After this we carry out painting.
- From the top edge we stretch the wiring with the socket and fix it to inside staples or small nails.
- We attach a mirror on top. It will act as a light reflector. We fix it at the corners.
- All that remains is to attach a pendant, for example, a chain.
The accessory is ready.
The video shows a version of the manufacture of such a lighting item, the operating principle is the same:
More ideas for lamps made from boards:


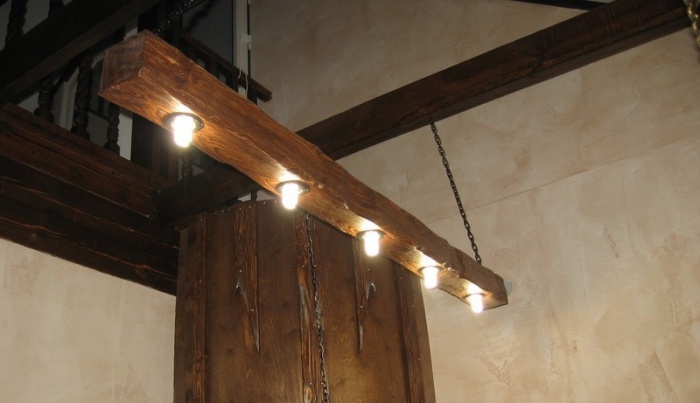
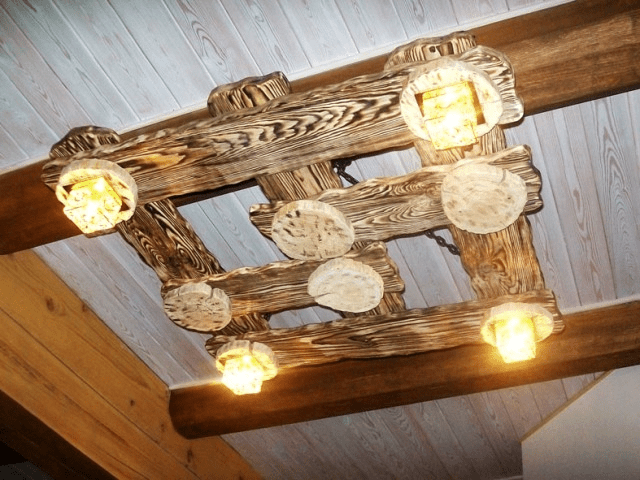
Lamps built into false beams. To make them, we connect 3 boards in a U-shape; wires and cartridges will be hidden in the resulting niche.

The wheel will create an antique effect or hunting lodge, forest bungalow. We attach the electrics to the top side of the wheel facing the ceiling.


Another interesting solution from the boards, watch the video
Master class: lampshades and lamps made of plywood
Plywood – light material, easy to process. You can create a variety of products from it. For example, an unusual night light for a children's room or hall. It will look equally good on the terrace country house and in a city apartment.

Or this:

For a house-shaped plywood night lamp, take universal scheme, on which you can make any pattern!

Now let's start making:
- We transfer the templates prepared for all 4 sides onto a sheet of plywood of any thickness.
- Sent for cutting electric jigsaw(or a laser machine for the finest detailing of petals and small fragments). You can use it manually, but you will have to tinker with a complex pattern.
- Sand the cut edges with sandpaper.
- Roofing work is done in the same way. We cut it to size, make a pattern and polish it.
- Glue the pieces together. To ensure that the thin sheets hold each other securely, we install bars inside the house in the corners, onto which we glue the walls.
- We start the cartridge and fix it on the desired side interior space. The wire can be inserted into the pattern or a separate hole can be made for it.
- We fix the roof and make the bottom. We also glue all the parts onto the corner bars.
- We make a suspension or fastening in a convenient way.
The house is ready. A homemade night light or chandelier can be simple with a simple ornament or designer with a complex idea, wall or tabletop. We present a video master class on making a house from several sections.
A plywood lamp can have any appearance. The main thing in working with this material is the need to cut holes for the passage of light. More photos of night lights and lampshades:


To assemble such a lampshade from plywood, you need to cut out a groove lock on each piece. Then the parts can be connected without glue.

A wooden chandelier diffuses light throughout the room. The parts are connected using decorative screws.
Master class: lamps and chandeliers made from branches
Branches are the most available material for creativity. You can collect them at any time in a park or in a square near your home and immediately start creating. The difference between branches and other wooden pieces is that they do not need to be dried. As long as there is moisture in them, they can be bent and created different shapes. Over time, they will dry out and no longer straighten out.

Before harvesting the branches, you need to decide on the design of the lampshade or chandelier. Will it be weaving or tying thick sticks with rope, will wood be combined with other products - forging, metal frames etc. Here are some interesting ideas:


A master class will help you make such an interior accessory:


Generalized instructions for creating a lampshade from branches:
It’s easy to make a lampshade from branches; you don’t need any special skills or tools.
Master class: log lamp
An ordinary log or even a snag can act as a blank for a chandelier. The main thing is that the material is dried and neutralized from insects and microflora.
- We give the workpiece the required size.
- At the points where the cartridges are inserted, we make holes of the same diameter as the hidden part of the electrical device.
- We attach the hangers.
- We insert the electrics.
You can watch the master class in the video:
Snag or stick unusual shape can be turned into a masterpiece by adding a simple lampshade to it:

Bottle chandeliers
Combined lamps look non-standard, for example, a wooden base and glass bottles as lampshades.

Glass diffuses light and creates shades different color. It’s easy to make such a lampshade:
- IN wooden shield we form holes for bottles. The neck should fit tightly, so we select the diameter as accurately as possible.
- We attach a hanger to the top of the boards. The chains by which the structure can be suspended from the ceiling look original.
- We prepare the bottles. In order for them to give off light, the bottom must be removed. This can be done by heating the glass with boiling water, then quickly transferring the bottle under running cold water.
- We insert the bottles into the holes in the board and pull the electric wire through the neck.
The video shows the process of creating an interesting table lamp.
Wooden lamps self made perfectly complement the interior, making the atmosphere of the home warmer and more comfortable. Original lamps made of wood have been in quite high demand lately, becoming a familiar element not only of home furnishings - they can often be found in cafes, restaurants, museums, and other public places.
Such a thing can fit perfectly into the interior and elevate it if you choose materials that best suit the situation.

Features of the material
Natural wood, in addition to its aesthetic properties, has a number of significant advantages. Products made from it are easy to use and environmentally friendly. When heated, wood does not emit toxic substances, but on the contrary, has a beneficial effect on people with chronic respiratory diseases, having medicinal properties. This effect is especially typical for coniferous species.

Wood is a material that is pliable enough to in capable hands master to obtain exactly the forms that he intended. Therefore, any creative design ideas are brought to life. Luxurious photos of exclusive wooden lamps easily convince of this.


The material is quite versatile, due to which it can be used widely, in almost any type of interior. Interesting configurations and a variety of shapes allow the item to organically fit into any style.

Lamps made of wood in the interior look solid and noble, moreover, they perfectly coexist with objects from the most various materials: plastic, glass, metal.

Along with the listed advantages, wood also has disadvantages. It is highly flammable, for this reason the products should not be placed in rooms with fireplaces, gas stoves and other sources of possible ignition.

The material is very sensitive to temperature changes and high humidity, therefore, placing wooden lamps in the bathroom or kitchen is highly undesirable. In addition, wood attracts small pests - termites and other insects. It is advisable to coat the products with special protective compounds that will prevent their appearance and protect the material from deformation.


When using an electrical appliance, observe a number of simple precautions:
- position the light source sufficiently long distance from open fire (fireplace, stove);
- remember that optimal place for the location of the device, rooms with normal humidity levels and room temperature are considered;
- wooden lamps do not allow the installation of ordinary incandescent lamps in them: their heating temperature is too high, it is unsafe; use LED, halogen, fluorescent lamps.

Application in various interiors
The versatility of wooden lamps allows them to be used when decorating the most various rooms, regardless of style. They are most appropriate in the setting country house, decorated in country style, Provence, oriental styles. The combination of natural simplicity with sophistication is the most valuable quality of wood.

Original “antique” lamps made of wood are widely in demand in retro styles. They are often made in the shape of cart wheels, with candle-shaped lamps located around the circumference. This design is usually used in restaurants, bars, and hotels.

Ceiling models look great in large rooms and living rooms, bringing luxury and elegance to the interior. Spot luminaire options are relevant for small rooms, especially if they have low ceilings.

Lamps of simple shapes, without any frills, are suitable for country style. They may look a little rough, but they will create a feeling of unity with nature and fit organically into the space without conflicting with other objects.
Oriental style requires the use of solid wood, welcomes clear shapes and lines, complemented by oriental motifs.
Characteristic of retro classic options or more original models, stylized as antiques.

Classic makes it possible to use stained glass; a lampshade for a lamp can be made from it; wooden structures have smooth, streamlined shapes.
High-tech allows you to create original designs, combining wood with metal, frosted glass and other materials.

How to make a lamp from wood with your own hands
Of course, by ordering a product in special workshops, you will receive a perfectly made, polished product. However, if you have experience working with wood, you can try to create an exclusive item yourself from the material that is available to you.


DIY wooden lamps are made from:
- branches;
- boards;
- bark;
- cuts;
- logs;
- veneer


If you have an idea that you can’t wait to implement, you can safely get started. First, the wood must be prepared by treating it with protective solutions and impregnations, and wait until it dries completely.
This stage is mandatory: an untreated product will not last long. The structure is then assembled and fastened together. We invite you to try several original options.

Driftwood lamp
This creative idea will not require much effort or expense to implement - use driftwood found in the forest under your feet. They are exclusive in themselves: every bend of the branch is unique. All you need to do is find a suitable specimen, clean it of bark and excess wood, then dry it thoroughly. For drying, a ventilated place away from direct sunlight is suitable.

After complete drying, you need to sand the driftwood well using sandpaper. Determine the side that will be attached to the ceiling. Using a blade, make grooves on it into which you will lay the wires. After finishing work with the wires, the holes must be carefully filled with putty, and then treated with stain and putty to match the color of the wood.

Cartridges are attached to the ends of the driftwood, you can come up with various ways their fastenings. When finished, treat the wood with varnish. It is necessary to lay several layers and dry each one. Choose acrylic or waterproof varnish.


In a similar way, you can also construct table lamp or sconce - driftwood will serve as an excellent base. This idea is easy to implement even if you do not have carpentry skills.

Chandelier made of branches
Gather carefully selected small branches together so that some of them are perpendicular to the ceiling. Next, you need to attach the lampshades to the ends of the branches, and carefully wrap the wires around them. Instead of branches, you can use real rhizomes if you are lucky enough to find one in the forest.

Find and implement your own ideas - wood gives you a lot of opportunities to experiment using your imagination. You will be rewarded for your creative impulses by receiving a designer product that will become an interior decoration.

Photos of wooden lamps


