Who doesn’t dream of building a small cozy home, in which you can relax comfortably and at the same time not save for it for several years? This is quite real, especially if you have encountered construction or renovation at least once in your life.
It doesn’t matter if there have been no such cases, our article will help anyone, even if you have never held a drill or hammer in your hands.
Preparatory work
First of all, you need to familiarize yourself with several rules, prepare a project for a country house made of timber and purchase Construction Materials. In order not to get ahead of ourselves, we will divide this section into several parts.
For your information!
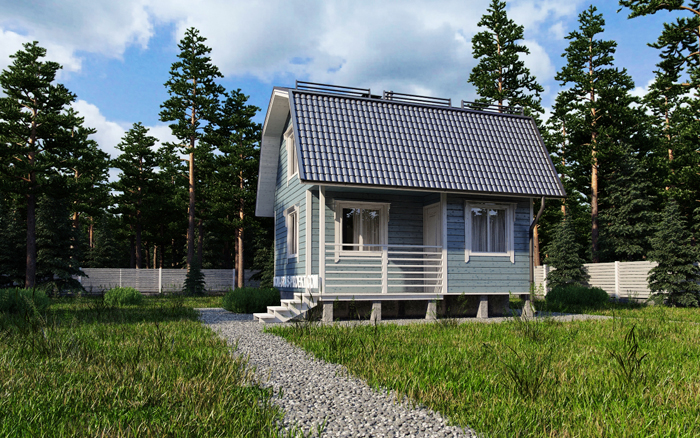
For example, we will consider cottage with dimensions of 4x5 meters, without an attic, but with access to the attic.
Ready-made projects of country houses made of timber are presented in this and other articles on our website.
Construction requirements
- The most important thing is to determine the location of the future building. It must be practical, in terms of accessibility, safe, in terms of protecting neighboring structures from possible fires, functional, in terms of providing all necessary communications.
Some useful tips:- You should retreat at least 5 meters from the street.
- The minimum distance from the fences of neighboring plots is 3 meters.
- Nearby wooden buildings must be located at a distance of at least 15 meters.
- The next step is to conduct a soil analysis to identify its composition, the maximum level of freezing, as well as the presence of groundwater.
- Prepare a place on the site for storing building materials, including covered areas to protect necessary tools from the rain.
Note!
It is better to route the wires of the carriers in a suspended state so that they do not lie on the ground.
This eliminates the possibility of accidental damage, as well as interaction of electricity with water.
Documentation preparation
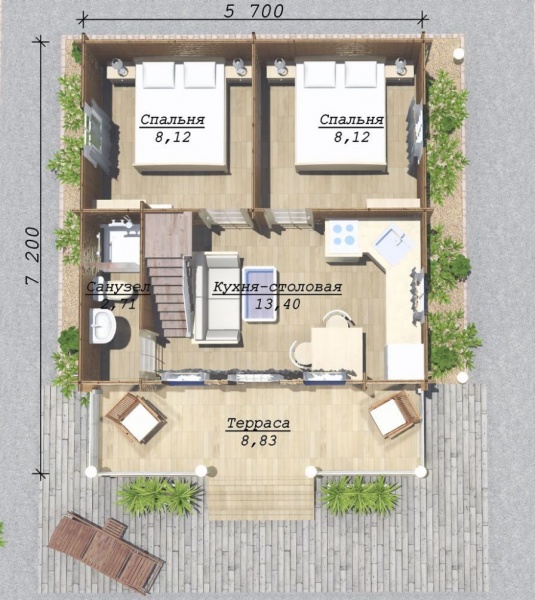
- The first step is to indicate on paper the dimensions of the future structure. Since we have a house with one floor, it is enough to indicate the height load-bearing walls and the height of the roof, as well as the length and width, as a result, your hands will total area Houses. Don't forget that our structure is 4 meters long and 5 meters wide, and 3 meters high, that is, 20 square meters or 60 cubic meters.
- After placing the load-bearing walls on paper, you must indicate interior walls, dividing the room into 1-2 rooms. Since our house is small, one spacious room with a small partition is enough to create a kitchen area.
- The project should indicate all construction materials that will be used in the work processes.
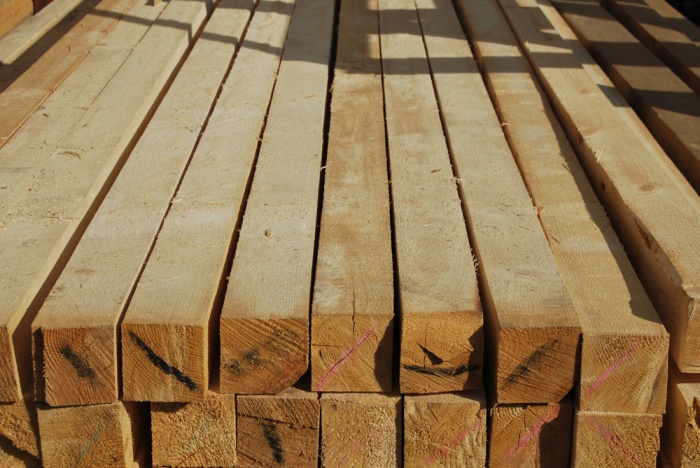
Construction materials
We have decided that the building will be built from timber - environmentally friendly safe material, which is better suited for country house. As for the roof, metal tiles or ordinary corrugated sheeting, so to speak, will do. economical option for a small building.
Concerning finishing materials, then it is best to use varnish or paint, which also have a positive effect on the strength of the structure, protecting the timber from abundant moisture. On the other hand, so that the paint sticks for a long time on wood, it needs to be thoroughly prepared and treated with protective agents.
Important!
The final price of construction largely depends on the type of timber chosen; it can be either profiled material or country houses can be easily built from laminated veneer lumber.
The latter option is more expensive, but less labor-intensive, so it’s up to you to decide based on your capabilities.
Required Tools
- Drill.
- Screwdriver.
- Hammer and mallet.
- Construction level and plumb line.
- Roulette.
- Hacksaw and jigsaw.
- Furniture stapler.
- Roller and brush for paint and varnish.
Foundation construction stage
After all the above procedures have been completed, materials and tools have been purchased, you can begin building the foundation. Typically, small country log houses do not put much strain on the soil, so if it does not consist of sand, then the most economical and practical option the base is columnar in appearance.
It’s easy to make it yourself from any available materials:
- Initially, recesses are dug so that the base of the pits is located below the freezing level of the soil.

Note!
For convenience, it is better to dig a hole half a meter in diameter so that the finished post can be treated with hydrophobic material and then covered with soil.
- 10-15 cm of sand is poured into the bottom of the recess and compacted thoroughly.
- It is necessary to make formwork from available materials (plywood and boards), about 20-30 cm high above the soil level. The cross-section of the pillar is 15x15 cm.

- Now in metal container(or on plastic film) requires kneading cement mortar, mix cement, crushed stone, sand and water to form a thick mixture.
- Pour the solution into the recess.
- Stick 3-4 reinforcement bars into the cement.
- After the solution has set (5-7 days in warm weather), it is necessary to cover it with bitumen.
- Now the hole is filled with soil.
Important!
The pillars should be located in increments of 1-1.5 meters, no more, but no less, although a large number of The use of supports does not affect the technical part in any way, but only affects your budget.
- After all the supports are ready, it is necessary to check the horizontal plane of the base. If everything worked out without any significant differences (an error of 3-5 mm is acceptable), then a piece of roofing material is laid on the pillars.
- Now all that remains is the base, fastening the products with nails.

We build walls
When building country houses from profiled timber, to save money, it is enough to use products with a section of 10 by 10 cm, this is enough to withstand all kinds of loads.
- The first step is to lay out one row on the base.

- The next step is to lay the second row every meter.
Note!
The fasteners should be recessed 1-2 cm into the material so that it does not come into contact with the timber of the next row.
- It is better to start assembling from one corner, build two perpendicular walls, not forgetting about possible internal partitions. If your project has them, then additional grooves should be made in the timber and the internal walls should be laid simultaneously with the external ones.

- Window openings should be left empty until the house has completely settled, with a few exceptions - one row of timber should connect all sides of the window opening. This is necessary in order to avoid unevenness. The same goes for doorways.

Roof installation
When all the walls have been erected to the required height, you can begin installing the roof, one of the most critical moments.
The end result is directly related to the durability and reliability of the structure.
- Initially, horizontal logs are installed, playing the role of a ceiling.
- Vertical supports are attached to them in the center (for gable roof), the height of which should be equal to the intended roof height.
For your information!
In the case of other types of roofing, vertical supports are located depending on what kind of structure is planned.
For example, for pitched roof they are mounted strictly above the load-bearing wall.
- Now it’s time to install the rafters; they should be attached to metal corners and self-tapping screws. The distance between the posts is no more than 60 cm.

- The rafters should be secured together with several horizontal boards.
- From the inside, you need to stitch everything with windproof film; to do this, use a furniture stapler.

- All that remains is to fix the building material that you have chosen for the roof. If this is ordinary corrugated sheeting, then it can be fastened without preliminary drilling, using galvanized self-tapping screws with a drill.
In case you plan to use country house IR all year round, you will need to secure another vapor barrier layer between the rafters with outside.
The need to build a compact house may arise due to various reasons. For example, such a small design is perfect for placement on summer cottage, not used for permanent residence. In a small house you can conveniently change clothes, put your things and spend the night.
Of course, ready-made cabins are sold on the market, but the quality of their execution often leaves much to be desired, and the cost is definitely overpriced. For the same money you can put together a great little house on your own.

Nothing complicated about self-construction There is no compact design. Follow the guide and everything will definitely work out.
Any construction must begin with planning, without which construction will take much more time, money and effort. There is a possibility that the finished structure, built without a plan, will not meet your needs and expectations.

For a small house it is not necessary to draw up detailed documentation with many drawings. Even a simple sketch indicating the main dimensions, communications and other design features will be sufficient.
Think about the order in advance internal organization future small house. Will it have just one room, or will there be enough space for arranging a small kitchen and small bathroom? At this point, focus on your personal preferences and capabilities.
For example, many prudent owners use a very interesting technique: they raise the ceiling and arrange sleeping area in the attic. This solution allows you to significantly save useful space.

It is recommended to pay special attention to the experience of the Japanese. Even on several square meters they manage to place everything necessary to create a comfortable and cozy environment, because even a mini house is still a house in which it is definitely more comfortable than on the street.

The following guide will give instructions on how to build a fairly simple small house. Approximately 75% of the space will be occupied by living quarters, and the remaining space will be used to accommodate a storage room and dry closet.


If with free space everything is very complicated, you can make separate entrances to the mentioned premises from the street. If there are no such problems with free space, and you don’t want to constantly go outside, arrange the entrance to technical room from the living space.
If desired, make your own changes to the plan. For example, instead of a pantry, you can arrange a mini-kitchen with a table, a couple of folding chairs or small stools and a compact stove.

After approval of the plan, proceed directly to construction activities. Start by laying out the foundation.
Foundation
For the construction of a small house, a simple foundation made of blocks is perfect. Very interesting solution invented by Western private developers. They create foundation block with four channels. A reinforcing bar is inserted into each of these channels. The rods themselves are driven into the ground. As a result, the block is securely attached to the ground.


In the project under consideration, the foundation will consist of six such blocks. You will place four blocks in the corners of the future building, the remaining two - under the internal partition.
You can make the blocks yourself from concrete or buy them from finished form.
Dig a hole 200 mm deep with sides corresponding to the dimensions of the blocks.
Fill the hole with a 20 cm layer of sand and gravel mixture. Pack the pillow thoroughly.
Install blocks and introduce reinforcement in accordance with the previously given recommendations.

Cover the blocks with a layer of roofing felt.
Make sure that the blocks are installed evenly and proceed to further planned activities.
Floor installation

First step
Mount the bottom trim. Make it from timber with a cross-section of 15x15 cm. To connect the strapping beams, use convenient option fastenings You can, for example, connect them using the tongue-and-groove method with additional reinforcement with glue and bolts.
Second step
Place a platform pre-assembled from a 15x5 cm board on top of the frame.
Third step
Cover the platform with plywood.

Fourth step
Turn the resulting box over and place insulation inside it.
Fifth step
Sew the insulation with a double layer of plywood. Lay plywood 1.2 cm thick along the box, and 0.9 cm thick across it. As a result, the floor will have a thickness of 2.1 cm. Use PVA glue to fasten the layers of plywood.
Sixth step
Sew the platform with roofing felt on all sides.
At this point the floor is ready. If you wish, you can additionally decorate it with other material to your taste.
Linoleum is perfect for finishing the floor.

First step
Treat timber and boards intended for the construction of walls, antiseptic.

Second step
Assemble the frame of the planned dimensions.

Third step
Arrange the top harness.
Fourth step
Cover the entire structure with plywood.

Fifth step
Attach windproof film to the outside of the walls. At the same time, this material will perform waterproofing functions.
During the construction of walls, do not forget to leave openings for installing doors and double-glazed windows.
Arrangement of the roof structure

The roof structure must be such that in the future, when opening the door, the roof overhang will not be affected. To comply with this rule, the slope of the roof slope must be 25 degrees.
First step
Install the rafters. To do this, use 10x5 cm boards. To fasten the boards, use corners and screws.

Second step
Mount the roof ridge. To make it, use a 15x5 cm board.
Third step
Additionally, fasten roof rafters puffs 10x2.5 cm.
Fourth step
Attach 0.9 cm thick plywood to the rafters.

Fifth step
Lay your preferred roofing material over the finished base. Good fit flexible tiles. It's comparative lightweight material with good operational properties. In this case, the roof of a small house will have small area, so there's a lot of money for finishing material you won't spend it.

Doors and double glazed windows
To create a healthy microclimate in a room, even if it is very small, you need to install windows. It is better to provide places for placing double-glazed windows at the stage of assembling the frame.
To determine the optimal total window area, divide the floor area of your small house by 5. Divide the resulting value by the number of windows you need.

If you are planning to equip your small house with a bathroom and kitchen, think in advance about the order of furniture placement so that the windows do not interfere with the normal use of the house in the future, but are a useful addition.
If possible, windows should be placed oriented towards the south-east direction, since north side there is very little sunlight and low western Sun rays bad for the eyes.
You can buy doors ready-made or make them yourself. It is enough to assemble the frame, fill the voids with thermal insulation (mineral wool is perfect), cover the frame with plywood and upholster it with the desired material.

Wall decoration

External
Proceed with the exterior wall decoration.


Internal
Proceed with interior decoration.
- Secure a layer of thermal insulation material.
- Cover the insulation with a layer of vapor barrier.
- Cover the walls with clapboard.
At this point the wall decoration is ready. After this, it is recommended to start arranging the ceiling and making a porch to your taste. It is better to carry out these activities before the construction of the roof structure begins.
Furnish and technical equipment of a small house according to your taste.


Ceiling finishing
- Cover the ceiling with a vapor barrier material.
- Secure the insulation material.
- Cover the ceiling with insulating layers with clapboard.
On attic you can lay the boards. At this point, focus on the specifics of your situation, taking into account exactly how you will use your attic.
Necessary communications
If necessary, install electrical wiring, sewerage and water supply into the house.

For heating a small house, both an electric heater and a gas convector are well suited. As fuel such gas convectors use liquefied gas. To ensure the most efficient heat distribution, the system should be equipped with a galvanized steel reflector.


A gas convector must be equipped with a smoke exhaust pipe. The chimney is carefully insulated to prevent fires. To protect the chimney from snow, rain and various debris, install a special protective canopy on its street end.
This completes the small country house. You did an excellent job without involving third-party specialists, which allowed you to save a significant amount of money, and you were convinced that there is nothing complicated in the construction of such structures - you just need to follow the manual in everything and adhere to the advice of professional builders. You can start using the house you built yourself.


Good luck!
Video - DIY small house
If you have an idea to build a house with your own hands, then the difficulty of choosing a material will be relevant.
Most budget option There will be construction of a house from timber. Despite the cheapness of this material, the house will be quite warm, durable and strong.
After studying the Internet, you will find that in most cases it is advised to choose timber with a cross-section of 150x150 mm.

But if you don’t want to attract additional labor, such lumber as dry timber 150x100 mm will suit you, which after erection and shrinkage can be insulated using mineral wool. The house will not be inferior in thermal insulation to other buildings made of larger cross-section timber.

Construction stages and foundation construction
And so, the material has been purchased, we begin building the house:

- Initially, it is necessary to clear the space and level the area for the foundation;
- In accordance with the composition of the soil, determine the type of foundation (specialized reference literature will help with this).
The foundation can be piled, monolithic or strip, which is more often used, because wooden houses are relatively light.

After installing the foundation, the concrete should gain strength (3-4 weeks), then we proceed to laying the timber. Even before laying, it is necessary to prepare dowels (dowels) - this is what is used to fasten the timber laid in the crowns together. They are usually made from dense wood (larch).

With a beam size of 150x100 mm, dowels about 12 cm long are suitable. Also, the technology for laying timber requires laying interventional insulation. Usually this roll materials such as jute, you can also use tow or moss.

According to the advice of experts, you should use fresh red or peat moss that has been stored for no more than 3 weeks.
The first crown of the future house should be made of larch, which is not subject to rotting. For greater reliability, it can be treated with bitumen.

The beams of the first crown are fastened together using a technique known as “half a tree” - the ends of the beam are cut lengthwise and crosswise. It is also necessary to fasten such a knot using staples or nails.
Methods of attaching timber to the foundation
At the stage of pouring the base into it upper layer install bolts with curved or cone-shaped bases. The distance between such bolts should not exceed more than 0.5 m. There should be at least two bolts for each element of the first crown.

In the timber of the first crown, even before laying, it is necessary to drill holes for the studs located in the foundation.

Pre-cut roofing material is laid on top of the grillage, which acts as a waterproofing material.

After laying the first crown and securing it to the foundation studs using washers and locknuts, align the horizontal line so that the house turns out without distortions. It is also recommended to check the diagonals.

Having laid the first crown, we begin to build the walls.

To do this you will need a variety of tools:
Note!

- Gasoline or electric saw;
- Hand-held circular saw;
- Drill;
- Level;
- Roulette;
- Axe;
- Hammer;
- Screwdriver;
- Hammer;
- Plane.
Also needed Consumables- nails, self-tapping screws, inter-crown insulation, fire-bioprotective impregnations.

After preparing everyone necessary materials and tools, we begin to build the walls of your future home. The timber is laid in rows (crowns) until the wall reaches the required height.

After laying 4-5 crowns, jambs for door and window openings. At the next stage, the final construction of the walls under the roof takes place.

Construction of roof and floors
We strongly do not recommend saving on materials for roofing installation. This part of the house can be designed in several versions:

- Single-pitch;
- Gable;
- Hip;
- Tent;
- Half-hip;
- Multi-pincer;
- Vaulted and diamond roofing.
It all depends on your desire, Money and the complexity of the rafter system.

Note!

Floors and ceilings in the house are also an important stage of construction. When arranging them, they are mainly guided by personal preferences, but high-quality waterproofing is mandatory for any manufacturing option. This is especially true for basements and plinths.


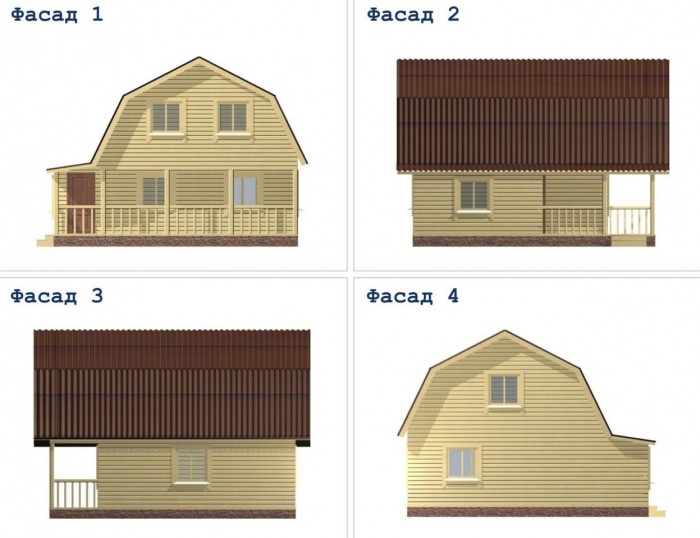
Photo of a house made of timber with your own hands


Note!


We can say with confidence that every resident of a noisy city wants to have a secluded and quiet place where they can escape from worries, problems and stress. There you can relax and gain strength. Such a place is a dacha. Some people use it as a place to relax, but for others it is an area with a lot of possibilities: a garden, vegetable garden or raising animals. Be that as it may, you need a house in your dacha. And if you have purchased a plot of land, the main and primary question for you is how to build a country house. You can hire specialists, or you can do everything yourself. Most often, country houses are built from timber. Such buildings are economical and environmentally friendly.
In this article you will learn how to build a country house from timber. We'll consider detailed instructions, compare some types of timber and learn the intricacies of working with it.
Choosing timber for a country house
If you decided to start construction wooden house 50-100 years ago, there was no need to bother, since the houses were built from logs. Today, thanks to technological progress, many different options for construction technologies have appeared, which have their own characteristics and characteristics. For example, if you need a country house made of economy-class timber, then ordinary timber is used. It is characterized by the fact that it has low price and everyone can afford it. But the material is practically not processed in any way. Its humidity is high, its strength leaves much to be desired, as does durability and precision of shape.
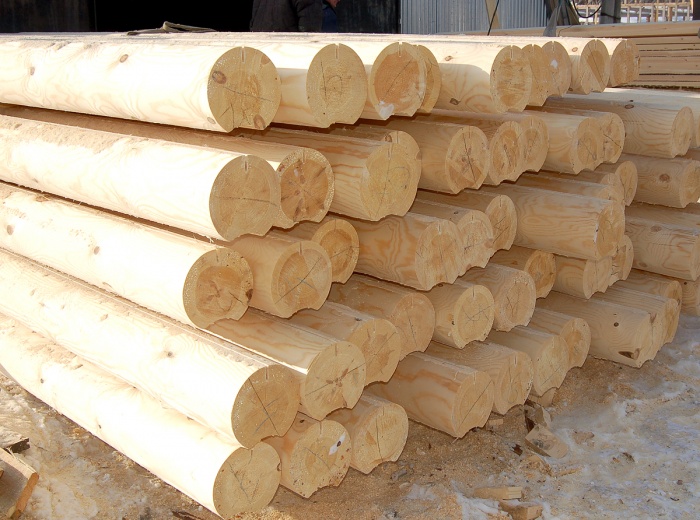
It is much more profitable to use rounded timber that has undergone some processing. It is tailored to size and has lock connection and polished. Appearance the timber is very worthy. However, humidity ranges from 15 to 25%, which causes greater shrinkage.
If you want to build a high-quality, durable, strong, beautiful and warm house, then it is better to resort to using profile timber. Thanks to manufacturing technology, it is several times better than regular and rounded timber. Each element has an ideal shape and a locking connection, which allows you to build ideal ones without gaps. A modernized version of profile timber is laminated veneer lumber. It is 70% stronger than conventional timber, has excellent heat retention and durability. However, construction country houses made from laminated veneer lumber entails big waste. Due to the processing, the material has a high price, so not everyone can afford it for their dacha.

Your primary task is to decide from what material to build a log country house. There are many factors to consider here, including price and personal preference. After this, you can begin to consider the technology of building a log house for a summer residence.
Preparatory work
Immediately before building a country house, you need to find out some nuances, without which normal construction is simply impossible. Once you have chosen suitable look timber, you need to think about this:

Perhaps it is the last point that is the most important. He needs to pay more attention, since the quality of your future country house depends on the project, its design features, type of foundation, etc.
Development of a country house project
A high-quality, correctly compiled and detailed project is like a map indicating the route. It is impossible to build a country house without it. Immediately before construction, you will need to collect some documents permitting construction. So, without a project it will be impossible to obtain permission.
What goes into a good project? Clearly indicated parameters of the building, its design and sketch. These are the dimensions of the country house (length, width, height), number of floors, roof structure. When you have distributed the main walls on paper, you need to choose the number of partitions and their location. They divide the building into rooms. If this is a dacha, then a kitchen, living room and bedroom will be enough for you.
In addition, the correct plan includes the type of foundation and its arrangement on paper. Also included in the project are all the building materials that will be used. And in the case when you want to build a country house from glued, rounded or profiled timber, make a sectional plan. Thanks to it, the company from which you will order the material will be able not only to sell you finished goods, but also to process them correctly. All you have to do is put all the details together to get a finished country house, as in the project.
Now you can start construction.
We build a country house from timber
The first step to take is to build a foundation. Since under construction timber houses Usually they are light in weight, then the foundation can be made simple. As an option - a columnar base. It is quick to build, affordable, and all the work can be done with your own hands. The instructions for creating are as follows:

That's it, the foundation is ready. Now all that remains is to tie it up using timber. A hole is made in it for a metal rod. You can see the correct connection in this photo.

We build the walls of a country house from timber
When the foundation and piping are ready, you can begin building up the walls from timber. If you are working with profiled timber, the process will resemble assembling a construction set. All you need to do is select the right parts and install the bars in their places. How exactly you can build a country house from glued or profiled timber, you can see from this video.
Concerning ordinary timber, then the process is a little more complicated and scrupulous. The first step is to lay the first row of beams on the finished base. Then a second row of beams is made, which is fixed along the entire length with dowels. They are slaughtered at a distance of 1 m from each other. Walls made of timber are built up in this way to a certain size, according to the plan. As for window and door openings, they should be left empty until the country house completely shrinks. This way you can avoid deformation of the timber, skewing and unevenness.

You can learn more about the technology of constructing a country house from ordinary timber from this video:
Creating a roof for a country house from timber
When the timber walls are ready, you can begin to build the roof. The work is quite difficult, as it is performed at height. The first step is to install horizontal varnishes, which will serve as the ceiling. In the center, vertical supports are fixed to them, the height of which is pre-marked in the project.

After which the rafters are installed, the fastening of which is done different ways. The most common is through metal corners and screws. The rafters are installed in increments of about 60 cm. They are attached to each other with horizontal boards and jibs. All that remains is to make the sheathing and cover the roof with the roofing material of your choice, which should also be in the project.
Conclusion

That's all, your country house is ready. All that remains is to complete its insulation and finishing. True, if you built a house from ordinary timber, then you need to wait six months or a year for the building to shrink. If it is laminated timber, then perform further work you can immediately. Your log cottage is ready and waiting for its owners.
It is the dream of any city dweller to have a house outside the city, where one can take a break from the bustle of the city and breathe fresh air. One day spent in such a place gives you a supply of energy for the entire working week. But not everyone can afford to have such a house.
In this case, people with a limited budget can either buy a ready-made frame garden house or build a garden house with their own hands.
If you decide to buy a ready-made small country house, then currently on the construction market big choice such houses. There are options for small frame houses, which are perfect for placing them on a summer cottage, in a garden or in any place for organizing active recreation.
These frame houses They are well insulated, so you can save on heating them, since the costs are minimal.
Large houses are perfect for the role country cottage. Companies manufacturing garden houses, not only offer ready-made houses, but they can also build a house according to the customer’s individual project.
Below are examples of finished houses.

There are many options for using these houses as garden houses, fishing houses, and for equipment. To make the houses that are presented below, wood was used that was processed by special means, therefore they have high strength, reliability, environmental friendliness and durability.
Depending on the size, a frame garden house may have different purposes. A small house can be used as storage space for storing household equipment. It is possible to make a house to order according to an individual project.
Selection of materials and step-by-step construction
Before you start building a frame garden house With your own hands, it is important to think about what materials will be used and calculate the required quantity. To build a frame house, you need to prepare the following building materials:
- timber for constructing the frame;
- edged board;
- insulation;
- polyurethane foam;
- roofing felt;
- hydro- and vapor barrier;
- fastening material.
For easy frame structure you can use a columnar foundation. If you build the foundation yourself, the cost of the work will be about 10 thousand rubles. When installing strip foundation it will take more time, but the foundation will be more reliable and durable. The cost of such a foundation will be 15-20 thousand rubles.

The amount of building material for the walls of a frame house depends on the size of the future house. For example, you can take a house 2.8 m high, 10 m long, 8 m wide. Using these parameters, the number of vertical racks for the frame of the house. The perimeter of the house is 36 m.
The racks should be located at a distance of 50 cm from each other. If you use timber with a cross section of 10*15 cm for the racks, then you will need about 4 cubes of timber. To construct the base and the final connection, you will need 3 more cubes, for a total of 7 cubes.
- If you use an edged board 3 m long, 15 cm wide and 2.5 cm thick to cover the walls, you will need 4.65 cubic meters of board.
- The cost of the frame with walls, partitions, door and window frames will be approximately 70-80 thousand rubles.
- You will have to spend about 20-25 thousand rubles on interior decoration with the cost of materials and hired specialists.
Thus, a lightweight frame house for a summer residence will cost about 250-300 thousand rubles.
Having decided to have Vacation home, you need to decide which house is best to build. You can buy ready-made. The construction market now has a large selection of companies that sell ready-made houses or build custom individual projects to order.
But if you have a little experience construction work, then you can build a house with your own hands, embodying all your fantasies in it. In addition, you will be able to save on construction costs.
To realize your dreams ideal option is the construction of a frame house. Such a house can be erected very quickly, is cheap, and besides, anyone can build it with their own hands.

Garden house design
Usually we build frame garden houses either from plywood or timber. Below we will consider both construction options.
From plywood
It is believed that the simplest in assembly and design is a frame country house made of plywood. Its construction lasts literally a week. If you make him beautiful external finishing, For example, wooden clapboard, then it will have a quite presentable appearance.
The list of materials for building a house depends on the personal preferences, tastes and financial capabilities of the owner. Therefore, only an approximate list will be considered.

The following tools should be prepared:
- saw;
- screwdriver;
- drill;
- hammer;
- roulette;
- building level;
- plumb line;
- set of screwdrivers and drills.
Materials you need to purchase:
- cement and sand;
- waterproofing - roofing felt;
- 4-meter board measuring 5x20 for mounting floors and frame rafters;
- 4-meter board measuring 5x15 for the construction of load-bearing frame walls;
- 4-meter board measuring 5x10 for internal partitions;
- plywood;
- OSB sheets;
- mineral wool as a heat insulator;
- flooring;
- thick board for the floor;
- drywall;
- fastening material.
- Covering the frame with plywood. When covering walls, it is necessary to perform thermal insulation using insulation. The outside of the house is sheathed with plywood, which is secured with self-tapping screws. Interior decoration performed with plasterboard, plywood, chipboard or fiberboard. Before installing a clean floor, insulation should be done. As flooring You can use linoleum or floorboard.
Foundation construction. At the beginning of any construction, we build the foundation. Since frame houses are lightweight, a strip or column foundation is suitable for them. For a small garden house it is better to use a pillar foundation. To build the foundation you will need garden auger. With its help, holes are made about 1.6 m deep in increments of 2 m. Posts are inserted into these holes.
To make the structure stable, a sand cushion about 0.2 m high is made. Before inserting the pillars, it is necessary to waterproof the holes using roofing felt. Cuffs are placed over the holes, and then everything is filled with solution.
Construction of the frame. The basis of the frame is the lower frame. It is carried out with beams along the entire perimeter of the future building. Bottom part strappings and joists should be treated with an antiseptic to protect the wood from fungus and insects.
It is important to protect the wood from rotting by placing a waterproofing layer between the foundation and the wood. Next, vertical supports are installed, which determine the height of the future structure.
You should not make the house too high, as it will be difficult to heat it later.
Thick boards are used to construct the subfloor.
Roof installation. To erect a roof, rafters must be installed. To speed up installation, racks 1.5 m high should be installed in the center. A beam is attached to the racks, which is joined at the edges at an angle of 50 degrees using an end connection.
Rafters are installed on the resulting structure. You can install the roof yourself in one day. As roofing material you can choose any one, it depends on personal preferences and financial capabilities. For the house in question, galvanized iron is suitable.
From timber
The technologies for constructing a frame garden house made of timber and a house made of plywood are similar. Similarly, first of all, the foundation is made: columnar or strip. Columnar foundation chosen for a small house.
Can be used concrete slabs, laid on a sand cushion and deepened into the soil by 15 cm. Roofing felt is laid on the built foundation for waterproofing.

After the foundation, the frame is erected. First, the lower frame and logs are laid on the foundation, then the vertical supports are installed. The construction of the frame takes a little time, but the structure is strong and durable.
There is an option for a garden house with a veranda. To do this, you need to extend the lower logs to the length of the proposed veranda, using additional supports.

The subfloor is laid with thick boards. For thermal insulation, the floor is first covered with insulation, then hydro- and vapor barrier is performed, for example, glassine. For flooring, you can use thick linoleum or floorboards.
Following the installation of the floor, the walls are made of timber. The connections are fastened with dowels. Insulation is laid between the crowns. Insulation must be done for each layer. Tow or jute can be used as insulation. Then the roof is mounted: braces and rafters made of timber are installed. At the next stage, the sheathing is carried out with timber and a layer of roofing material is laid.
A country house can be made more attractive if the exterior is finished with siding or wooden clapboard.
After the basic work on building a house with your own hands has been completed, you can install windows and doors and move on to interior decoration.

Building a house made of timber takes longer than a house made of plywood, but it is more reliable and durable. Be that as it may, a house built with your own hands will serve you for many years.