If you find that an old chair is completely worn out, do not rush to throw it away. Often old pieces of furniture bring with them pleasant memories of people and events in your family's life. And what’s the truth? Previously, furniture was made to last...
Therefore, a restored chair may well serve not only you, but also your children. Simply by changing its appearance, you can return the furniture to its former attractiveness and novelty. Fortunately, there are many options now. Everything will depend only on your imagination.
How to update an old chair? Pre-cleaning
To begin with, the surface of the chair needs to be clear from old covering, whatever it may be. If there is soft seat upholstery, it must first be removed. To do this, you don't necessarily need " male power" Try turning the chair upside down and you will see that the seat is attached with screws that need to be removed. To do this, you need to arm yourself with a hammer (for knocking out the seat) and a screwdriver (straight or Phillips).
Now you can start removing the old coating. To do this, you can use regular sandpaper of different grain sizes or a sanding sponge. It is important to sand the surface of the wood well. This will help you easily apply the coating you choose later. It is worth saying right away that this work is not easy.
But it is possible to simplify the process a little by periodically moistening the surface to be treated. This way you can get rid of dust. Just don't be afraid of the moisture old varnish becomes viscous. This is fine. After the chair has completely dried, you need to sand the entire surface well again with fine sandpaper.
How to update an old chair? Everything is in order
Now it all depends on your imagination. If you decide to varnish the surface of the chair, you need to use a colorless primer so that the texture of the wood is clearly visible through the protective layer. A layer of primer will have to be used in any case. Even if you decide to paint the chair in the future.
The fact is that paint adheres better and lasts longer if the surface is first primed.
The surface must be coated with varnish in two layers. It is important that the first coat is thoroughly dry before applying the second. The varnish can be applied with a brush or by spraying it over the surface.
The chair can be painted any color. Nowadays furniture is considered very fashionable white. And the seat upholstery can be contrasting. Nowadays there are many ways to show originality. For example, use a stencil. Let it be flowers or any other ornament.
Another way to cover the surface of a chair is beeswax balm. The surface is also pre-sanded and primed with drying oil. Then cover with a thin layer of balm using a cloth. After twelve hours, the surface is polished with a brush.
Now you can begin restoring the upholstery. The old one needs to be removed. Previously, it was attached to the seat using ordinary nails. You will also have to get rid of the foam rubber. It is necessary to cut a new one according to the old standards. The fabric must be cut with a margin for hemming. The upholstery material can be very different: like a special fabric for upholstered furniture, as well as regular linen or thick cotton. It is better to fasten the fabric with a furniture stapler. But if you don't have one, don't worry. You can use regular nails by hammering them in. It is important to remember that the material must be well stretched on all sides.
Now the seat can be inserted into its original place and fastened with screws.
Upgrade an old chair with a cover
There is another way to ak update old chair - use a cover. It can be made from any fabric, hiding defects and imperfections without major intervention. The cover can be with a variety of frills, ruffles, bows, tassels... You can make several options. Holiday option and casual. Show your imagination! Don't rush to throw it away old furniture, try to become a designer, we are sure that you will succeed!
Sometimes there is no point in buying new chairs at an inflated price. Often refined designer furniture created from old blanks restored beyond recognition. Restoring chairs with your own hands will help you “breathe” second life into your apartment decoration with the help of the following instructions and tips experienced craftsmen. Ultimately, you will get a product that is durable and comfortable, knowing how to repair it. An updated Soviet chair will become a real asset to your home interior.
Even high-quality furniture elements are subject to mechanical breakdowns and surface abrasion. Often, through our fault, favorite pieces of home furniture become unsuitable for further use. The legs and back suffer the most - other parts are more or less unharmed. Old chairs are often twisted and decorated into first-class poufs and armchairs. It costs a lot of money when ordering a service from a professional designer to restore a chair.
At home, you can restore wooden chairs with backs and stools without the help of a professional carpenter - it is not necessary to have extensive experience in decorative and applied works. It is enough to see at least once how to reupholster the soft part. What you see will help you figure out how long it will take to restore your chair.
The experience gained will help you experiment with more in the future. complex structures(hallway, sofa, wardrobe, table, bed, chest of drawers and other wooden attributes of the house). A completely unnecessary and aged item can be turned into a real functional decorative element. All this can be done from an old chair in a new way.
Craftsmen know different ways to restore furniture - remaking a chair and restoring a stool depend on the degree of damage to the parts. The most common chair breakdowns:
- damaged legs, loose back, loose seat, other defects in wooden parts;
- worn out upholstery of old furniture;
- severe abrasions paint coating.
The repair scheme should be selected depending on the availability of certain problem areas. In many cases, it is enough to fasten the parts with new fittings. The same renovation trend extends to worn upholstery. Worn fabric and foam rubber need to be replaced with new elements: sheathed with a new flap. In fact, there are no antique chairs that are unsuitable for restoration, even if your grandmother painted them. In the master class below you will learn how to update an old chair and how to tastefully paint its surface.
Upholstered chairs “Before and After”
1
2
3
4
5
6
Refreshing the color and design of old wood
The complete or partial transformation of a restored chair directly depends on the availability of certain tools and materials. Not many people know how to properly restore old chairs at home. In the process of restoration kitchen furniture you can’t do without a drill (screwdriver), a small hammer, two different types screwdrivers, scissors, brush, clamp, stapler with mounting brackets, sandpaper, small mallet and scissors. As the last component you will need:
- self-tapping screws;
- wood glue;
- foam pillow;
- varnish and coloring agents;
- a piece of upholstery fabric.
At the first stage of repair, the surface should be restored. The furniture is cleaned of dust and thoroughly wiped with a wet sponge. Next, the seat and back of the body are removed and the components are disassembled. Sometimes it needs to be fixed. Use rubber mallet, instead of a metal hammer, so as not to damage the parts.
If the chair is assembled using screws, the structure is disassembled without special effort with your own hands. It is enough to unscrew them for complete dismantling. You need to fold them in such a way as not to confuse them later. To clean the remaining epoxy glue, use a dampened rag, then carefully scrape off the old with a dull knife. The cleaned frame is left to dry for some time. Only then is the structure restored and remodeled.
To remove epoxy adhesive in labor-intensive areas, use steam jet pressure instead of water. In the absence of a special device, a proven “old-fashioned” method is used to perform the delicate procedure - using a hose with a tip that is placed on the spout of a kettle to transform the tree.
Changing the look of furniture: the best example
The step-by-step process of restoring the old stool should be carried out as follows:
- Treatment with putty against all kinds of chips and cracks.
- Sanding wood with different types of sandpaper (first coarse-grained, then fine-grained).
- Inspection of the complete structure being repaired (correction of looseness by gluing and other methods).
- Seat restoration (with soft upholstery or with a hard seat).
- Decorating the surface of a wooden chair base (varnishing or painting).
Removing old varnish Will speed up the process of removing the old layer Sander The legs can be securely fixed using wooden scarves. You will also need studs with nuts and washers. Polishing and painting are best done on fresh air
We stretch the upholstery, securing it with a construction stapler at a distance of no more than 1–2 centimeters. Depending on the shape, the fabric at the corners can be fixed like this. Another way to secure the fabric at the corners
How to Repurpose and Paint an Old Wooden Chair
Do-it-yourself restoration of old chairs is aimed not only at updating the frame. The upholstery of an antique chair can be decorated different ways with your own hands:
- Fabric covering of the soft part or removable top cover.
- Updating the back with a decoupage pattern to match antique chairs.
- Restoring the back with durable textiles (a piece of denim, rope, tapestry, jacquard or velor).
- Additional decoration for upholstery - macrame.
- Reupholstering the too soft backrest with belts (you need to remove the old upholstery, replace it with simple mesh with square cells).
You can find it online great amount Photo and video different ideas craftsmen who restore furniture. The new back of an old piece of furniture can be decorated with a hand-sewn fabric cover. Individual capes and covers can be changed based on the interchangeable design of other home attributes. Each master decides for himself what can be done using old wooden chairs. By choosing what to paint, you will restore the product in an individual style.
It is very disappointing to throw away something that is part of a furniture set. Do-it-yourself restoration of chairs will help you avoid damaging the package. Also, don’t be upset if something that plays the role of exclusive fails. dear to my heart, memorabilia. And here restoration can work real miracles.
Paint coating of chairs
What is a favorite chair? These are wonderful moments of returning to childhood... Or the memory of a loved one... Or even a chair can be passed down from generation to generation. Or something else, but so dear that you don’t want to part with it.
But, unfortunately, a thing cannot last forever. The furniture gets scratches and peels. alas, it becomes unpresentable. However, restoring old chairs with your own hands will help preserve the item for some time.

Often, before varnishing, a chair needs to be completely cleaned. old paint or varnish. This process requires patience and perseverance from the master. But the payment for labor will be fully consistent with the efforts invested.
Decorating chairs
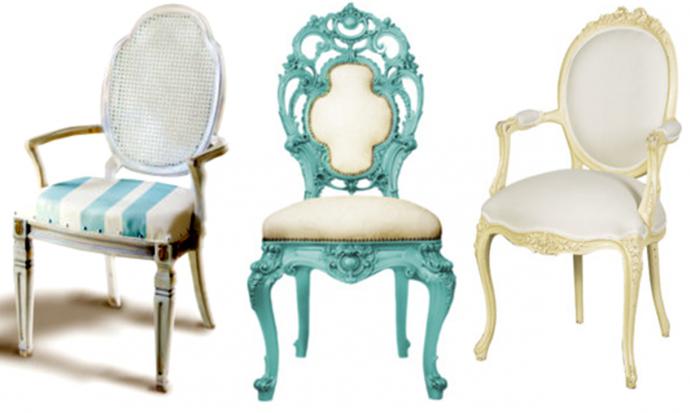
Sometimes it makes sense to make drastic changes color scheme furniture. Chairs painted white or gold look very creative. Often craftsmen choose other colors for the wooden part of the chair: blue or light blue, pink or bright red. But then the upholstery should be pure white or with golden ornaments. The elegance of this design transports people to the times of Catherine the Second, reviving palace luxury.
White furniture can be decorated with gilded ornaments, simply drawn or made in the form of a bas-relief. Blanks for this type of decoration can be purchased in stores or cast yourself from plaster and glued on. Restoring and decorating chairs with your own hands in an antique style will add charm and originality to the design. Sometimes the edges of the upholstery are decorated with beautiful braid and tassels.
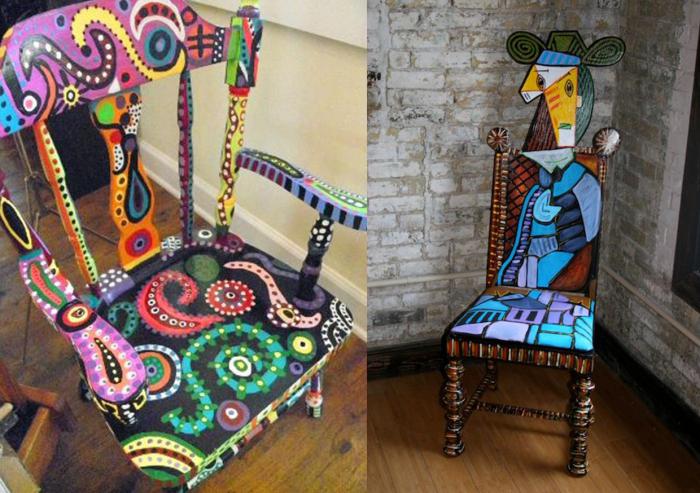
Chairs painted in a cubic style will also change the image of the room. And some will prefer floral or plant colors. In any case, surface coating will protect the item from corrosion and increase its service life. Therefore, the practical benefits that such a DIY restoration of chairs will bring are also obvious.
Comprehensive instructions for replacing failed parts
Except appearance products, owners of beautiful antique chairs are concerned about their functionality. Therefore, do-it-yourself restoration of wooden chairs includes replacing some parts in the product. For example, it is difficult to turn a broken strip from the back of a chair absolutely identical to the remaining ones. Therefore, it is recommended to make the required number of slats of a different configuration, but of the appropriate size (height and thickness). You can even try to buy them in a store, although it will be very difficult.

Repair of Viennese chairs
Very often the slats simply fall out of their sockets. This defect usually occurs Viennese chairs. Do-it-yourself restoration in this case occurs according to the algorithm described above. Only here you no longer need to remove all the slats from the lower grooves. It is enough to clean the vacated hollow from the remnants of dried glue, fill it with an adhesive compound and strengthen the fallen part in it.
Upholstered chair repair
Furniture plays a role in our lives important role. For example, soft chairs look elegant and stylish in the interior. And it’s much more comfortable to sit on them than on regular ones.
The most common repair is do-it-yourself restoration of chairs when it comes to upholstery that has lost its visual appeal. It also often has stains or even holes that cannot be removed, unsightly abrasions, and fades in time. bright colors. And sometimes you just want to change the entire design of the room, redo it in a different color scheme.
Restoring an upholstered chair with your own hands will not take very much time. Even an inexperienced craftsman, a teenager or a woman can produce it. It is only important to choose sufficiently durable upholstery fabric and professional furniture foam rubber.
Calculation of fabric when replacing upholstery
Often a set of furniture is used in the interior. In this case, the upholstery is usually replaced on all chairs at once. Therefore, you should calculate in advance the size of the fabric needed for the restoration.
First you need to measure the width and length of the seat. Do not forget to add a centimeter on all sides for the hem of the fabric. Most often, this part is square, measuring 50 by 50 centimeters, that is, 50 square centimeters.
Then, if the chair has a soft back, the same must be done with this part of the object. By calculating the size of upholstery needed to restore one chair, you can calculate the amount required material for all chairs. Simply multiplying the result by the number of objects (usually 6 pieces), the restorer will receive the number of square centimeters. They need to be divided by the width of the upholstery fabric that you found in the store. The answer to this problem will include the number of required “linear” centimeters.

It is best to buy a little more material, with a reserve, because otherwise, the craftsman may have to sew the fabric together, because when cutting, there will be a piece left in one strip, and a piece in the other.
And to avoid this, the master will also need the ability to lay out patterns on fabric in such a way that there is as little unused fabric left as possible. This will not be difficult to do if you prepare the number of details you need from the newspaper in advance.
Upholstery replacement
If restoring old chairs with your own hands consists only in the fact that the master needs to change the fabric on the soft part of the object, then this will take very little time.
It is enough to simply unscrew all the parts that require repair, that is, the seats and backrests. Then it is removed from them old upholstery, a new one is applied, a hem is made, the edges are nailed with small furniture nails with wide heads. In the absence of such, small pieces should be cut out of cardboard or leatherette. Before hammering, you need to put them on the nails so that they hold the fabric tightly and do not slip through the holes punched in the fabric.
First, secure the front part of the seat. The nails are distributed quite often, 0.7 centimeters apart. If necessary, make small folds that are permanently fixed.
Then the second symmetrical side is pierced, stretching the fabric. After this, work with the sides, leaving the corners free. Before stuffing, they should be carefully stretched, straightening the fabric so that there are no folds on the front of the upholstery.
The last stage of this repair is to fix the corners of the upholstery with staples. If the thickness of the plywood or fiberboard used for the frame of the soft part of the chair is 3-4 mm, four-millimeter staples will be required. You definitely need to take this fact into account! Naturally, if the frame is made of material 10 millimeters thick, then the staples are 10 millimeters thick.
Replacing padding when repairing an upholstered chair
The amount of foam rubber is calculated in the same way as for upholstery fabric. Only now you no longer need to add hem allowances. Instead of foam rubber, you can use batting.
Sometimes it makes sense to not completely replace the packing. Then it’s enough just to apply a “patch” in the place where the pressure was pressed, and cover everything on top with a thin layer of batting or foam rubber.
If it is produced complete replacement padding, then all parts should be removed from the seat: screws, staples, nails. It may be easier to cut out a new seat piece from plywood or fiberboard, attach the padding to it, and cover it with new upholstery on top.
Sealing the joints of chair parts
Loose furniture can be repaired in two ways. One is to tighten the joints using screws or bolts. They should not be screwed into the old grooves, but nearby, if possible. Sometimes a craftsman needs to use a “patch” cut from soft metal.

The second method is gluing. Then the chair is disassembled into parts and the joints are cleaned of old glue. Having carefully coated the joints, the parts are connected and tightened with clamps.

Repairing broken legs
The most difficult thing is if the “trauma” to the chair consists of a “fracture” of a part. For an ordinary chair, you can completely replace a part by turning another one. But it is almost impossible to make a twisted or curved leg at home, which is typical for, for example, Viennese chairs.
Do-it-yourself restoration in this case is carried out only with the help of glue. Moreover, tightening the part must be done not only in the gluing areas, but also at the ends of the leg, so that its size remains the same.

After drying, the joint is treated with sandpaper. To fix the “fracture” more reliably, you need to sharpen it with inside a groove into which you then glue a wooden plate, drowning it completely.
Can also be used metal part, placing it on self-tapping screws. The excavation site is then carefully covered with putty or a mixture with sawdust, leveled, sanded and processed
One of the easiest and most unexpected ways to update an old chair is to repaint its upholstery. This option will help if the upholstery is not damaged, but, for example, you need to hide stains or just want to change its color. You can repaint the upholstery using spray paint or paint from a can. Choose universal paint or acrylic for fabric, and before starting painting, you can apply a layer of special primer. You can find paint and primer at hardware, art and craft stores. The bonus of such a remodel is that the upholstery treated with paint acquires not only a new color, but also water repellent properties, and stains from it can most often simply be removed with a damp cloth.
You will need:
Fabric paint;
A large brush for covering wide surfaces and a small brush, which is more convenient for painting edges;
- container for mixing paint;
Spray bottle with water;
If desired, use masking tape, which can be used to protect the wooden parts of the chair from paint getting on them, and you can do without a primer).
1. First, remove the cushions from the chair. Clean off all the dust, wipe the upholstery with a damp cloth; if there are significant greasy stains, it is better to treat them with a stain remover so that they do not prevent the paint from laying flat.

2. If you wish, coat the surface of the chair with primer. You can do without it. In this case, first saturate the upholstery with water by spraying it with a spray bottle. Don't forget the chair cushion(s). While the upholstery is still wet, dilute some paint with water in a 1:1 ratio and saturate the upholstery with this mixture. This step is especially important if the upholstery of your chair is made of thick fabric. Can be protected before painting wooden parts chairs with masking tape.

3. When the first layer is completely dry, you can begin the second. This time cover the chair with undiluted paint. Carefully brush over all corners, painting everything required areas upholstery.


5. If you wish, you can decorate the finished chair with decor by placing it on glue. Ready!


More ideas for re-upholstered chairs:


2. How to reupholster a chair: master class

This method is, of course, more complicated than repainting. However, by reupholstering, you can almost completely renew an old chair, getting rid of holes and scuffs and getting an almost new piece for your interior.
You will need:
Fabric for upholstery (choose durable, dense fabric);
Scissors;
Sewing machine and thread;
Furniture stapler and staples for it;
Glue gun;
Braid for decoration;
A screwdriver to remove staples from the upholstery of an old chair.
1. Using a screwdriver, carefully remove the staples securing the upholstery parts to the chair. The removed parts will serve as patterns for new upholstery parts of the same type. You can remove not all of the upholstery or, if you wish, not remove it at all. Then you will have to take measurements from the chair and make patterns for new upholstery parts.

Photo: awesomesauceassashattery.com
2. Cut out new upholstery parts from fabric, not forgetting about an allowance of at least 2 cm. Start attaching them to the chair with a furniture stapler, as shown in the photo.


Photo: awesomesauceassashattery.com
3. The piece for the back of the chair may need to be constructed from several pieces to ensure it fits well on the chair. Having sewn it, attach the part with a stapler to the back, folding the edges of the fabric.

Photo: awesomesauceassashattery.com
4. Tape and a glue gun will help hide the attachment points of the back part.


Photo: awesomesauceassashattery.com
5. Finally, sew new case for a chair cushion.

Photo: awesomesauceassashattery.com
More ideas for upholstered chairs:


Photo: fourgenerationsoneroof.com


Photo: lovelylittlelife-hannah.blogspot.com

3. How to restore an old “grandmother’s” chair: master class
Several decades ago, such chairs were in almost every Soviet apartment, and in some houses and dachas they have survived to this day. By the way, today such “grandmother’s” chairs, like other items of Soviet design, are again in fashion. No wonder: the design of this chair is simple and durable, it is comfortable, elegant and laconic. To old item furniture could decorate your interior, the chair needs to be restored.
Working technology:
1. Remove the wooden parts of the legs and armrests, clean them of old varnish, if necessary, glue them and cover them with several layers of new varnish.
2. Carefully remove the old upholstery fabric. If necessary, replace the foam rubber by attaching it with a furniture stapler.
3. Using the old upholstery pieces, cut out new ones and attach them to the chair with a furniture stapler.
4. Screw on the parts of the legs and armrests.
Ideas for remodeling a “grandmother’s” chair:

As a result of natural aging and mechanical influences, furniture loses its quality. Its restoration seems to many an impossible task. Covered in this article specific example shows how to quickly and easily refurbish an old wooden stool.
Old furniture is usually thrown out or taken to the garage, where it lies and gathers dust, and then accidentally comes into view. That’s when the idea arises to give it a second life. By following the basic rules of restoration, you can repair old table, chest of drawers or closet. It also turned out to be unnecessary old stool. It lay there for about a couple of decades. When the stool caught my eye once again, it was decided to repair it.
Restoration work consists of certain stages. Preliminarily analyzed general state products: structural integrity, quality of wood and paintwork. A decision is made on the feasibility of carrying out restoration work. Then the stages of restoration actions are planned.
In a particular case, inspection of the stool showed the following:
- Despite its simplicity, the stool was made of well-dried and quality wood;
- all connections turned out to be loose, but intact (after disassembly, defects may appear);
- There were no damaged parts.
This is what we need to restore this stool.
Tools:
- Chisel.
- Drill.
- Wood drill.
- Grinder machine.
- Sandpaper fine and coarse grain.
- Wood saw with fine teeth.
- Mallet.
- Brush.
- Tape for tightening.
Materials:
- Waterproof wood glue D3.
- Stain.
- Wood varnish.
- Dye.
- Furniture dowels 6x30.
We start by disassembling the stool. Carefully pry up and remove the seat.
The master who made this stool did without nails. The tenon joints were additionally reinforced with dowels; they could not be pulled out. Therefore, we drill it out - take a wood drill with a central tip.


When disassembling, the main thing is not to confuse the connection elements. You can mark them, but it’s easier to lay them out sequentially, as you can see in the photo below.

Now we take one part and sand it.

Immediately clean the grooves from the old glue and put the workpiece back in its place.

This is how it should turn out.

After sanding all the workpieces, we assemble the stool “dry” and check ourselves and the connections themselves. We coat the joints with glue. This needs to be done quite quickly - until the glue dries (usually 10-15 minutes).

We assemble the frame; if necessary, we help with light blows of the mallet through the lining. Immediately wipe off excess glue. Now we tighten it around the perimeter with two ribbons.

Place it on a flat surface and use a square to check the right angles.

While the glue dries (1-2 hours is enough for ours), sand the stool seat.

We drill holes for the dowels to a depth that takes into account the length of the dowel and the thickness of the stool cover (so that they do not come out through the seat). Immediately place the dowels on the glue.

We mark the locations of the recesses on the back of the seat.

Apply glue to the top of the frame.

We install the seat in place.

Align the holes for the side dowels.

Use a mallet to hammer the dowels in until they stop and cut off the protruding parts.

We clean the traces from the hacksaw and glue.

We cover the seat of the stool with stain, and after it dries - with varnish. We paint the bottom of the stool in 2 layers grey colour. The stool is ready.

Vadim Kirkin, rmnt.ru