Plastic bottles are a real boon for creative people. Even beginners with no experience can independently make a variety of crafts from this material. Recycling plastic not only makes the raw material practical, but also saves environment, improving the environment. Unusual ideas With step by step description will help you make crafts to decorate the garden and decorate your summer cottage.
Original ideas for crafts from plastic bottles for the garden step by step
Plastic bottles are considered an affordable raw material; making funny figures does not require any creative skills. Additional tools you need are scissors, paints, a stationery knife, and other available materials. For getting beautiful crafts It is recommended to stock up on other plastic products – cups, plates, spoons.


Flowers: how to make an open bud
Buds of daisies, roses, bells and lilies of the valley - with all this you can decorate your garden space without much effort. Large flowers made from five-liter plastic bottles look great. To get started, you need to prepare the bottoms of the bottles, scissors, and acrylic paint. The step-by-step process looks like this:
- Bottle bottoms must be cut along lines that are clearly visible. The incision is not made all the way, leaving 2-3 cm in the middle.
- From each petal you need to cut 1-2 thin strips and curl them beautifully towards the center.
- Fire is used to give the flower its shape. You can take matches or a lighter: bring the bottom of the bottle to the fire and turn it in the desired direction. The bottle begins to melt, taking on a different shape.
- At the final stage, the product must be painted with acrylic. You can use a brush or a foam sponge - this will prevent streaks from being visible.
The photo shows that such products are suitable for decorating flat surfaces. You can decorate the fence with plastic flowers, place them in the garden near the house, and also equip the tiled path with them.


Palm tree - an exotic garden decoration
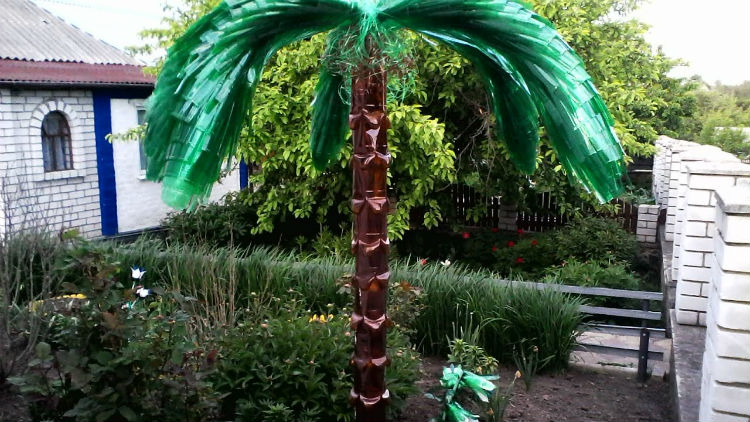
A palm tree from plastic bottles. Making such a garden decoration item is not difficult, the main thing is to follow the sequence of stages. First you need to prepare the materials: a large number of brown and green plastic bottles, a stationery knife, tape, a tube for decorating the barrel and a thick rope. The master class looks like this step by step:
- Creating leaves.
- Creating a trunk.
- Assembly of all parts of the structure.
To make a palm tree crown, you need to cut off the bottom of green bottles, and top part cut into small strips and bend them in the other direction. There is no need to touch the lid and neck. Depending on the number of bottles, the palm will be thicker or vice versa. After this, you need to take brown bottles, cut off the bottom and make stripes from it towards the neck. There should also be a lot of bottles. To assemble the tree, a rope is tied to each lid, secured inside. The palm tree will serve as an excellent decoration for an inconspicuous corner on the site.


Swan: designing a reservoir area
The white bird is the most common craft in garden plots. It’s easy to do, and the result is an original figure. To get started, you need to prepare one five-liter bottle, as well as a knife, a mesh for decorating the wings, and putty. An interesting swan is created like this:
- The horizontal side of a plastic bottle is cut off.
- A hole is made through the lid, a thick wire is inserted, bending it - this will be the neck.
- To give the product round shape it is covered with sand.
- Make a stand: spread the putty in an even layer on polyethylene and wait for it to harden.
- Small rolls of putty are rolled into a rope and form the neck of the bird.
- Using a spatula, the material is applied to the bottle itself, making feathers.
- Used to make wings metal grid– it is inserted on the sides and also puttied.
A swan will look beautiful if you draw its eyes and draw feathers on its body.


Pig: a simple master class
Another simple decorating tutorial garden plot by recycling plastic bottles. The pig looks original if you organize a small flower bed inside for summer flowers. To make a pig, you will need one five-liter bottle, as well as a knife, a can of paint, a brush, a pencil, wire, a black marker, cardboard and plastic glue. You need to do the following:
- Cut out piglet ears from cardboard and paint them with pink paint.
- Leg blanks can be made from the cut off upper parts of plastic half-liter bottles.
- In a five-liter bottle, cuts are made with a knife: for the ears, for attaching the legs and for the tail.
- The wire is twisted in a convenient way, inserted into the hole.
- At the end the pig is covered spray paint selected color.
You can place soil inside the pig and grow small flowers: to do this, you need to cut a hole below the ears, making an oval.


Minions: bringing the cartoon to reality
Modern DIY crafts from plastic bottles step by step for beginners involve making popular cartoon characters. These master classes are for children, so an adult can complete the task without any problems by involving a child in the process. You can try to make a beautiful and funny minion:
- You will need one or more (according to the number of minions) bottles with a volume of 1.5 liters or more.
- There is no need to trim anything here, because the man himself has an oval shape; it is enough to depict the minion’s face as accurately as possible.
- The top of the bottle is painted yellow, bottom part- in a blue tint.
- Eyes are drawn on a yellow background, like those of minions.
You can remove several wires from the cover - this will be funny human hair. Such figures will decorate the garden and add a touch of humor to the exterior.
Flowerbed: how to make a basis for growing flowers
The simplest manufacturing option garden flower bed will use a tire from a wheel. The result is a large flowerbed in which you can plant flowering plants. To work, you will need a large number of small bottles of the same type, glue for plastic, and a tire from a wheel. Paint can also be useful if you want to change the color of the bottles.
The prepared wheel is installed in the desired location of the future flower bed or in the garden. The tire can be painted any color, or left black. Bottles are gradually glued to the top of the wheel, row by row. Toward the top, the throat of the flowerbed will be a little narrow, so you will need to properly pour the soil for future plants. If you don’t want to leave the bottles transparent, you can paint them in the chosen shade before work.


Decorative ball - an original figure in the garden
In order to make a dense and openwork ball with your own hands, you will need to prepare several dozen plastic containers from under water. It is advisable to take bottles with a volume of at least 1 liter. The basis for gluing the bottles will be a ball of cement; it is not difficult to make. To do this, you need to mix water and cement with sand in a ratio of 1:3. The process then looks like this:
- The bottoms of all bottles are cut off.
- Each bottom is painted a certain color; you can use several shades and make a rainbow ball.
- When the bottoms are ready, they are attached to the cement base.
- You can secure the products with strong glue or insert them into the cement while it is still wet.
The result is an original and unusual ball that will decorate the space near the house. The sphere can be placed near the gate, and can also be made the center of the composition in the garden.


Sheep: how to do it step by step
To create a sheep, elongated bottles are useful. It is necessary to prepare the container:
- 1.5 liters – 4 pcs;
- 2 liters – 11 pcs;
- 1 liter – 3 pcs;
- 2 liters – 20 pcs. with a figured bottom.
You also need some bendable wire and a can of white or gold paint. The top parts with necks are cut off from liter bottles, and one bottle is inserted into another. Process of creation:
- Ears are cut out of a liter container and secured with wire.
- The body and neck are made from two-liter bottles.
- The head is attached to the neck, the legs of the sheep are made from 1.5 and 2 liter containers.
- For curly wool, the sheep are connected with curly bottoms using wire.
At the final stage, the sheep is collected and coated with paint. The eyes and nose are made from corks of a contrasting color.
Owl: decorating trees
To country house shines with new colors, it is important to properly decorate the yard space. Another idea for this is to create a figure from PVC bottles in the form of an owl. To do this you need to prepare 5 containers Brown, tin lids, transparent container, glue gun, pliers, acrylic paints and threads. Instructions:
- The bottom and throat are cut off, and cuts are made along the edges.
- The cut fringe is pulled together with a thread: the upper part of the bottle will serve as the head, and the lower part will serve as the tail.
- The remaining bottles are useful for making wings: they are cut into rectangles and painted white.
- By using glue gun the wings are fixed to the base.
- The eyes are made from tin lids - they can also be tinted and a picture of the pupils can be made.
The night bird will fit perfectly into the design of the site; it can be placed on a tree branch.


Peacock - an unusual solution for the site
Another colorful, but no less easy to make bird is the peacock. His beautiful and colorful feathers will amaze guests country house, because the peacock will become the center of the composition. In order to make it yourself, you need to take pieces of foam plastic - they will be the base and body. The remaining elements are made from plastic bottles:
- Feathers are cut out from containers of different sizes, after which they are painted with acrylic and glued along the perimeter of the tail.
- Feathers in the form of a fringe can be made with thin scissors on a green bottle.
- The beak is made from the top of the container by cutting out a triangle and secured to the head with nails.
- The legs are made from the tops of small bottles with necks and wire.
At the final stage, the bird needs to be assembled: the legs are attached to the body, after which it is covered with feathers. Next, attach the wings and tail - the peacock is ready!


Donkey: DIY decorative figure
Continuing the animal theme, you can make a donkey out of bottles. It can be installed near fruit tree, setting up a hive for bees there. If desired, the donkey can be used as a flowerbed by attaching a cart made of wooden branches to its back.
The body is made from a five-liter container, the front and hind legs are made from kefir or milk containers. The animal's face can be made from a keg bottle of beer or kvass. The ears are made of plastic or cardboard. The entire donkey is covered with gray spray paint, a braid is attached to its muzzle, a cut bottle with soil is hung on the side and a flower is grown there. Another simple option self-made– application polyurethane foam in combination with bottles.


Frog: composition for an artificial pond
A frog figurine would be appropriate where there are ponds or artificially constructed fountains on the site. She can coexist with a swan, turtle, fish, ships. All you need to create is two two-liter bottles, the top of which is cut off. To work, you only need the bottoms. The paws are made from flat parts - cut out according to a pre-designed template.
The crucial moment is painting the frog. First the background is tinted green, this may require several layers. Then, with a thin brush, draw out the eyes, muzzle, and draw the phalanges on the paws. If desired, you can make a crown for the frog - it is also made from a plastic bottle. The neck is cut off to form arrows, painted golden – the crown is ready.
The imagination of gardeners does not end with the ideas listed - original crafts from plastic bottles to the garden are replenished with the following master classes:
- butterflies;
- snowmen;
- trains;
- candies;
- robots;
- penguins;
- cats;
- dogs;
- cockerels;
- towers.
Plastic containers are distinguished by the fact that they do not rot after precipitation: a gardener can safely go to the city during the rainy season without worrying about appearance products. To prevent the paint from slipping, after painting you need to coat the figure with varnish. So original and easy to make garden figures will delight the residents of the site for many years.


Since Soviet times, bottles have been collected and invented application on the farm.
Today they are used to make jewelry, toys and even furniture.
Summer residents use containers to decorate their plots.
Let's look at examples of how you can make crafts from plastic bottles with your own hands for the street, cottage, garden, vegetable garden, what other components are needed for this, and look at photos of the products.
We are offering to you step by step instructions making crafts in the shape of a palm tree with a photo.
To make a palm tree from plastic containers, brown bottles are cut to the hangers, the edges are cut into triangles and folded back. In the middle of the bottom drill a hole and string it on or a metal rod installed on the ground.

Green bottles are cut in half lengthwise. The edges of the workpieces are cut, imitating small leaves.

Plastic leaves bolted together.

For the lush crown of palm trees assembled from several levels and glued to the trunk.

Looks beautiful near the gazebos and in front of the entrance to the site.
Flowers
For flowers, prepare a trunk - a painted thick wire.
To make chamomile, you will need white containers. Most often, milk drinks are sold in this type of store. Petals are cut out of it, fastened together by drilling a hole and tightening it with a bolt. The middle is made from the bottom of a brown bottle.

The bell is also cut out of white bottles. They cut off their heads, cutting the edges with corners. A hole is pierced in the lid, where a wire is inserted and attached to the barrel.
These flowers will decorate paths in the garden or between the beds.

Thus, the variety of flowers made depends on how to cut the blanks and how to fasten them together.
Vase
Now let's look at how to make a small vase for decorating a porch or window sill on the veranda. You will need:
- 2 bottles;
- scissors;
- spray paint;
- PVA glue;
The bottom and neck are cut off from one bottle. The thread is cut off from the latter, turned over and the wide side is attached to the bottom glue gun. The upper part is cut off from the second, the thread is removed, and the edges are decorated with a wavy line. The narrow part is glued to the first workpiece.
Surface of the vase smear with glue and sprinkle her rice. After drying, the bottles are painted with spray paint in two colors.

Birdhouse
A circle is cut out on the side, it will become the entrance. To the top glue parts from disks, imitating tiles. The house is painted, decorated beautifully and straw or tow is placed inside.
To make it more convenient for birds to climb inside the birdhouse, glue a round stick or a piece of pencil in front of entrance. A wire is threaded through the lid to form a loop.

Flowerbed or flower garden
Fencing flower beds with bottles has become common. They are cut, filled with soil and arranged in flower beds, as shown in the photo.
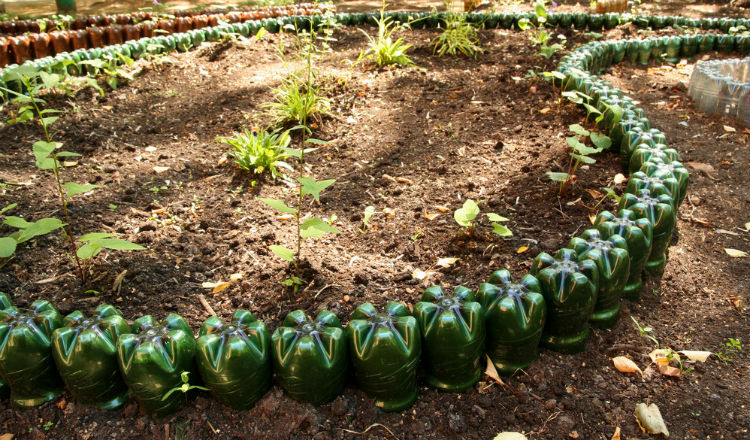
In the ground next to the plants put upside down bottoms and paint them. The resulting figures are, for example, ladybug or flower.
Figurines for the garden in the form of animals
Animals from bottles are made as toys for children's playgrounds in the country or to decorate the garden. You can create favorite cartoon character, a copy of pets or make any fantasy come true.
Examples of such work are in the photo below.
Cat
These figures will be a great decoration on the porch or in front of the gazebo. What you will need for this composition:
- bottles 1.5 l and 0.5 l;
- stationery knife;
- paints;
- glue gun;
- color package.
For stability the container is filled with earth, it will become the body of a cat. The remaining details are cut out from the second container: muzzle, ears, tail.
The cut off necks are used to make cat paws. Fasten everything with glue and paint. A bow from a bag or other decorations is glued to the neck.

Piglets
Such pigs are suitable decoration for a playground or garden beds. The container is filled with sand, the ears and tail are glued on.
Capacity painted in pink color and draw nostrils with eyes.
The photo below shows two examples of how you can make a pig.

Frog
To create such a “frog princess”, you will need:
- about 12 green containers and one yellow;
- stationery knife and scissors;
- glue gun;
- a regular lighter and gas cylinder with a lighter attachment.
First, the body is made. Two bottles cut from one side along. Remove the neck, unfold it and cut off the excess. Glue them together so that you get a body and an open mouth.
“Warts” are burned on the back.
The necks of the other two containers, along with the lids, will serve as bulging eyes.
On a yellow container, a pattern is cut out with a stationery knife on the base for the future crown. Then the container is turned inside out, connecting the neck and bottom inside with glue. The crown is ready, it is attached to the top of the head.
For the paws, blanks are cut out from seven bottles and carefully warmed up with fire from a gas cylinder so that the plastic deforms and becomes pliable. The blanks are glued together and attached to the body. All that remains is to melt the sharp edges with a lighter.

Peacock
To make a peacock, except for bottles, additional materials will be needed:
- two metal rods;
- Styrofoam;
- metal grid;
- wire;
- paint in cans;
- knife and scissors;
- lighter.
The rods will become the legs of a bird, the body is attached to them from a 5 liter canister. The neck consists of two bottles. The head is cut out of foam plastic.
For the wings and tail, use a mesh, to which feathers tied with wire, cut with scissors.

Feathers for the body can be cut similarly to the tail or make them smaller and thinner, glue to the body with glue.
Next, the beak and crest on the head are made. Before making the peacock's plumage, feathers melt with a lighter and stick into foam. At the end, the craft is painted from a balloon and patterns are drawn on the tail.

Swan
Homemade swans decorate flower beds, flower beds and ponds.
For the simplest option to make a swan you will need:
- net;
- Styrofoam;
- wire;
- thick metal rod;
- corrugated hose (suitable for a washing machine);
- paints.
A body frame is made from mesh, and plastic feather blanks are tied to it. The metal rod is bent, it will act as a neck. Cover it with a hose.
The head is cut out of foam plastic and placed on the end of the rod. The figure is painted and placed in the right place.

Hedgehog
The hedgehog's body is made from a barrel-shaped container. The middle of another bottle is cut out and roll into a cone, this will be the muzzle.
The parts are fastened with a heat gun, and the ears are made in the same way.
From other bottles make strips and cut out needles, glue them to the body with plates, overlapping.
The eyes are cut out of plastic and painted. The nose is formed from the scraps. The toes are made from cocktail straws.
At the end the craft is painted and it is ready to decorate the garden.

Hare
One of the simplest designs.
3-5 liter bottle filled with sand. From another cut out the ears and glue them to the base. All that remains is to draw a funny face of a hare.

Donkey
To make a donkey you need:
- two large containers;
- three bottles of 1.5 l;
- rods or plastic pipes for legs, four pieces;
- wire for tail;
- glue and paints.
From a five-liter container make a torso and glue the neck to it from 1.5 l.
For the muzzle, cut off the bottom, carefully shape the edges into a mouth, and attach half the bottle in the form of a head. Ears are cut out from a five-liter container and glue it.
The entire structure is placed on “legs” and painted.

Wolf
To create a wolf, the hero of the cartoon “Once Upon a Time There Was a Dog,” additional materials needed:
- metal grid;
- wire;
- polyurethane foam.
The base of the body is a large container and a net. Wire arms and legs are attached to them.
The muzzle is made from a 5-liter bottle, and the nose from a 2-liter bottle. The main structure is tied wire to the picket fence, it is dug into the ground.
The figure is given the desired shape using polyurethane foam; after hardening, the excess is cut off and the surface is treated with sandpaper.
Final stage– coloring.

beds
Summer residents use bottles for seedlings and creating such neat beds.
Manufacturing is very simple: you need to cut a hole in the side, fill with soil and plant shift.

Round bottles cut across, we get “glasses”.
We suggest looking at the pictures below and using them as an example of making a flower bed.

Drip irrigation
For drip irrigation plants in greenhouses no need to buy special equipment.
The bottoms of the bottles are cut off and holes are made in the caps. To distribute water to several plants, you can add tubes from IVs. The inverted container is placed in Right place and fill with water.

Fence for the front garden
Plastic containers can be good material for making fences in vegetable gardens and front gardens.
Pillars are dug in, through holes are made in the container, bottom and top in each. passes through them thick stretched wire, fixed to poles.

Pinwheel
A simple pinwheel, cut from one bottle. A hole is made in the middle of the workpiece, a nail with a large head is driven through it or a bolt is threaded through it.
They are attached to a vertical surface not tightly, but loosely, so that the wind turns the pinwheel.

Berries
Spectacular decorations for flower beds and beds. Select barrel bottles, cut off the neck, bottom mounted on metal rods, playing the role of a stem.
Leaves are cut out of green plastic, the structure is assembled, painted and stuck into the ground.

ladybugs
Cute bugs from painted bottoms and ping pong balls, will decorate the children's play area in the country.

Butterflies
On transparent plastic paint with stained glass paints bright butterflies, and then simply cut them out. Such crafts made from PET bottles can be used outdoors and in the apartment.
They are placed on the leaves indoor plants using double-sided tape or glued to wallpaper.

Approximate number of bottles for crafts
The table shows what can be made from plastic containers and approximately how many bottles are needed for a particular craft.
Useful video
This video presents ideas of what you can make from plastic bottles with your own hands:
Surely the inventors of plastic bottles had no idea how widely people would use them. Today craftsmen have learned how to make things out of plastic bottles with their own hands. great amount useful things, from toys to a boat or house. We will limit ourselves to considering crafts that will help you beautifully decorate your plot, garden or vegetable garden.
Unusual qualities of homemade products from plastic bottles
Plastic bottles are extremely popular among those who like to create. garden crafts. The explanation for this is simple: on the one hand, the material is easily accessible, on the other hand, it is easy to work with. It’s no wonder that among the fans of the “genre” there are a huge number of women.
Note that plastic containers take an extremely long time to decompose like garbage, but they serve endlessly in the rain and sun in the yard. It's nice to make something fun and useful out of something that was supposed to be thrown away. The presence of numerous interesting examples further provokes creative and inventive souls to create something better and different.
Plastic bottles come in many colors; crafts made from them can be painted and enriched with a variety of decorative elements, which most often are also improvised materials. The use of both small and large empty bottles with a volume of 0.5 to 5 liters allows you to create the most different combinations figures. The author of the text sets himself the task of offering you the most interesting examples and familiarize yourself with the techniques of working with plastic bottles yourself using the example of several descriptions. Thus, you can both choose interesting and beautiful homemade products to repeat, and learn how to implement your own ideas.
Please note: it is very important to choose a place for the figurine in the garden where it will harmoniously fit into the surrounding environment.
Bright crafts and decorations made from bottles in the yard

 Such poppies always bloom, and you won’t be fined for it
 The most bright decoration there are flowers in the yard. They come out wonderfully from plastic containers and a considerable number of examples have already been invented. Do you want to build your own bottle tree? It's possible!

 Winter and summer in the same color
 Probably the easiest crafts to make from plastic bottles are mushrooms. Making mushrooms with your own hands is extremely simple and very similar to real ones. The mushroom cap is the bottom of the bottle, its stem is the top of the container. They should be colored as you wish. It is most convenient to fasten both parts with a self-tapping screw.
To get the characteristic protrusions on the fly agaric leg, you can use two bottle necks to make it. Weed can be created from the side of a green container.
 In this lake the water never freezes, and swans always live
 The blue lake in the yard is most realistically made from plastic bottles. Its surface, even in the absence of wind, is covered with characteristic ripples. Making such a pond is as easy as shelling pears. You need to paint at least 100 bottles with blue paint from the inside, and then bury them in the ground, neck down. Flowers and
Funny figures of animals and people for the garden from plastic containers
We all enjoy decorating our garden with crafts from animals, gnomes and people. A considerable number of different figures for the site have already been invented. Interestingly, even when copied, every creative invention has features introduced by the author. Nothing prevents you from leaving “your own mark on history” by inventing an original gnome.
All sorts of different animals in the yard and garden

 Here are several options for turtle designs. All of them are made from the bottom of a bottle, which resembles an amphibian shell. Using paints and other decorative elements, you can create a turtle with “ own face».

 A caterpillar in a garden is quite appropriate. In this design, it will not turn into a butterfly, but it will not be able to harm either. You can make an insect from the bottoms, lids and bodies of plastic containers. The easiest way is to assemble the top parts of the bright green bottles in sequence. There may be a wire inside that is bent on both sides of the figure.
 Funny gnomes for a farmstead can be made from the most different containers. Perhaps you can’t do without the use of paints here. Decor occupies a special place in the design of gnomes: give free rein to your imagination and try to use everything that comes your way. This is exactly the case when you can compose something unusual and your own.
 The land has not been plowed with the help of horses in the country for a long time, but the presence of their figures is appropriate and welcome. The horse's body is most often made from five-liter eggplants, and the legs, neck and muzzle are made from smaller containers. A horse is very similar to a donkey, so when making it, you can use the donkey assembly instructions that follow.

 Pigs in the country made from plastic bottles are a classic of the genre. Of course, a 5-liter container is best for making a well-fed pig. It is often used as a flowerpot. The techniques for assembling the pig are exactly the same as for the donkey. A description of this follows.

 A bright spot on the site will be a figurine of a fox or a bear, covered with orange paint. We already realized that big five liter bottles Well suited for both the already mentioned and other animal crafts. Here again, imagination and scenery are required. Assembly is the same as the donkey making guide that follows below.

 We can say with complete confidence that you can build any animal from plastic bottles. Choose a sample to your liking and create!

 Here are a few more examples of using plastic containers to make animals. Frogs, hares, bears and sheep - everything is like in a real forest.
Hunting trophy from a plastic container

 If you can’t hunt even with a camera, you can hang it in your country house hunting trophy from plastic canister. In addition to the container for making a horned head, you will additionally need about 30 multi-colored corks, a piece of wire with a diameter of 3 mm and self-tapping screws.
Instructions for assembling a hunting trophy:

Funny donkey made from plastic bottles for your garden

 As the pictures suggest, donkeys are a little different. I came up with my own collective image and prepared a master class for you:
- To assemble the craft, we prepared 8 bottles. Subsequently, another one, brown, was needed to make the animal’s mane.
- The neck of a 5-liter eggplant was cut off and the bottle caps for the feet were screwed on with self-tapping screws. Driving the screws into different places, you can adjust the tilt of the plugs. It is necessary to use at least three screws to secure one cover.


- Cut off the neck of the head container.
- Cut out the blank for the donkey's neck from the middle part of the bottle. In side view it has the shape of a trapezoid. On the sides of the part we leave two protrusions for which the neck will be attached.
- We fasten the neck to the head with two self-tapping screws. They will be inside the torso.
- We bend the neck to the head and fasten the parts with another screw.

- Now we attach the neck to the body with two self-tapping screws. They will be inside the torso.
- We turn the neck towards the body and fasten it with two more screws from below.


- This is what the donkey frame looks like at this stage.
- Cut out ear blanks from a green bottle. For one ear you will need a quarter of a bottle cut lengthwise. At the bottom of the ear we cut protrusions for attaching to the head, in accordance with the image.
- We bend the sides of the protrusions so that they fit into the narrow slots prepared in the head.

- We mark the slots on the head with a marker in accordance with the size of the ear. Their size should correspond to the width of the protrusions on the ear with curved edges. We make the slots.
- We insert the ear protrusions into the slots on the donkey's head. After installation, the bent parts will straighten and securely hold the ear on the body of the animal’s head.


- This is what our ward looks like with ears. Paint it with gray paint and leave it to dry overnight.
- Cooking donkey mane from a brown bottle. The length of the workpiece corresponds to the length of the neck. To attach the part to the neck, cut out three protrusions in accordance with the image. We imitate hair by cutting through the part with a step of 2mm and not reaching its edge by 15mm.
- We bend the edges of the protrusions for subsequent fixation to the neck. We make two blanks for the mane.


- On the neck we mark three slots with a marker in accordance with the location of the protrusions on the parts of the mane. Their width should correspond to the size of the protrusions on the parts of the mane with curved edges. We make slits.
- We bend the edges of the protrusions on the parts of the mane and sequentially insert them into the slots on the animal’s neck.


- It is convenient to make the donkey's harness and tail from garden border tape. It is necessary to cut a 15mm wide strip from it and attach it to the body of the craft with five self-tapping screws. Eyes will suit old toy. We attach them using double-sided tape. We paint the inside of the muzzle and ears with white paint. We paint the nostrils and mouth with red and black paints.

- You can harness it! We use a plastic box as a cart. The wheels are good from a used children's toy. They can be mounted on axles made of welding electrodes. We make shafts from thin branches. For good stability in windy weather, sand should be poured into the bottles of the donkey's legs.
Do-it-yourself products will definitely come in handy on the farm
Our articles about useful homemade products for your own yard from plastic bottles
You can read that or in our articles. Here is a list of several more articles about useful garden products:
Interesting examples of creations from containers for household purposes
 As you can see, quite monumental structures can be built from plastic bottles. However, many of us, having appreciated the scale of the work and the large number of bottles, are ready to utter the words from the old joke: “I won’t drink that much.” It’s up to you to decide which homemade products are good, but we offer a master class on how to make a prosaic broom from plastic bottles with your own hands.
Step by step guide to the sequence of actions:

When assembling the craft, we set the task of using fewer bottles and get a panicle of sufficient rigidity. However, it turned out to be not wide enough. To solve this problem, you should use the entire length of the bottle for blanks.
 In this case, you will need twice as much container. In this option, to ensure sufficient rigidity of the broom, it will have to be tied with twine, as in the photo.
 Along with the broom, we made a dustpan from plastic container. To implement this idea, it is better to use a thick plastic canister. Cut out the part according to the image, place it on wooden handle and we get a scoop. The scoop does not dig the ground, but it is suitable for sand and cement and works in tandem with our broom!
The second option is very difficult to implement today, so recycling comes to the fore. Plastic can be sent to special factories for recycling it, or you can make useful things out of it. In this collection you will learn how to make various useful things for your home and garden from plastic bottles.
1. DIY ottoman made from plastic bottles step by step
You will need:
Plastic bottles
Foam rubber
Knitting needles
Ruler
Scissors
Sewing machine
1. Wash and dry several plastic bottles covered with caps. Gather all the bottles in a circle and secure them together with tape.
2. Cut two circles from cardboard to cover the top and bottom of all connected bottles. Tape these circles to the connected bottles.
3. Prepare two rectangular pieces of foam rubber and one round piece. Rectangular pieces should be used to cover the side of the collected bottles, and a round piece should be used to cover the top part. Secure everything with tape.
4. Make a cover for your seat from any fabric. If you like to knit, you can knit a cover.
2. We make a faucet extension from plastic bottles with our own hands
It will be more convenient for children to wash their hands.
3. DIY products made from plastic bottles: pocket for a rag/sponge
1. Cut the bottle into the desired shape.
2. Sand the edges with sandpaper.
3. Hang on the faucet.
4. How to make a bag from plastic bottles
Photo instructions
Video instruction
5. What can be made from plastic bottles: cups for storing cosmetics
6. Feeder made of plastic bottles for a cat or dog
There are many ways to make bird feeders, but this one is designed for cats and dogs.
You will need:
2 large plastic bottles
Scissors
1. In the middle of one bottle you need to make holes slightly larger than the neck of the other bottle.
2. The second bottle needs to be cut in half crosswise.
3. Fill the bottom with food.
4. Connect the parts and open the lid.
7. Vase for sweets: master class on crafts from plastic bottles
You will need:
Plate, round plastic or thick cardboard
6 two-liter plastic bottles
Wooden or plastic rod (you can use a straight branch of suitable diameter and length)
Super glue
Spray paint and glitter (optional)
1. Making the base for the craft. To do this you need a plate, ceramic or glass plate. In the middle of the plate you need to enlarge the hole to 10 mm using a drill.
2. You will also need to use a drill to make holes in the center of the three plastic bottle pieces you will be using. It's easier to drill from the inside out.
3. Cut off the bottom of each of the 6 plastic bottles. Place 3 parts on the rod and secure with glue. Glue the remaining parts to the base (plate) around the rod. If you wish, you can spray paint everything.
It is worth noting that the rod is held on the base thanks to a plastic part that is glued to the plate, as well as to the rod itself.
4. If you wish, you can decorate your vase.
8. DIY wicker baskets from plastic bottles (master class)
And here is a version of a wicker basket made from plastic cocktail tubes:
9. Garden crafts made from plastic bottles (photo): broom
1. Remove the label from the plastic bottle.
2. Using a utility knife, cut off the bottom of the bottle.
3. Start making cuts on the bottle, leaving 1 cm between each.
4. Cut off the neck of the bottle.
5. Repeat steps 1-4 with 3 more bottles. Leave one bottle with a neck.
6. Place all the cut neckless bottles on top of one necked bottle. You will have a blank for a broom.
7. Cut off the top of one bottle and place it over the resulting blank.
8. Make two holes through all the bottles and insert wire into them and wrap the ends.
9. Insert a stick or rod into the neck and secure with a nail. You can also use glue.
Video instruction
10. Modular boxes: description of crafts made from plastic bottles
You will need:
Several large plastic bottles or canisters
Stationery knife
Scissors
Marker or pencil
Strong thread.
1. Cut a suitable hole from a bottle or canister using a utility knife and/or scissors. It should not be too small for everything to fit, or too large for the plastic structure to fall apart.
2. Start connecting the bottles with a strong thread. Start with two, then add two more already connected to them, and so on. Tie strong knots. You can also try using hot glue or superglue (Moment glue).
3. Assemble a design that is convenient for you. You decide how many rows and “floors” to make. However, it is worth knowing that the higher the structure, the less stable it is. You may need to secure the entire structure with rope again.
4. It's time to put scattered things on the shelf.
11. DIY house made from plastic bottles (video)
12. How to make a house/greenhouse from plastic bottles with your own hands
1. Remove labels and wash bottles.
2. Cut off the bottom of each bottle and unscrew the caps.
3. Place the bottles on a long, straight branch, stick or rod.
4. Do wooden frame house (greenhouse).
5. Repeat steps 1-3, making required amount rods with bottles. After this, all the rods need to be attached to the frame of the house.
*Alternatively, you can simply wire the required number of bottles together and attach the rows of bottles to the frame of the house. In this case, there is no need for a rod and no need to remove the caps from the bottles.
* The greenhouse can be made more airtight by covering it with bubble wrap.
Video instruction