Our main task in this case is to show the reality of assembling such a device as homemade plywood boats for a motor. That is, we will figure out how to make such a floating structure on which this engine could be hung to set it in motion.
In addition, you will be shown the video in this article, which corresponds to this topic.
Advantages of the slinging and glue method
Wire is used to temporarily stitch boat parts together by stitching plywood through small holes. Thickened epoxy and fiberglass fabrics are used for strong bonding and reinforcing boat joints. After the hull is made and rigid, the boat is complete. This includes guns, seats, dagger wells, etc. flotation hulls, sailing devices.
- The plywood parts of the boat are measured and cut according to the plans.
- Small holes are made around the edges of the pieces.
- It is very similar to making a puzzle together or sewing.
Materials and device

Homemade flat-bottomed boats from such material (see photo above) have at least three inherent advantages that will always favor the purchase or self-manufacturing such a design.
Due to its simplicity, it allowed relatively unskilled beginners to make good strong beautiful boats without a lot of tools or highly developed woodworking skills. Many designers offer plans for seams and plywood boats. I have links to glider boats. A large number of of traditional constructions has been redesigned to be suitable for the stitch and glue method of shipbuilding. Designers will have wooden boat plans for beginners and less experienced builders and it will clearly point to it.
First of all, this is its lightness, because glued veneer has a much lower specific gravity than a solid solid wood. Secondly, it is the stability of the body, which is mounted from whole pieces plywood and has clear geometric proportions, giving the boat for this quality.
Materials and Assembly Parts

What is the boat made of?
Another advantage of the stitch and glue method is that it allows easy replacement of plywood, which can be replaced with the high quality wood used in the past, which is much more expensive and difficult to obtain. Plywood is sorted, and pickled plywood grades are uniform in quality and highly resistant to water damage.
In addition to being an easy shipbuilding method and allowing shipbuilders to use more available materials, seam and adhesive provide another significant benefit for boat builders. Because less structure is required in stitching and adhesives, finished boats can be much lighter than traditionally built boats. Through careful control of materials, the weight savings can be quite outstanding.
- Perhaps the most attractive thing in such a design as home-made motor boats from plywood is the fact that any person who has certain skills in carpentry or even one who (as it is commonly called) “hands grow from where they need to” can literally assemble it for half a day.
Agree that for a summer resident or just a vacationer, this factor is far from the last value, because most often plywood with boards can be purchased at the nearest store, but to carry a finished boat ...

How to Build a Stitch and a Glue Boat
The first step is to decide what kind of boat you want. You will need to answer some questions such as. Spend some time sharpening chisels and flats, oiling clamps, and just making sure your tools are in order.
How to build a stitch and glue boat, go shopping
When you have your plans in place and have looked at them well and understood what you need, you can get your materials. If they don't have a list of materials, do so. Very helpful to have full list to the top so you can avoid having to keep going back to the shops.- To assemble the structure in question, we need plywood, 6 mm thick, but it is imperative to monitor the condition of the veneer so that there are no cracks or swelling anywhere on the sheet. The board needs 25 mm thick from the rocks coniferous tree(spruce, pine, cedar, larch), but again without knots and cracks.
Recommendation. When choosing a type of wood for a boat, we most often come across spruce and pine, and here you need to take into account some points.
Spruce is whiter than pine and has more water resistance than is very good for sheathing, but do not forget that spruce boards can easily split when nailed.
Consider this feature when choosing a material.Many boat builders want to get on the water as cheaply and quickly as they can and will use more low material, or take a chance on unproven veneers. Stories abound of builders using cheap plywood and then when it gets wet when the boat delaminates. My personal preference is to use good materials and longer to catch the boat. At least use plywood plywood if you can't find or can't afford a marine layer. Appearance may have voids inside, but the glue will be good.
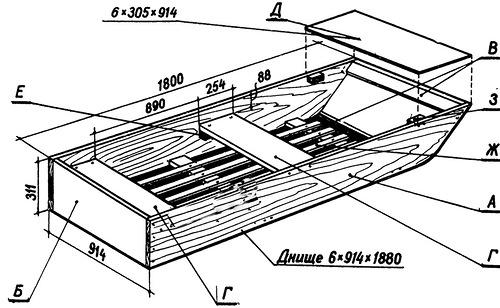
- In addition to wood, we need certain geometric parameters boards, so their width should correspond to 305 mm and thickness - 25 mm. And we need a certain length for the stern and sides - 864 mm, and all dimensions must be adjusted as accurately as possible, since the parts will be fastened with self-tapping screws to the hull and any error will lead to its deformation.
Parts and Assembly
| Designation letter on the diagram | the name of detail | Amount | Parameters in mm | ||
| Length | Width | Thickness | |||
| BUT | Board | 2 | 1800 | 305 | 25 |
| B | Stern | 1 | 864 | 205 | 25 |
| AT | Spacer | 3 | 864 | 100 | 25 |
| G | Seat | 2 | 864 | 254 | 25 |
| D | Deck | 1 | 914 | 305 | 6 |
| E | Seat bars | 4 | 254 | 25 | 25 |
| AND | Lattice rail | 8 | 1200 | 50 | 20 |
| Z | Deck block | 2 | 200 | 25 | 25 |
| And | Paddle (blank) | 1 | 1200 | 140 | 35 |
| To | A pen | 1 | 120 | - | 30 |
Parameters and number of parts of a homemade plywood boat
The same goes for epoxy and paints, use quality materials when building their boats. It is worth mentioning that you will need a number of other Supplies such as pacifier sticks, plastic gloves, cheap paint brushes, sandpaper, mixing bowls. Keep track of shopping at the dollar store. Also ask your relatives to hang on to yogurt and margarine containers. If you have to buy them from boats, they can increase significantly.
Thanks to the epoxy resin, the use of stitch and glue is possible. Although some builders have occasionally used polyester resin, most hobby stitchers and adhesive boat builders use epoxy. Unlike polyester and hardener, epoxy is virtually odorless and can be used internally. The epoxy comes in two parts, which must be mixed in the exact ratio. polyester resin cured by evaporating several sprays of methyl ethyl ketone peroxide.
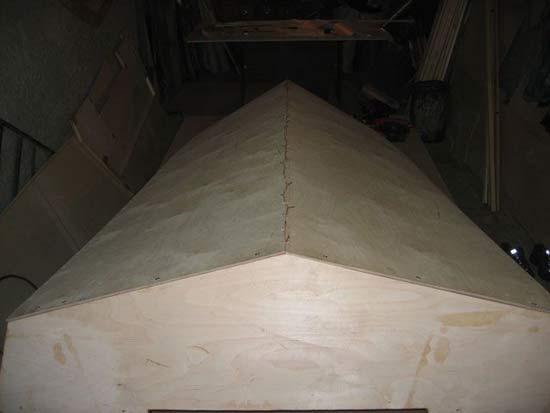
- Plywood or plank parts by themselves are unlikely to cause any difficulties in manufacturing, since their shape is quite simple. But, nevertheless, it is very important to maintain the exact dimensions in preparation. The fact is that homemade motorboats from plywood can become a floating craft only if the assembly is done correctly and there are no any cracks and gaps.
That is why all joined edges must be very carefully adjusted so that they become close to each other (for tight joining of edges, it is advisable to grind them to remove all burrs and irregularities).
Advice. For installation of all parts available on the boat, use only galvanized or tin-plated self-tapping screws.
For sheathing, short screws 18 × 3 mm or 25 x 3 mm are most acceptable, but for elements such as the seat, side, feed (larger ones) it is better to use self-tapping screws 60 × 4 mm or 60 × 5 mm.Epoxy is more expensive, but worth it. There are many different types epoxy resin, and it's very confusing for beginner boat builders. Essentially, your choice should be the tuning speed. Most epoxy resin suppliers will offer a standard resin and several different hardeners. Using a slower hardener will buy you time. More quick setup hardeners will shorten assembly time. In very warm weather, use a slower setting to counteract the temperature.
There are exposures designed for cold weather. There are many brands.
There are somewhat longer ones in Europe, but most boat builders have to learn how to join sheets together to make larger pieces. The classic way of lining plywood is to cut, grind, grind or bevel sand on each side of the sheets for bonding, and lap and glue the slopes using epoxy. The overlay should be 8 times the thickness.

- The bottom is at, but, nevertheless, it needs to be joined to the sides and stern, so the instruction requires the use of glue at the joints. You can use various waterproof brands, for example, VIAM-B / 3, but if there is none, then use thickly grated oil paint- taking into account the compression and swelling of the joint, it will not let water through.
In addition to gluing the joint, it is tightened with self-tapping screws, and the minimum step should be 40 cm (or less), and the seams should also be caulked with a cloth or percale, soaked with AK-20 glue. - A very important and crucial moment is the priming and painting of an already assembled product with your own hands, because all its water resistance largely depends on this. The boat is primed with drying oil, but not in the usual mode, but only after boiling the liquid.
Hot drying oil is applied to the inside and outside of the boat, filling in all the joints, bends and bumps, and then allow it to dry completely. After that, you can paint your brainchild in any color you like or separate the shades - before the waterline and after it.

How to Build a Stitch and Glue Boat, Mark and Cut
Using the block plane is easy and fast. After the bevels are cut, they are glued together with epoxy thickened with silica. Once the epoxy has bonded, it will be as strong as plywood. It may bend slightly. Many shipbuilders have successfully used this method. The plywood creates nice even lines as you cut through the different layers. 
Carefully measure and draw the various parts of your boat on your plywood.
- A paddle for a boat can be made from a 35 mm birch board, but at the end, be sure to (K) file down a spike and make a handle there. (see also) Put a rubber ring on the spindle (handle) to prevent water from running off, and cover the end of the blade with a strip of brass, bending it on both sides. An oar, just like a boat, needs to be treated with drying oil and painted.
Conclusion
Now you just have to install the engine at the stern of the boat, secure it thoroughly and boldly go out into the expanse of a pond or lake. Do not forget only to lay a crate of 50 × 25 mm or 50 × 30 mm timber on the bottom so that the bottom does not squeeze through.
Usually the plans will give you a series of points that you measure and mark on the plywood. You then place small nails into the dots and join a long, flexible piece of wood. This is sometimes called a batten. This gives you a smooth curve connecting all points. You will need the center line, the position of any bulkhead and seats, the position of the hull in the center, the waterline, or any other significant point. Also mark inside and outside, left and right, the bow and stern of your boat. Once the pieces are cut out, they don't look like anything until you start assembling the boat.

Using a saw, this can be a jeep saw or one of the smaller circular saws, cut out your pieces. The handle can be cut by hand. It will only take longer, but it will work just as well. Cut your pieces down a little more than the actual size. This allows you to polish the line and have a more accurate part.
Despite the abundance of fishing and tourist boats in specialized stores, the most different forms and sizes, many are still interested in how to make a homemade plywood boat. main reason such interest lies, perhaps, in the indestructible craving of our compatriots for creative work.
Let you buy anything today, but in a home-made boat or dinghy, made according to drawings almost from the Fisherman magazine, there is some kind of indescribable charm.
Since the epoxy that is used to glue the pieces together can be filled to make a fairly thick filling paste, it doesn't matter if you make small mistakes and crevices and gaps form when assembling boat parts. They will be filled in and won't show when you glue your boat. More precisely better, but not a robber. Stitch and glue is a very forgiving boat building method for beginners.
Using sandpaper, wooden file or small plane, smooth the cut to a line. Do not reduce it if you have reduced it less than your line. Transfer any important mark to flat pieces if you haven't already when lofting the boat. It is difficult to measure it on a curve after the boat is assembled. Do a quick check of your measurements.
In the article we will give some tips, using which you can quickly learn how to make boats - homemade plywood.
Materials and tools
Not so long ago, homemade plywood mini boats were very popular. This made it possible to work out methods for their manufacture, as well as to determine the most suitable materials.
Lay the pieces down and mark points along the edges where the 2 pieces will be together. Put them side by side if you have any doubts and check your little spots. Once you are satisfied that they are aligned well enough, then drill them with a slightly larger bit than your wire diameter. Prepare some short pieces of wire, I like about 5 inches long.
Sewing and glue
Some people use copper wire, some are steel, others prefer plastic zippers. The copper can stay in the boat and just get smooth. Don't rinse it because rust can mark your wood if you're planning on varnishing instead of paint. 
The next step is the most exciting for me, because this is where your flat plywood boat parts turn into a boat.
Of course, today the list of available varnishes, impregnations and adhesives for plywood is much wider than it was even ten years ago - but for the manufacture of small-sized boats with our own hands, we do not need anything complicated:
- Plywood is the most important component. For the manufacture of boats, sheets of glued natural birch veneer with a thickness of about 5 mm are most often used. Separate parts, such as frames or keels, are cut from a thicker (10 - 15 mm) material.
Note!
In order to ensure sufficient reliability for the sides, only high-quality plywood should be used for sheathing, without cracks, delaminations, knots, etc.
Of course, the price of material of the first or second grade will be higher, but then you will be sure of the safety of your boat.The wires should not be tense at this point. it is better to spin them until you assemble the boat. An extra pair of hands is helpful. It is also more convenient to work on a table or on horses or on short benches. Sooner or later you will look at your work and see the shape of the boat shape.
The boat on the left is now sewn together and ready to be fixed. Plans are combined a little differently. Sometimes the designer wants you to overlap the pieces. Sometimes plywood needs to be assembled in a corner. Regardless of your plan, make sure the plywood is in the correct position. Tighten the wires if necessary. Corners tend to need some hesitation and adjustments. A small gap is good and allows the epoxy to touch all surfaces. If you need to do more holes for additional wires ahead, this sometimes makes things easier.


- Wood is used for the installation of internal struts, the design of the sides, seats etc. It is advisable to use an edged planed board made of light wood species.
- The suture material is used to connect individual parts cladding in one piece. Seams can be made using a fairly thin and flexible wire, plastic clamps, thick nylon fishing line, etc.
- Glue is needed to ensure the seams are properly sealed.. To date, the masters have practically abandoned natural compounds based on casein, and prefer modern polymer resins.
In addition, we will need special varnishes and impregnations that protect the wood from swelling and decay. It is also worth stocking up with fiberglass or similar material for gluing all seams. As an alternative to fiberglass, fiberglass can be used - then the entire bottom and sides will be pasted over with it.
Well, do not forget about the paint - after all, we want our ship to be beautiful!
As for the tools, the set will be almost standard:
- Saw on wood.
- Electric jigsaw with a set of blades of different lengths.
- Sander.
- Hand tool(hammer, pliers, chisels, etc.)
- Clamps for clamping plywood when gluing.
- Brushes for impregnation, varnishing and.
Making a boat
Drawings and layout
Before starting work, we determine what kind of vessel we need. Today, on the net you can find a variety of drawings of home-made plywood boats, so nothing is impossible either in building a punt for fishing or in assembling a tourist kayak.

If none of the found drawings suits us, you can do the design yourself.
True, in this case, you will need certain skills to calculate the carrying capacity, otherwise the boat can turn out to be extremely decorative.
- Having studied the available projects of home-made plywood boats, or having made our own, we transfer the contours of the main details to paper.
- Using paper templates, we draw lines on plywood sheets along which frames and sheets for sheathing will be cut.
- If the factory length does not suit you (and this happens in 99% of cases), then it is necessary to splice them. To do this, we cut off the ends of the plywood at an acute angle so that the length of the resulting bevel is 7-10 thicknesses of the sheet itself.

- Having attached the beveled parts to each other, we coat them with glue and clamp them with clamps. This technique is called the connection "on the mustache."
- In parallel, we prepare wooden bars from which the frame of our future boat will be made.
Advice!
To facilitate the work on the project, you can assemble special goats from bars with a section of 50x50 mm.
It will be much more convenient to place all the details on these goats during the connection process, especially if you work without helpers.
Case assembly
When everything is ready, we begin work:
- Using a wood saw or electric jigsaw, . The indentation from the design size should not be more than 1 mm, otherwise the sides will not “converge” during stitching.
- We glue the transom parts (tailgate) and frames to obtain the desired thickness and strength. Glued parts will be somewhat heavy, but it's not scary!
- If you plan to install outboard motor, then the transom should be additionally glued with fiberglass and reinforced with a hardwood board.

Advice!
To increase the strength of the connection, the frames and transoms can be additionally fixed with self-tapping screws.
In this case, the length of the self-tapping screws should be such that the point does not pierce the part through and through.
- We install the transom on pre-made goats and begin to attach the bottom and sides to it, bringing them together on the bow.
- We fasten the sheathing parts either with the help of suture material (if not very thick plywood is used), or exclusively with glue, cutting off the edge of the plywood at an angle.
- At this stage, it is very important that all elements converge in size, since in order to reduce the gap, it will be necessary to disassemble the entire structure and partially cut the frames.
After the "rough assembly" you can start gluing.
Adhesive work
The instructions for gluing and sealing our vessel are as follows:
- We prepare a mixture of epoxy resin and aerosil (silicon dioxide). We mix the components in a 1:1 promotion using a nozzle on a drill. The optimal consistency of the mixture is like thick sour cream.
- We strengthen the corners between the bottom, sides and transom with the help of wooden fillets - small corners that ensure the rigidity of the connection.
- Strips of fiberglass and fiberglass are glued to all seams from the inside, carefully lubricating the joints with an epoxy-aerosol composition.
Note!
Since the majority adhesive compositions contain volatile toxins, all paint and varnish work should be carried out using respiratory protection!
- After the glue has dried, we install the frames in the selected places.
- To fix the frames, we use the same glue. If the dimensions of the vessel are large enough, then in order to strengthen the structure, the frames should be additionally fixed on the bottom and sides with overlapping strips of fiberglass.

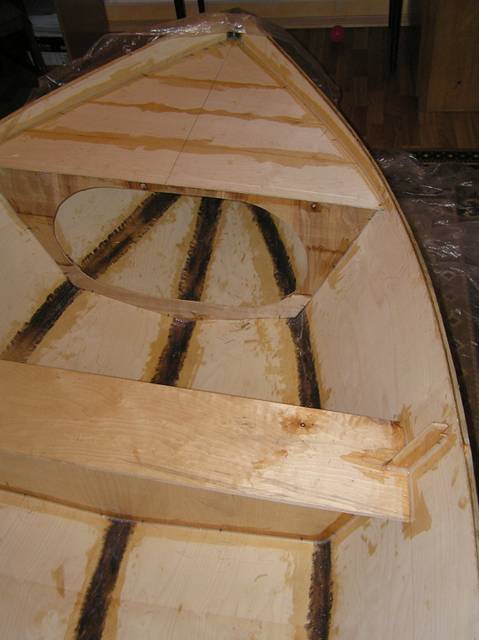
- We lay the flooring on the bottom, fasten the oarlocks, seats and other parts provided for by the design.
- If it is planned to equip the boat with a cockpit ( closed space in the bow), install the cover, fixing it on the sides and frames.
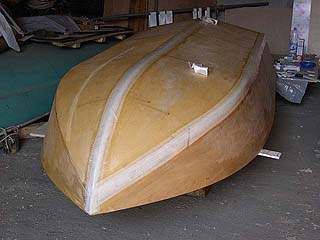
After waiting until the whole structure dries, we remove the boat from the goats, turn it over and grind the outer surface. Then we process the seams with an epoxy mixture and glue the bottom with fiberglass.
Coloring
At the final stage, we need to provide our boat with protection from moisture and give it an attractive outer appearance:
- First, carefully degrease all the details.
- Then we process the wood with impregnation. Here, the composition for sea or river vessels from Tikkurila is quite suitable.
- We putty all planes, masking cracks and irregularities, and then we process it with a special primer.
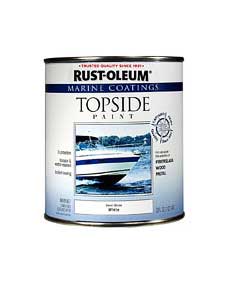
- Paint homemade plywood boats you can use almost any paint, but if you want to ensure the durability of the ship, then it is better to use special pigment mixtures designed for processing wooden ships.
- The average paint consumption is 1 - 1.5 l / m 2. It is best to apply it with a brush, but the use of an airbrush is also allowed.
Conclusion

homemade boat plywood made using this technology will be quite suitable for fishing trips, family walks, etc. Of course, it is not worth going out to the open sea in it, but as practice shows, for big rivers and lakes of our country, such a design is quite reliable. In the presented video in this article you will find additional information on this topic.