The standard set of tasks for a real man, as you know, includes three points: give birth to a son, plant a tree and build a house. And today among the stronger sex, regardless of profession and status, there are many who strive to literally bring them to life. Even more easy to use modern materials and technologies allow us to successfully carry out construction and repair work on our own country house. For example, guaranteed reliability and durability of a pitched roof can be achieved through the use of underlayment. It forms a continuous waterproofing layer through which moisture that has penetrated into the under-roof space simply drains without causing damage to the structure.
Now this progressive specialized material is produced in Russia. ANDEREP underlay carpets from TECHNONICOL Corporation successfully compete in foreign markets and make quality independent of imports for Russian consumers. A non-professional builder can easily handle their installation. However, there are a number of nuances, neglect of which can lead to a decrease in efficiency. About them - below.
Substrate preparation and installation conditions
The successful functioning of the underlay carpet and finishing coating largely depends on a properly prepared base and the conditions in which the installation was carried out. Therefore, it is extremely important to avoid mistakes at these stages. Base plates - OSB, or moisture-resistant plywood must be laid with a gap of no more than 3 mm. Otherwise, during the process of thermal expansion, the surface may be deformed, unevenness will be created on the lining carpet, and the roof will lose, at least in its aesthetic appeal. Installation on wet bases or “spring installation” can also lead to the formation of wavy folds on the surface. During the winter, structures inevitably gain moisture, and at positive temperatures they begin to release it. The expert recommends avoiding haste and starting laying the material only when the building frame and the mounted surface are in one temperature conditions and in acceptable humidity. For sheathing structures, the permissible humidity is no more than 20%, for solid wooden flooring(OSB and moisture-resistant plywood) - no more than 12%.
Folds and waves in the underlayment can also occur if it is installed in different temperature and time frames. For example, a team may begin work in the evening, when the air temperature drops and the material hardens. At such a time, even small folds on the material will be invisible. In the morning, when the temperature rises, the lining carpet will soften, begin to fit tightly to the surface, and any irregularities will gather into large folds. To prevent this from happening, the installation of the lining carpet must be carried out in one temperature regime with its maximum softness and pliability, that is, during the day and at the same time of year.
Alexey Vorobiev
Choosing the right underlay carpet
Many people today understand the need for underlay carpet. But it is important not just to lay down an underlayment, but to choose a solution that is most suitable for a specific construction task. A common mistake is replacing specialized products with cheap roofing materials, most often roofing felt. The savings in this case are very doubtful. The strength characteristics of roofing felt are lower. Unlike underlay carpets, it does not have a “self-healing” function. A huge number of holes formed during the process of mechanical fastening of itself and roofing material and increased in the process, for example, seasonal deformations, turn such a coating into a “sieve”. Moisture that gets into the under-roof space will almost certainly end up on wooden base and can lead to its rotting and destruction. Underlay carpets, unlike roofing felt, create a continuous protective layer even on surfaces of complex geometry. But among them it is important to choose the right one. For example, under flexible tiles Any product from the ANDEREP line will do. But the use of economical underlay carpets ANDEREP GL and ANDEREP GL PLUS, specially designed only for flexible tiles, with other roofing materials - metal sheets, ceramic tiles etc. fraught with problems.
To do this, it is better to choose universal ultra-light underlay carpets ANDEREP PROF and ANDEREP PROF PLUS, and in places where roofs made of flexible tiles and tiles are most likely to leak, it is recommended to use ANDEREP ULTRA.
ANDEREP GL and ANDEREP GL PLUS are based on fiberglass. It imparts the necessary strength, but does not have tensile strength; therefore, materials based on it do not withstand deformation well. For higher loads, ANDEREP PROF, ANDEREP PROF PLUS and ANDEREP ULTRA materials are suitable, based on durable and stretchable polyester.
Alexey Vorobiev
Installation of “self-adhesive” and underlay carpets with mechanical fastening
A simple and optimal solution for installation is self-adhesive underlay carpets, such as ANDEREP ULTRA. To attach them, you just need to remove the protective film and roll the material to the base. It adheres tightly to the surface without forming air gaps. But when working with self-adhesive materials, it is extremely important to meet several conditions. The material must be laid on a surface that is as dry and clean as possible. And the air temperature during work should not be lower than +10˚C. In addition, in places of high loads, for example, in the valley area, it is necessary to additionally apply mechanical fastening.
The most common use of underlay carpets is with mechanical fastening. This installation method is practical and simple. However, it is extremely important to correctly calculate the required amount of fasteners - if the standards are not followed, during strong gusts of wind there will be a risk of the material tearing off the surface. Overlapping material sheets must be secured with special roofing mastics. This is a rather labor-intensive process. This year TECHNONICOL launched the upgraded materials ANDEREP GL PLUS and ANDEREP PROF PLUS on the market. Unlike their “big brothers” (ANDEREP GL and ANDEREP PROF, respectively), they are equipped with special adhesive (bitumen-free) strips - to fasten the sheets, you only need to remove the protective film and glue the next sheet to the adhesive surface. The use of such materials reduces mastic consumption, makes installation less labor-intensive and increases the reliability of joints.
When installing any underlay carpet, it is extremely important to ensure its maximum tension and adherence to the surface. Therefore, installation must begin after the material rolled out from the roll has completely straightened out. The behavior of underlay carpets on the roof largely depends on their base. If the moisture requirements for the wood used in construction are not met, folds may form on materials with a fiberglass base in the joint areas of the base. To prevent such a problem from arising, it is necessary to reduce the step at which the material is attached to the base and provide additional mechanical fasteners in the middle, in several rows. Super-thin underlay carpets with a polyester backing are flexible and when folds occur, they simply wrinkle, preventing the material from lifting up the surface of the roof covering. But, accordingly, their price is more expensive.
Alexey Vorobiev
Timely protection of the underlay carpet
Underlay carpets are intended for laying under the finishing coating. Bitumen mixture without special protection not designed for prolonged exposure to ultraviolet radiation. The sand coating on the material is intended only to ensure the safe movement of the person performing the installation. It is advisable to leave such material without a topcoat for no more than a week. But the underlay carpets ANDEREP GL PLUS, ANDEREP PROF, ANDEREP PROF PLUS and ANDEREP ULTRA will not lose their properties under direct influence environment for six months.
When installing the roof due to various reasons There may be interruptions in work. In such situations, a number of underlay carpets can effectively perform the functions of a temporary roof for a fairly long period. ANDEREP GL PLUS, ANDEREP PROF, ANDEREP PROF PLUS materials give this ability protective covering non-woven polypropylene (Spunbond), and ANDEREP ULTRA - increased content of high-quality modifiers contained in the bitumen mixture.
Alexey Vorobiev
Thus, right choice underlay carpet and strict adherence to the manufacturer’s instructions will allow those who are used to doing everything themselves to provide reliable and durable protection pitched roof Houses.
In order for flexible roof tiles to serve for a long time, it is important to install them correctly, in compliance with all requirements and standards. The process involves laying a special lining carpet. It is purchased separately and costs a lot of money, but without it the roof will be unreliable. Is an underlayment needed for flexible tiles and how is it installed? We answer these and other questions in the article.

To understand the features and necessity of using underlay carpet, it is important to understand what kind of material it is and what functions it performs. Underlay carpet- this is a kind of membrane that performs a moisture-repellent function, protects the roof from leaks and interior spaces houses from flooding. The carpet is roll material, which is made from bitumen and polymers. Usually the structure of the material contains fiberglass or a base made of polyester fabric. This part of the carpet is covered polymer compounds(usually based on bitumen), as well as small quartz sand or fine crumbs. The bottom of the carpet may have an adhesive film that helps secure the material to the base. Crumbs or sand ensure that the surface of the carpet is not slippery - the material is always laid with the abrasive side up.


In general, the structure of the roof, which is covered with soft tiles, has the following layers, when viewed from top to bottom:
- directly the flexible tile itself;
- carpet lining;
- base (for example, OSB board);
- layer of waterproofing material;
- insulation layer;
- rafter and sheathing system;
- film providing vapor barrier.
Only a roof that has all these layers will be reliable and will not leak throughout its entire service life.

Functions of underlay carpet
The lining carpet has two main functions - leveling the base and waterproofing the roof. Using this material, you can easily make invisible the joints between the sheets of material that cover the sheathing. It will also help compensate for differences in roof level.
On a note! The underlay will also prevent air bubbles from forming underneath. separate elements roofs.

The waterproofing function is especially important in vulnerable places - for example, in the area of eaves, valleys, and the junction of the roof with pipes. The material will also prevent the formation of condensation inside roofing system during air temperature fluctuations. And the carpet in regions with a lot of snow acts as a shock-absorbing substrate when a large number of precipitation forms on the roof.

Due to the fact that the lining carpet provides excellent protection for the wooden roof structure from moisture, it will last as long as possible, as it will not begin to rot. After all, even processed by various protective equipment wood is still prone to destruction if it is constantly exposed to moisture.
On a note! The underlay carpet can be used as a temporary roof - it is so reliable. Material in rainy regions plays important role in protecting the building under construction from moisture. It is always installed first.

Prices for lining carpets
Underlay carpet
In general, the following advantages of lining carpet can be distinguished:
- strength;
- tightness;
- good moisture-proof function;
- heat and sound insulation of premises;
- leveling the roof base;
- ensuring protection of the interior of the roof from condensation.
The main disadvantage of underlay carpet is its considerable cost. The material is sometimes compared in price to the softest tiles.

With a slight slope of the roof slopes, the coating is laid on the valleys and ridge. The carpet should be laid in rolls from bottom to top. The overlap is usually 20 cm
Is underlay carpet required?
Many people ask how justified the use of lining bark is. After all, waterproofing can be done in other ways, and the base under the tiles can be made as even as possible. Is it worth spending money on this expensive material? The answer from experts is unequivocal - it’s worth it. And all the positive aspects of using underlay carpet are described above. The most important thing is that the material will extend the service life of the roof as a whole for many years.

There are also cases in which it is impossible to refuse a carpet under any circumstances. For example, if the roof slope is very small (up to 18 degrees) or, conversely, too high (over 60 degrees), then you will still have to use this material. Otherwise, the store where the soft tiles were purchased will not even provide a guarantee for their products.
On a note! If the desire to save money is great, then on medium-sloping slopes you can not lay an underlay carpet, but use it only in particularly vulnerable places.

Which carpet to choose?
If the decision to purchase carpet underlay is not worth it, then it is important to decide what type of product to purchase. The material is always produced in rolls 1 m wide, but, depending on the manufacturer or some features, it may differ. First of all, carpets are divided into two types according to the method of fastening:
- self-adhesive, which is fixed by an adhesive strip applied at the factory to the wrong side of the material and sealed with a protective film. This is the most common variety;
- without adhesive base, which is fixed only with galvanized self-tapping screws or roofing nails with a pitch of 20 cm. The edges of the sections joining each other are additionally connected using bitumen mastic.

There is also a so-called combined type, which is fixed at the bottom of the canvas adhesive base, and at the top - with the help of fasteners. There are also weldable materials that are fixed by heating construction hairdryer.
Important! When purchasing an underlay carpet, you need to make sure that there are instructions for use for it. And during installation you will have to act strictly according to it.

Self-adhesive carpet is the most popular among all types. It is produced in rolls measuring 1x15 meters or more. During installation, it is unrolled and glued to the base of the roof parallel to the overhang of the eaves. Individual strips are laid with an overlap of 10-15 cm. The service life of the carpet is on average 15-25 years and will directly depend on several factors - the design features of the roof, climatic conditions region, compliance with installation rules.
Advice! In areas where leakage is most likely, it is recommended to lay the underlay carpet in two layers.

Table. Manufacturers of underlay carpets.
| Name | Characteristic |
|---|---|
| Finnish-made material, which, depending on the type, can be fixed in different ways - mechanically, with glue. Prevents the formation and accumulation of condensation. The material is of high quality. |
| Russian manufacturer. The company produces lining carpets that can be fixed to the base using screws or glue. The material is of high quality. |
| One of the most famous manufacturing companies. It produces several types of underlay carpets that can be used for various types of roofs. |
| Material made from non-woven polypropylene. Suitable for arranging cold roofs, for laying under bitumen shingles, for standing seam metal roofs. Can act as a temporary roof. Production - Germany. |
| The material is produced in Russia. The base is fiberglass coated with a bituminous composition, sometimes with the addition of polymers. Suitable for roofs with a slope greater than 11.3 degrees. |


On a note! The lining carpet purchased for work must be stored in a dry place at a temperature of no more than +30 degrees. It is best to place the rolls in a vertical position. They cannot be placed near heating radiators.
Installation subtleties
Installing underlay carpet is relatively simple, but during work you should adhere to certain rules and follow recommendations. Then the material will last long years without any complaints, reliably protecting the roof from leaks. When installing underlay carpet, it is important to ensure that the material is well stretched. Usually the covering spreads horizontally, starting from the lower edge of the roof. But if the roof has a large slope, then the rolls can be laid vertically.

The pitch of the self-tapping screws, if a material that requires mechanical fixation is used, is approximately 10-20 cm. Roofing fasteners can also be used for additional fixation of the self-adhesive coating. All joints and seams must be well sealed with bitumen mastic, and the width of the adhesive strip should not be less than 10 cm.
The main condition that must be observed when laying the underlayment is the evenness of the base, which is created on top of the sheathing or roof rafters. The following materials can be used as a base for underlay carpet.


Attention! During installation level base under the carpet, it is important to ensure that there are gaps between the individual sheets of leveling material. Their width is 2-4 mm. Otherwise, the material may deform over time due to thermal expansion or humidity.
Prices for moisture-resistant plywood
Moisture-resistant plywood
Installation of underlayment on the roof is carried out at air temperatures from +5 to +25 degrees. If it is necessary to trim the material, use a sharp knife and a board, which is placed under the area to be trimmed. This will prevent damage to other layers of material.

Step 1. To lay underlayment under soft tiles you will need a number of tools, as well as some materials. This is bitumen mastic, a small metal spatula, sharp knife, pencil and tape measure, pliers, hammer.

Step 2. The rafters are covered with leveling material (OSB boards). A gap of several millimeters must be left between the individual elements of the base. Next, the cornice strips are installed. They are fixed along the perimeter of the roof on its edge. In this case, in the valley area, two separate planks are laid overlapping.

Step 3. The eaves strips are nailed down with galvanized roofing nails in a checkerboard pattern in 15 cm increments. Too close to the bend cornice strip fasteners are not clogged.


Step 4. In the valley area, the planks are joined so that the small remaining tongue of the previously fixed plank is under the next plank. Then the connection will be neat.


Step 5. Installation of the underlay carpet begins. A piece of carpet 1 m wide is laid on the valley so that there is 50 cm of covering on both sides of the valley axis.

Step 6. The carpet is carefully leveled on the surface, while it should not reach the edge of the eaves strip by about 2-3 cm. smaller angle and the length of the roof slope, the smaller the indentation.

Step 7 The protective film is removed from the back surface of the carpet. For convenience, one part of the carpet is turned away, the film is removed from it and put away under the other part of the carpet.

Step 8 Half a carpet with removed film placed back and smoothed to the surface of the base with your hands. Exactly the same procedure is performed with the second half of the carpet.

Step 9 The underlayment carpet is laid on the rest of the roof in horizontal stripes. A distance of 1-3 cm is also maintained from the edge of the cornice.

Step 10 The material is laid overlapping the previously laid piece of carpet on the valley. The overlap must be at least 15 cm.

Step 11 Gluing starts from the edge of the roof. The protective film is torn off from the extreme section of the carpet and tucked under the other edge of the material. The coating is spread on the base and glued.

Step 12 The rest of the roll is rolled into a tube. During gluing, simultaneous removal takes place protective film and gluing the carpet to the roof surface.

Step 13 The rest of the roof can be covered with mechanically secured carpet. Line segment required length laid with a longitudinal overlap of 10 cm. The carpet in the upper part is nailed with galvanized fastening material in increments of 20-25 cm.

Step 14 All carpet joints are coated with bitumen-based mastic. Layer of applied adhesive composition should not be more than 1 mm.

Prices for bitumen mastic
Bitumen mastic
Video - Installation of underlay carpet
Video – Nuances of installing a TechnoNikol carpet
Video – Lining carpet Shinglas
Installation of underlay carpet is not difficult, the main thing is to comply with all the rules and requirements. Only in this case will it be possible to prevent mistakes that could become fatal and spoil the reliability of the roof.
The roof is the face of the house. That is why this part of the structure must be given Special attention, but you may have considerable difficulties in the process of choosing a roofing material, since there are many “rumors” about soft roofing. Let's still find out what is “truth” and what is “false” regarding.
Myth No. 1: Soft roofing is the same roofing material only more expensive
In factcomparison of these materials causes indignation among specialists.
In order to understand the differences or similarities between these roofing materials, you must first find out what is the basis of the material. The basis of roofing felt is recycled waste paper - paper! The basis soft roof - fiberglass. Fiberglass, unlike paper, does not rot - this is the first and most important difference!
For production, high-quality bitumen is used with the addition of an innovative SBS polymer, which is used to cover fiberglass on both sides, which makes it a durable material compared to roofing felt, for which ordinary bitumen is used.
Upper layer roofing felt - the surface is not protected from ultraviolet rays, which is why the service life is only 5 years. The top layer of the soft roof is stone granulate, which protects the bitumen from any external influences, resulting in a service life of more than 50 years.
Myth No. 2: Soft roofing is a very expensive roofing material that only very rich people can afford.
In factone of the most common myths.
Firstly, “very rich people” are ready to purchase roofing materials for their home such as slate, copper, and, of course, soft roofing... right?
Secondly, yes - flexible tiles are not cheap, but compared to the roofing materials listed above, they stand out for their affordable price.
Most likely, this rumor was generated by owners of houses with outdated roofs, who know only one roofing material - slate. So, after a certain time, everyone who owns a house is faced with the problem of choosing roofing material. Often the choice falls on flexible tiles, because they are beautiful and reliable material. Comparing the price of outdated slate or low-quality roofing felt with flexible tiles, the difference becomes so obvious that it is difficult not to notice. In this case, of course, flexible tiles are an expensive roofing material. Unfortunately, it doesn't happen that way cheap roofing can be of high quality, reliable and durable.
Remember that saving on the roof is just as absurd as saving on the foundation. The service life of the entire building depends on the quality of the roofing material.. The question of “cheap or expensive thing” is individual for each person.
Myth No. 3: In the cold, flexible tiles crack and break.
In factThis assumption is partly correct.
The fact is that each of the materials presented on the market has its own production characteristics and specifications, so to speak, a “recipe” for flexible tiles. Some soft roof manufacturers use oxidized bitumen, which is main reason the fragility of the roofing material, it cracks in the cold and cannot withstand mechanical pressure (you cannot move on such a roof).
However, if flexible tiles are made on the basis of polymer-modified bitumen (SBS), then they can easily withstand the conditions of the harsh Russian winter. SBS is styrene butadiene styrene or artificial rubber. The unique molecular structure of polymers interacts with bitumen, increasing its flexibility, elasticity and strength over a wide range of temperatures and reducing the sensitivity of bitumen to extreme temperatures. The bending of such a material at sub-zero temperatures shows flexibility and absence of cracks at very low temperatures.
Myth No. 4: Flexible tiles deform in the sun and the boards are visible
In fact, unevenness will occur on the roof only if low-quality (raw) boards, plywood or OSB boards. We recommend using high-quality OSB boards or moisture-resistant plywood, and if you do use edged board, then it should be naturally dried!
Myth No. 5: Flexible tiles fade
In fact, the color of Katepal flexible tiles is ensured thanks to the surface of stone granules, which are colored thermochemically, i.e. the coloring enzyme penetrates into the structure of the stone, and is not simply coated on top, so the granules do not lose their original color. This is also protection against ultraviolet rays.
This is a misconception that homeowners have when inspecting their roof. If you bend (raise) the top row of shingles, the color of the granulate underneath will be much darker and richer. There is a very simple explanation for this: it is not those granules that are in sight that are subject to change, but those that are covered with subsequent shingles.
The difference in the color of the tile granules on the upper “petals” and “under the petals” occurs due to the fact that bitumen, which has an oily dark structure, is absorbed from the upper layer by granules of the lower, which is why the upper shingles appear “faded”, more faded. This is where the misconception arises that roofing material fades.
Myth #6: Very difficult installation in cold weather!
Really difficult - but possible!
It cannot be installed in rain and snow; the presence of an SBS modifier allows work to be carried out at subzero temperatures, but certain conditions must be observed:
- Before installation, tiles are stored in a warm room for 2-3 days.
- For better adhesion, the adhesive layer of the tile is heated with a hair dryer; in extreme cases, it is glued with a heat gun.
- All metal elements that require bending are bent only in a warm room.
Bitumen adhesive for work must be heated in a water bath (it is strictly prohibited to dilute it with acetone and other additives).

Myth No. 7: The need for additional expenses due to a solid foundation
In fact, a solid base - design feature flexible tile roofs.
Just as a house needs a foundation, so does a roof, for example, made of natural tiles - a powerful sheathing and reinforced truss structure, for the proper functioning of the under-roof space it is necessary proper ventilation. Neglect these requirements, perceive them as unnecessary waste money, at least incorrectly. Each material has its own prerequisites, without which its use is impossible.
We hope that your choice of roofing material will be based on solid facts and not on the misconceptions of the majority.
When installing flexible tiles, the use of low-quality, cheap component materials that do not comply with GOST leads to unpleasant consequences. For example, “blowing of the roof” or “appearance of waves.” In this article we would like to take a closer look at the reasons for this effect.
Example 1. Flexible bitumen shingles from a European manufacturer. 3TAB shingle shape. Photo taken from a large Russian construction portal.
This problem and methods for dealing with it are well known to professionals, and we would like to once again focus on this topic in order to prevent errors during installation.

Example 2. Flexible bitumen shingles from a European manufacturer. Shingle shape Hexagon. Photo taken from a large Russian construction portal.
It is no secret that the real reason for this problem is the quality of the materials of the solid base and compliance with the technology of its installation. This conclusion is clearly confirmed by the results of studies of similar objects, as well as tests of base and roofing materials conducted by our company, studies conducted by our colleagues from the Unikma company (), as well as many foreign studies.
The most common material for making a solid base today is OSB-3.

This is due to the manufacturability of this material, attractive price and high performance characteristics declared by manufacturing companies. However, it is the actual properties of this material that are the source of the problems that arise.
The reason for the formation of waves is the linear expansion of the OSB board (see Fig. 1 and Fig. 2). When delivered to the site in its original packaging, the OSB board has minimal humidity due to its manufacturing technology. The humidity of the new slab material is significantly lower than the humidity of the surrounding air. During operation, the moisture content in the slab and the surrounding air comes into equilibrium, which leads to moistening of the OSB and linear expansion (swelling). The edges of the slab, thanks to the gaps of 3-5 mm left between the slabs, have the ability to move, which leads to the formation of “waves” on the shingles bitumen shingles along the short (to a greater extent) and long sides of OSB boards.

Rice. 1 Factory humidity of OSB during installation without preliminary exposure.

Rice. 2 Actual humidity of OSB during operation.
If you doubt the quality of the product, ask the distributor for a quality certificate for the OSB board, which indicates the actual characteristics for a specific batch of products.
Installation conditions.
The formation of “waves” is less often observed on roofs installed in the warm and humid season, since in such conditions OSB boards have time to acquire “equilibrium” moisture even before installation of the roof covering - during storage on the site and installation of the base.Waves most often appear on roofs installed in cold weather (less than +5 °C), when air humidity is minimal. But they appear when the outside temperature rises along with air humidity.
When installing a roof in cold weather, we recommend pre-conditioning (conditioning) the OSB panels before installation. OSB panels should be stored outdoors for 1-2 weeks, exposed to atmospheric air, in this case it is necessary to cover the OSB panels from precipitation, and lay gaskets (slats) between the sheets to allow air access to all parts of the sheet.
The problem is aggravated by the fact that the quality of OSB boards leaves much to be desired. For example, at some sites where waves appeared, samples of OSB boards from leading manufacturers were taken and sent to an independent laboratory to be tested for the indicator “thickness swelling in 24 hours” (GOST 32567-2013 clause 5.8 table 5).

Example 3. Flexible bitumen shingles from an American manufacturer. 3TAB shingle shape. Photo taken from the American Construction Forum.
According to the test results, at least half of these samples did not comply with GOST for this indicator, and, as a result, they were unsuitable for use as a solid base. Unfortunately, absolutely all manufacturers of flexible tiles, both domestic and foreign, are faced with this phenomenon, regardless of the shape of the tile or the type of bitumen. And this once again confirms that the reason for the occurrence of “waves” lies in the foundation.
Some customers mistakenly believe that this effect is due to the quality of the shingles or underlayment themselves, blaming the manufacturer. They base their guesses on the fact that when the OSB roof is opened, the slab looks normal, i.e. it does not delaminate, does not warp, and even some of the gaps remain (only they become much smaller, but no one pays attention to this). This gives the impression of a quality product. But, as shown above, this is not at all the case, and it is the OSB board that is the root cause of the formation of folds on the roof.
However, there is also positive news: from the experience of observing similar roofs on which waves formed, it was noticed that these deformations disappear over time. The time period ranges from several weeks to one year and depends on the quality of the OSB board, air humidity and the organization of ventilation of the under-roof space. In addition, do not forget that this effect exclusively affects the aesthetic perception of the installed material and cannot in any way worsen the waterproofing characteristics of flexible bitumen shingles.

Example 4. Multilayer flexible bitumen shingles from Russian manufacturer. Shingle shape Dragon tooth. Photo taken from the Russian construction forum
Below we would like to present measures that will reduce the risk of waves on tiles:
- Pre-conditioning (conditioning) of OSB panels before installation. OSB panels should be stored outdoors for 1-2 weeks, exposed to atmospheric air, while it is necessary to cover the OSB panels from precipitation, and lay gaskets (slats) between the sheets to allow air access to all parts of the sheet.
- Cutting OSB sheets along the long side (2500 mm) into pieces of 0.5 meters, which will reduce the linear expansion of each individual piece and reduce the formation of waves.
When examining leaky roofs made of bituminous shingles, it is not surprising that it often turns out that most problems are not a consequence of wear and tear or other operational damage, but the result of errors in installing a soft roof. Some of these flaws are difficult to correct, while others can be corrected even several years after the roof is installed.
When a customer reports a leaking roof, he often has his own (not always correct) ideas about the causes of the leaks. After listening carefully, we begin our examination with a series of clarifying questions. How long does it take for a roof to leak? Were there any leaks in this place earlier? How long has the roof been in use?
If a leak comes and goes over a long period of time, the cause is most likely due to design flaws or wrong choice materials. If the roof is 20 years old, the problem is most likely due to its disrepair. If the house is new (2-3 years), then the reason usually lies in roof installation errors. First of all, we ask you to show traces of water in the house and try to determine whether the roof is to blame. Sometimes leaks that appear to be related to the roof turn out to be problems with the sheathing of walls or windows.
Having examined the house from the inside, we go to the roof, where we narrow the search to an area with a radius of 3-4 m with the center in the area where the leak appears inside the house. Then we check the coating - assess its condition, look for punctures from nails or tree branches.
Inaccurately installed ventilation risers and chimneys, cable entries, satellite dish mounts - all this may be among the possible reasons leak. We especially carefully check valleys that are prone to leaks. If the problems lie in the valley, we replace it entirely, without even trying to do minor patching of holes.
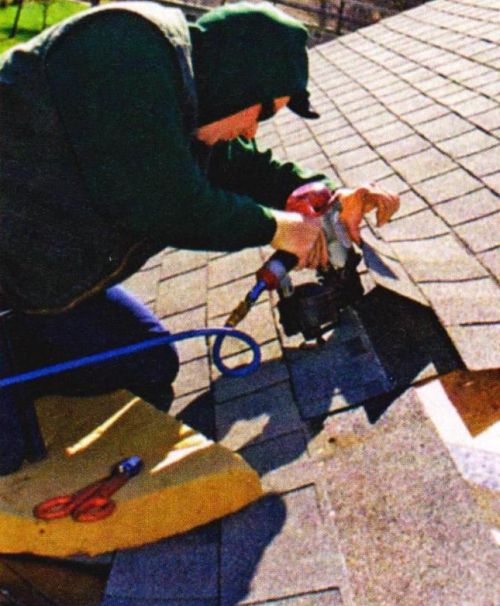
Poorly secured flooring
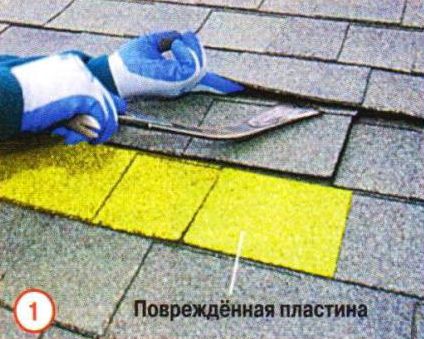
The most common problem I encounter when inspecting a building. If the flooring sags, the fasteners “pull out on their own”, as a result of which protruding nail heads damage soft tiles and cause leaks. However, pushing out nails is quite possible over time and on a well-made roof. When I find the problem nail, I pull it out and then replace the damaged plate.

The first row of bitumen shingles is not laid correctly
It's amazing how often I find leaks because the plate joints in the starter and first rows match. This arrangement will certainly cause leakage along the lower edge of the slope and lead to rotting of the ends of the rafters and other structural elements.
If the structure is not damaged, then the repair in this situation is simple: you need to pull out a few nails and insert metal inserts between the roofing plates of the starting and first rows, covering the unprotected joints. These plates can be secured with nails or drops of sealant.
Of course, if the decking is damaged, you will first have to remove several rows of roofing plates and replace the damaged ones wooden parts, lay waterproof membrane coating and only after that restore the roof rows.

If the roofing plates are not securely fastened, the wind will lift the edges, allowing water to penetrate under the roofing. Cases of improper fastening include a lack of fasteners, their location on the plate being too high or low, and other defects. Always follow the recommended fastening pattern for the plates and fasten them “storm style” on all roofs in windy areas and on roofs with a slope greater than 10:12.
Place nails correctly. They should pass through the fastening strip directly under the adhesive strip, where they will be covered by the tabs of the next row of plates. Exposed nails are a sure way for water to enter the roof.
The causes of leaks are often roof design flaws, which usually arise at the design stage. Project errors include incorrect placement of gutters or valleys directing water to the walls, poor location dormer windows, illiterate choice of location for the chimney, which obstructs the flow of water, and unnecessarily intricate outlines of the roof.

It is almost impossible to correct such design flaws, since the house has already been built, but you should definitely pay close attention to areas where leaks are likely due to this.
It may seem strange, but sheets with a continuous adhesive strip can themselves cause leaks. Water, having got under a plate with a continuous adhesive strip on the side, will not be able to flow down and will move to the side until it finds an exit point, which is usually at the junction between the plates. This is where the leak starts. Valleys, chimneys, internal drains, vents are the most vulnerable places for water, allowing water to penetrate under the roof. Such leaks are very difficult to detect and eliminate their cause. Therefore, it is better not to take risks and use plates with an intermittent adhesive strip. If you must use continuous adhesive strips, make sure that the valley and chimney flashings do not direct water into areas where it can find its way under the covering.

Avoid using plates with a continuous adhesive strip. Water that gets under the plate from the side has no way out. Intermittent adhesive strips allow water to drain at each interval.
"Fracture" of the package
Some roofers make a big mistake when loading a package of plates onto the roof, stacking it with the package folded over the ridge. This can cause the plates to fracture and separate their layers, which will certainly affect the service life of the new roof.
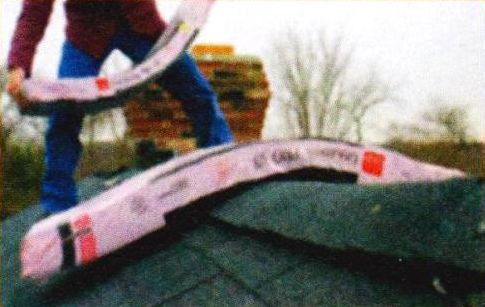
Always place packages on a flat roof surface. And further. Since cold plates are more prone to cracking, try to avoid roofing works in cold weather, except in emergency cases.

Do not bend the roofing plates over the ridge. This can damage the base material and reduce the lifespan of the roof. Place packages on flat roof, and to prevent them from slipping, use a stop.
Errors in arranging connections
One of the causes of leaks may be incorrectly installed connecting elements. For example, if the apron covers the adhesive strip of the roofing plate, then the plate of the next (upper, above the junction, row) will not be glued to the bottom one.
|
The flashing, when a nail is driven into its top edge, lifts the bottom edge of the next row of roofing plates. An additional nail securing the bottom edge of the apron is a potential leak point |
The flashing should be positioned flush with the top edge of the roof plate and secured with only one nail in the top corner. The adjoining elements should overlap each other by approximately 5 cm |

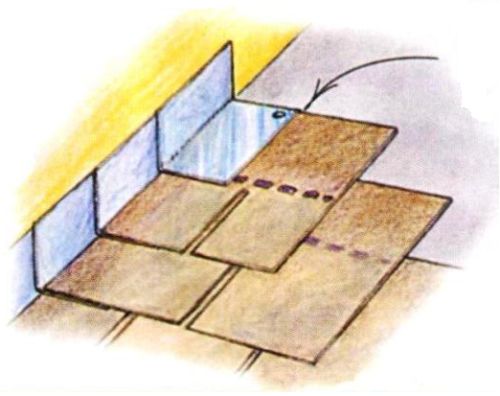
Sometimes this problem they try to solve it by moving the apron slightly upward so that its upper edge is higher than the edge of the roofing plate. When a nail is driven into the junction element, the upper edge of the roofing plate becomes a fulcrum. This causes the flashing to lift the bottom edge of the next row of roofing plate, creating a gap where water can penetrate. The roofer tries to correct this by driving a nail into the bottom edge of the flashing piece, which will not be covered by the next row, which can also cause a leak.
The cause of many leaks is poor waterproofing chimneys. However, before fixing this problem, check the condition of the masonry and make sure that there are no loose bricks. The most common mistake when waterproofing chimneys, the problem is that roofers do not embed apron flanges into the masonry.
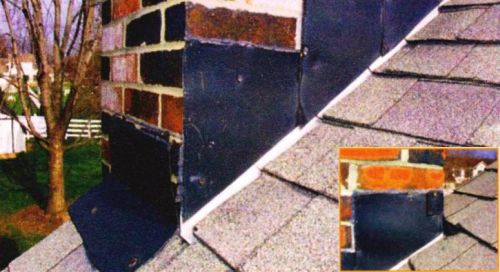
The junction here should be made only from a strip curved on the machine sheet metal, strictly L-shaped in profile, carefully embedding the apron into the mortar between the rows of masonry. A joint made without the use of a bending machine is a serious signal indicating the craftsman’s inattention to detail. If you find a roof with poorly executed chimney insulation, immediately look for other defects nearby.
Waterproofing a chimney is a job for a professional. The interface between chimneys and roofs are potential areas for leaks. If the masons did not embed the aprons in the mortar between the rows of masonry, and the junction was made using nails and putty, this is very bad. The seams must be grooved with an angle grinder so that the apron can be securely sealed between the rows of masonry.
Leaks can easily occur due to operational damage to the roof. Television or satellite antennas, skylights and ventilation hatches cannot be installed at random, but this happens quite often.

Overgrown tree branches can also destroy the integrity of the coating, and excessive shading of the roof promotes the growth of moss on its surface, which also leads to damage to the roof.
Careless covering of valleys
One can only be surprised that most valleys do not leak, given the widespread use in roofing practice of self-adhesive waterproof films as coverings in valleys. Some inexpensive films have a warranty period of only 5 years. Roofing plates with a service life of 50 years on top of a film with a service life of 5 years are nonsense. The only one reliable way eliminate the leak in the valley - completely block this problem area. When repairing valleys, always use not only a waterproof film, but also a metal apron.

Repairing a valley usually means completely covering it. Starting at the top, remove one entire roofing plate from each side of the valley. Accuracy here is extremely important, since the thoroughness of dismantling the roof determines how well it can be reassembled.

Roofing with undercut plates in valleys is often done incorrectly (left). Valleys with a metal apron are reliable (right).
Removing a damaged plate without harming its undamaged neighbors is not an easy task. This work is best done when the plates are cold enough so that they do not bend underfoot, and at the same time warm enough so that they do not crack during the work. In summer, it is better to do such repairs early in the morning. In winter, such work should be avoided, except in urgent cases.
 |
Separate the glued plates in the row below and two rows above the plate to be removed. It may turn out not an easy task. Roofing plates, whose service life is up to 50 years, are glued together very firmly. In such cases, the adhesive strip will have to be cut. |
 |
Once the plates are separated from each other, the nails holding the damaged plate can be removed. |
 |
Before removing the plate, you need to pull out four more nails in a row |
 |
Now you can pull out the damaged plate, slip a new one in its place and re-fasten the previously released plates with nails. |
When attaching the repair plate, you should not drive new nails into the holes from previously pulled out ones - they will most likely be squeezed out. Hammer nails next to the old holes, and drop a little sealant into the last ones. Also seal all torn edges of the plates with sealant.